
Firmware Installation Guide (English)
Page 3
... update file from the USB flash drive using your favorite channels and any issues while performing this upgrade, call Insignia Customer Support at (877) 467‐4289 for assistance. Note: If you experience any custom settings that you may have set up the process is powered up . Verify TV Powered off the TV;
... update file from the USB flash drive using your favorite channels and any issues while performing this upgrade, call Insignia Customer Support at (877) 467‐4289 for assistance. Note: If you experience any custom settings that you may have set up the process is powered up . Verify TV Powered off the TV;
Warranty (English)
Page 2
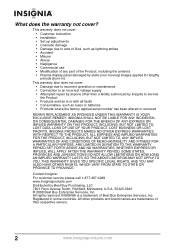
... • Abuse • Negligence • Commercial use • Modification of any part of their respective owners. 2 www.insigniaproducts.com INSIGNIA PRODUCTS MAKES NO OTHER EXPRESS WARRANTIES WITH RESPECT TO THE PRODUCT, ALL EXPRESS AND IMPLIED WARRANTIES FOR THE PRODUCT, INCLUDING, BUT NOT LIMITED ... WARRANTY PERIOD. What does the warranty not cover? This warranty does not cover: • Customer instruction • Installation • Set up adjustments • Cosmetic damage • Damage due to an incorrect voltage supply • Attempted repair by anyone other products and...
... • Abuse • Negligence • Commercial use • Modification of any part of their respective owners. 2 www.insigniaproducts.com INSIGNIA PRODUCTS MAKES NO OTHER EXPRESS WARRANTIES WITH RESPECT TO THE PRODUCT, ALL EXPRESS AND IMPLIED WARRANTIES FOR THE PRODUCT, INCLUDING, BUT NOT LIMITED ... WARRANTY PERIOD. What does the warranty not cover? This warranty does not cover: • Customer instruction • Installation • Set up adjustments • Cosmetic damage • Damage due to an incorrect voltage supply • Attempted repair by anyone other products and...
User Manual (English)
Page 3
... menus 16 Selecting a channel 16 Adjusting the volume 17 Displaying additional information 17 Adjusting the picture 17 Adjusting the TV picture 17 Adjusting Advanced Video settings 18 www.insigniaproducts.com i
... menus 16 Selecting a channel 16 Adjusting the volume 17 Displaying additional information 17 Adjusting the picture 17 Adjusting the TV picture 17 Adjusting Advanced Video settings 18 www.insigniaproducts.com i
User Manual (English)
Page 4
...DTV closed captioning styles 28 Adjusting time settings 29 Setting the clock 29 Setting the sleep timer 29 Adjusting menu settings 30 Selecting the menu language 30 Changing the menu transparency 30 Labeling an input source 31 Adjusting the INSIGNIA logo brightness 32 Turning Auto Input ...Sensing on or off 32 Resetting settings to the defaults 33 Programming your remote control 33 Troubleshooting remote control programming 37 Manufacturers'...
...DTV closed captioning styles 28 Adjusting time settings 29 Setting the clock 29 Setting the sleep timer 29 Adjusting menu settings 30 Selecting the menu language 30 Changing the menu transparency 30 Labeling an input source 31 Adjusting the INSIGNIA logo brightness 32 Turning Auto Input ...Sensing on or off 32 Resetting settings to the defaults 33 Programming your remote control 33 Troubleshooting remote control programming 37 Manufacturers'...
User Manual (English)
Page 8
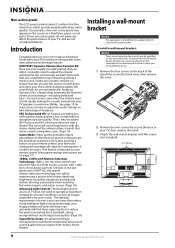
... simply pressing a button on your remote control. It couldn't be easier. (The button is featured on your remote control, your television settings will be supported by UL Listed wall mount bracket. Installing a wall-mount bracket Warning This apparatus is intended to be experiencing a picture ... are qualified to do so. 1 Remove the four screws on how to adjust the audio settings to get the maximum experience. Using intelligent light sensing technology, your Insignia Advanced Series television can automatically find these opportunities to your TV, then remove the stand. 3 Attach the ...
... simply pressing a button on your remote control. It couldn't be easier. (The button is featured on your remote control, your television settings will be supported by UL Listed wall mount bracket. Installing a wall-mount bracket Warning This apparatus is intended to be experiencing a picture ... are qualified to do so. 1 Remove the four screws on how to adjust the audio settings to get the maximum experience. Using intelligent light sensing technology, your Insignia Advanced Series television can automatically find these opportunities to your TV, then remove the stand. 3 Attach the ...
User Manual (English)
Page 9
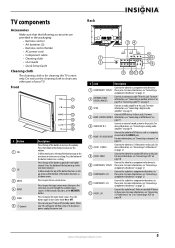
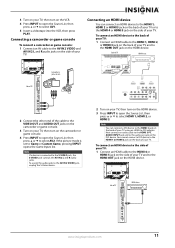
... button to clean any other part of the button to go to these jacks. In Menu mode, press the top of the button to increase a setting. Press the bottom of the button to go to cycle through the available input sources. Press the top of the button functions as the up... arrow and the bottom of the button to go to the next menu or to decrease a setting. In Menu mode, the top of the button functions as the down arrow. Press to open the on page 12. 10 COMPONENT 2 L/R Connect the audio...
... button to clean any other part of the button to go to these jacks. In Menu mode, press the top of the button to increase a setting. Press the bottom of the button to go to cycle through the available input sources. Press the top of the button functions as the up... arrow and the bottom of the button to go to the next menu or to decrease a setting. In Menu mode, the top of the button functions as the down arrow. Press to open the on page 12. 10 COMPONENT 2 L/R Connect the audio...
User Manual (English)
Page 10
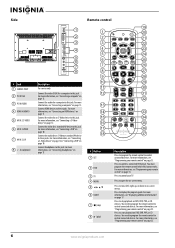
... 25 7 26 8 27 9 28 10 29 11 30 12 31 32 13 14 33 15 34 16 GAME 35 DYN VOL 17 36 18 NS-RC02U-10A 37 # Button 1 SET 2 DVD 3 TV 4 MENU 5 6 GUIDE 7 (stop playback on page 33. 6 www.insigniaproducts.com Press to open the on page 33. For more information, see...
... 25 7 26 8 27 9 28 10 29 11 30 12 31 32 13 14 33 15 34 16 GAME 35 DYN VOL 17 36 18 NS-RC02U-10A 37 # Button 1 SET 2 DVD 3 TV 4 MENU 5 6 GUIDE 7 (stop playback on page 33. 6 www.insigniaproducts.com Press to open the on page 33. For more information, see...
User Manual (English)
Page 11
... to open the Source List, then press or to fast reverse on -screen menu. Press to control connected devices. For more information, see "Setting the sleep timer" on page 17. When your TV on or off (standby mode). You need to program the remote control to the previous channel... this button again to turn closed captioning" on page 18. 37 PICT Press to select the aspect ratio. For more information, see "Adjusting Advanced Video settings" on page 27. 35 GAME Press to restore the sound. 33 - You can select Heavy, Medium, Low, or Off. For more information, see...
... to open the Source List, then press or to fast reverse on -screen menu. Press to control connected devices. For more information, see "Setting the sleep timer" on page 17. When your TV on or off (standby mode). You need to program the remote control to the previous channel... this button again to turn closed captioning" on page 18. 37 PICT Press to select the aspect ratio. For more information, see "Adjusting Advanced Video settings" on page 27. 35 GAME Press to restore the sound. 33 - You can select Heavy, Medium, Low, or Off. For more information, see...
User Manual (English)
Page 12
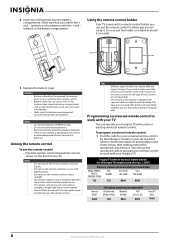
... program a universal remote control: 1 Find the code for All URC-6690 Sony RM-VL600 115 135 0464 8043 Comcast M1057 0463 Set-top box manufacturers and models Dish Network Motorola VIP508, VIP622 DRC800 TIVO Series 3, HD 720 0463 0091 DirectTV RC23 10463 8 www....control holder Your TV comes with all Insignia TVs manufactured after Jan. 1, 2007) Universal remote control manufacturers and models Philips PHDVD5, PH5DSS, PMDVR8, PDVR8 RCA RCU807 One for your universal remote control by identifying its model (or your set-top box's remote control manufacturer and model...
... program a universal remote control: 1 Find the code for All URC-6690 Sony RM-VL600 115 135 0464 8043 Comcast M1057 0463 Set-top box manufacturers and models Dish Network Motorola VIP508, VIP622 DRC800 TIVO Series 3, HD 720 0463 0091 DirectTV RC23 10463 8 www....control holder Your TV comes with all Insignia TVs manufactured after Jan. 1, 2007) Universal remote control manufacturers and models Philips PHDVD5, PH5DSS, PMDVR8, PDVR8 RCA RCU807 One for your universal remote control by identifying its model (or your set-top box's remote control manufacturer and model...
User Manual (English)
Page 13
... • Plug the power cord into a power outlet. If you require a converter/descrambler box, you can also connect cable TV using the Insignia TV remote to "teach" the commands one end of a coaxial cable to the antenna jack. Tips • If your universal remote control has... a code search feature, run a code search to your universal remote control or set -top box and your universal remote control's instructions to try codes for your TV. For more information about connecting a converter/descrambler box, see...
... • Plug the power cord into a power outlet. If you require a converter/descrambler box, you can also connect cable TV using the Insignia TV remote to "teach" the commands one end of a coaxial cable to the antenna jack. Tips • If your universal remote control has... a code search feature, run a code search to your universal remote control or set -top box and your universal remote control's instructions to try codes for your TV. For more information about connecting a converter/descrambler box, see...
User Manual (English)
Page 14
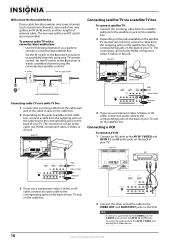
...jack on the satellite box. 2 Depending on the jacks available on the satellite TV receiver (set-top box), connect a cable from the outgoing jacks on the cable box to the cable-out, HDMI...jack, unplug the S-Video device. 10 www.insigniaproducts.com The two-way splitter and RF switch are not provided. Set the RF switch to the A position to tune to the AV IN 1 VIDEO and AV IN 1 L and... R audio jacks on the VCR. RF switch A Two-set signal splitter B Out In TV Cable converter/descrambler box Connecting cable TV via a satellite TV box To connect satellite...
...jack on the satellite box. 2 Depending on the jacks available on the satellite TV receiver (set-top box), connect a cable from the outgoing jacks on the cable box to the cable-out, HDMI...jack, unplug the S-Video device. 10 www.insigniaproducts.com The two-way splitter and RF switch are not provided. Set the RF switch to the A position to tune to the AV IN 1 VIDEO and AV IN 1 L and... R audio jacks on the VCR. RF switch A Two-set signal splitter B Out In TV Cable converter/descrambler box Connecting cable TV via a satellite TV box To connect satellite...
User Manual (English)
Page 15
... game console To connect a camcorder or game console: 1 Connect an AV cable to the HDMI OUT jack on the HDMI device. Note If a device is set to the HDMI 4 or HDMI 5 jack on the side of your TV or to Game or Custom Game, pressing INPUT opens the Game Inputs list...
... game console To connect a camcorder or game console: 1 Connect an AV cable to the HDMI OUT jack on the HDMI device. Note If a device is set to the HDMI 4 or HDMI 5 jack on the side of your TV or to Game or Custom Game, pressing INPUT opens the Game Inputs list...
User Manual (English)
Page 18
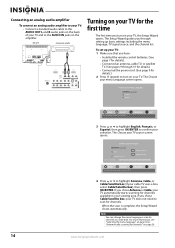
...Antenna or Cable, your TV automatically starts scanning for details). • Connected an antenna, cable TV, or satellite TV. (See pages 9 through setting up your TV: 1 Make sure that you chose Cable/Satellite box, your TV. Note You can change the menu language or scan for channels" ...on page 30 or "Automatically scanning for channels at a later date. When the scan is complete, the Setup Wizard closes automatically. To set up basic settings including the menu language, TV signal source, and the channel list. Connecting an analog audio amplifier To connect an analog audio amplifier to...
...Antenna or Cable, your TV automatically starts scanning for details). • Connected an antenna, cable TV, or satellite TV. (See pages 9 through setting up your TV: 1 Make sure that you chose Cable/Satellite box, your TV. Note You can change the menu language or scan for channels" ...on page 30 or "Automatically scanning for channels at a later date. When the scan is complete, the Setup Wizard closes automatically. To set up basic settings including the menu language, TV signal source, and the channel list. Connecting an analog audio amplifier To connect an analog audio amplifier to...
User Manual (English)
Page 19
.... • TV • AV 2 • Component 2 • VGA • HDMI 4 • HDMI 5 3 Press OK/ENTER. The other inputs are active. Warning When your TV is set to Game or Game Custom: 1 With your TV turned on your TV. The Source List opens. The Game Inputs source list opens. You can select... or to highlight the video input source your want . Selecting the video input source To select the video input source when the Picture mode is set to Game or Game Custom: 1 With your TV turned on, press INPUT. To select the video input source using the remote control. Source List TV...
.... • TV • AV 2 • Component 2 • VGA • HDMI 4 • HDMI 5 3 Press OK/ENTER. The other inputs are active. Warning When your TV is set to Game or Game Custom: 1 With your TV turned on your TV. The Source List opens. The Game Inputs source list opens. You can select... or to highlight the video input source your want . Selecting the video input source To select the video input source when the Picture mode is set to Game or Game Custom: 1 With your TV turned on, press INPUT. To select the video input source using the remote control. Source List TV...
User Manual (English)
Page 20
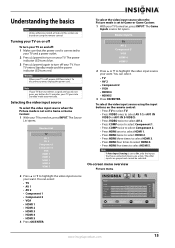
... Audyssey Dynamic Volume SRS TruSurround HD Treble Bass Balance Digital Audio/SPDIF PICTURE AUDIO CHANNELS SETTINGS Medium Off 32 32 0 RAW MOVE OK ENTER SELECT Adjust settings to affect sound quality MENU PREVIOUS EXIT EXIT Channels menu Channels Auto Channel Search Add/Skip... OK ENTER SELECT Adjust channel options MENU PREVIOUS EXIT EXIT Settings menu Settings Parental Controls Closed Caption Time Menu Settings LOGO Brightness Auto Input Sensing PICTURE AUDIO CHANNELS SETTINGS Low On MOVE OK ENTER SELECT Set various TV options MENU PREVIOUS EXIT EXIT Navigating the menus ...
... Audyssey Dynamic Volume SRS TruSurround HD Treble Bass Balance Digital Audio/SPDIF PICTURE AUDIO CHANNELS SETTINGS Medium Off 32 32 0 RAW MOVE OK ENTER SELECT Adjust settings to affect sound quality MENU PREVIOUS EXIT EXIT Channels menu Channels Auto Channel Search Add/Skip... OK ENTER SELECT Adjust channel options MENU PREVIOUS EXIT EXIT Settings menu Settings Parental Controls Closed Caption Time Menu Settings LOGO Brightness Auto Input Sensing PICTURE AUDIO CHANNELS SETTINGS Low On MOVE OK ENTER SELECT Set various TV options MENU PREVIOUS EXIT EXIT Navigating the menus ...
User Manual (English)
Page 21
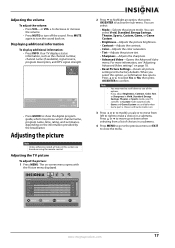
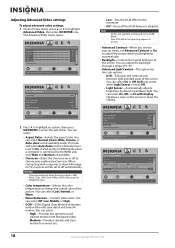
... signal source, program description, and DTV signal strength. Picture Mode Brightness Contrast Color Tint Sharpness PICTURE AUDIO CHANNELS SETTINGS Vivid 42 45 54 0 +5 MOVE OK ENTER SELECT Adjust settings to affect picture quality MENU PREVIOUS EXIT EXIT 2 Press to highlight an option, then press OK/ENTER to ...mode is on. 3 Press or to modify a scale or to move up or down to see "Adjusting Advanced Video settings" on page 18. • Reset Picture Settings-Resets all picture settings to show current channel name, program name, time, rating, and summaries, depending on .
... signal source, program description, and DTV signal strength. Picture Mode Brightness Contrast Color Tint Sharpness PICTURE AUDIO CHANNELS SETTINGS Vivid 42 45 54 0 +5 MOVE OK ENTER SELECT Adjust settings to affect picture quality MENU PREVIOUS EXIT EXIT 2 Press to highlight an option, then press OK/ENTER to ...mode is on. 3 Press or to modify a scale or to move up or down to see "Adjusting Advanced Video settings" on page 18. • Reset Picture Settings-Resets all picture settings to show current channel name, program name, time, rating, and summaries, depending on .
User Manual (English)
Page 22
..., Cinema, or Auto. Picture Advanced Video Color Temperature Noise Reduction DCM Advanced Contrast Backlight Advanced Light Control PICTURE AUDIO CHANNELS SETTINGS Cool Middle Low On 30 MOVE OK ENTER SELECT Automatically adjust picture detail and brightness MENU PREVIOUS EXIT EXIT Picture Advanced Video... Overscan Color Temperature DCR On Light Sensor On Backlight Advanced Light Control PICTURE AUDIO CHANNELS SETTINGS On Cool Off Off On With Display 21 MOVE OK ENTER SELECT MENU PREVIOUS Enhance contrast ratio between light and ...
..., Cinema, or Auto. Picture Advanced Video Color Temperature Noise Reduction DCM Advanced Contrast Backlight Advanced Light Control PICTURE AUDIO CHANNELS SETTINGS Cool Middle Low On 30 MOVE OK ENTER SELECT Automatically adjust picture detail and brightness MENU PREVIOUS EXIT EXIT Picture Advanced Video... Overscan Color Temperature DCR On Light Sensor On Backlight Advanced Light Control PICTURE AUDIO CHANNELS SETTINGS On Cool Off Off On With Display 21 MOVE OK ENTER SELECT MENU PREVIOUS Enhance contrast ratio between light and ...
User Manual (English)
Page 23
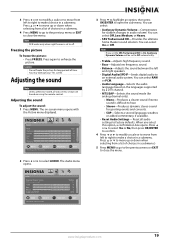
...menu. Press or to move from a list of time. You may damage your TV's screen. Adjusting the sound Note Unless otherwise noted, all audio settings to make a choice in a submenu. You can select On or Off. You can select Off, Low, Medium, or Heavy. • SRS ...theater sound solution. Reset all tasks in audio volume. Picture Mode Brightness Contrast Color Tint Sharpness PICTURE AUDIO CHANNELS SETTINGS Vivid 42 45 54 0 +5 MOVE OK ENTER SELECT Adjust settings to affect picture quality MENU PREVIOUS EXIT EXIT 2 Press or to hear. • Stereo-Produces dynamic stereo ...
...menu. Press or to move from a list of time. You may damage your TV's screen. Adjusting the sound Note Unless otherwise noted, all audio settings to make a choice in a submenu. You can select On or Off. You can select Off, Low, Medium, or Heavy. • SRS ...theater sound solution. Reset all tasks in audio volume. Picture Mode Brightness Contrast Color Tint Sharpness PICTURE AUDIO CHANNELS SETTINGS Vivid 42 45 54 0 +5 MOVE OK ENTER SELECT Adjust settings to affect picture quality MENU PREVIOUS EXIT EXIT 2 Press or to hear. • Stereo-Produces dynamic stereo ...
User Manual (English)
Page 24
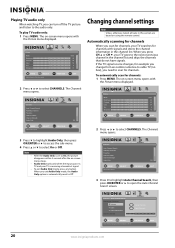
... Auto Channel Search screen. Channels Auto Channel Search Add/Skip Channels Favorites Channel Labels Channel Strength Audio Only PICTURE AUDIO CHANNELS SETTINGS Off MOVE OK ENTER SELECT Adjust channel options MENU PREVIOUS EXIT EXIT 3 Press to highlight Auto Channel Search, then press... signal source changes, for channels MOVE OK ENTER SELECT MENU PREVIOUS Select Antenna if using the remote control. PICTURE AUDIO CHANNELS SETTINGS Channels Auto Channel Search Choose your TV source Antenna Cable Cable/Satellite Box 0 Analog Channels 0 Digital Channels Scan for example ...
... Auto Channel Search screen. Channels Auto Channel Search Add/Skip Channels Favorites Channel Labels Channel Strength Audio Only PICTURE AUDIO CHANNELS SETTINGS Off MOVE OK ENTER SELECT Adjust channel options MENU PREVIOUS EXIT EXIT 3 Press to highlight Auto Channel Search, then press... signal source changes, for channels MOVE OK ENTER SELECT MENU PREVIOUS Select Antenna if using the remote control. PICTURE AUDIO CHANNELS SETTINGS Channels Auto Channel Search Choose your TV source Antenna Cable Cable/Satellite Box 0 Analog Channels 0 Digital Channels Scan for example ...
User Manual (English)
Page 25
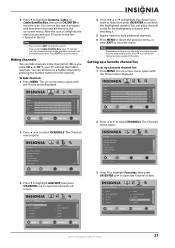
...in the channel list. Channels Auto Channel Search Add/Skip Channels Favorites Channel Labels Channel Strength Audio Only PICTURE AUDIO CHANNELS SETTINGS Off MOVE OK ENTER SELECT Adjust channel options MENU PREVIOUS EXIT EXIT Channels Auto Channel Search Add/Skip Channels Favorites Channel ...Labels Channel Strength Audio Only PICTURE AUDIO CHANNELS SETTINGS Off MOVE OK ENTER SELECT Adjust channel options MENU PREVIOUS EXIT EXIT 3 Press to highlight Favorites, then press OK/ENTER ...
...in the channel list. Channels Auto Channel Search Add/Skip Channels Favorites Channel Labels Channel Strength Audio Only PICTURE AUDIO CHANNELS SETTINGS Off MOVE OK ENTER SELECT Adjust channel options MENU PREVIOUS EXIT EXIT Channels Auto Channel Search Add/Skip Channels Favorites Channel ...Labels Channel Strength Audio Only PICTURE AUDIO CHANNELS SETTINGS Off MOVE OK ENTER SELECT Adjust channel options MENU PREVIOUS EXIT EXIT 3 Press to highlight Favorites, then press OK/ENTER ...


