

Technical Brief (Ink Jet Printers)
Page 1
... produce award-winning print quality, and each of offering a one-size-fits-all -in-one printers. Print Quality-Core Printing Technologies The core technologies used in Epson ink jet printers work together to produce brilliant Photo Quality color, sharp text, and incredible print speeds Small Ink Droplet Size Small ink droplets produce smoother gradations...
... produce award-winning print quality, and each of offering a one-size-fits-all -in-one printers. Print Quality-Core Printing Technologies The core technologies used in Epson ink jet printers work together to produce brilliant Photo Quality color, sharp text, and incredible print speeds Small Ink Droplet Size Small ink droplets produce smoother gradations...

Technical Brief (Ink Jet Printers)
Page 2
..." • Large ink droplets are unique in photos and laser sharp text. Epson printers are used in dense coverage areas to improve print speed With this technique, Epson printers can be used in other ink jet printers: Epson MicroPiezo Technology Mechanical method: Precise electrical pulses cause ... you cannot see them with more tone representations • The smallest ink droplets can be combined to improve color ranges and accuracy because Epson printers can produce a number of print head nozzles Page 2 Additionally, smaller ink droplets produce less visible printed dots...
..." • Large ink droplets are unique in photos and laser sharp text. Epson printers are used in dense coverage areas to improve print speed With this technique, Epson printers can be used in other ink jet printers: Epson MicroPiezo Technology Mechanical method: Precise electrical pulses cause ... you cannot see them with more tone representations • The smallest ink droplets can be combined to improve color ranges and accuracy because Epson printers can produce a number of print head nozzles Page 2 Additionally, smaller ink droplets produce less visible printed dots...

Technical Brief (Ink Jet Printers)
Page 3
...is most efficient pattern for the job. Epson Papers: In general, Epson printers will deliver their respective owners. High Quality Halftoning: Every ink jet printer uses a method referred to get sharp black text, superb photo quality photos, or both on the content, selected output quality... for optional cartridges, and you see continuous tone color. Epson papers are specifically designed to change. ©2006 Epson America, Inc. Ink Jet Printer Technical Brief Page 3 Fine Art Pro Advanced Amateur Photo Enthusiast Chief Memory Officer® General Purpose...
...is most efficient pattern for the job. Epson Papers: In general, Epson printers will deliver their respective owners. High Quality Halftoning: Every ink jet printer uses a method referred to get sharp black text, superb photo quality photos, or both on the content, selected output quality... for optional cartridges, and you see continuous tone color. Epson papers are specifically designed to change. ©2006 Epson America, Inc. Ink Jet Printer Technical Brief Page 3 Fine Art Pro Advanced Amateur Photo Enthusiast Chief Memory Officer® General Purpose...
Product Information Guide
Page 1
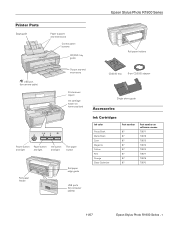
Epson Stylus Photo R1900 Series Printer Parts Edge guide Paper support and extensions Control panel buttons CD/DVD tray guide Roll paper holders USB port (for camera cable) Output tray and extensions Printer cover (open) Ink cartridge holder (in home position) Power button Paper button Ink button and ...Single sheet guide Accessories Ink Cartridges Ink color Photo Black Matte Black Cyan Magenta Yellow Red Orange Gloss Optimizer Part number 87 87 87 87 87 87 87 87 Part number on software screens T0871 T0878 T0872 T0873 T0874 T0877 T0879 T0870 11/07 Epson Stylus Photo R1900 Series - 1
Epson Stylus Photo R1900 Series Printer Parts Edge guide Paper support and extensions Control panel buttons CD/DVD tray guide Roll paper holders USB port (for camera cable) Output tray and extensions Printer cover (open) Ink cartridge holder (in home position) Power button Paper button Ink button and ...Single sheet guide Accessories Ink Cartridges Ink color Photo Black Matte Black Cyan Magenta Yellow Red Orange Gloss Optimizer Part number 87 87 87 87 87 87 87 87 Part number on software screens T0871 T0878 T0872 T0873 T0874 T0877 T0879 T0870 11/07 Epson Stylus Photo R1900 Series - 1
Product Information Guide
Page 3
...Epson Stylus Photo R1900 Series Paper type Epson Presentation Paper Matte Epson Velvet Fine Art Paper Epson Watercolor Paper Radiant White Epson UltraSmooth® Fine Art Paper 250 gsm PremierArt™ Matte Scrapbook Photo Paper for Epson PremierArt Water Resistant Canvas for Epson Piezo Pro® Matte Canvas for Epson Epson Bright White Paper Epson Photo Quality Self-adhesive Sheets Epson... Sheet count 100 100 100 100 20 20 20 25 20 10 Roll Roll 500 10 10 Printer Specifications Printing Paper path Sheet feeder capacity Sheet feeder, top entry Roll paper feeder, rear entry Approx. 120 sheets...
...Epson Stylus Photo R1900 Series Paper type Epson Presentation Paper Matte Epson Velvet Fine Art Paper Epson Watercolor Paper Radiant White Epson UltraSmooth® Fine Art Paper 250 gsm PremierArt™ Matte Scrapbook Photo Paper for Epson PremierArt Water Resistant Canvas for Epson Piezo Pro® Matte Canvas for Epson Epson Bright White Paper Epson Photo Quality Self-adhesive Sheets Epson... Sheet count 100 100 100 100 20 20 20 25 20 10 Roll Roll 500 10 10 Printer Specifications Printing Paper path Sheet feeder capacity Sheet feeder, top entry Roll paper feeder, rear entry Approx. 120 sheets...
Product Information Guide
Page 5
... printing results, use up a cartridge within 6 months Unopened package: do not refill them. Epson Stylus Photo R1900 Series Ink Cartridges Note: We recommend that you use genuine Epson cartridges and do not use if the date on the package has expired Storage: -4 to... compliant devices) 11/07 Epson Stylus Photo R1900 Series - 5 For print quality, a small amount of use, and temperature. Color Cartridge life Temperature Photo Black, Matte Black, Cyan, Magenta, Yellow, Red, Orange, Gloss Optimizer (see page 1 for priming the printer. The printer ships with full cartridges and...
... printing results, use up a cartridge within 6 months Unopened package: do not refill them. Epson Stylus Photo R1900 Series Ink Cartridges Note: We recommend that you use genuine Epson cartridges and do not use if the date on the package has expired Storage: -4 to... compliant devices) 11/07 Epson Stylus Photo R1900 Series - 5 For print quality, a small amount of use, and temperature. Color Cartridge life Temperature Photo Black, Matte Black, Cyan, Magenta, Yellow, Red, Orange, Gloss Optimizer (see page 1 for priming the printer. The printer ships with full cartridges and...
Product Information Guide
Page 6
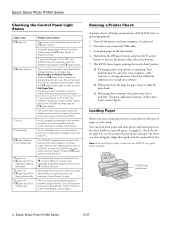
Epson Stylus Photo R1900 Series Checking the Control Panel Light Status Light status I paper ...printer. Remove the loaded paper to print on . Parts inside . Hold down the I paper and H ink flashing fast Problem and solution Paper may be out. see if you are at the end of paper you must load your special paper one sheet at a time using . Epson Stylus Photo R1900... 4. The print head is low. Load plain paper in a cartridge is obstructed by your printer is closed. The R1900 Series begins printing the nozzle check pattern. ❏ If the page prints, your computer, ...
Epson Stylus Photo R1900 Series Checking the Control Panel Light Status Light status I paper ...printer. Remove the loaded paper to print on . Parts inside . Hold down the I paper and H ink flashing fast Problem and solution Paper may be out. see if you are at the end of paper you must load your special paper one sheet at a time using . Epson Stylus Photo R1900... 4. The print head is low. Load plain paper in a cartridge is obstructed by your printer is closed. The R1900 Series begins printing the nozzle check pattern. ❏ If the page prints, your computer, ...
Product Information Guide
Page 7
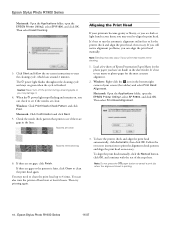
... and printed side up the extensions. 2. Do not adjust the edge guide or open the printer cover during paper feeding and printing. Slide the edge guide left edge guide may move slightly during printing. 11/07 Epson Stylus Photo R1900 Series - 7 Do not load paper above the arrow on the edge guide and slide it...
... and printed side up the extensions. 2. Do not adjust the edge guide or open the printer cover during paper feeding and printing. Slide the edge guide left edge guide may move slightly during printing. 11/07 Epson Stylus Photo R1900 Series - 7 Do not load paper above the arrow on the edge guide and slide it...
Product Information Guide
Page 8
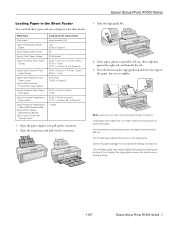
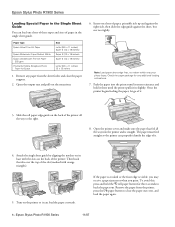
...) Super B (13 × 19 inches) Letter (8.5 × 11 inches) 12 × 12 inches 1. Epson Stylus Photo R1900 Series 11/07 Open the output tray and pull out the extensions. 6. Push the paper into the printer and is visible, you may receive a paper jam error when you print. Turn on the back of... all the way to back the paper out. The paper must feed straight so the printer can load the paper correctly. If the paper is crooked or the front edge is straight. Epson Stylus Photo R1900 Series Loading Special Paper in the Single Sheet Guide You can load one sheet of paper...
...) Super B (13 × 19 inches) Letter (8.5 × 11 inches) 12 × 12 inches 1. Epson Stylus Photo R1900 Series 11/07 Open the output tray and pull out the extensions. 6. Push the paper into the printer and is visible, you may receive a paper jam error when you print. Turn on the back of... all the way to back the paper out. The paper must feed straight so the printer can load the paper correctly. If the paper is crooked or the front edge is straight. Epson Stylus Photo R1900 Series Loading Special Paper in the Single Sheet Guide You can load one sheet of paper...
Product Information Guide
Page 9
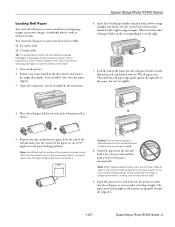
... a right orange triangle). Place the roll paper holders on the paper. 1. Epson Stylus Photo R1900 Series Loading Roll Paper You can properly identify the edge of it. 11/07 Epson Stylus Photo R1900 Series - 9 Then insert the other roll paper holder in the corresponding slot on the printer. 2. Remove any paper loaded in these widths: ❏ 8.3-inches wide ❏...
... a right orange triangle). Place the roll paper holders on the paper. 1. Epson Stylus Photo R1900 Series Loading Roll Paper You can properly identify the edge of it. 11/07 Epson Stylus Photo R1900 Series - 9 Then insert the other roll paper holder in the corresponding slot on the printer. 2. Remove any paper loaded in these widths: ❏ 8.3-inches wide ❏...
Product Information Guide
Page 10
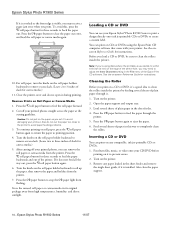
...Turn the knobs on the printer. 2. Loading a CD or DVD You can remove the roll paper or canvas media from the printer. 7. Turn on the roll paper holder backward to avoid damaging your printer. Epson Stylus Photo R1900 Series 11/07 Cut off your printed photos, you may receive a paper... jam error when you 're using the Epson Print CD computer software that came with...
...Turn the knobs on the printer. 2. Loading a CD or DVD You can remove the roll paper or canvas media from the printer. 7. Turn on the roll paper holder backward to avoid damaging your printer. Epson Stylus Photo R1900 Series 11/07 Cut off your printed photos, you may receive a paper... jam error when you 're using the Epson Print CD computer software that came with...
Product Information Guide
Page 11
... DVD Select this paper, print using and adjusts the ink coverage accordingly. Epson Stylus Photo R1900 Series 4. Now you 're using a premium ICC profile, downloadable from the printer. Caution: Do not turn the printer on Cool Peel Transfer Paper Epson Velvet Fine Art Paper Epson Watercolor Paper Radiant White Epson UltraSmooth Fine Art Paper 250 gsm PremierArt Matte Scrapbook...
... DVD Select this paper, print using and adjusts the ink coverage accordingly. Epson Stylus Photo R1900 Series 4. Now you 're using a premium ICC profile, downloadable from the printer. Caution: Do not turn the printer on Cool Peel Transfer Paper Epson Velvet Fine Art Paper Epson Watercolor Paper Radiant White Epson UltraSmooth Fine Art Paper 250 gsm PremierArt Matte Scrapbook...
Product Information Guide
Page 12
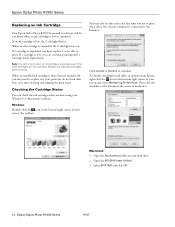
... ink cartridge is low or expended. Checking the Cartridge Status You can continue printing until a cartridge needs replacement. Epson Stylus Photo R1900 Series Replacing an Ink Cartridge Your Epson Stylus Photo R1900 Series and its software will let you know when an ink cartridge is expended even if the other cartridges are...the bottom right corner of the screen to print. Then click the checkbox at the bottom of your screen (the taskbar). Open the EPSON Printer Utility2. 3. If a cartridge is more than six months old, you may also see this screen the first time you try to ...
... ink cartridge is low or expended. Checking the Cartridge Status You can continue printing until a cartridge needs replacement. Epson Stylus Photo R1900 Series Replacing an Ink Cartridge Your Epson Stylus Photo R1900 Series and its software will let you know when an ink cartridge is expended even if the other cartridges are...the bottom right corner of the screen to print. Then click the checkbox at the bottom of your screen (the taskbar). Open the EPSON Printer Utility2. 3. If a cartridge is more than six months old, you may also see this screen the first time you try to ...

Product Information Guide
Page 13
...up to replace them thoroughly with soap and water. Cartridges are ready to room temperature for priming the printer. Epson Stylus Photo R1900 Series 4. The printer ships with water. Turn on software screens T0871 T0878 T0872 T0873 T0874 T0877 T0879 T0870 Leave your ... 11/07 Epson Stylus Photo R1900 Series - 13 Select EPSON StatusMonitor. Purchasing Ink Cartridges Purchase these genuine Epson cartridges: Ink color Photo Black Matte Black Cyan Magenta Yellow Red Orange Gloss Optimizer Part number 87 87 87 87 87 87 87 87 Part number on the printer. 2. Do...
...up to replace them thoroughly with soap and water. Cartridges are ready to room temperature for priming the printer. Epson Stylus Photo R1900 Series 4. The printer ships with water. Turn on software screens T0871 T0878 T0872 T0873 T0874 T0877 T0879 T0870 Leave your ... 11/07 Epson Stylus Photo R1900 Series - 13 Select EPSON StatusMonitor. Purchasing Ink Cartridges Purchase these genuine Epson cartridges: Ink color Photo Black Matte Black Cyan Magenta Yellow Red Orange Gloss Optimizer Part number 87 87 87 87 87 87 87 87 Part number on the printer. 2. Do...
Product Information Guide
Page 14
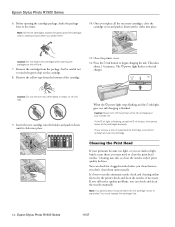
...must replace the cartridge first. 14 - Remove the yellow tape from the package, but be careful not to let the printer check and clean the nozzles, if necessary. Cleaning the Print Head If your printouts become too light, or you cannot reinstall...printer cover. 12. It's best to run the automatic nozzle check and cleaning utility first to touch the green chip on the cartridge. 8. If you remove a low or expended ink cartridge, you see dark or light bands across them . 10. Epson Stylus Photo R1900 Series 6. This takes about 2 ½ minutes. Epson Stylus Photo R1900...
...must replace the cartridge first. 14 - Remove the yellow tape from the package, but be careful not to let the printer check and clean the nozzles, if necessary. Cleaning the Print Head If your printouts become too light, or you cannot reinstall...printer cover. 12. It's best to run the automatic nozzle check and cleaning utility first to touch the green chip on the cartridge. 8. If you remove a low or expended ink cartridge, you see dark or light bands across them . 10. Epson Stylus Photo R1900 Series 6. This takes about 2 ½ minutes. Epson Stylus Photo R1900...
Product Information Guide
Page 15
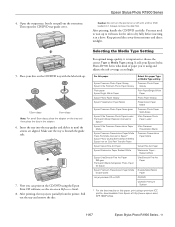
... (the taskbar) and select Head Cleaning. 11/07 Epson Stylus Photo R1900 Series - 15 From the Computer 1. Windows: Right-click the icon in the sheet feeder. 2. Macintosh: Open the Applications folder, open the EPSON Printer Utility2, select SP R1900, and click OK. You can clean the print head... and examine the nozzle check pattern. 4. Then select Auto Head Cleaning. Epson Stylus Photo R1900 Series Automatically Checking and Cleaning the Print Head You can manually run a nozzle check and confirm that your printer then reads to see a message on green when the cycle is finished...
... (the taskbar) and select Head Cleaning. 11/07 Epson Stylus Photo R1900 Series - 15 From the Computer 1. Windows: Right-click the icon in the sheet feeder. 2. Macintosh: Open the Applications folder, open the EPSON Printer Utility2, select SP R1900, and click OK. You can clean the print head... and examine the nozzle check pattern. 4. Then select Auto Head Cleaning. Epson Stylus Photo R1900 Series Automatically Checking and Cleaning the Print Head You can manually run a nozzle check and confirm that your printer then reads to see a message on green when the cycle is finished...
Product Information Guide
Page 16
...the rest of your screen (the taskbar) and select Print Head Alignment. Epson Stylus Photo R1900 Series Macintosh: Open the Applications folder, open the EPSON Printer Utility2, select SP R1900, and click OK. It's best to let the printer check and align the print head, if necessary. You can align the ... corner of the steps here. Nozzles need cleaning. 1. Then select Print Head Alignment. If there are no gaps, click Finish. Epson Stylus Photo R1900 Series 11/07 When the P power light stops flashing and remains on -screen instructions to cancel a print job when the alignment ...
...the rest of your screen (the taskbar) and select Print Head Alignment. Epson Stylus Photo R1900 Series Macintosh: Open the Applications folder, open the EPSON Printer Utility2, select SP R1900, and click OK. It's best to let the printer check and align the print head, if necessary. You can align the ... corner of the steps here. Nozzles need cleaning. 1. Then select Print Head Alignment. If there are no gaps, click Finish. Epson Stylus Photo R1900 Series 11/07 When the P power light stops flashing and remains on -screen instructions to cancel a print job when the alignment ...
Product Information Guide
Page 17
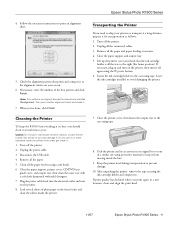
...5. Clean all the paper feeders using protective material to ship your screen. 6. Close the printer cover, then fasten the output tray to avoid damaging the printer. Epson Stylus Photo R1900 Series 4. Keep the printer level during transportation to the case using the P power button. 6. If necessary, enter ...in a new location, clean and align the print head. 11/07 Epson Stylus Photo R1900 Series - 17 Plug the power cable back into the electrical outlet and turn on the printer, then turn on the printer. 8. Note: If no patterns are aligned, choose the closest one...
...5. Clean all the paper feeders using protective material to ship your screen. 6. Close the printer cover, then fasten the output tray to avoid damaging the printer. Epson Stylus Photo R1900 Series 4. Keep the printer level during transportation to the case using the P power button. 6. If necessary, enter ...in a new location, clean and align the print head. 11/07 Epson Stylus Photo R1900 Series - 17 Plug the power cable back into the electrical outlet and turn on the printer, then turn on the printer. 8. Note: If no patterns are aligned, choose the closest one...

Start Here
Page 1
Remove all the tape and packing material. (There is shown below.) *411086800* *411086800* Start Here Epson Stylus® Photo R1900 1 Unpack If anything is missing, contact Epson® as described on the printer than is more tape on the back.
Remove all the tape and packing material. (There is shown below.) *411086800* *411086800* Start Here Epson Stylus® Photo R1900 1 Unpack If anything is missing, contact Epson® as described on the printer than is more tape on the back.
Start Here
Page 2
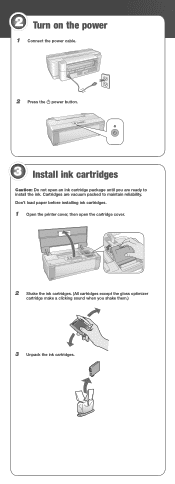
Cartridges are ready to maintain reliability. Don't load paper before installing ink cartridges. 1 Open the printer cover, then open an ink cartridge package until you shake them.) 3 Unpack the ink cartridges. 2 Turn on the power 1 Connect the power cable. 2 Press the power button. 3 Install ink cartridges Caution: Do not open the cartridge cover. 2 Shake the ink cartridges. (All cartridges except the gloss optimizer cartridge make a clicking sound when you are vacuum packed to install the ink.
Cartridges are ready to maintain reliability. Don't load paper before installing ink cartridges. 1 Open the printer cover, then open an ink cartridge package until you shake them.) 3 Unpack the ink cartridges. 2 Turn on the power 1 Connect the power cable. 2 Press the power button. 3 Install ink cartridges Caution: Do not open the cartridge cover. 2 Shake the ink cartridges. (All cartridges except the gloss optimizer cartridge make a clicking sound when you are vacuum packed to install the ink.


