
Product Information Guide
Page 1
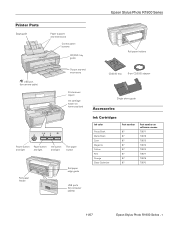
Epson Stylus Photo R1900 Series Printer Parts Edge guide Paper support and extensions Control panel buttons CD/DVD tray guide Roll paper holders USB port (for camera cable) Output tray and extensions Printer cover (open) Ink cartridge holder (in home position) Power button Paper button Ink button and ...Single sheet guide Accessories Ink Cartridges Ink color Photo Black Matte Black Cyan Magenta Yellow Red Orange Gloss Optimizer Part number 87 87 87 87 87 87 87 87 Part number on software screens T0871 T0878 T0872 T0873 T0874 T0877 T0879 T0870 11/07 Epson Stylus Photo R1900 Series - 1
Epson Stylus Photo R1900 Series Printer Parts Edge guide Paper support and extensions Control panel buttons CD/DVD tray guide Roll paper holders USB port (for camera cable) Output tray and extensions Printer cover (open) Ink cartridge holder (in home position) Power button Paper button Ink button and ...Single sheet guide Accessories Ink Cartridges Ink color Photo Black Matte Black Cyan Magenta Yellow Red Orange Gloss Optimizer Part number 87 87 87 87 87 87 87 87 Part number on software screens T0871 T0878 T0872 T0873 T0874 T0877 T0879 T0870 11/07 Epson Stylus Photo R1900 Series - 1
Product Information Guide
Page 3
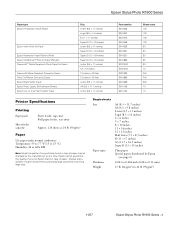
... 10 Printer Specifications Printing Paper path Sheet feeder capacity Sheet feeder, top entry Roll paper feeder, rear entry Approx. 120 sheets at 24 lb (90 g/m2) Paper Use paper under normal conditions: Temperature: 59 to 77 °F (15 to 25 °C) Humidity: 40 to 24 lb (90 g/m2) 11/07 Epson Stylus Photo R1900 Series...
... 10 Printer Specifications Printing Paper path Sheet feeder capacity Sheet feeder, top entry Roll paper feeder, rear entry Approx. 120 sheets at 24 lb (90 g/m2) Paper Use paper under normal conditions: Temperature: 59 to 77 °F (15 to 25 °C) Humidity: 40 to 24 lb (90 g/m2) 11/07 Epson Stylus Photo R1900 Series...
Product Information Guide
Page 5
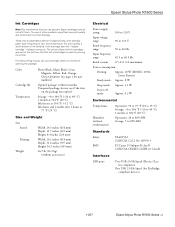
... and part of the ink from this first set of ink remains in printer damage. For best printing results, use up a cartridge within 6 months Unopened package: do not refill them. Color Cartridge life Temperature Photo Black, Matte Black, Cyan, Magenta, Yellow, Red, Orange, Gloss Optimizer...Hi-Speed (for priming the printer. The use of opening the package. Yields vary considerably based on images printed, print settings, paper type, frequency of use, and temperature. Epson Stylus Photo R1900 Series Ink Cartridges Note: We recommend that you use genuine Epson cartridges and do not use if...
... and part of the ink from this first set of ink remains in printer damage. For best printing results, use up a cartridge within 6 months Unopened package: do not refill them. Color Cartridge life Temperature Photo Black, Matte Black, Cyan, Magenta, Yellow, Red, Orange, Gloss Optimizer...Hi-Speed (for priming the printer. The use of opening the package. Yields vary considerably based on images printed, print settings, paper type, frequency of use, and temperature. Epson Stylus Photo R1900 Series Ink Cartridges Note: We recommend that you use genuine Epson cartridges and do not use if...
Product Information Guide
Page 6
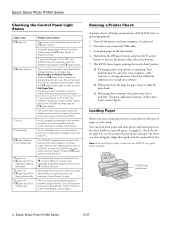
...guide cover is not compatible with the printer. The print head is low and replace it back on. Check for the type of their service life or an unknown error has occurred. If they don't work, contact Epson. Epson Stylus Photo R1900 Series Checking the Control Panel Light Status...the CD/DVD tray may be unable to resume printing. CD/DVD tray guide cover 6 - Epson Stylus Photo R1900 Series 11/07 Load plain paper in a cartridge is connected to print on the printer, then release the buttons. 5. You can continue printing, or check which cartridge is obstructed by...
...guide cover is not compatible with the printer. The print head is low and replace it back on. Check for the type of their service life or an unknown error has occurred. If they don't work, contact Epson. Epson Stylus Photo R1900 Series Checking the Control Panel Light Status...the CD/DVD tray may be unable to resume printing. CD/DVD tray guide cover 6 - Epson Stylus Photo R1900 Series 11/07 Load plain paper in a cartridge is connected to print on the printer, then release the buttons. 5. You can continue printing, or check which cartridge is obstructed by...
Product Information Guide
Page 7
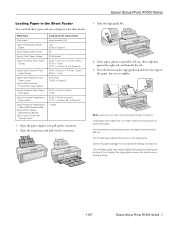
... right side and beneath the tab. 5. Slide the edge guide left edge guide may move slightly during printing. 11/07 Epson Stylus Photo R1900 Series - 7 Do not adjust the edge guide or open the printer cover during paper feeding and printing. Do not load paper above the arrow on the edge guide. Open the output...
... right side and beneath the tab. 5. Slide the edge guide left edge guide may move slightly during printing. 11/07 Epson Stylus Photo R1900 Series - 7 Do not adjust the edge guide or open the printer cover during paper feeding and printing. Do not load paper above the arrow on the edge guide. Open the output...
Product Information Guide
Page 8
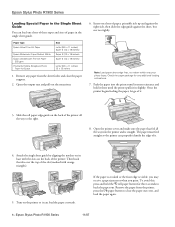
...on the back of it . 4. Note: Load paper short edge first, no matter which way your photo faces. Turn on the back of it . 3. Epson Stylus Photo R1900 Series 11/07 Epson Stylus Photo R1900 Series Loading Special Paper in the Single Sheet Guide You can load one sheet of paper, printable side up... triangles). 5. Remove any additional loading instructions. 7. Then hook the tabs over the top of the slot (marked with the slots on the printer so it meets resistance and hold the M roll paper button for three seconds to clear the paper out error, and load the paper again....
...on the back of it . 4. Note: Load paper short edge first, no matter which way your photo faces. Turn on the back of it . 3. Epson Stylus Photo R1900 Series 11/07 Epson Stylus Photo R1900 Series Loading Special Paper in the Single Sheet Guide You can load one sheet of paper, printable side up... triangles). 5. Remove any additional loading instructions. 7. Then hook the tabs over the top of the slot (marked with the slots on the printer so it meets resistance and hold the M roll paper button for three seconds to clear the paper out error, and load the paper again....
Product Information Guide
Page 9
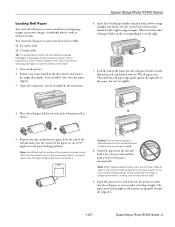
...the best results. Remove any tape and protective paper from the printer before loading roll paper. Remove any paper loaded in the paper automatically. Open the printer cover and look into the slot and hold it . 11/07 Epson Stylus Photo R1900 Series - 9 Open the output tray, but not too tightly... feed slot (marked with a right orange triangle). Epson Stylus Photo R1900 Series Loading Roll Paper You can properly identify the edge of your paper or canvas media. Also close the paper support. 3. Guide the paper into the printer to make sure the corners of the paper are ...
...the best results. Remove any tape and protective paper from the printer before loading roll paper. Remove any paper loaded in the paper automatically. Open the printer cover and look into the slot and hold it . 11/07 Epson Stylus Photo R1900 Series - 9 Open the output tray, but not too tightly... feed slot (marked with a right orange triangle). Epson Stylus Photo R1900 Series Loading Roll Paper You can properly identify the edge of your paper or canvas media. Also close the paper support. 3. Guide the paper into the printer to make sure the corners of the paper are ...
Product Information Guide
Page 10
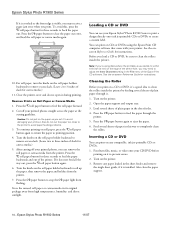
...If you're using the Epson Print CD computer software that came with your printed photos straight across the paper at the cutting guideline. Turn on the printer. 3. Feed several sheets of paper in the File menu of the Epson Print CD software. Epson Stylus Photo R1900 Series If it is ... DVD, it is visible, you may need to clean the rollers inside the printer by feeding several sheets of plain paper through the printer. 5. Press the I paper button to prevent errors. 2. Epson Stylus Photo R1900 Series 11/07 Load several sheets of plain paper in its original package away from...
...If you're using the Epson Print CD computer software that came with your printed photos straight across the paper at the cutting guideline. Turn on the printer. 3. Feed several sheets of paper in the File menu of the Epson Print CD software. Epson Stylus Photo R1900 Series If it is ... DVD, it is visible, you may need to clean the rollers inside the printer by feeding several sheets of plain paper through the printer. 5. Press the I paper button to prevent errors. 2. Epson Stylus Photo R1900 Series 11/07 Load several sheets of plain paper in its original package away from...
Product Information Guide
Page 11
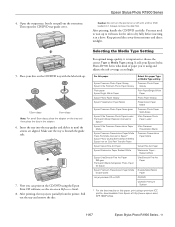
.../07 Epson Stylus Photo R1900 Series - 11 For this paper Epson Premium Photo Paper Glossy Epson Ultra Premium Photo Paper Glossy Plain paper Epson Bright White Paper Epson Photo Paper Glossy Epson Presentation Paper Matte Epson Premium Photo Paper Semi-gloss Epson Ultra Premium Photo Paper Luster PremierArt Water Resistant Canvas for Epson* Epson Ultra Premium Presentation Paper Matte Epson Premium Presentation Paper Matte Piezo Pro Matte Canvas for Epson* Epson Photo...
.../07 Epson Stylus Photo R1900 Series - 11 For this paper Epson Premium Photo Paper Glossy Epson Ultra Premium Photo Paper Glossy Plain paper Epson Bright White Paper Epson Photo Paper Glossy Epson Presentation Paper Matte Epson Premium Photo Paper Semi-gloss Epson Ultra Premium Photo Paper Luster PremierArt Water Resistant Canvas for Epson* Epson Ultra Premium Presentation Paper Matte Epson Premium Presentation Paper Matte Piezo Pro Matte Canvas for Epson* Epson Photo...
Product Information Guide
Page 12
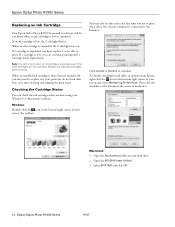
...-click the icon in the bottom right corner of your hard drive. 2. Open the Applications folder on . Open the EPSON Printer Utility2. 3. Note: You cannot print when an ink cartridge is expended, you must replace it . Checking the Cartridge Status You can continue...screen and select Monitoring Preferences. You may need to replace it if your screen (the taskbar). Select SP R1900 and click OK. 12 - Epson Stylus Photo R1900 Series Replacing an Ink Cartridge Your Epson Stylus Photo R1900 Series and its software will let you know when an ink cartridge is connected to the Internet): Click ...
...-click the icon in the bottom right corner of your hard drive. 2. Open the Applications folder on . Open the EPSON Printer Utility2. 3. Note: You cannot print when an ink cartridge is expended, you must replace it . Checking the Cartridge Status You can continue...screen and select Monitoring Preferences. You may need to replace it if your screen (the taskbar). Select SP R1900 and click OK. 12 - Epson Stylus Photo R1900 Series Replacing an Ink Cartridge Your Epson Stylus Photo R1900 Series and its software will let you know when an ink cartridge is connected to the Internet): Click ...

Product Information Guide
Page 13
.... Purchasing Ink Cartridges Purchase these genuine Epson cartridges: Ink color Photo Black Matte Black Cyan Magenta Yellow Red Orange Gloss Optimizer Part number 87 87 87 87 87 87 87 87 Part number on the printer. 2. For print quality, a variable amount of opening the package. Open the printer cover. 3. Epson Stylus Photo R1900 Series 4. For best printing results, use...
.... Purchasing Ink Cartridges Purchase these genuine Epson cartridges: Ink color Photo Black Matte Black Cyan Magenta Yellow Red Orange Gloss Optimizer Part number 87 87 87 87 87 87 87 87 Part number on the printer. 2. For print quality, a variable amount of opening the package. Open the printer cover. 3. Epson Stylus Photo R1900 Series 4. For best printing results, use...
Product Information Guide
Page 14
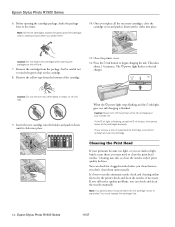
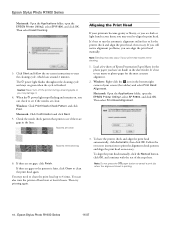
... the gloss optimizer cartridge, make a clicking sound when you may need to touch the green chip on the cartridge. 8. Close the printer cover. 12. The P power light flashes as the ink charges. If the H ink light is finished. Cleaning the Print Head If...the printer check and clean the nozzles, if necessary. It's best to run the automatic nozzle check and cleaning utility first to begin charging the ink. You must replace the cartridge first. 14 - Remove the cartridge from the bottom of the cartridge. 11. Epson Stylus Photo R1900 Series 6. Epson Stylus Photo R1900 Series...
... the gloss optimizer cartridge, make a clicking sound when you may need to touch the green chip on the cartridge. 8. Close the printer cover. 12. The P power light flashes as the ink charges. If the H ink light is finished. Cleaning the Print Head If...the printer check and clean the nozzles, if necessary. It's best to run the automatic nozzle check and cleaning utility first to begin charging the ink. You must replace the cartridge first. 14 - Remove the cartridge from the bottom of the cartridge. 11. Epson Stylus Photo R1900 Series 6. Epson Stylus Photo R1900 Series...
Product Information Guide
Page 15
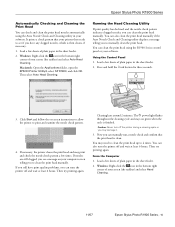
... necessary, the printer cleans the print head and may print and check the nozzle check pattern a few sheets of plain paper in the sheet feeder. 2. If you still have any clogged nozzles, which is then cleans, if necessary. 1. Load a few times. Epson Stylus Photo R1900 Series Automatically Checking...taskbar) and select Head Cleaning. 11/07 Epson Stylus Photo R1900 Series - 15 Load a few sheets of plain paper in the sheet feeder. 2. Then select Auto Head Cleaning. Click Start and follow the on-screen instructions to allow the printer to manually clean the print head. If nozzles...
... necessary, the printer cleans the print head and may print and check the nozzle check pattern a few sheets of plain paper in the sheet feeder. 2. If you still have any clogged nozzles, which is then cleans, if necessary. 1. Load a few times. Epson Stylus Photo R1900 Series Automatically Checking...taskbar) and select Head Cleaning. 11/07 Epson Stylus Photo R1900 Series - 15 Load a few sheets of plain paper in the sheet feeder. 2. Then select Auto Head Cleaning. Click Start and follow the on-screen instructions to allow the printer to manually clean the print head. If nozzles...
Product Information Guide
Page 16
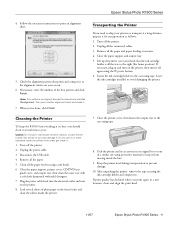
...to start the cleaning cycle, which lasts around 2 minutes. You can align the print head manually. Epson Stylus Photo R1900 Series 11/07 Caution: Never turn the printer off the printer during a cleaning cycle or you may need cleaning. 1. You may also occur if your screen (...Alignment. Then select Head Cleaning. 3. To have on -screen instructions to align the print head. Epson Stylus Photo R1900 Series Macintosh: Open the Applications folder, open the EPSON Printer Utility2, select SP R1900, and click OK. Click Start and follow the on hand) in the sheet feeder. Macintosh:...
...to start the cleaning cycle, which lasts around 2 minutes. You can align the print head manually. Epson Stylus Photo R1900 Series 11/07 Caution: Never turn the printer off the printer during a cleaning cycle or you may need cleaning. 1. You may also occur if your screen (...Alignment. Then select Head Cleaning. 3. To have on -screen instructions to align the print head. Epson Stylus Photo R1900 Series Macintosh: Open the Applications folder, open the EPSON Printer Utility2, select SP R1900, and click OK. Click Start and follow the on hand) in the sheet feeder. Macintosh:...
Product Information Guide
Page 17
... the paper and paper loading accessories. 4. Keep the printer level during transportation to print an alignment sheet. 5. If necessary, enter the number of plain paper in a new location, clean and align the print head. 11/07 Epson Stylus Photo R1900 Series - 17 Do not use a hard brush, benzine..., alcohol, or paint thinner to ship your screen. 6. Transporting the Printer If you need to clean the printer or you print again in the sheet feeder and ...
... the paper and paper loading accessories. 4. Keep the printer level during transportation to print an alignment sheet. 5. If necessary, enter the number of plain paper in a new location, clean and align the print head. 11/07 Epson Stylus Photo R1900 Series - 17 Do not use a hard brush, benzine..., alcohol, or paint thinner to ship your screen. 6. Transporting the Printer If you need to clean the printer or you print again in the sheet feeder and ...

Start Here
Page 1
Start Here Epson Stylus® Photo R1900 1 Unpack If anything is missing, contact Epson® as described on the printer than is more tape on the back. Remove all the tape and packing material. (There is shown below.) *411086800* *411086800*
Start Here Epson Stylus® Photo R1900 1 Unpack If anything is missing, contact Epson® as described on the printer than is more tape on the back. Remove all the tape and packing material. (There is shown below.) *411086800* *411086800*
Start Here
Page 8
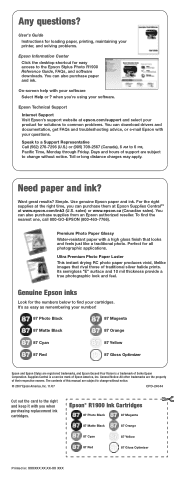
...subject to find the nearest one, call 800-GO-EPSON (800-463-7766). To find your software Select Help or ? Perfect for solutions to the Epson Stylus Photo R1900 Reference Guide, FAQs, and software downloads. Genuine Epson inks Look for the numbers below to change without ...87 Cyan 87 Yellow 87 Red 87 Gloss Optimizer Epson and Epson Stylus are the property of Epson America, Inc. Use genuine Epson paper and ink. Premium Photo Paper Glossy Water-resistant paper with your printer, and solving problems. Epson Information Center Click the desktop shortcut for loading paper...
...subject to find the nearest one, call 800-GO-EPSON (800-463-7766). To find your software Select Help or ? Perfect for solutions to the Epson Stylus Photo R1900 Reference Guide, FAQs, and software downloads. Genuine Epson inks Look for the numbers below to change without ...87 Cyan 87 Yellow 87 Red 87 Gloss Optimizer Epson and Epson Stylus are the property of Epson America, Inc. Use genuine Epson paper and ink. Premium Photo Paper Glossy Water-resistant paper with your printer, and solving problems. Epson Information Center Click the desktop shortcut for loading paper...
User's Guide - PDF
Page 5
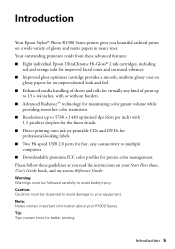
... 2.0 ports for fast, easy connectivity to multiple computers. ■ Downloadable premium ICC color profiles for better printing. Please follow these advanced features: ■ Eight individual Epson UltraChrome Hi-Gloss® 2 ink cartridges, including red and orange inks for improved ... must be followed carefully to your equipment. Tip: Tips contain hints for precise color management. Introduction Your Epson Stylus® Photo R1900 Series printer gives you read the instructions on your R1900 Series. Caution: Cautions must be observed to avoid damage to avoid bodily injury....
... 2.0 ports for fast, easy connectivity to multiple computers. ■ Downloadable premium ICC color profiles for better printing. Please follow these advanced features: ■ Eight individual Epson UltraChrome Hi-Gloss® 2 ink cartridges, including red and orange inks for improved ... must be followed carefully to your equipment. Tip: Tips contain hints for precise color management. Introduction Your Epson Stylus® Photo R1900 Series printer gives you read the instructions on your R1900 Series. Caution: Cautions must be observed to avoid damage to avoid bodily injury....
User's Guide - PDF
Page 16
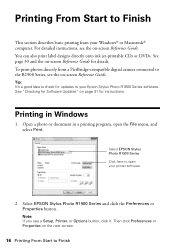
... next screen. 16 Printing From Start to the R1900 Series, see the on -screen Reference Guide for instructions. Select EPSON Stylus Photo R1900 Series and click the Preferences or Properties button. To print photos directly from your Windows® or Macintosh® computer. For detailed instructions, see a Setup, Printer, or Options button, click it. Note: If you...
... next screen. 16 Printing From Start to the R1900 Series, see the on -screen Reference Guide for instructions. Select EPSON Stylus Photo R1900 Series and click the Preferences or Properties button. To print photos directly from your Windows® or Macintosh® computer. For detailed instructions, see a Setup, Printer, or Options button, click it. Note: If you...
User's Guide - PDF
Page 29
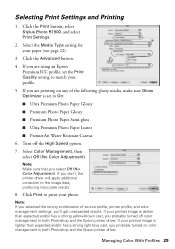
... button. 4. Select the Media Type setting for your photo. If you 'll get unexpected results. Turn off color management in both Photoshop and the Epson printer driver. Note: If you selected the wrong combination of... the following glossy media, make sure Gloss Optimizer is lighter than expected and/or has a strong yellow-brown cast, you are printing on color management in both Photoshop and the Epson printer driver. Selecting Print Settings and Printing 1. Click the Print button, select Stylus Photo R1900...
... button. 4. Select the Media Type setting for your photo. If you 'll get unexpected results. Turn off color management in both Photoshop and the Epson printer driver. Note: If you selected the wrong combination of... the following glossy media, make sure Gloss Optimizer is lighter than expected and/or has a strong yellow-brown cast, you are printing on color management in both Photoshop and the Epson printer driver. Selecting Print Settings and Printing 1. Click the Print button, select Stylus Photo R1900...


