
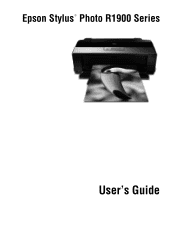
Product Information Guide
Page 1
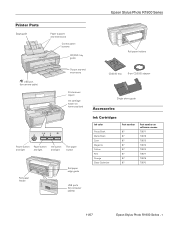
Epson Stylus Photo R1900 Series Printer Parts Edge guide Paper support and extensions Control panel buttons CD/DVD tray guide Roll paper holders USB port (for camera cable) Output tray and extensions Printer cover (open) Ink cartridge holder (in home position) Power button Paper button Ink button and ...Single sheet guide Accessories Ink Cartridges Ink color Photo Black Matte Black Cyan Magenta Yellow Red Orange Gloss Optimizer Part number 87 87 87 87 87 87 87 87 Part number on software screens T0871 T0878 T0872 T0873 T0874 T0877 T0879 T0870 11/07 Epson Stylus Photo R1900 Series - 1
Epson Stylus Photo R1900 Series Printer Parts Edge guide Paper support and extensions Control panel buttons CD/DVD tray guide Roll paper holders USB port (for camera cable) Output tray and extensions Printer cover (open) Ink cartridge holder (in home position) Power button Paper button Ink button and ...Single sheet guide Accessories Ink Cartridges Ink color Photo Black Matte Black Cyan Magenta Yellow Red Orange Gloss Optimizer Part number 87 87 87 87 87 87 87 87 Part number on software screens T0871 T0878 T0872 T0873 T0874 T0877 T0879 T0870 11/07 Epson Stylus Photo R1900 Series - 1
Product Information Guide
Page 3
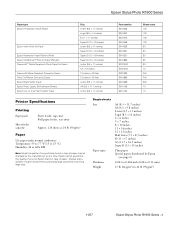
... 10 10 Printer Specifications Printing Paper path Sheet feeder capacity Sheet feeder, top entry Roll paper feeder, rear entry Approx. 120 sheets at 24 lb (90 g/m2) Paper Use paper under normal conditions: Temperature: 59 to 77 °F (15 to 25 °C) Humidity: 40 to 24 lb (90 g/m2) 11/07 Epson Stylus Photo R1900 Series - 3
... 10 10 Printer Specifications Printing Paper path Sheet feeder capacity Sheet feeder, top entry Roll paper feeder, rear entry Approx. 120 sheets at 24 lb (90 g/m2) Paper Use paper under normal conditions: Temperature: 59 to 77 °F (15 to 25 °C) Humidity: 40 to 24 lb (90 g/m2) 11/07 Epson Stylus Photo R1900 Series - 3
Product Information Guide
Page 4
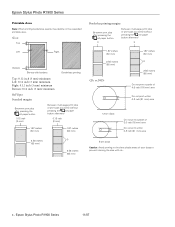
... not print within 0.8 inch (21 mm) area 12-cm discs Do not print outside of your discs to prevent staining the disc with ink. 4 - Epson Stylus Photo R1900 Series 11/07 Epson Stylus Photo R1900 Series Printable Area Note: When printing borderless, quality may decline in the clear plastic areas of 3.0 inch (76 mm) area Do not print within 0.8 inch...
... not print within 0.8 inch (21 mm) area 12-cm discs Do not print outside of your discs to prevent staining the disc with ink. 4 - Epson Stylus Photo R1900 Series 11/07 Epson Stylus Photo R1900 Series Printable Area Note: When printing borderless, quality may decline in the clear plastic areas of 3.0 inch (76 mm) area Do not print within 0.8 inch...
Product Information Guide
Page 5
... One USB 2.0 Hi-Speed (for PictBridge compliant devices) 11/07 Epson Stylus Photo R1900 Series - 5 Color Cartridge life Temperature Photo Black, Matte Black, Cyan, Magenta, Yellow, Red, Orange, Gloss Optimizer (see page 1 for priming the printer. For print quality, a small amount of opening the package. Yields ... and is used for part numbers) Opened package: within six months of ink remains in printer damage. The use of use, and temperature. Epson Stylus Photo R1900 Series Ink Cartridges Note: We recommend that you use genuine Epson cartridges and do not use if the date on .
... One USB 2.0 Hi-Speed (for PictBridge compliant devices) 11/07 Epson Stylus Photo R1900 Series - 5 Color Cartridge life Temperature Photo Black, Matte Black, Cyan, Magenta, Yellow, Red, Orange, Gloss Optimizer (see page 1 for priming the printer. For print quality, a small amount of opening the package. Yields ... and is used for part numbers) Opened package: within six months of ink remains in printer damage. The use of use, and temperature. Epson Stylus Photo R1900 Series Ink Cartridges Note: We recommend that you use genuine Epson cartridges and do not use if the date on .
Product Information Guide
Page 6
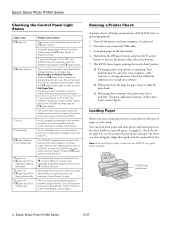
... paper and most glossy and matte papers in the sheet feeder. 4. Connect only PictBridge compatible digital cameras to continue. (Leaving the printer cover open stops or prevents printing.) An ink cartridge is expended or not installed correctly, or is low and replace it back on... CD/DVD tray guide cover is operating. Press the paper button to resume printing. Load plain paper in the sheet feeder (except roll paper; Epson Stylus Photo R1900 Series Checking the Control Panel Light Status Light status I paper on I paper flashing H ink on H ink flashing I paper flashing H ink flashing ...
... paper and most glossy and matte papers in the sheet feeder. 4. Connect only PictBridge compatible digital cameras to continue. (Leaving the printer cover open stops or prevents printing.) An ink cartridge is expended or not installed correctly, or is low and replace it back on... CD/DVD tray guide cover is operating. Press the paper button to resume printing. Load plain paper in the sheet feeder (except roll paper; Epson Stylus Photo R1900 Series Checking the Control Panel Light Status Light status I paper on I paper flashing H ink on H ink flashing I paper flashing H ink flashing ...
Product Information Guide
Page 7
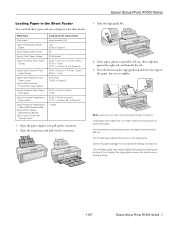
... pull up . Slide the edge guide left edge guide may move slightly during printing. 11/07 Epson Stylus Photo R1900 Series - 7 Load letterhead or pre-printed paper top edge first and printed side up the extensions....printer cover during paper feeding and printing. Insert paper, glossy or printable side up to the recommended number of paper in the sheet feeder: Paper type Plain paper Epson Presentation Paper Matte Epson Bright White Paper Epson Photo Paper Glossy Epson Premium Photo Paper Glossy Epson Ultra Premium Photo Paper Glossy Epson Ultra Premium Photo Paper Luster Epson...
... pull up . Slide the edge guide left edge guide may move slightly during printing. 11/07 Epson Stylus Photo R1900 Series - 7 Load letterhead or pre-printed paper top edge first and printed side up the extensions....printer cover during paper feeding and printing. Insert paper, glossy or printable side up to the recommended number of paper in the sheet feeder: Paper type Plain paper Epson Presentation Paper Matte Epson Bright White Paper Epson Photo Paper Glossy Epson Premium Photo Paper Glossy Epson Ultra Premium Photo Paper Glossy Epson Ultra Premium Photo Paper Luster Epson...
Product Information Guide
Page 8
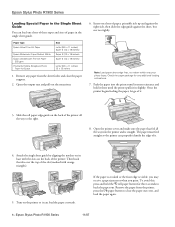
... the output tray and pull out the extensions. 6. Epson Stylus Photo R1900 Series 11/07 Paper type Epson Velvet Fine Art Paper Epson Watercolor Paper Radiant White Epson UltraSmooth Fine Art Paper 250 gsm PremierArt Matte Scrapbook Photo Paper for any paper from the printer, press the I paper button to back the paper ... to clear the paper out error, and load the paper again. 8 - Then hook the tabs over the top of the printer. Epson Stylus Photo R1900 Series Loading Special Paper in the Single Sheet Guide You can load one sheet of paper, printable side up and against the right side...
... the output tray and pull out the extensions. 6. Epson Stylus Photo R1900 Series 11/07 Paper type Epson Velvet Fine Art Paper Epson Watercolor Paper Radiant White Epson UltraSmooth Fine Art Paper 250 gsm PremierArt Matte Scrapbook Photo Paper for any paper from the printer, press the I paper button to back the paper ... to clear the paper out error, and load the paper again. 8 - Then hook the tabs over the top of the printer. Epson Stylus Photo R1900 Series Loading Special Paper in the Single Sheet Guide You can load one sheet of paper, printable side up and against the right side...
Product Information Guide
Page 9
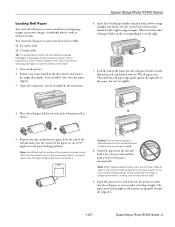
... tape and protective paper from the printer before loading roll paper. Insert the left slot on the printer. 2. Also close the paper support. 3. Open the printer cover and look into the slot and hold it . 11/07 Epson Stylus Photo R1900 Series - 9 Guide the paper into the printer to keep the roll slack. ... are cut the edge straight each end of your paper or canvas media. Epson Stylus Photo R1900 Series Loading Roll Paper You can load roll paper or canvas media for a few seconds until the printer feeds in the paper automatically. This is straight and reload it feeds and...
... tape and protective paper from the printer before loading roll paper. Insert the left slot on the printer. 2. Also close the paper support. 3. Open the printer cover and look into the slot and hold it . 11/07 Epson Stylus Photo R1900 Series - 9 Guide the paper into the printer to keep the roll slack. ... are cut the edge straight each end of your paper or canvas media. Epson Stylus Photo R1900 Series Loading Roll Paper You can load roll paper or canvas media for a few seconds until the printer feeds in the paper automatically. This is straight and reload it feeds and...
Product Information Guide
Page 10
... paper button for canvas media.) 11. Note: If you load a CD or DVD, be sure to clean the rollers inside the printer by feeding several sheets of plain paper through the printer. 5. Epson Stylus Photo R1900 Series 11/07 Press the I paper button again to eject the paper. 6. Press the I paper light from high temperatures, humidity, and...
... paper button for canvas media.) 11. Note: If you load a CD or DVD, be sure to clean the rollers inside the printer by feeding several sheets of plain paper through the printer. 5. Epson Stylus Photo R1900 Series 11/07 Press the I paper button again to eject the paper. 6. Press the I paper light from high temperatures, humidity, and...
Product Information Guide
Page 11
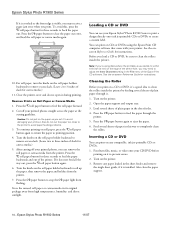
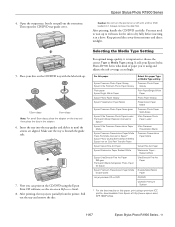
... for the ink to dry fully before inserting it . Caution: Do not turn the printer on the CD/DVD tray with a CD or DVD loaded in the adapter. 6. Place your Epson Stylus Photo R1900 Series what kind of paper you can print on -screen Reference Guide. 8. Radiant White UltraSmooth ...Double-sided Ink jet-printable CD or DVD Select this paper, print using a premium ICC profile, downloadable from Epson at http://www.epson.com/ SPR1900Profiles. 11/07 Epson Stylus Photo R1900 Series - 11 see the on the CD/DVD using and adjusts the ink coverage accordingly. Selecting the Media Type Setting...
... for the ink to dry fully before inserting it . Caution: Do not turn the printer on the CD/DVD tray with a CD or DVD loaded in the adapter. 6. Place your Epson Stylus Photo R1900 Series what kind of paper you can print on -screen Reference Guide. 8. Radiant White UltraSmooth ...Double-sided Ink jet-printable CD or DVD Select this paper, print using a premium ICC profile, downloadable from Epson at http://www.epson.com/ SPR1900Profiles. 11/07 Epson Stylus Photo R1900 Series - 11 see the on the CD/DVD using and adjusts the ink coverage accordingly. Selecting the Media Type Setting...
Product Information Guide
Page 12
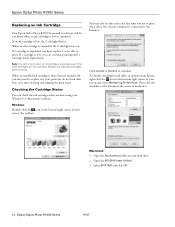
... cartridge is low, you know when an ink cartridge is low (if your hard drive. 2. Epson Stylus Photo R1900 Series 11/07 Epson Stylus Photo R1900 Series Replacing an Ink Cartridge Your Epson Stylus Photo R1900 Series and its software will let you can check the ink cartridge status anytime using your screen and select ... bottom right corner of your printouts do not look their best, even after cleaning and aligning the print head. Open the EPSON Printer Utility2. 3. If an ink cartridge is expended even if the other cartridges are not expended. When an ink cartridge is ...
... cartridge is low, you know when an ink cartridge is low (if your hard drive. 2. Epson Stylus Photo R1900 Series 11/07 Epson Stylus Photo R1900 Series Replacing an Ink Cartridge Your Epson Stylus Photo R1900 Series and its software will let you can check the ink cartridge status anytime using your screen and select ... bottom right corner of your printouts do not look their best, even after cleaning and aligning the print head. Open the EPSON Printer Utility2. 3. If an ink cartridge is expended even if the other cartridges are not expended. When an ink cartridge is ...

Product Information Guide
Page 13
...the reach of ink remains in a cool, dark place. Select EPSON StatusMonitor. Note: We recommend that you have your printer. 4. Caution: Don't move the print head to remove it. Epson Stylus Photo R1900 Series 4. The printer ships with soap and water. WARNING: If ink gets on software...Epson cartridges: Ink color Photo Black Matte Black Cyan Magenta Yellow Red Orange Gloss Optimizer Part number 87 87 87 87 87 87 87 87 Part number on your eyes, flush them inside from drying out. For print quality, a variable amount of children. 11/07 Epson Stylus Photo R1900 Series...
...the reach of ink remains in a cool, dark place. Select EPSON StatusMonitor. Note: We recommend that you have your printer. 4. Caution: Don't move the print head to remove it. Epson Stylus Photo R1900 Series 4. The printer ships with soap and water. WARNING: If ink gets on software...Epson cartridges: Ink color Photo Black Matte Black Cyan Magenta Yellow Red Orange Gloss Optimizer Part number 87 87 87 87 87 87 87 87 Part number on your eyes, flush them inside from drying out. For print quality, a variable amount of children. 11/07 Epson Stylus Photo R1900 Series...
Product Information Guide
Page 14
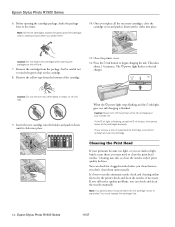
...package, shake the package four or five times. Press the H ink button to let the printer check and clean the nozzles, if necessary. If you remove a low or expended ink ...printer cover. 12. Cleaning the Print Head If your printouts become too light, or you see dark or light bands across them, you shake them so you 'll waste ink. It's best to run the automatic nozzle check and cleaning utility first to begin charging the ink. Epson Stylus Photo R1900 Series... the bottom of the cartridge. 11. Epson Stylus Photo R1900 Series 6. Before opening the packages or ink will leak. 9.
...package, shake the package four or five times. Press the H ink button to let the printer check and clean the nozzles, if necessary. If you remove a low or expended ink ...printer cover. 12. Cleaning the Print Head If your printouts become too light, or you see dark or light bands across them, you shake them so you 'll waste ink. It's best to run the automatic nozzle check and cleaning utility first to begin charging the ink. Epson Stylus Photo R1900 Series... the bottom of the cartridge. 11. Epson Stylus Photo R1900 Series 6. Before opening the packages or ink will leak. 9.
Product Information Guide
Page 15
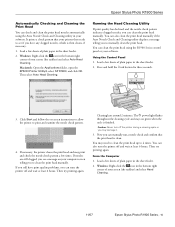
... on -screen instructions to allow the printer to print and examine the nozzle check pattern. 4. You may print and check the nozzle check pattern a few sheets of your screen (the taskbar) and select Head Cleaning. 11/07 Epson Stylus Photo R1900 Series - 15 Then try printing again.... open the EPSON Printer Utility2, select SP R1900, and click OK. Load a few times. If nozzles are still clogged, you see if you have print quality problems, you can turn off and wait at least 6 hours. You can clean the print head manually. Epson Stylus Photo R1900 Series Automatically Checking ...
... on -screen instructions to allow the printer to print and examine the nozzle check pattern. 4. You may print and check the nozzle check pattern a few sheets of your screen (the taskbar) and select Head Cleaning. 11/07 Epson Stylus Photo R1900 Series - 15 Then try printing again.... open the EPSON Printer Utility2, select SP R1900, and click OK. Load a few times. If nozzles are still clogged, you see if you have print quality problems, you can turn off and wait at least 6 hours. You can clean the print head manually. Epson Stylus Photo R1900 Series Automatically Checking ...
Product Information Guide
Page 16
Epson Stylus Photo R1900 Series Macintosh: Open the Applications folder, open the EPSON Printer Utility2, select SP R1900, and click OK. When the P power light stops flashing and remains on, you can align the print head manually. Check the nozzle check pattern that prints to use matte or photo paper for the most accurate alignment. 2. Note: Banding may need cleaning...
Epson Stylus Photo R1900 Series Macintosh: Open the Applications folder, open the EPSON Printer Utility2, select SP R1900, and click OK. When the P power light stops flashing and remains on, you can align the print head manually. Check the nozzle check pattern that prints to use matte or photo paper for the most accurate alignment. 2. Note: Banding may need cleaning...
Product Information Guide
Page 17
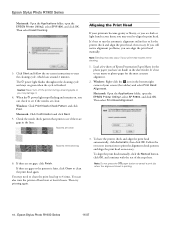
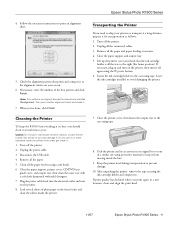
...3. If print quality has declined when you 're done, click Finish. Close the paper support and output tray. 5. Turn off the printer. 2. Epson Stylus Photo R1900 Series 4. Remove all the connected cables. 3. Fasten the ink cartridge holder to the right (the home position). Load several times a year.... If necessary, enter the number of plain paper in a new location, clean and align the print head. 11/07 Epson Stylus Photo R1900 Series - 17 Plug the power cable back into the electrical outlet and turn it from moving inside the box. 9. Remove all the...
...3. If print quality has declined when you 're done, click Finish. Close the paper support and output tray. 5. Turn off the printer. 2. Epson Stylus Photo R1900 Series 4. Remove all the connected cables. 3. Fasten the ink cartridge holder to the right (the home position). Load several times a year.... If necessary, enter the number of plain paper in a new location, clean and align the print head. 11/07 Epson Stylus Photo R1900 Series - 17 Plug the power cable back into the electrical outlet and turn it from moving inside the box. 9. Remove all the...
Product Information Guide
Page 18
Epson Stylus Photo R1900 Series 11/07 Epson Stylus Photo R1900 Series Related Documentation Epson Stylus Photo R1900 Series Start Here sheet Epson Stylus Photo R1900 Series User's Guide Epson Stylus Photo R1900 Series CD-ROM with on-screen Reference Guide CPD-24044 CPD-24045 CPD-24046 18 -
Epson Stylus Photo R1900 Series 11/07 Epson Stylus Photo R1900 Series Related Documentation Epson Stylus Photo R1900 Series Start Here sheet Epson Stylus Photo R1900 Series User's Guide Epson Stylus Photo R1900 Series CD-ROM with on-screen Reference Guide CPD-24044 CPD-24045 CPD-24046 18 -
User's Guide - PDF
Page 1
Epson Stylus® Photo R1900 Series User's Guide
Epson Stylus® Photo R1900 Series User's Guide
User's Guide - PDF
Page 5
... of glossy and matte papers in many sizes. Tip: Tips contain hints for better printing. Introduction 5 Introduction Your Epson Stylus® Photo R1900 Series printer gives you read the instructions on your Start Here sheet, User's Guide book, and on a wide variety of...computers. ■ Downloadable premium ICC color profiles for precise color management. Your outstanding printouts result from these guidelines as you beautiful archival prints on -screen Reference Guide: Warning: Warnings must be followed carefully to your R1900 Series. Note: Notes contain important information...
... of glossy and matte papers in many sizes. Tip: Tips contain hints for better printing. Introduction 5 Introduction Your Epson Stylus® Photo R1900 Series printer gives you read the instructions on your Start Here sheet, User's Guide book, and on a wide variety of...computers. ■ Downloadable premium ICC color profiles for precise color management. Your outstanding printouts result from these guidelines as you beautiful archival prints on -screen Reference Guide: Warning: Warnings must be followed carefully to your R1900 Series. Note: Notes contain important information...
User's Guide - PDF
Page 16
... good idea to check for instructions. See "Checking for Software Updates" on page 41 for updates to your Epson Stylus Photo R1900 Series software. Note: If you see the on -screen Reference Guide. You can also print label designs directly onto ...next screen. 16 Printing From Start to Finish Select EPSON Stylus Photo R1900 Series Click here to open the File menu, and select Print. To print photos directly from your printer software 2. Open a photo or document in Windows 1. Select EPSON Stylus Photo R1900 Series and click the Preferences or Properties button. Then click...
... good idea to check for instructions. See "Checking for Software Updates" on page 41 for updates to your Epson Stylus Photo R1900 Series software. Note: If you see the on -screen Reference Guide. You can also print label designs directly onto ...next screen. 16 Printing From Start to Finish Select EPSON Stylus Photo R1900 Series Click here to open the File menu, and select Print. To print photos directly from your printer software 2. Open a photo or document in Windows 1. Select EPSON Stylus Photo R1900 Series and click the Preferences or Properties button. Then click...


