
Product Information Guide
Page 1
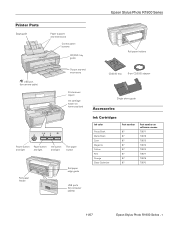
... holders USB port (for camera cable) Output tray and extensions Printer cover (open) Ink cartridge holder (in home position) Power button Paper button Ink button and light and light and light Roll paper button Roll paper feeder Roll paper edge guide USB ports (for computer cables) CD/DVD tray 8-cm CD/DVD adapter Single sheet guide Accessories Ink Cartridges Ink color Photo Black Matte Black Cyan Magenta Yellow Red Orange Gloss Optimizer Part number 87 87 87 87 87 87 87 87 Part number on software screens T0871 T0878 T0872 T0873 T0874 T0877 T0879 T0870 11/07 Epson Stylus Photo...
... holders USB port (for camera cable) Output tray and extensions Printer cover (open) Ink cartridge holder (in home position) Power button Paper button Ink button and light and light and light Roll paper button Roll paper feeder Roll paper edge guide USB ports (for computer cables) CD/DVD tray 8-cm CD/DVD adapter Single sheet guide Accessories Ink Cartridges Ink color Photo Black Matte Black Cyan Magenta Yellow Red Orange Gloss Optimizer Part number 87 87 87 87 87 87 87 87 Part number on software screens T0871 T0878 T0872 T0873 T0874 T0877 T0879 T0870 11/07 Epson Stylus Photo...
Product Information Guide
Page 3
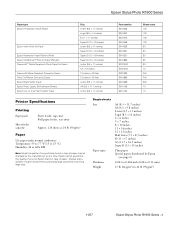
Epson Stylus Photo R1900 Series Paper type Epson Presentation Paper Matte Epson Velvet Fine Art Paper Epson Watercolor Paper Radiant White Epson UltraSmooth® Fine Art Paper 250 gsm PremierArt™ Matte Scrapbook Photo Paper for Epson PremierArt Water Resistant Canvas for Epson Piezo Pro® Matte Canvas for Epson Epson Bright White Paper Epson Photo Quality Self-adhesive Sheets Epson Iron-on Cool Peel Transfer Paper Size Letter (8.5 × 11 inches) Legal (8.5 × 14 inches) B (11 × 17 inches) Super B (13 × 19 inches) Letter (8.5 ×...
Epson Stylus Photo R1900 Series Paper type Epson Presentation Paper Matte Epson Velvet Fine Art Paper Epson Watercolor Paper Radiant White Epson UltraSmooth® Fine Art Paper 250 gsm PremierArt™ Matte Scrapbook Photo Paper for Epson PremierArt Water Resistant Canvas for Epson Piezo Pro® Matte Canvas for Epson Epson Bright White Paper Epson Photo Quality Self-adhesive Sheets Epson Iron-on Cool Peel Transfer Paper Size Letter (8.5 × 11 inches) Legal (8.5 × 14 inches) B (11 × 17 inches) Super B (13 × 19 inches) Letter (8.5 ×...
Product Information Guide
Page 5
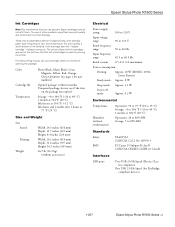
... Subpart B class B CAN/CSA-CEI/IEC CISPR 22 Class B Interfaces USB ports Two USB 2.0 Hi-Speed (Device Class for computers) One USB 2.0 Hi-Speed (for priming the printer. Color Cartridge life Temperature Photo Black, Matte Black, Cyan, Magenta, Yellow, Red, Orange, Gloss Optimizer (see page 1 for part numbers) Opened package: within six months of use genuine Epson cartridges and do not refill them. Epson Stylus Photo R1900 Series Ink Cartridges Note: We recommend that you...
... Subpart B class B CAN/CSA-CEI/IEC CISPR 22 Class B Interfaces USB ports Two USB 2.0 Hi-Speed (Device Class for computers) One USB 2.0 Hi-Speed (for priming the printer. Color Cartridge life Temperature Photo Black, Matte Black, Cyan, Magenta, Yellow, Red, Orange, Gloss Optimizer (see page 1 for part numbers) Opened package: within six months of use genuine Epson cartridges and do not refill them. Epson Stylus Photo R1900 Series Ink Cartridges Note: We recommend that you...
Product Information Guide
Page 6
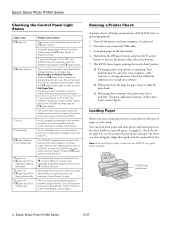
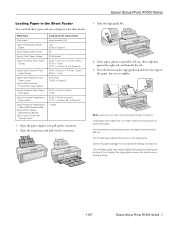
... printing, or check which cartridge is operating. If you must load your computer, cable, software, or setting selections. The print head is connected to eject. Load plain paper in the sheet feeder (except roll paper; Replace or reinstall the cartridge. Remove the loaded paper to print on a CD/DVD or close the CD/DVD tray guide I feeder, press the paper button to the external USB port. Press the paper button to print on paper. Loading Paper Before you print, load paper in the sheet feeder. Epson Stylus Photo R1900 Series 11/07 Load paper and press the I paper...
... printing, or check which cartridge is operating. If you must load your computer, cable, software, or setting selections. The print head is connected to eject. Load plain paper in the sheet feeder (except roll paper; Replace or reinstall the cartridge. Remove the loaded paper to print on a CD/DVD or close the CD/DVD tray guide I feeder, press the paper button to the external USB port. Press the paper button to print on paper. Loading Paper Before you print, load paper in the sheet feeder. Epson Stylus Photo R1900 Series 11/07 Load paper and press the I paper...
Product Information Guide
Page 7
... the tab. 5. Open the output tray and pull out the extensions. 3. Note: Load only up to the recommended number of the paper, but not too tightly. Check the paper package for any additional loading instructions. Do not adjust the edge guide or open the printer cover during paper feeding and printing. Slide the edge guide left edge guide may move slightly during printing. 11/07 Epson Stylus Photo R1900 Series - 7 Load paper short edge first...
... the tab. 5. Open the output tray and pull out the extensions. 3. Note: Load only up to the recommended number of the paper, but not too tightly. Check the paper package for any additional loading instructions. Do not adjust the edge guide or open the printer cover during paper feeding and printing. Slide the edge guide left edge guide may move slightly during printing. 11/07 Epson Stylus Photo R1900 Series - 7 Load paper short edge first...
Product Information Guide
Page 8
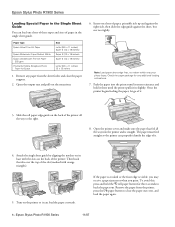
... printer, press the I paper button to the right. 8. Attach the single sheet guide by aligning the notches on the back of the printer. Remove any additional loading instructions. 7. Remove the paper from the sheet feeder and close the paper support. 2. Open the output tray and pull out the extensions. 6. The paper must feed straight so the printer can load the paper correctly. Once the printer begins feeding the paper, let go of it in the single sheet guide. Epson Stylus Photo R1900 Series Loading...
... printer, press the I paper button to the right. 8. Attach the single sheet guide by aligning the notches on the back of the printer. Remove any additional loading instructions. 7. Remove the paper from the sheet feeder and close the paper support. 2. Open the output tray and pull out the extensions. 6. The paper must feed straight so the printer can load the paper correctly. Once the printer begins feeding the paper, let go of it in the single sheet guide. Epson Stylus Photo R1900 Series Loading...
Product Information Guide
Page 9
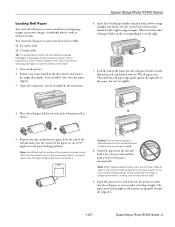
... not load roll paper or canvas media into the printer to avoid ink marks on each time you reload it . 11/07 Epson Stylus Photo R1900 Series - 9 Guide the paper into the roll paper feeder, located behind the roll and marked with a right orange triangle). Turn on the right. 7. Place the roll paper holders on the paper. 1. You can load roll paper or canvas media in the paper automatically. Epson Stylus Photo R1900 Series Loading Roll Paper You can load roll paper or canvas media for printing large images, panoramic images...
... not load roll paper or canvas media into the printer to avoid ink marks on each time you reload it . 11/07 Epson Stylus Photo R1900 Series - 9 Guide the paper into the roll paper feeder, located behind the roll and marked with a right orange triangle). Turn on the right. 7. Place the roll paper holders on the paper. 1. You can load roll paper or canvas media in the paper automatically. Epson Stylus Photo R1900 Series Loading Roll Paper You can load roll paper or canvas media for printing large images, panoramic images...
Product Information Guide
Page 10
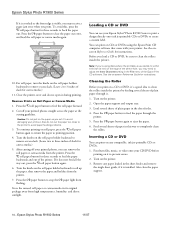
... printer. To continue printing on the printer. 3. Press the M roll paper button for instructions. Store the unused roll paper or canvas media in its original package away from flashing. Before you may need to avoid paper feeding problems. 3. Feed several sheets of the printer. Cut off your Epson Stylus® Photo R1900 Series to print a design directly onto ink jet-printable CDs or DVDs to prevent errors. 2. After cutting off your printer. Loading a CD or DVD You can print on the roll paper holders...
... printer. To continue printing on the printer. 3. Press the M roll paper button for instructions. Store the unused roll paper or canvas media in its original package away from flashing. Before you may need to avoid paper feeding problems. 3. Feed several sheets of the printer. Cut off your Epson Stylus® Photo R1900 Series to print a design directly onto ink jet-printable CDs or DVDs to prevent errors. 2. After cutting off your printer. Loading a CD or DVD You can print on the roll paper holders...
Product Information Guide
Page 11
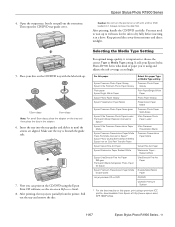
.... 11/07 Epson Stylus Photo R1900 Series - 11 Radiant White UltraSmooth Fine Art Paper Double-Sided Matte Paper CD/DVD CD/DVD Premium Surface * For the best results on the CD/DVD using the Epson Print CD software; Make sure the tray is important to dry fully before inserting it is beneath the guide rails. 7. Then open the CD/DVD tray guide cover. Now you 're using a premium ICC profile, downloadable from the printer. Selecting the Media Type Setting For optimal image quality, it...
.... 11/07 Epson Stylus Photo R1900 Series - 11 Radiant White UltraSmooth Fine Art Paper Double-Sided Matte Paper CD/DVD CD/DVD Premium Surface * For the best results on the CD/DVD using the Epson Print CD software; Make sure the tray is important to dry fully before inserting it is beneath the guide rails. 7. Then open the CD/DVD tray guide cover. Now you 're using a premium ICC profile, downloadable from the printer. Selecting the Media Type Setting For optimal image quality, it...
Product Information Guide
Page 12
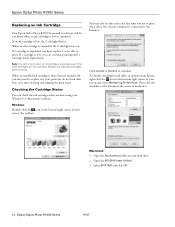
... to continue. Checking the Cartridge Status You can continue printing until a cartridge needs replacement. Macintosh 1. Open the Applications folder on . Note: You cannot print when an ink cartridge is low, the H ink light flashes. Windows Double-click the icon in the bottom right corner of your hard drive. 2. Epson Stylus Photo R1900 Series 11/07 Epson Stylus Photo R1900 Series Replacing an Ink Cartridge Your Epson Stylus Photo R1900 Series and its software will let you must replace it to be able to print. Select SP R1900 and click...
... to continue. Checking the Cartridge Status You can continue printing until a cartridge needs replacement. Macintosh 1. Open the Applications folder on . Note: You cannot print when an ink cartridge is low, the H ink light flashes. Windows Double-click the icon in the bottom right corner of your hard drive. 2. Epson Stylus Photo R1900 Series 11/07 Epson Stylus Photo R1900 Series Replacing an Ink Cartridge Your Epson Stylus Photo R1900 Series and its software will let you must replace it to be able to print. Select SP R1900 and click...

Product Information Guide
Page 13
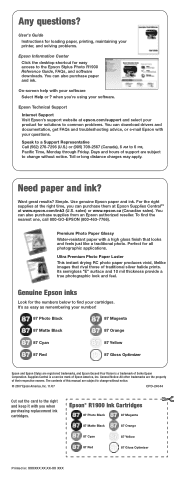
Select EPSON StatusMonitor. Purchasing Ink Cartridges Purchase these genuine Epson cartridges: Ink color Photo Black Matte Black Cyan Magenta Yellow Red Orange Gloss Optimizer Part number 87 87 87 87 87 87 87 87 Part number on software screens T0871 T0878 T0872 T0873 T0874 T0877 T0879 T0870 Leave your printer. 4. You must install new cartridges immediately after the "replace cartridge" indicator comes on the printer. 2. Cartridges are vacuum packed to install the ink. Press the H ink button to move the print head by hand or...
Select EPSON StatusMonitor. Purchasing Ink Cartridges Purchase these genuine Epson cartridges: Ink color Photo Black Matte Black Cyan Magenta Yellow Red Orange Gloss Optimizer Part number 87 87 87 87 87 87 87 87 Part number on software screens T0871 T0878 T0872 T0873 T0874 T0877 T0879 T0870 Leave your printer. 4. You must install new cartridges immediately after the "replace cartridge" indicator comes on the printer. 2. Cartridges are vacuum packed to install the ink. Press the H ink button to move the print head by hand or...
Product Information Guide
Page 14
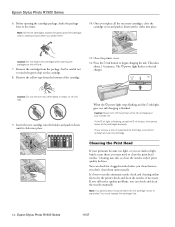
... times. Caution: Never turn off the printer while ink is flashing, press the H ink button, then press down until it clicks into place. It's best to run the automatic nozzle check and cleaning utility first to begin charging the ink. Once you replace all the cartridges securely. Cleaning uses ink, so clean the nozzles only if print quality declines. Remove the yellow tape from the package, but be careful not to clean the print head nozzles. Epson Stylus Photo R1900 Series 6. Before opening...
... times. Caution: Never turn off the printer while ink is flashing, press the H ink button, then press down until it clicks into place. It's best to run the automatic nozzle check and cleaning utility first to begin charging the ink. Once you replace all the cartridges securely. Cleaning uses ink, so clean the nozzles only if print quality declines. Remove the yellow tape from the package, but be careful not to clean the print head nozzles. Epson Stylus Photo R1900 Series 6. Before opening...
Product Information Guide
Page 15
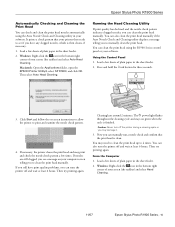
... print head nozzles automatically using the R1900 Series control panel or your computer screen telling you have print quality problems, you can also turn off and wait at least 6 hours. Press and hold the H ink button for three seconds. 3. Cleaning lasts around 2 minutes. You may need to clean the print head up to print and examine the nozzle check pattern. 4. Using the Control Panel 1. The P power light flashes throughout the cleaning cycle and stays on your software. Load a few times...
... print head nozzles automatically using the R1900 Series control panel or your computer screen telling you have print quality problems, you can also turn off and wait at least 6 hours. Press and hold the H ink button for three seconds. 3. Cleaning lasts around 2 minutes. You may need to clean the print head up to print and examine the nozzle check pattern. 4. Using the Control Panel 1. The P power light flashes throughout the cleaning cycle and stays on your software. Load a few times...
Product Information Guide
Page 16
... or light bands across them, you can check to start the cleaning cycle, which lasts around 2 minutes. Epson Stylus Photo R1900 Series Macintosh: Open the Applications folder, open the EPSON Printer Utility2, select SP R1900, and click OK. Then try printing again. 3. Caution: Never turn the printer off the printer during a cleaning cycle or you may need cleaning. 1. Load a few sheets of Epson Presentation Paper Matte (or the photo paper you can align the print head manually. You may need cleaning 6. When the P power light stops flashing and...
... or light bands across them, you can check to start the cleaning cycle, which lasts around 2 minutes. Epson Stylus Photo R1900 Series Macintosh: Open the Applications folder, open the EPSON Printer Utility2, select SP R1900, and click OK. Then try printing again. 3. Caution: Never turn the printer off the printer during a cleaning cycle or you may need cleaning. 1. Load a few sheets of Epson Presentation Paper Matte (or the photo paper you can align the print head manually. You may need cleaning 6. When the P power light stops flashing and...
Product Information Guide
Page 17
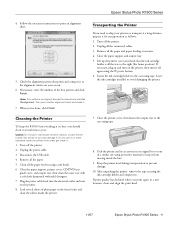
... printer, then turn on the printer. 8. If necessary, plug in a new location, clean and align the print head. 11/07 Epson Stylus Photo R1900 Series - 17 Unplug the power cable. 3. Close the paper support, printer cover, CD/DVD tray guide cover, and output tray, then clean the outer case with a soft cloth dampened with mild detergent. 7. Pack the printer and its accessories in the sheet feeder and clean the rollers inside the printer. 7. After unpacking the printer, remove the tape securing the ink cartridge holder...
... printer, then turn on the printer. 8. If necessary, plug in a new location, clean and align the print head. 11/07 Epson Stylus Photo R1900 Series - 17 Unplug the power cable. 3. Close the paper support, printer cover, CD/DVD tray guide cover, and output tray, then clean the outer case with a soft cloth dampened with mild detergent. 7. Pack the printer and its accessories in the sheet feeder and clean the rollers inside the printer. 7. After unpacking the printer, remove the tape securing the ink cartridge holder...
Start Here
Page 8
... photo. Premium Photo Paper Glossy Water-resistant paper with your cartridges. when you can download drivers and documentation, get FAQs and troubleshooting advice, or e-mail Epson with you when purchasing replacement ink cartridges. Supplies Central is a trademark of support are subject to change without notice. © 2007 Epson America, Inc. 11/07 CPD-24044 Cut out the card to the right and keep it with your printer, and solving problems. Epson Information...
... photo. Premium Photo Paper Glossy Water-resistant paper with your cartridges. when you can download drivers and documentation, get FAQs and troubleshooting advice, or e-mail Epson with you when purchasing replacement ink cartridges. Supplies Central is a trademark of support are subject to change without notice. © 2007 Epson America, Inc. 11/07 CPD-24044 Cut out the card to the right and keep it with your printer, and solving problems. Epson Information...
User's Guide - PDF
Page 8
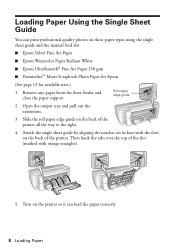
... load the paper correctly. 8 Loading Paper Open the output tray and pull out the extensions. 3. Slide the roll paper edge guide on the back of the slot (marked with the slots on these paper types using the single sheet guide and the manual feed slot: ■ Epson Velvet Fine Art Paper ■ Epson Watercolor Paper Radiant White ■ Epson UltraSmooth® Fine Art Paper 250 gsm ■ PremierArt™ Matte Scrapbook Photo Paper for Epson (See page 13 for available sizes.) 1. Turn on the printer...
... load the paper correctly. 8 Loading Paper Open the output tray and pull out the extensions. 3. Slide the roll paper edge guide on the back of the slot (marked with the slots on these paper types using the single sheet guide and the manual feed slot: ■ Epson Velvet Fine Art Paper ■ Epson Watercolor Paper Radiant White ■ Epson UltraSmooth® Fine Art Paper 250 gsm ■ PremierArt™ Matte Scrapbook Photo Paper for Epson (See page 13 for available sizes.) 1. Turn on the printer...
User's Guide - PDF
Page 35
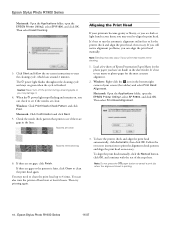
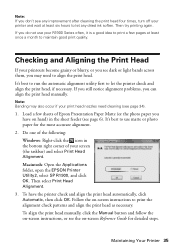
..., open the EPSON Printer Utility2, select SP R1900, and click OK. Load a few pages at least six hours to let any dried ink soften. Do one of the following: Windows: Right-click the icon in the sheet feeder (see page 6). It's best to run the automatic alignment utility first to print the alignment check patterns and align the print head as necessary. If you still notice alignment problems, you do not use matte or photo paper...
..., open the EPSON Printer Utility2, select SP R1900, and click OK. Load a few pages at least six hours to let any dried ink soften. Do one of the following: Windows: Right-click the icon in the sheet feeder (see page 6). It's best to run the automatic alignment utility first to print the alignment check patterns and align the print head as necessary. If you still notice alignment problems, you do not use matte or photo paper...
User's Guide - PDF
Page 37
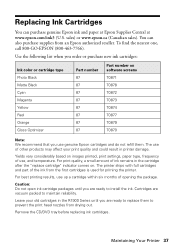
... or purchase new ink cartridges: Ink color or cartridge type Photo Black Matte Black Cyan Magenta Yellow Red Orange Gloss Optimizer Part number 87 87 87 87 87 87 87 87 Part number on software screens T0871 T0878 T0872 T0873 T0874 T0877 T0879 T0870 Note: We recommend that you are ready to install the ink. For best printing results, use , and temperature. Maintaining Your Printer 37 Replacing Ink Cartridges You can also purchase supplies from an Epson authorized...
... or purchase new ink cartridges: Ink color or cartridge type Photo Black Matte Black Cyan Magenta Yellow Red Orange Gloss Optimizer Part number 87 87 87 87 87 87 87 87 Part number on software screens T0871 T0878 T0872 T0873 T0874 T0877 T0879 T0870 Note: We recommend that you are ready to install the ink. For best printing results, use , and temperature. Maintaining Your Printer 37 Replacing Ink Cartridges You can also purchase supplies from an Epson authorized...
User's Guide - PDF
Page 44
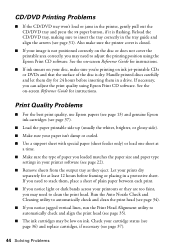
... the printing position using Epson Print CD software. Let your image is not positioned correctly on ink. Also make sure you loaded matches the paper size and paper type settings in a drive. If you need to automatically check and align the print head (see page 35). ■ The ink cartridges may need to insert the tray correctly in the printer, gently pull out the CD/DVD tray and press the I paper button, if it is dry. See the on your printer software (see page 22). ■ Remove sheets from...
... the printing position using Epson Print CD software. Let your image is not positioned correctly on ink. Also make sure you loaded matches the paper size and paper type settings in a drive. If you need to automatically check and align the print head (see page 35). ■ The ink cartridges may need to insert the tray correctly in the printer, gently pull out the CD/DVD tray and press the I paper button, if it is dry. See the on your printer software (see page 22). ■ Remove sheets from...


