User Manual
Page 1
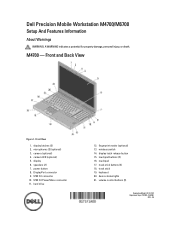
...DisplayPort connector 9. USB 3.0 connector 10. track-stick buttons (3) 18. microphones (2) (optional) 3. camera (optional) 4. display latch release button 15. volume control buttons (3) Regulatory Model: P21F, P22F Regulatory Type: P21F001, P22F001 2012 - 06 Front View 1. touchpad buttons... 19. device status lights 21. power button 8. touchpad 17. fingerprint reader (optional) 13. wireless switch 14. Dell Precision Mobile Workstation M4700/M6700 Setup And Features Information About Warnings WARNING: A WARNING indicates a potential for property damage, personal injury, or death....
...DisplayPort connector 9. USB 3.0 connector 10. track-stick buttons (3) 18. microphones (2) (optional) 3. camera (optional) 4. display latch release button 15. volume control buttons (3) Regulatory Model: P21F, P22F Regulatory Type: P21F001, P22F001 2012 - 06 Front View 1. touchpad buttons... 19. device status lights 21. power button 8. touchpad 17. fingerprint reader (optional) 13. wireless switch 14. Dell Precision Mobile Workstation M4700/M6700 Setup And Features Information About Warnings WARNING: A WARNING indicates a potential for property damage, personal injury, or death....
User Manual
Page 3
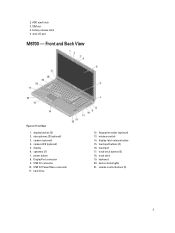
.... 2. volume control buttons (3) 3 SIM slot 4. hard drive 12. wireless switch 14. touchpad 17. device status lights 21. display-latch release button 15. camera LED (optional) 5. USB 3.0 connector 10. USB 3.0 PowerShare connector 11. battery release latch 5. display latches (2) 2. DisplayPort connector 9. keyboard 20. Front and Back View Figure 4. camera (optional) 4. power button 8. dock I/O port...
.... 2. volume control buttons (3) 3 SIM slot 4. hard drive 12. wireless switch 14. touchpad 17. device status lights 21. display-latch release button 15. camera LED (optional) 5. USB 3.0 connector 10. USB 3.0 PowerShare connector 11. battery release latch 5. display latches (2) 2. DisplayPort connector 9. keyboard 20. Front and Back View Figure 4. camera (optional) 4. power button 8. dock I/O port...
User Manual
Page 5
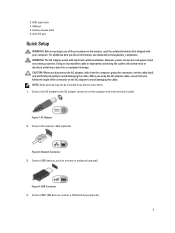
... 7. dock I/O port Quick Setup WARNING: Before you begin any of the connector on the computer and to the electrical outlet. battery release latch 5. NOTE: Some devices may cause fire or equipment damage. Connect the AC adapter to the AC adapter connector on the AC ...that you wrap the AC adapter cable, ensure that shipped with electrical outlets worldwide. For additional best practices information, see www.dell.com/regulatory_compliance WARNING: The AC adapter works with your computer. Using an incompatible cable or improperly connecting the cable to the power...
... 7. dock I/O port Quick Setup WARNING: Before you begin any of the connector on the computer and to the electrical outlet. battery release latch 5. NOTE: Some devices may cause fire or equipment damage. Connect the AC adapter to the AC adapter connector on the AC ...that you wrap the AC adapter cable, ensure that shipped with electrical outlets worldwide. For additional best practices information, see www.dell.com/regulatory_compliance WARNING: The AC adapter works with your computer. Using an incompatible cable or improperly connecting the cable to the power...
Owner's Manual
Page 11
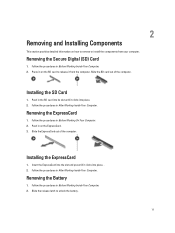
.... Insert the ExpressCard into the slot and press till it clicks into place. . 2. 2 Removing and Installing Components This section provides detailed information on how to release it from your computer. Removing the Secure Digital (SD) Card 1. Slide the...
.... Insert the ExpressCard into the slot and press till it clicks into place. . 2. 2 Removing and Installing Components This section provides detailed information on how to release it from your computer. Removing the Secure Digital (SD) Card 1. Slide the...
Owner's Manual
Page 28
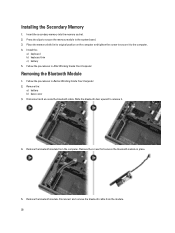
... the memory module to secure it . 4. Remove the bluetooth module. Disconnect and remove the bluetooth cable from the computer. Slide the bluetooth door upward to release it to the computer. 4. Remove the bluetooth module from the module. 28 Place the memory shield in Before Working Inside Your Computer. 2. Removing the Bluetooth...
... the memory module to secure it . 4. Remove the bluetooth module. Disconnect and remove the bluetooth cable from the computer. Slide the bluetooth door upward to release it to the computer. 4. Remove the bluetooth module from the module. 28 Place the memory shield in Before Working Inside Your Computer. 2. Removing the Bluetooth...
Owner's Manual
Page 38
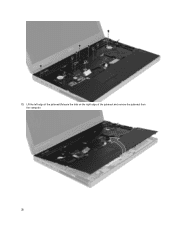
13. Lift the left edge of the palmrest.Release the tabs on the right edge of the palmrest and remove the palmrest from the computer. 38
13. Lift the left edge of the palmrest.Release the tabs on the right edge of the palmrest and remove the palmrest from the computer. 38


