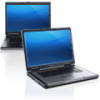
User Manual
Page 7
...Devices, Inc. only) • End User License Agreement Additional information on discs and players. The Bluetooth® word mark is available at www.dell.com/regulatory_compliance for more information on: • Safety best practices • Regulatory certification • Ergonomics ...See www.dell.com for use on your computer and the regulatory compliance website at support.dell.com/manuals. © 2012 Dell Inc. Voltaje de alimentación Frecuencia Consumo eléctrico: M4700 M6700 Voltaje de salida Intensidad de salida 100 V...
...Devices, Inc. only) • End User License Agreement Additional information on discs and players. The Bluetooth® word mark is available at www.dell.com/regulatory_compliance for more information on: • Safety best practices • Regulatory certification • Ergonomics ...See www.dell.com for use on your computer and the regulatory compliance website at support.dell.com/manuals. © 2012 Dell Inc. Voltaje de alimentación Frecuencia Consumo eléctrico: M4700 M6700 Voltaje de salida Intensidad de salida 100 V...

User Manual
Page 8
trademark and owned by Dell Inc. is a registered trademark of such mark by the Bluetooth® SIG, Inc. and any use of Wireless Ethernet Compatibility Alliance, Inc. 8 Wi-Fi® is under license.
trademark and owned by Dell Inc. is a registered trademark of such mark by the Bluetooth® SIG, Inc. and any use of Wireless Ethernet Compatibility Alliance, Inc. 8 Wi-Fi® is under license.
Owner's Manual
Page 2
...®, and Celeron® are trademarks of Dell Inc. Notes, Cautions, and Warnings NOTE: A NOTE indicates important information that helps you how to hardware or loss of data and tells you make better use of such mark by the Bluetooth® SIG, Inc. WARNING: A WARNING ...trademarks of Intel Corporation in the United States and/or other countries. The Bluetooth® word mark is a registered trademark and owned by Dell Inc. Trademarks used in this text: Dell™, the DELL logo, Dell Precision™, Precision ON™,ExpressCharge™, Latitude™, Latitude ON™...
...®, and Celeron® are trademarks of Dell Inc. Notes, Cautions, and Warnings NOTE: A NOTE indicates important information that helps you how to hardware or loss of data and tells you make better use of such mark by the Bluetooth® SIG, Inc. WARNING: A WARNING ...trademarks of Intel Corporation in the United States and/or other countries. The Bluetooth® word mark is a registered trademark and owned by Dell Inc. Trademarks used in this text: Dell™, the DELL logo, Dell Precision™, Precision ON™,ExpressCharge™, Latitude™, Latitude ON™...
Owner's Manual
Page 4
......26 Removing the Primary Memory...26 Installing the Primary Memory...27 Removing the Secondary Memory...27 Installing the Secondary Memory...28 Removing the Bluetooth Module...28 Installing the Bluetooth Module...29 Removing the Display Bezel...29 Installing the Display Bezel...31 Removing the Camera...31 Installing the Camera...31 Removing the Display...
......26 Removing the Primary Memory...26 Installing the Primary Memory...27 Removing the Secondary Memory...27 Installing the Secondary Memory...28 Removing the Bluetooth Module...28 Installing the Bluetooth Module...29 Removing the Display Bezel...29 Installing the Display Bezel...31 Removing the Camera...31 Installing the Camera...31 Removing the Display...
Owner's Manual
Page 28
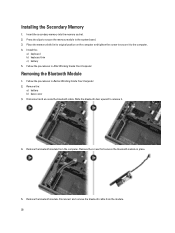
...module. 28 Place the memory shield in place. 5. Remove the bluetooth module. Insert the secondary memory into the memory socket. 2. Press the clips to secure the memory module to the computer. 4. Removing the Bluetooth Module 1. Follow the procedures in After Working Inside Your Computer.... Working Inside Your Computer. 2. Remove the screw that secures the bluetooth module in its original position on the computer and tighten the screw to secure it . 4. Remove the: a) battery b) base cover 3. Slide the bluetooth door upward to release it to the system board. 3. Disconnect ...
...module. 28 Place the memory shield in place. 5. Remove the bluetooth module. Insert the secondary memory into the memory socket. 2. Press the clips to secure the memory module to the computer. 4. Removing the Bluetooth Module 1. Follow the procedures in After Working Inside Your Computer.... Working Inside Your Computer. 2. Remove the screw that secures the bluetooth module in its original position on the computer and tighten the screw to secure it . 4. Remove the: a) battery b) base cover 3. Slide the bluetooth door upward to release it to the system board. 3. Disconnect ...
Owner's Manual
Page 29
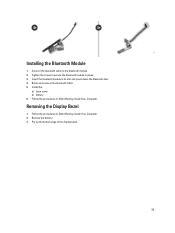
Tighten the screw to the bluetooth module. 2. Connect the bluetooth cable to secure the bluetooth module in its slot and press down the bluetooth door. 4. Install the: a) base cover b) battery 6. Follow the procedures in After Working Inside Your Computer. Removing the Display Bezel 1. Follow the procedures in After Working Inside Your Computer. 2. Route and connect the bluetooth cable. 5. Insert the bluetooth module in place. 3. Pry up the bottom edge of the display bezel. 29 Installing the Bluetooth Module 1. Remove the battery. 3.
Tighten the screw to the bluetooth module. 2. Connect the bluetooth cable to secure the bluetooth module in its slot and press down the bluetooth door. 4. Install the: a) base cover b) battery 6. Follow the procedures in After Working Inside Your Computer. Removing the Display Bezel 1. Follow the procedures in After Working Inside Your Computer. 2. Route and connect the bluetooth cable. 5. Insert the bluetooth module in place. 3. Pry up the bottom edge of the display bezel. 29 Installing the Bluetooth Module 1. Remove the battery. 3.
Owner's Manual
Page 37
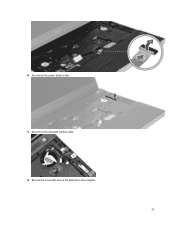
Remove the screw that secure the palmrest to the computer. 37 Disconnect the power button cable. 11. Disconnect the bluetooth module cable. 12. 10.
Remove the screw that secure the palmrest to the computer. 37 Disconnect the power button cable. 11. Disconnect the bluetooth module cable. 12. 10.
Owner's Manual
Page 39
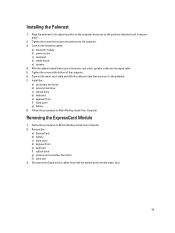
... the palmrest to the palmrest. 7. Connect the smart card cable and affix the adhesive tape that secures it snaps in place. 2. Connect the following cables: a) bluetooth module b) power button c) touchpad d) media board e) speaker 4. Follow the procedures in After Working Inside Your Computer. Disconnect the ExpressCard cables from both the system board...
... the palmrest to the palmrest. 7. Connect the smart card cable and affix the adhesive tape that secures it snaps in place. 2. Connect the following cables: a) bluetooth module b) power button c) touchpad d) media board e) speaker 4. Follow the procedures in After Working Inside Your Computer. Disconnect the ExpressCard cables from both the system board...
Owner's Manual
Page 66
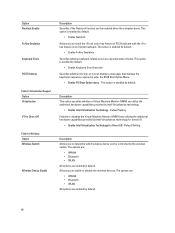
... a Virtual Machine Monitor (VMM) can be enabled when the computer boots. Default Setting. The options are: • WWAN • Bluetooth • WLAN All options are enabled by default. • Enable Keyboard Error Detection Specifies whether the sign-on screen displays a message... default. Option Numlock Enable Fn Key Emulation Keyboard Errors POST Hotkeys Table 9. Default Setting. The options are: • WWAN • Bluetooth • WLAN All options are enabled by Intel Virtualization technology for direct I/O. • Enable Intel Virtualization Technology for Direct I /O -...
... a Virtual Machine Monitor (VMM) can be enabled when the computer boots. Default Setting. The options are: • WWAN • Bluetooth • WLAN All options are enabled by default. • Enable Keyboard Error Detection Specifies whether the sign-on screen displays a message... default. Option Numlock Enable Fn Key Emulation Keyboard Errors POST Hotkeys Table 9. Default Setting. The options are: • WWAN • Bluetooth • WLAN All options are enabled by Intel Virtualization technology for direct I/O. • Enable Intel Virtualization Technology for Direct I /O -...


