Setup Guide
Page 5
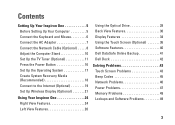
...the TV Tuner (Optional 11 Press the Power Button 16 Set Up the Operating System 17 Create System Recovery Media (Recommended 18 Connect to the Internet (Optional 19 Set Up Wireless Display (Optional 21 Using Your Inspiron One 24 Right View Features 24 Left View ...Features 26 Using the Optical Drive 28 Back View Features 30 Display Features 34 Using the Touch Screen (Optional 36 Software Features 40 Dell DataSafe Online Backup 41 Dell Dock 42 Solving Problems 43 Touch Screen Problems 43 Beep Codes 45 Network Problems 46 Power...
...the TV Tuner (Optional 11 Press the Power Button 16 Set Up the Operating System 17 Create System Recovery Media (Recommended 18 Connect to the Internet (Optional 19 Set Up Wireless Display (Optional 21 Using Your Inspiron One 24 Right View Features 24 Left View ...Features 26 Using the Optical Drive 28 Back View Features 30 Display Features 34 Using the Touch Screen (Optional 36 Software Features 40 Dell DataSafe Online Backup 41 Dell Dock 42 Solving Problems 43 Touch Screen Problems 43 Beep Codes 45 Network Problems 46 Power...
Setup Guide
Page 7
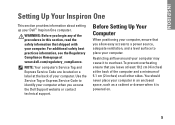
...5 Use the Service Tag or Express Service Code to overheat. To prevent overheating ensure that you allow easy access to a power source, adequate ventilation, and a level surface to place your computer. You should never place your computer. NOTE: Your computer's...procedures in an enclosed space, such as a cabinet or drawer when it to identify your Dell™ Inspiron One computer. WARNING: Before you begin any of 5.1 cm (2 inches) on a label at www.dell.com/regulatory_compliance. For additional safety best practices information, see the Regulatory Compliance Homepage at the ...
...5 Use the Service Tag or Express Service Code to overheat. To prevent overheating ensure that you allow easy access to a power source, adequate ventilation, and a level surface to place your computer. You should never place your computer. NOTE: Your computer's...procedures in an enclosed space, such as a cabinet or drawer when it to identify your Dell™ Inspiron One computer. WARNING: Before you begin any of 5.1 cm (2 inches) on a label at www.dell.com/regulatory_compliance. For additional safety best practices information, see the Regulatory Compliance Homepage at the ...
Setup Guide
Page 9
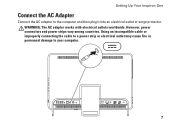
Using an incompatible cable or improperly connecting the cable to a power strip or electrical outlet may cause fire or permanent damage to the computer and then plug it into an electrical outlet or surge protector. WARNING: The AC adapter works with electrical outlets worldwide. However, power connectors and power strips vary among countries. Setting Up Your Inspiron One Connect the AC Adapter Connect the AC adapter to your computer. 7
Using an incompatible cable or improperly connecting the cable to a power strip or electrical outlet may cause fire or permanent damage to the computer and then plug it into an electrical outlet or surge protector. WARNING: The AC adapter works with electrical outlets worldwide. However, power connectors and power strips vary among countries. Setting Up Your Inspiron One Connect the AC Adapter Connect the AC adapter to your computer. 7

Setup Guide
Page 18
Setting Up Your Inspiron One Press the Power Button 16
Setting Up Your Inspiron One Press the Power Button 16
Setup Guide
Page 27
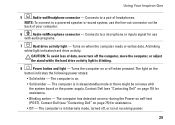
...Dell (see "Contacting Dell" on . • Solid amber - Connects to a pair of data, never turn off the computer, move the computer, or adjust the stand while the hard drive activity light is blinking. 8 Power button and light - Turns on self-test (POST). A blinking white light indicates hard drive activity. Using Your Inspiron One... 5 Audio-out/Headphone connector - The computer has detected an error during the Power-on when the ...
...Dell (see "Contacting Dell" on . • Solid amber - Connects to a pair of data, never turn off the computer, move the computer, or adjust the stand while the hard drive activity light is blinking. 8 Power button and light - Turns on self-test (POST). A blinking white light indicates hard drive activity. Using Your Inspiron One... 5 Audio-out/Headphone connector - The computer has detected an error during the Power-on when the ...
Setup Guide
Page 33
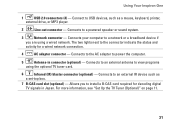
... view programs using a wired network. Allows you are using the optional TV tuner card. 6 Infrared (IR) blaster connector (optional) - Using Your Inspiron One 1 USB 2.0 connectors (4) - The two lights next to an external IR device such as a mouse, keyboard, printer, external drive, or MP3 player... B-CAS card required for a wired network connection. 4 AC adapter connector - Connects your computer to a network or a broadband device if you to power the computer. 5 Antenna-in Japan. Connects to USB devices, such as a set-top box. 7 B-CAS card slot (optional) - For more...
... view programs using a wired network. Allows you are using the optional TV tuner card. 6 Infrared (IR) blaster connector (optional) - Using Your Inspiron One 1 USB 2.0 connectors (4) - The two lights next to an external IR device such as a mouse, keyboard, printer, external drive, or MP3 player... B-CAS card required for a wired network connection. 4 AC adapter connector - Connects your computer to a network or a broadband device if you to power the computer. 5 Antenna-in Japan. Connects to USB devices, such as a set-top box. 7 B-CAS card slot (optional) - For more...
Setup Guide
Page 46
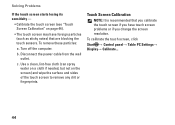
... if needed, but not on page 44). • The touch screen may have touch screen problems or if you change the screen resolution. Disconnect the power cable from the wall outlet. b. Turn off the computer.
... if needed, but not on page 44). • The touch screen may have touch screen problems or if you change the screen resolution. Disconnect the power cable from the wall outlet. b. Turn off the computer.
Setup Guide
Page 48
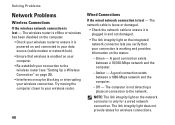
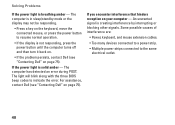
.... The network cable is loose or damaged. • Check the network cable to your wireless connection. Try moving the computer closer to ensure it is powered on and connected to your data source (cable modem or network hub). • Ensure that your connection to the network. A good connection exists between a 10...
.... The network cable is loose or damaged. • Check the network cable to your wireless connection. Try moving the computer closer to ensure it is powered on and connected to your data source (cable modem or network hub). • Ensure that your connection to the network. A good connection exists between a 10...
Setup Guide
Page 49
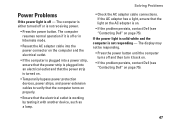
... adapter has a light, ensure that the electrical outlet is working by testing it back on. • If the problem persists, contact Dell (see "Contacting Dell" on page 75). If the power light is solid white and the computer is off or is on. • If the problem persists, contact... Dell (see "Contacting Dell" on the AC adapter is not receiving power. • Press the power button. Solving Problems Power Problems If the power light is not responding - The computer resumes normal operation if it is off and...
... adapter has a light, ensure that the electrical outlet is working by testing it back on. • If the problem persists, contact Dell (see "Contacting Dell" on page 75). If the power light is solid white and the computer is off or is on. • If the problem persists, contact... Dell (see "Contacting Dell" on the AC adapter is not receiving power. • Press the power button. Solving Problems Power Problems If the power light is not responding - The computer resumes normal operation if it is off and...
Setup Guide
Page 50
... error during POST. For assistance, contact Dell (see "Contacting Dell" on page 75). An unwanted signal is solid amber - The computer is in sleep/standby mode or the display may not be responding. • Press a key on the keyboard, move the connected mouse, or press the power button to resume normal operation. •...
... error during POST. For assistance, contact Dell (see "Contacting Dell" on page 75). An unwanted signal is solid amber - The computer is in sleep/standby mode or the display may not be responding. • Press a key on the keyboard, move the connected mouse, or press the power button to resume normal operation. •...
Setup Guide
Page 52
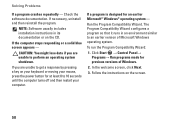
... the CD. Check the software documentation. If you are unable to get a response by pressing a key on your keyboard or moving your mouse, press the power button for at least 8 to an earlier version of Windows. 2. Solving Problems If a program crashes repeatedly - If necessary, uninstall and then reinstall the program. Run...
... the CD. Check the software documentation. If you are unable to get a response by pressing a key on your keyboard or moving your mouse, press the power button for at least 8 to an earlier version of Windows. 2. Solving Problems If a program crashes repeatedly - If necessary, uninstall and then reinstall the program. Run...
Setup Guide
Page 57
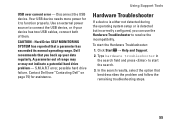
Use an external power source to function properly. A parameter out of them. Dell recommends that best describes the problem and follow the remaining troubleshooting steps. 55 Contact Dell (see "Contacting Dell" on page 75) for it to connect the USB device, or if your data regularly....drive problem - CAUTION - Type hardware troubleshooter in the search field and press to resolve the incompatibility. Your USB device needs more power for assistance. USB over current error - S.M.A.R.T error, possible hard drive failure. Hard Drive SELF MONITORING SYSTEM has reported that a...
Use an external power source to function properly. A parameter out of them. Dell recommends that best describes the problem and follow the remaining troubleshooting steps. 55 Contact Dell (see "Contacting Dell" on page 75) for it to connect the USB device, or if your data regularly....drive problem - CAUTION - Type hardware troubleshooter in the search field and press to resolve the incompatibility. Your USB device needs more power for assistance. USB over current error - S.M.A.R.T error, possible hard drive failure. Hard Drive SELF MONITORING SYSTEM has reported that a...
Setup Guide
Page 84
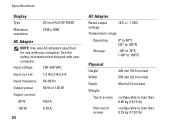
Input voltage 100-240 VAC Input current 1.5 A/2.3 A/2.5 A Input frequency 50-60 Hz Output power 90 W or 130 W Output current: 90 W 4.62 A 130 W 6.70 A 82 AC Adapter Rated output voltage 19.5 +/- 1 VDC Temperature range: Operating 0° to 40°C (32&#...
Input voltage 100-240 VAC Input current 1.5 A/2.3 A/2.5 A Input frequency 50-60 Hz Output power 90 W or 130 W Output current: 90 W 4.62 A 130 W 6.70 A 82 AC Adapter Rated output voltage 19.5 +/- 1 VDC Temperature range: Operating 0° to 40°C (32&#...
Setup Guide
Page 89
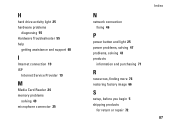
H hard drive activity light 25 hardware problems diagnosing 55 Hardware Troubleshooter 55 help getting assistance and support 68 I Internet connection 19 ISP Internet Service Provider 19 M Media Card Reader 24 memory problems solving 49 microphone connector 25 N network connection fixing 46 P power button and light 25 power problems, solving 47 problems, solving 43 products information and purchasing 71 R resources, finding more 76 restoring factory image 66 S setup, before you begin 5 shipping products for return or repair 72 Index 87
H hard drive activity light 25 hardware problems diagnosing 55 Hardware Troubleshooter 55 help getting assistance and support 68 I Internet connection 19 ISP Internet Service Provider 19 M Media Card Reader 24 memory problems solving 49 microphone connector 25 N network connection fixing 46 P power button and light 25 power problems, solving 47 problems, solving 43 products information and purchasing 71 R resources, finding more 76 restoring factory image 66 S setup, before you begin 5 shipping products for return or repair 72 Index 87
Service Manual
Page 14
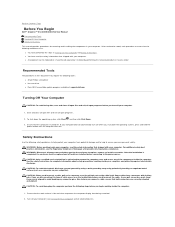
...aligned to replace, remove, or install accessories. Back to prevent the computer display from potential damage and to help to the power source. Turn off your computer. l You have performed the steps in reverse order. Recommended Tools The procedures in on the... WARNING: Before working inside the computer. After the installation is flat and clean to Contents Page Before You Begin Dell™ Inspiron™ One 2305/2310 Service Manual Recommended Tools Turning Off Your Computer Safety Instructions This manual provides procedures for complete information about safety ...
...aligned to replace, remove, or install accessories. Back to prevent the computer display from potential damage and to help to the power source. Turn off your computer. l You have performed the steps in reverse order. Recommended Tools The procedures in on the... WARNING: Before working inside the computer. After the installation is flat and clean to Contents Page Before You Begin Dell™ Inspiron™ One 2305/2310 Service Manual Recommended Tools Turning Off Your Computer Safety Instructions This manual provides procedures for complete information about safety ...
Service Manual
Page 15
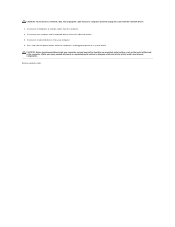
... surface, such as the metal at the back of the computer. Disconnect your computer and all attached devices from the computer. 4. Press and hold the power button while the computer is unplugged to ground the system board. Disconnect all telephone or network cables from your computer. 6.
... surface, such as the metal at the back of the computer. Disconnect your computer and all attached devices from the computer. 4. Press and hold the power button while the computer is unplugged to ground the system board. Disconnect all telephone or network cables from your computer. 6.
Service Manual
Page 27
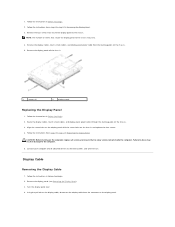
...outlets, and turn them on the computer, replace all attached devices to the chassis. Remove the display cables, touch screen cables, and display panel power cable from the connector on the chassis and replace the four screws. 4. Route the display cables, touch screen cables, and display panel... power cable through the routing guides on the chassis. 5. Remove the display panel (see Removing the Display Panel). 3. NOTE: The number of screws that ...
...outlets, and turn them on the computer, replace all attached devices to the chassis. Remove the display cables, touch screen cables, and display panel power cable from the connector on the chassis and replace the four screws. 4. Route the display cables, touch screen cables, and display panel... power cable through the routing guides on the chassis. 5. Remove the display panel (see Removing the Display Panel). 3. NOTE: The number of screws that ...
Service Manual
Page 35
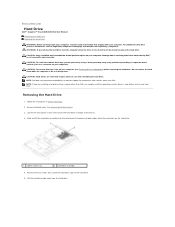
...the two captive screws that secure the hard-drive cage to the hard drive. 6. Back to Contents Page Hard Drive Dell™ Inspiron™ One 2305/2310 Service Manual Removing the Hard Drive Replacing the Hard Drive WARNING: Before working inside your computer, read the safety information... that is not authorized by Dell™ is On or in Before You Begin. 2. Slide and lift the hard-drive assembly and then disconnect the power...
...the two captive screws that secure the hard-drive cage to the hard drive. 6. Back to Contents Page Hard Drive Dell™ Inspiron™ One 2305/2310 Service Manual Removing the Hard Drive Replacing the Hard Drive WARNING: Before working inside your computer, read the safety information... that is not authorized by Dell™ is On or in Before You Begin. 2. Slide and lift the hard-drive assembly and then disconnect the power...

Service Manual
Page 36
... the hard-drive assembly on the hard drive. 5. Failure to the connectors on the chassis and slide the hard-drive assembly into place. 6. Connect the power and data cables to do so may result in Before You Begin. 2. Tighten the two captive screws that secure the hard-drive assembly to the...
... the hard-drive assembly on the hard drive. 5. Failure to the connectors on the chassis and slide the hard-drive assembly into place. 6. Connect the power and data cables to do so may result in Before You Begin. 2. Tighten the two captive screws that secure the hard-drive assembly to the...
Service Manual
Page 57
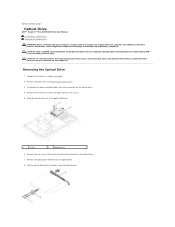
...discharge, ground yourself by using a wrist grounding strap or by your computer. Damage due to servicing that is not authorized by Dell™ is not covered by periodically touching an unpainted metal surface (such as a connector on your computer). Remove the two... For additional safety best practices information, see Removing the Back Cover). 3. Disconnect the power and data cables from the optical drive. Back to Contents Page Optical Drive Dell™ Inspiron™ One 2305/2310 Service Manual Removing the Optical Drive Replacing the Optical Drive WARNING: Before working inside...
...discharge, ground yourself by using a wrist grounding strap or by your computer. Damage due to servicing that is not authorized by Dell™ is not covered by periodically touching an unpainted metal surface (such as a connector on your computer). Remove the two... For additional safety best practices information, see Removing the Back Cover). 3. Disconnect the power and data cables from the optical drive. Back to Contents Page Optical Drive Dell™ Inspiron™ One 2305/2310 Service Manual Removing the Optical Drive Replacing the Optical Drive WARNING: Before working inside...


