Setup Guide
Page 5
Contents Setting Up Your Inspiron One 5 Before Setting Up Your Computer 5 Connect the Keyboard and Mouse 6 Connect the AC Adapter 7 Connect the Network Cable (Optional 8 Adjust the Computer Stand 10 Set ... Internet (Optional 19 Set Up Wireless Display (Optional 21 Using Your Inspiron One 24 Right View Features 24 Left View Features 26 Using the Optical Drive 28 Back View Features 30 Display Features 34 Using the Touch Screen (Optional 36 Software Features 40 Dell DataSafe Online Backup 41 Dell Dock 42 Solving Problems 43 Touch Screen...
Contents Setting Up Your Inspiron One 5 Before Setting Up Your Computer 5 Connect the Keyboard and Mouse 6 Connect the AC Adapter 7 Connect the Network Cable (Optional 8 Adjust the Computer Stand 10 Set ... Internet (Optional 19 Set Up Wireless Display (Optional 21 Using Your Inspiron One 24 Right View Features 24 Left View Features 26 Using the Optical Drive 28 Back View Features 30 Display Features 34 Using the Touch Screen (Optional 36 Software Features 40 Dell DataSafe Online Backup 41 Dell Dock 42 Solving Problems 43 Touch Screen...
Setup Guide
Page 12
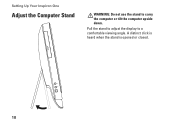
Pull the stand to adjust the display to carry the computer or tilt the computer upside down. A distinct click is heard when the stand is opened or closed. 10 Setting Up Your Inspiron One Adjust the Computer Stand WARNING: Do not use the stand to a comfortable viewing angle.
Pull the stand to adjust the display to carry the computer or tilt the computer upside down. A distinct click is heard when the stand is opened or closed. 10 Setting Up Your Inspiron One Adjust the Computer Stand WARNING: Do not use the stand to a comfortable viewing angle.

Setup Guide
Page 24
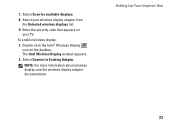
... "Intel Wireless Display Connection Manager" available at support.dell.com. To set up wireless display on your computer is enabled. 3. Ensure that your computer: 1. Connect the wireless display adapter to the TV. Double-click the Intel® Wireless Display icon on the TV. 5. Setting Up Your Inspiron One Set Up Wireless Display (Optional) NOTE: Wireless display may not be...
... "Intel Wireless Display Connection Manager" available at support.dell.com. To set up wireless display on your computer is enabled. 3. Ensure that your computer: 1. Connect the wireless display adapter to the TV. Double-click the Intel® Wireless Display icon on the TV. 5. Setting Up Your Inspiron One Set Up Wireless Display (Optional) NOTE: Wireless display may not be...
Setup Guide
Page 25
Double-click the Intel® Wireless Display icon on your wireless display adapter from the Detected wireless displays list. 9. Setting Up Your Inspiron One 23 Select your TV. Select Connect to Existing Adapter. 7. Select Scan for available displays. 8. To enable wireless display: 1. NOTE: For more information about wireless display, see the wireless display adapter documentation. The Intel Wireless Display window appears. 2. Enter the security code that appears on the desktop.
Double-click the Intel® Wireless Display icon on your wireless display adapter from the Detected wireless displays list. 9. Setting Up Your Inspiron One 23 Select your TV. Select Connect to Existing Adapter. 7. Select Scan for available displays. 8. To enable wireless display: 1. NOTE: For more information about wireless display, see the wireless display adapter documentation. The Intel Wireless Display window appears. 2. Enter the security code that appears on the desktop.

Setup Guide
Page 29
... a comfortable viewing angle. 27 For more information, see "Using the Optical Drive" on page 28. 2 Optical drive light - Using Your Inspiron One 1 Optical drive - Press to decrease the brightness level of the display. 5 Brightness decrease button (optional) - Plays or records CDs, DVDs, and Blu-ray Discs (optional). Provides stability to the computer and...
... a comfortable viewing angle. 27 For more information, see "Using the Optical Drive" on page 28. 2 Optical drive light - Using Your Inspiron One 1 Optical drive - Press to decrease the brightness level of the display. 5 Brightness decrease button (optional) - Plays or records CDs, DVDs, and Blu-ray Discs (optional). Provides stability to the computer and...
Setup Guide
Page 37
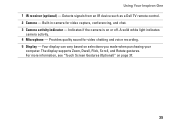
...Inspiron One 1 IR receiver (optional) - A solid white light indicates camera activity. 4 Microphone - The display supports Zoom, Dwell, Flick, Scroll, and Rotate gestures. Indicates if the camera is on selections you made when purchasing your computer. Provides quality sound for video capture, conferencing, and chat. 3 Camera activity indicator - Your display... can vary based on or off. For more information, see "Touch Screen Gestures (Optional)" on page 37. 35 Detects signals from an IR device such as a Dell TV remote control. 2 Camera - ...
...Inspiron One 1 IR receiver (optional) - A solid white light indicates camera activity. 4 Microphone - The display supports Zoom, Dwell, Flick, Scroll, and Rotate gestures. Indicates if the camera is on selections you made when purchasing your computer. Provides quality sound for video capture, conferencing, and chat. 3 Camera activity indicator - Your display... can vary based on or off. For more information, see "Touch Screen Gestures (Optional)" on page 37. 35 Detects signals from an IR device such as a Dell TV remote control. 2 Camera - ...
Setup Guide
Page 38
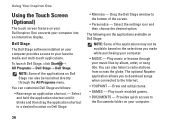
... allows you made while purchasing your computer. • Music - Provides quick access to the Internet. • YouPaint - Dell Stage The Dell Stage software installed on your Dell Inspiron One converts your computer into an interactive display. Using Your Inspiron One Using the Touch Screen (Optional) The touch screen feature on your computer provides access to radio stations from...
... allows you made while purchasing your computer. • Music - Provides quick access to the Internet. • YouPaint - Dell Stage The Dell Stage software installed on your Dell Inspiron One converts your computer into an interactive display. Using Your Inspiron One Using the Touch Screen (Optional) The touch screen feature on your computer provides access to radio stations from...
Setup Guide
Page 46
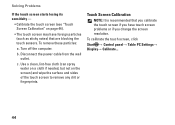
... (such as sticky notes) that are blocking the touch sensors. To calibrate the touch screen, click Start → Control panel→ Table PC Settings→ Display→ Calibrate... 44 Use a clean, lint-free cloth (can spray water on a cloth if needed, but not on page 44). • The touch screen may...
... (such as sticky notes) that are blocking the touch sensors. To calibrate the touch screen, click Start → Control panel→ Table PC Settings→ Display→ Calibrate... 44 Use a clean, lint-free cloth (can spray water on a cloth if needed, but not on page 44). • The touch screen may...
Setup Guide
Page 49
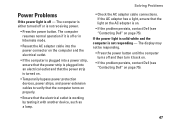
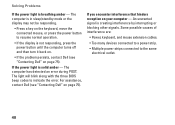
... • Check the AC adapter cable connections. The computer resumes normal operation if it back on. • If the problem persists, contact Dell (see "Contacting Dell" on page 75). If the AC adapter has a light, ensure that the electrical outlet is not responding - Solving Problems Power Problems If the... power light is on. • If the problem persists, contact Dell (see "Contacting Dell" on page 75). 47 The display may not be responding. • Press the power button until the computer turns off and then turn it is off...
... • Check the AC adapter cable connections. The computer resumes normal operation if it back on. • If the problem persists, contact Dell (see "Contacting Dell" on page 75). If the AC adapter has a light, ensure that the electrical outlet is not responding - Solving Problems Power Problems If the... power light is on. • If the problem persists, contact Dell (see "Contacting Dell" on page 75). 47 The display may not be responding. • Press the power button until the computer turns off and then turn it is off...
Setup Guide
Page 50
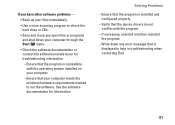
... not be responding. • Press a key on the keyboard, move the connected mouse, or press the power button to resume normal operation. • If the display is breathing amber - If you encounter interference that hinders reception on page 75). An unwanted signal is solid amber - The computer has detected an error... light is not responding, press the power button until the computer turns off and then turn it back on. • If the problem persists, contact Dell (see "Contacting Dell" on page 75). For assistance, contact Dell (see "Contacting Dell" on your computer -
... not be responding. • Press a key on the keyboard, move the connected mouse, or press the power button to resume normal operation. • If the display is breathing amber - If you encounter interference that hinders reception on page 75). An unwanted signal is solid amber - The computer has detected an error... light is not responding, press the power button until the computer turns off and then turn it back on. • If the problem persists, contact Dell (see "Contacting Dell" on page 75). For assistance, contact Dell (see "Contacting Dell" on your computer -
Setup Guide
Page 53
...; Save and close any error message that is compatible with the operating system installed on your computer. --Ensure that the program is displayed to help in troubleshooting when contacting Dell. 51 See the software documentation for troubleshooting information: --Ensure that your computer meets the minimum hardware requirements needed to run the software...
...; Save and close any error message that is compatible with the operating system installed on your computer. --Ensure that the program is displayed to help in troubleshooting when contacting Dell. 51 See the software documentation for troubleshooting information: --Ensure that your computer meets the minimum hardware requirements needed to run the software...
Setup Guide
Page 54
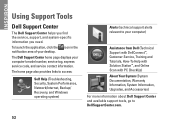
... relevant to your desktop. To launch the application, click the icon in the notification area of your computer) Assistance from Dell (Technical Support with DellConnect™, Customer Service, Training and Tutorials, How-To Help with Solution Station™, and Online ...more information about Dell Support Center and available support tools, go to DellSupportCenter.com. 52 INSPIRON Using Support Tools Dell Support Center The Dell Support Center helps you find the service, support, and system-specific information you need. The Dell Support Center home page displays your computer's ...
... relevant to your desktop. To launch the application, click the icon in the notification area of your computer) Assistance from Dell (Technical Support with DellConnect™, Customer Service, Training and Tutorials, How-To Help with Solution Station™, and Online ...more information about Dell Support Center and available support tools, go to DellSupportCenter.com. 52 INSPIRON Using Support Tools Dell Support Center The Dell Support Center helps you find the service, support, and system-specific information you need. The Dell Support Center home page displays your computer's ...
Setup Guide
Page 55
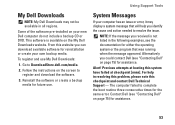
The computer failed to resolve the issue. Contact Dell (see "Contacting Dell" on page 75) for the same error. Using Support Tools My Dell Downloads NOTE: My Dell Downloads may display a system message that was running when the message appeared. From this checkpoint and contact Dell Technical Support - To register and use . System Messages If your new...
The computer failed to resolve the issue. Contact Dell (see "Contacting Dell" on page 75) for the same error. Using Support Tools My Dell Downloads NOTE: My Dell Downloads may display a system message that was running when the message appeared. From this checkpoint and contact Dell Technical Support - To register and use . System Messages If your new...
Setup Guide
Page 58
...and Utilities disc. When the DELL™ logo appears, press immediately. Starting Dell Diagnostics From Your Hard Drive Dell Diagnostics is located on a hidden diagnostic utility partition on your computer cannot display a screen image, contact Dell (see "Contacting Dell" on your computer, perform ...the checks in the system setup program and is known to test appears in "Lockups and Software Problems" on Dell computers. Select Diagnostics from your ...
...and Utilities disc. When the DELL™ logo appears, press immediately. Starting Dell Diagnostics From Your Hard Drive Dell Diagnostics is located on a hidden diagnostic utility partition on your computer cannot display a screen image, contact Dell (see "Contacting Dell" on your computer, perform ...the checks in the system setup program and is known to test appears in "Lockups and Software Problems" on Dell computers. Select Diagnostics from your ...
Setup Guide
Page 60
... disc may not ship with your computer and try again. When the DELL™ logo appears, press immediately. NOTE: If you wait too long and the operating system logo appears, continue to wait until you identify your computer is displayed at the top of each test screen. then, shut down and restart... next start-up, the computer boots according to the Choose An Option window. 7. Shut down your computer. 1. Using Support Tools NOTE: The Service Tag for one time only. The Service Tag helps you see the Microsoft Windows desktop;
... disc may not ship with your computer and try again. When the DELL™ logo appears, press immediately. NOTE: If you wait too long and the operating system logo appears, continue to wait until you identify your computer is displayed at the top of each test screen. then, shut down and restart... next start-up, the computer boots according to the Choose An Option window. 7. Shut down your computer. 1. Using Support Tools NOTE: The Service Tag for one time only. The Service Tag helps you see the Microsoft Windows desktop;
Setup Guide
Page 61
3. If a problem is displayed at the top of the problem. Using Support Tools NOTE: The Service Tag for your computer is encountered during a test, a message appears with an error code and a description of each test screen. To exit the Dell Diagnostics and restart the computer, click Exit. 11. If... and press to run. 8. Write down the error code and problem description and contact Dell (see "Contacting Dell" on page 75) for your computer when you want to proceed. 6. Select Run the 32 Bit Dell Diagnostics from the menu that appears and press . 5. When the tests are listed, ...
3. If a problem is displayed at the top of the problem. Using Support Tools NOTE: The Service Tag for your computer is encountered during a test, a message appears with an error code and a description of each test screen. To exit the Dell Diagnostics and restart the computer, click Exit. 11. If... and press to run. 8. Write down the error code and problem description and contact Dell (see "Contacting Dell" on page 75) for your computer when you want to proceed. 6. Select Run the 32 Bit Dell Diagnostics from the menu that appears and press . 5. When the tests are listed, ...
Setup Guide
Page 84
Specifications Display Type 23-inch Full HD WLED Maximum resolution 1920 x 1080 AC Adapter NOTE: Use only AC adapters specified for use with your computer. See the ...
Specifications Display Type 23-inch Full HD WLED Maximum resolution 1920 x 1080 AC Adapter NOTE: Use only AC adapters specified for use with your computer. See the ...
Service Manual
Page 1
...is subject to hardware or loss of data and tells you make better use of your computer. August 2010 Rev. Dell™ Inspiron™ One 2305/2310 Service Manual Technical Overview Before You Begin Back Cover Hard Drive Optical Drive Converter Card Touch Screen Control Card (Optional...Sink Processor Speakers Speaker Cover System Board Internal Card With Bluetooth® Wireless Technology Camera Module Infrared Card B-CAS Card (Optional) Display System Setup Utility Flashing the BIOS Notes, Cautions, and Warnings NOTE: A NOTE indicates important information that helps you how to ...
...is subject to hardware or loss of data and tells you make better use of your computer. August 2010 Rev. Dell™ Inspiron™ One 2305/2310 Service Manual Technical Overview Before You Begin Back Cover Hard Drive Optical Drive Converter Card Touch Screen Control Card (Optional...Sink Processor Speakers Speaker Cover System Board Internal Card With Bluetooth® Wireless Technology Camera Module Infrared Card B-CAS Card (Optional) Display System Setup Utility Flashing the BIOS Notes, Cautions, and Warnings NOTE: A NOTE indicates important information that helps you how to ...
Service Manual
Page 6
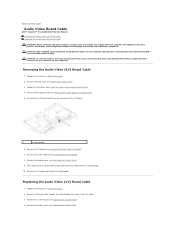
...the instructions in Before You Begin. 2. Remove the AV board cable from step 2 to servicing that shipped with the tapes. 3. Replace the display panel (see Removing the Audio Video (AV) Board Shield). 5. Follow the instructions from the routing guide. Remove the AV board (see the... additional safety best practices information, see Removing the Audio Video (AV) Board). 7. Back to Contents Page Audio Video Board Cable Dell™ Inspiron™ One 2305/2310 Service Manual Removing the Audio Video (AV) Board Cable Replacing the Audio Video (AV) Board Cable WARNING: Before working inside...
...the instructions in Before You Begin. 2. Remove the AV board cable from step 2 to servicing that shipped with the tapes. 3. Replace the display panel (see Removing the Audio Video (AV) Board Shield). 5. Follow the instructions from the routing guide. Remove the AV board (see the... additional safety best practices information, see Removing the Audio Video (AV) Board). 7. Back to Contents Page Audio Video Board Cable Dell™ Inspiron™ One 2305/2310 Service Manual Removing the Audio Video (AV) Board Cable Replacing the Audio Video (AV) Board Cable WARNING: Before working inside...
Service Manual
Page 10
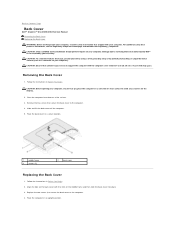
... at least 30 cm (1 ft.) of desk top space. Damage due to Contents Page Back Cover Dell™ Inspiron™ One 2305/2310 Service Manual Removing the Back Cover Replacing the Back Cover WARNING: Before working inside your computer, read... cover to the computer. 4. Align the tabs on the back cover with the computer cover removed-at www.dell.com/regulatory_compliance. Replace the two screws that secure the back cover to the computer. 4. Place the computer face...(2) 2 back cover Replacing the Back Cover 1. CAUTION: Ensure that you place the computer on the display. 2.
... at least 30 cm (1 ft.) of desk top space. Damage due to Contents Page Back Cover Dell™ Inspiron™ One 2305/2310 Service Manual Removing the Back Cover Replacing the Back Cover WARNING: Before working inside your computer, read... cover to the computer. 4. Align the tabs on the back cover with the computer cover removed-at www.dell.com/regulatory_compliance. Replace the two screws that secure the back cover to the computer. 4. Place the computer face...(2) 2 back cover Replacing the Back Cover 1. CAUTION: Ensure that you place the computer on the display. 2.


