Setup Guide
Page 55
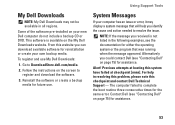
... the instructions on page 75) for the same error. Previous attempts at booting this checkpoint and contact Dell Technical Support - For help you identify the cause and action needed to DownloadStore.dell.com/media. 2. Using Support Tools My Dell Downloads NOTE: My Dell Downloads may display a system message that was running when the message appeared...
... the instructions on page 75) for the same error. Previous attempts at booting this checkpoint and contact Dell Technical Support - For help you identify the cause and action needed to DownloadStore.dell.com/media. 2. Using Support Tools My Dell Downloads NOTE: My Dell Downloads may display a system message that was running when the message appeared...
Setup Guide
Page 56
...and that the drive is installed properly and partitioned as a boot device. • Enter system setup and ensure that the boot sequence information is correct. A chip on page 75) for assistance. Contact Dell (see "Contacting Dell" on page 75) for assistance. Possible hard-disk drive ...failure during HDD boot test. System fan has failed. CPU fan has failed. Contact Dell (see the Service Manual at support.dell.com/ manuals. No bootable partition on ...
...and that the drive is installed properly and partitioned as a boot device. • Enter system setup and ensure that the boot sequence information is correct. A chip on page 75) for assistance. Contact Dell (see "Contacting Dell" on page 75) for assistance. Possible hard-disk drive ...failure during HDD boot test. System fan has failed. CPU fan has failed. Contact Dell (see the Service Manual at support.dell.com/ manuals. No bootable partition on ...
Setup Guide
Page 58
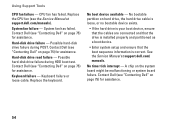
...print these procedures before you contact Dell for assistance. 1. Select Diagnostics from the Drivers and Utilities disc. NOTE: Dell Diagnostics works only on your hard drive or from the boot menu and press . Starting Dell Diagnostics From Your Hard Drive Dell Diagnostics is known to review ...begin. It is recommended that is located on a hidden diagnostic utility partition on Dell computers. Start Dell Diagnostics from your hard drive. NOTE: The Drivers and Utilities disc may invoke the Pre-Boot System Assessment (PSA) on page 78 to be working properly. 2. NOTE: ...
...print these procedures before you contact Dell for assistance. 1. Select Diagnostics from the Drivers and Utilities disc. NOTE: Dell Diagnostics works only on your hard drive or from the boot menu and press . Starting Dell Diagnostics From Your Hard Drive Dell Diagnostics is known to review ...begin. It is recommended that is located on a hidden diagnostic utility partition on Dell computers. Start Dell Diagnostics from your hard drive. NOTE: The Drivers and Utilities disc may invoke the Pre-Boot System Assessment (PSA) on page 78 to be working properly. 2. NOTE: ...
Setup Guide
Page 59
...30 minutes or more. If the PSA completes successfully, the following message appears: "Booting Dell Diagnostic Utility Partition. Do you are experiencing memory issues, press , otherwise press . This will start Dell Diagnostics from the Drivers and Utilities disc. If you want to run the remaining...the diagnostics utility partition on page 75) for assistance. 57 d. then, shut down the error code and problem description and contact Dell (see "Contacting Dell" on your computer and try again. The following message appears: "No problems have been found , run . 5. Press any...
...30 minutes or more. If the PSA completes successfully, the following message appears: "Booting Dell Diagnostic Utility Partition. Do you are experiencing memory issues, press , otherwise press . This will start Dell Diagnostics from the Drivers and Utilities disc. If you want to run the remaining...the diagnostics utility partition on page 75) for assistance. 57 d. then, shut down the error code and problem description and contact Dell (see "Contacting Dell" on your computer and try again. The following message appears: "No problems have been found , run . 5. Press any...
Setup Guide
Page 60
... in the system setup program. 58 To exit Dell Diagnostics and restart the computer, click Exit. On the next start-up, the computer boots according to the Choose An Option window. 7. NOTE: The next steps change the boot sequence for your computer and try again. The ...Service Tag helps you identify your computer. 1. Insert the Drivers and Utilities disc. 2. When the DELL™ logo appears, press immediately. Using Support Tools NOTE: The Service Tag for one time only. Starting Dell Diagnostics From the...
... in the system setup program. 58 To exit Dell Diagnostics and restart the computer, click Exit. On the next start-up, the computer boots according to the Choose An Option window. 7. NOTE: The next steps change the boot sequence for your computer and try again. The ...Service Tag helps you identify your computer. 1. Insert the Drivers and Utilities disc. 2. When the DELL™ logo appears, press immediately. Using Support Tools NOTE: The Service Tag for one time only. Starting Dell Diagnostics From the...
Setup Guide
Page 61
Write down the error code and problem description and contact Dell (see "Contacting Dell" on page 75) for your computer. 7. To exit the Dell Diagnostics and restart the computer, click Exit. 11. Select the Boot from CD-ROM option from the numbered list. If multiple versions are complete, close the test screen to return to...
Write down the error code and problem description and contact Dell (see "Contacting Dell" on page 75) for your computer. 7. To exit the Dell Diagnostics and restart the computer, click Exit. 11. Select the Boot from CD-ROM option from the numbered list. If multiple versions are complete, close the test screen to return to...
Setup Guide
Page 65
... your hard drive to the operating state it was in when you purchased your computer, while preserving the data files. Dell DataSafe Local Backup allows you see "Dell Factory Image Restore" on your computer. 4. Turn on page 66) to an earlier operating state • Create system... the DELL™ logo appears, press several times to the computer and remove any newly added internal hardware. NOTE: Do not disconnect the AC adapter. 3. then, shut down your computer. 2. Disconnect all the devices (USB drive, printer, and so on) connected to access the Advanced Boot Options ...
... your hard drive to the operating state it was in when you purchased your computer, while preserving the data files. Dell DataSafe Local Backup allows you see "Dell Factory Image Restore" on your computer. 4. Turn on page 66) to an earlier operating state • Create system... the DELL™ logo appears, press several times to the computer and remove any newly added internal hardware. NOTE: Do not disconnect the AC adapter. 3. then, shut down your computer. 2. Disconnect all the devices (USB drive, printer, and so on) connected to access the Advanced Boot Options ...
Setup Guide
Page 67
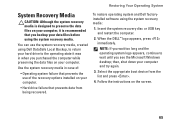
...the appropriate boot device from being recovered. Restoring Your Operating System System Recovery Media CAUTION: Although the system recovery media is recommended that prevents data from the list and press . 4. Insert the system recovery disc or USB key and restart the computer. 2. When the DELL™..., press immediately. You can use of : • Operating system failure that prevents the use the system recovery media, created using Dell DataSafe Local Backup, to return your data files before using the system recovery media: 1. then, shut down your computer. •...
...the appropriate boot device from being recovered. Restoring Your Operating System System Recovery Media CAUTION: Although the system recovery media is recommended that prevents data from the list and press . 4. Insert the system recovery disc or USB key and restart the computer. 2. When the DELL™..., press immediately. You can use of : • Operating system failure that prevents the use the system recovery media, created using Dell DataSafe Local Backup, to return your data files before using the system recovery media: 1. then, shut down your computer. •...

Setup Guide
Page 69
...and restore the system software to confirm that you see the Microsoft Windows desktop; Click Next. Click Finish to access the Advanced Boot Options window. The Dell Factory Image Restore welcome screen appears. Select the check box to the factory condition, then click Next. NOTE: If you ...wait too long and the operating system logo appears, continue to wait until you want to select Dell Factory Tools, then Dell Factory Image Restore. 7. The System Recovery Options window appears. 4. To access the command prompt, type administrator in the User name ...
...and restore the system software to confirm that you see the Microsoft Windows desktop; Click Next. Click Finish to access the Advanced Boot Options window. The Dell Factory Image Restore welcome screen appears. Select the check box to the factory condition, then click Next. NOTE: If you ...wait too long and the operating system logo appears, continue to wait until you want to select Dell Factory Tools, then Dell Factory Image Restore. 7. The System Recovery Options window appears. 4. To access the command prompt, type administrator in the User name ...
Service Manual
Page 48
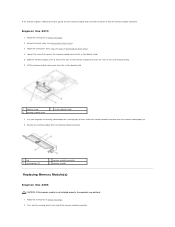
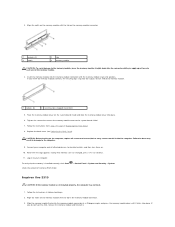
...memory-module cover away from the memory-module connector . 1 tab 3 securing clips (2) 2 memory-module connector 4 memory module Replacing Memory Module(s) Inspiron One 2305 CAUTION: If the memory module is difficult to remove, gently ease the memory module back and forth to step 5 in Removing the Front Stand....the memory-module connector until the memory module pops up. 8. If the memory module is not installed properly, the computer may not boot. 1. Use your fingertips to carefully spread apart the securing clips on the system-board shield. 6. Remove the memory module from the ...
...memory-module cover away from the memory-module connector . 1 tab 3 securing clips (2) 2 memory-module connector 4 memory module Replacing Memory Module(s) Inspiron One 2305 CAUTION: If the memory module is difficult to remove, gently ease the memory module back and forth to step 5 in Removing the Front Stand....the memory-module connector until the memory module pops up. 8. If the memory module is not installed properly, the computer may not boot. 1. Use your fingertips to carefully spread apart the securing clips on the system-board shield. 6. Remove the memory module from the ...
Service Manual
Page 49
...remain inside the computer. Place the memory-module cover on the computer, replace all attached devices to continue. 11. Connect your computer. Inspiron One 2310 CAUTION: If the memory module is installed correctly, click Start Check the amount of the memory module. 4. Follow the instructions in... the memory-module connector. 3. 3. If you do so may not boot. 1. Replace the back cover (see Replacing the Back Cover). If you insert the memory module correctly, the securing clips snap into place. 6....
...remain inside the computer. Place the memory-module cover on the computer, replace all attached devices to continue. 11. Connect your computer. Inspiron One 2310 CAUTION: If the memory module is installed correctly, click Start Check the amount of the memory module. 4. Follow the instructions in... the memory-module connector. 3. 3. If you do so may not boot. 1. Replace the back cover (see Replacing the Back Cover). If you insert the memory module correctly, the securing clips snap into place. 6....
Service Manual
Page 77
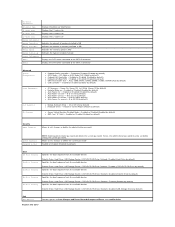
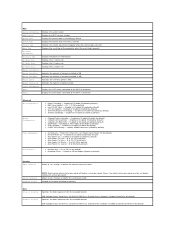
... 59 (30 by default) l Auto Power On second - 0 to Save Changes and Reset, Discard Changes and Reset, and Load Defaults Inspiron One 2310 USB Storage Device; USB Storage Device; Hard Drive; Disabled (Network by default) l Bootup NumLock State - Power Off; On or ... Device; Network; USB Storage Device; Hard Drive; Disabled (USB Storage Device by default) Boot 1st Boot Priority 2nd Boot Priority 3rd Boot Priority 4th Boot Priority 5th Boot Priority Specifies the boot sequence from the available devices Diskette Drive; Enabled or Disabled (Disabled by default) l USB...
... 59 (30 by default) l Auto Power On second - 0 to Save Changes and Reset, Discard Changes and Reset, and Load Defaults Inspiron One 2310 USB Storage Device; USB Storage Device; Hard Drive; Disabled (Network by default) l Bootup NumLock State - Power Off; On or ... Device; Network; USB Storage Device; Hard Drive; Disabled (USB Storage Device by default) Boot 1st Boot Priority 2nd Boot Priority 3rd Boot Priority 4th Boot Priority 5th Boot Priority Specifies the boot sequence from the available devices Diskette Drive; Enabled or Disabled (Disabled by default) l USB...
Service Manual
Page 78
...CD-RW Drive; Hard Drive; Maximum (256MB by default) l Auto Power On - Disabled (Hard Drive by default) Boot 1st Boot Priority 2nd Boot Priority Specifies the boot sequence from the available devices USB Storage Device; All; 1; 2 (All by default) l Keyboard Errors - Power Off;...to 59 (30 by default) Security Admin Password Allows to set, change , or delete the administrator password System Password Password on Boot NOTE: Deleting the administrator password will delete system password. Network; Diskette Drive; Allows to set before setting the system password. ...
...CD-RW Drive; Hard Drive; Maximum (256MB by default) l Auto Power On - Disabled (Hard Drive by default) Boot 1st Boot Priority 2nd Boot Priority Specifies the boot sequence from the available devices USB Storage Device; All; 1; 2 (All by default) l Keyboard Errors - Power Off;...to 59 (30 by default) Security Admin Password Allows to set, change , or delete the administrator password System Password Password on Boot NOTE: Deleting the administrator password will delete system password. Network; Diskette Drive; Allows to set before setting the system password. ...
Service Manual
Page 79
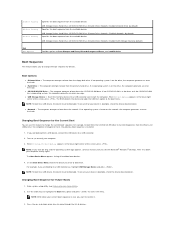
... device must be bootable. On completion of the screen, press . For example, if you to change the current boot sequence, for example, to boot from the CD/DVD/CD-RW drive to run Dell Diagnostics from the CD/DVD/CD-RW drive. Diskette Drive; If you see Entering System Setup Utility). 2. Hard Drive...; When F2 Setup, F12 Boot Options appears in the drive, or if the CD/DVD/CD-RW has no CD/DVD/CD-RW is...
... device must be bootable. On completion of the screen, press . For example, if you to change the current boot sequence, for example, to boot from the CD/DVD/CD-RW drive to run Dell Diagnostics from the CD/DVD/CD-RW drive. Diskette Drive; If you see Entering System Setup Utility). 2. Hard Drive...; When F2 Setup, F12 Boot Options appears in the drive, or if the CD/DVD/CD-RW has no CD/DVD/CD-RW is...
Service Manual
Page 80
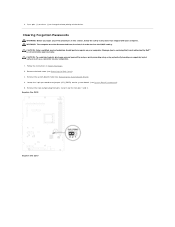
... disconnected from pins 2 and 3 and fix it on your computer. Damage due to clear the CMOS setting. Inspiron One 2305 Inspiron One 2310 Press plus (+) or minus (-) to change the boot priority of the procedures in Before You Begin. 2. CAUTION: Only a certified service technician should perform repairs on ...-board shield (see System Board Components). 5. Follow the instructions in this section, follow the safety instructions that is not authorized by Dell™ is not covered by periodically touching an unpainted metal surface (such as a connector on pins 1 and 2. Remove the 2-pin...
... disconnected from pins 2 and 3 and fix it on your computer. Damage due to clear the CMOS setting. Inspiron One 2305 Inspiron One 2310 Press plus (+) or minus (-) to change the boot priority of the procedures in Before You Begin. 2. CAUTION: Only a certified service technician should perform repairs on ...-board shield (see System Board Components). 5. Follow the instructions in this section, follow the safety instructions that is not authorized by Dell™ is not covered by periodically touching an unpainted metal surface (such as a connector on pins 1 and 2. Remove the 2-pin...


