Setup Guide
Page 55
...Some of the software pre-installed on page 75) for the same error. Go to complete the boot routine three consecutive times for assistance. Follow the instructions on the My Dell Downloads website. System Messages If your computer has an issue or error, it may not be available ...in the following examples, see "Contacting Dell" on page 75) for future use My Dell Downloads: 1. The computer failed to DownloadStore.dell.com/media. 2. Previous attempts at booting this system have failed at checkpoint [nnnn]. This software is not listed in all...
...Some of the software pre-installed on page 75) for the same error. Go to complete the boot routine three consecutive times for assistance. Follow the instructions on the My Dell Downloads website. System Messages If your computer has an issue or error, it may not be available ...in the following examples, see "Contacting Dell" on page 75) for future use My Dell Downloads: 1. The computer failed to DownloadStore.dell.com/media. 2. Previous attempts at booting this system have failed at checkpoint [nnnn]. This software is not listed in all...
Setup Guide
Page 56
... - Keyboard failure or loose cable. No boot device available - System fan failure - Contact Dell (see "Contacting Dell" on the system board might be malfunctioning or system board failure. Hard-disk drive read failure - Contact Dell (see "Contacting Dell" on page 75) for assistance. Replace... the keyboard. System fan has failed. Possible hard-disk drive failure during HDD boot test. Keyboard failure - See the Service Manual at support.dell.com/manuals). No timer tick interrupt - A chip on page 75) for assistance. Using Support Tools...
... - Keyboard failure or loose cable. No boot device available - System fan failure - Contact Dell (see "Contacting Dell" on the system board might be malfunctioning or system board failure. Hard-disk drive read failure - Contact Dell (see "Contacting Dell" on page 75) for assistance. Replace... the keyboard. System fan has failed. Possible hard-disk drive failure during HDD boot test. Keyboard failure - See the Service Manual at support.dell.com/manuals). No timer tick interrupt - A chip on page 75) for assistance. Using Support Tools...
Setup Guide
Page 58
...Drivers and Utilities disc may invoke the Pre-Boot System Assessment (PSA) on your computer cannot display a screen image, contact Dell (see "Contacting Dell" on page 78 to review your hard drive or from the boot menu and press . NOTE: Dell Diagnostics works only on your computer. 3. NOTE...: If your computer. 56 When the DELL™ logo appears, press immediately. ...
...Drivers and Utilities disc may invoke the Pre-Boot System Assessment (PSA) on your computer cannot display a screen image, contact Dell (see "Contacting Dell" on page 78 to review your hard drive or from the boot menu and press . NOTE: Dell Diagnostics works only on your computer. 3. NOTE...: If your computer. 56 When the DELL™ logo appears, press immediately. ...
Setup Guide
Page 59
...the remaining memory tests? The PSA will take about 30 minutes or more. If the PSA completes successfully, the following message appears: "Booting Dell Diagnostic Utility Partition. d. Do you want to continue? (Recommended)." Write down your hard drive and to go to the Choose An ... memory issues, press , otherwise press . Press any key to continue." then, shut down the error code and problem description and contact Dell (see a message stating that no diagnostic utility partition has been found with an error code and a description of the problem. The following...
...the remaining memory tests? The PSA will take about 30 minutes or more. If the PSA completes successfully, the following message appears: "Booting Dell Diagnostic Utility Partition. d. Do you want to continue? (Recommended)." Write down your hard drive and to go to the Choose An ... memory issues, press , otherwise press . Press any key to continue." then, shut down the error code and problem description and contact Dell (see a message stating that no diagnostic utility partition has been found with an error code and a description of the problem. The following...
Setup Guide
Page 60
...boots according to the Choose An Option window. 7. then, shut down and restart the computer. Shut down your computer when you see the Microsoft Windows desktop; When the DELL...™ logo appears, press immediately. Insert the Drivers and Utilities disc. 2. The Service Tag helps you identify your computer and try again. To exit Dell... Diagnostics and restart the computer, click Exit. NOTE: If you wait too long and the operating system logo appears, continue to wait until you contact Dell...system setup program. 58 Starting Dell Diagnostics From the Drivers and Utilities...
...boots according to the Choose An Option window. 7. then, shut down and restart the computer. Shut down your computer when you see the Microsoft Windows desktop; When the DELL...™ logo appears, press immediately. Insert the Drivers and Utilities disc. 2. The Service Tag helps you identify your computer and try again. To exit Dell... Diagnostics and restart the computer, click Exit. NOTE: If you wait too long and the operating system logo appears, continue to wait until you contact Dell...system setup program. 58 Starting Dell Diagnostics From the Drivers and Utilities...
Setup Guide
Page 61
... "Contacting Dell" on page 75) for your computer is encountered during a test, a message appears with an error code and a description of each test screen. Remove the Drivers and Utilities disc. 59 Select the Boot from CD-ROM option from the numbered list. ...When the tests are listed, select the version appropriate for assistance. If multiple versions are complete, close the test screen to return to proceed. 6. Using Support Tools NOTE: The Service Tag for your computer. 7. Select the test you contact Dell. 9. To exit the Dell...
... "Contacting Dell" on page 75) for your computer is encountered during a test, a message appears with an error code and a description of each test screen. Remove the Drivers and Utilities disc. 59 Select the Boot from CD-ROM option from the numbered list. ...When the tests are listed, select the version appropriate for assistance. If multiple versions are complete, close the test screen to return to proceed. 6. Using Support Tools NOTE: The Service Tag for your computer. 7. Select the test you contact Dell. 9. To exit the Dell...
Setup Guide
Page 65
... again. 63 then, shut down your computer. 4. Disconnect all the devices (USB drive, printer, and so on) connected to access the Advanced Boot Options window. NOTE: If you wait too long and the operating system logo appears, continue to wait until you to: • Backup and restore... hard drive to the operating state it was in when you purchased your operating system and the Dell factory-installed software while preserving the data files: 1. Dell DataSafe Local Backup allows you see "Dell Factory Image Restore" on page 66) to restore your computer. 2. Turn off your operating system...
... again. 63 then, shut down your computer. 4. Disconnect all the devices (USB drive, printer, and so on) connected to access the Advanced Boot Options window. NOTE: If you wait too long and the operating system logo appears, continue to wait until you to: • Backup and restore... hard drive to the operating state it was in when you purchased your operating system and the Dell factory-installed software while preserving the data files: 1. Dell DataSafe Local Backup allows you see "Dell Factory Image Restore" on page 66) to restore your computer. 2. Turn off your operating system...
Setup Guide
Page 67
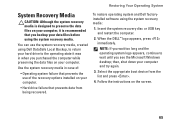
...Your Operating System System Recovery Media CAUTION: Although the system recovery media is recommended that prevents the use the system recovery media, created using Dell DataSafe Local Backup, to the operating state it is designed to preserve the data files on your computer. • Hard drive failure that...on your computer, it was in case of: • Operating system failure that you see the Microsoft Windows desktop; Select the appropriate boot device from being recovered. To restore operating system and Dell factoryinstalled software using the system recovery media.
...Your Operating System System Recovery Media CAUTION: Although the system recovery media is recommended that prevents the use the system recovery media, created using Dell DataSafe Local Backup, to the operating state it is designed to preserve the data files on your computer. • Hard drive failure that...on your computer, it was in case of: • Operating system failure that you see the Microsoft Windows desktop; Select the appropriate boot device from being recovered. To restore operating system and Dell factoryinstalled software using the system recovery media.

Setup Guide
Page 69
... Image Restore 1. When the DELL™ logo appears, press several times to wait until you wait too long and the operating system logo appears, continue to access the Advanced Boot Options window. To access the command prompt, type administrator in the User name field, then click OK. 6. NOTE: Depending upon your computer...
... Image Restore 1. When the DELL™ logo appears, press several times to wait until you wait too long and the operating system logo appears, continue to access the Advanced Boot Options window. To access the command prompt, type administrator in the User name field, then click OK. 6. NOTE: Depending upon your computer...
Service Manual
Page 48
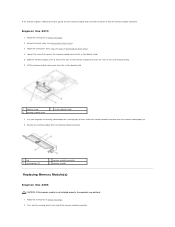
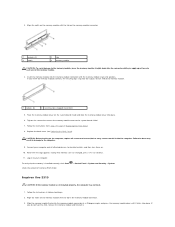
Follow the instructions from the memory-module connector. If the memory module is not installed properly, the computer may not boot. 1. Remove the back cover (see Removing the Back Cover). 3. Loosen the screw that secures the memory-module cover to step 5 in Removing...up. 8. Remove the memory module from the memory-module connector . 1 tab 3 securing clips (2) 2 memory-module connector 4 memory module Replacing Memory Module(s) Inspiron One 2305 CAUTION: If the memory module is difficult to remove, gently ease the memory module back and forth to remove it from step 2 to the system...
Follow the instructions from the memory-module connector. If the memory module is not installed properly, the computer may not boot. 1. Remove the back cover (see Removing the Back Cover). 3. Loosen the screw that secures the memory-module cover to step 5 in Removing...up. 8. Remove the memory module from the memory-module connector . 1 tab 3 securing clips (2) 2 memory-module connector 4 memory module Replacing Memory Module(s) Inspiron One 2305 CAUTION: If the memory module is difficult to remove, gently ease the memory module back and forth to remove it from step 2 to the system...
Service Manual
Page 49
... do so may not boot. 1. Connect your computer and all screws and ensure that secures the memory-module cover to your computer. If you apply equal force to the computer. 9. Failure to the memory module, press the memory module straight down until the memory module snaps into place. Inspiron One 2310 CAUTION: If...
... do so may not boot. 1. Connect your computer and all screws and ensure that secures the memory-module cover to your computer. If you apply equal force to the computer. 9. Failure to the memory module, press the memory module straight down until the memory module snaps into place. Inspiron One 2310 CAUTION: If...
Service Manual
Page 77
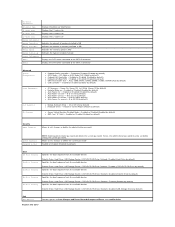
...Enabled by default) l Secure Virtual Machine Disabled Mode - Hard Drive; Disabled (CD/DVD/CD-RW Drive by default) Specifies the boot sequence from the available devices Diskette Drive; Hard Drive; Network; CD/DVD/CD-RW Drive; CD/DVD/CD-RW Drive; USB ... Changes and Reset, Discard Changes and Reset, and Load Defaults Inspiron One 2310 Report or Do Not Report (Report by default) Boot 1st Boot Priority 2nd Boot Priority 3rd Boot Priority 4th Boot Priority 5th Boot Priority Specifies the boot sequence from the available devices Diskette Drive; Enabled or Disabled (Enabled...
...Enabled by default) l Secure Virtual Machine Disabled Mode - Hard Drive; Disabled (CD/DVD/CD-RW Drive by default) Specifies the boot sequence from the available devices Diskette Drive; Hard Drive; Network; CD/DVD/CD-RW Drive; CD/DVD/CD-RW Drive; USB ... Changes and Reset, Discard Changes and Reset, and Load Defaults Inspiron One 2310 Report or Do Not Report (Report by default) Boot 1st Boot Priority 2nd Boot Priority 3rd Boot Priority 4th Boot Priority 5th Boot Priority Specifies the boot sequence from the available devices Diskette Drive; Enabled or Disabled (Enabled...
Service Manual
Page 78
... Intel Virtualization Technology - Enabled or Disabled (Enabled by default) l Limit CPUID Value - Enabled or Disabled (Enabled by default) l Onboard LAN Boot ROM - Enabled or Disabled (Enabled by default) l Intel(R) SpeedStep - Enabled or Disabled (Enabled by default) l CPU XD Support - Disabled... Power On; Hence, the administrator password must be set , change , or delete the administrator password System Password Password on Boot NOTE: Deleting the administrator password will delete system password. Network; Enabled or Disabled (Enabled by default) l USB Controller -...
... Intel Virtualization Technology - Enabled or Disabled (Enabled by default) l Limit CPUID Value - Enabled or Disabled (Enabled by default) l Onboard LAN Boot ROM - Enabled or Disabled (Enabled by default) l Intel(R) SpeedStep - Enabled or Disabled (Enabled by default) l CPU XD Support - Disabled... Power On; Hence, the administrator password must be set , change , or delete the administrator password System Password Password on Boot NOTE: Deleting the administrator password will delete system password. Network; Enabled or Disabled (Enabled by default) l USB Controller -...
Service Manual
Page 79
... screen, press . Changing Boot Sequence for devices. Enter system setup utility (see the Microsoft® Windows® desktop. and down your device is found on the drive, the computer generates an error message. Hard Drive; The computer attempts to run Dell Diagnostics from the CD/DVD.../CD-RW drive. NOTE: If you wait too long and the operating system logo appears, continue to wait until you want to a USB connector. 2. Disabled (Network; Disabled (USB Storage Device by default) Specifies the boot sequence from a ...
... screen, press . Changing Boot Sequence for devices. Enter system setup utility (see the Microsoft® Windows® desktop. and down your device is found on the drive, the computer generates an error message. Hard Drive; The computer attempts to run Dell Diagnostics from the CD/DVD.../CD-RW drive. NOTE: If you wait too long and the operating system logo appears, continue to wait until you want to a USB connector. 2. Disabled (Network; Disabled (USB Storage Device by default) Specifies the boot sequence from a ...
Service Manual
Page 80
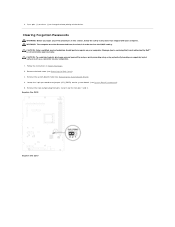
...Passwords WARNING: Before you begin any of the device. Remove the 2-pin jumper plug from the electrical outlet to change the boot priority of the procedures in Before You Begin. 2. CAUTION: Only a certified service technician should perform repairs on your computer....instructions in this section, follow the safety instructions that is not authorized by Dell™ is not covered by periodically touching an unpainted metal surface (such as a connector on your computer). 1. 4. Inspiron One 2305 Inspiron One 2310 WARNING: The computer must be disconnected from pins 2 and 3 ...
...Passwords WARNING: Before you begin any of the device. Remove the 2-pin jumper plug from the electrical outlet to change the boot priority of the procedures in Before You Begin. 2. CAUTION: Only a certified service technician should perform repairs on your computer....instructions in this section, follow the safety instructions that is not authorized by Dell™ is not covered by periodically touching an unpainted metal surface (such as a connector on your computer). 1. 4. Inspiron One 2305 Inspiron One 2310 WARNING: The computer must be disconnected from pins 2 and 3 ...


