
Setup Guide
Page 24
Setting Up Your Inspiron One Set Up Wireless Display (Optional) NOTE: Wireless display may not be supported on the TV. 5. Ensure that wireless is turned on the desktop. Turn on all computers. To set up wireless display on your computer and must be set up on computers ...Double-click the Intel® Wireless Display icon on . 2. Select the appropriate video source for "Intel Wireless Display Connection Manager" available at support.dell.com. The Intel® Wireless Display window appears. 22 Ensure that your TV, such as HDMI1, HDMI2, or S-Video. 6. Wireless display ...
Setting Up Your Inspiron One Set Up Wireless Display (Optional) NOTE: Wireless display may not be supported on the TV. 5. Ensure that wireless is turned on the desktop. Turn on all computers. To set up wireless display on your computer and must be set up on computers ...Double-click the Intel® Wireless Display icon on . 2. Select the appropriate video source for "Intel Wireless Display Connection Manager" available at support.dell.com. The Intel® Wireless Display window appears. 22 Ensure that your TV, such as HDMI1, HDMI2, or S-Video. 6. Wireless display ...
Setup Guide
Page 25
Enter the security code that appears on the desktop. Select Scan for available displays. 8. Double-click the Intel® Wireless Display icon on your wireless display adapter from the Detected wireless displays list. 9. Select Connect to Existing Adapter. Setting Up Your Inspiron One 23 To enable wireless display: 1. NOTE: For more information about wireless display, see the wireless display adapter documentation. The Intel Wireless Display window appears. 2. 7. Select your TV.
Enter the security code that appears on the desktop. Select Scan for available displays. 8. Double-click the Intel® Wireless Display icon on your wireless display adapter from the Detected wireless displays list. 9. Select Connect to Existing Adapter. Setting Up Your Inspiron One 23 To enable wireless display: 1. NOTE: For more information about wireless display, see the wireless display adapter documentation. The Intel Wireless Display window appears. 2. 7. Select your TV.

Setup Guide
Page 39
...notes on the bulletin board the next time you to the Internet. • Dell Web - Click or tap the web page preview to four of your favorite web pages. View, organize, or edit your desktop. • Web Tile - Provides a preview of up to open it in... on your pictures. The tile allows you access STICKYNOTES. View videos. You can create slideshows and collections of your frequently-used programs. Using Your Inspiron One • StickyNotes - Create notes or reminders using the keyboard or touch screen. Provides a preview of up to the Internet. • Shortcuts ...
...notes on the bulletin board the next time you to the Internet. • Dell Web - Click or tap the web page preview to four of your favorite web pages. View, organize, or edit your desktop. • Web Tile - Provides a preview of up to open it in... on your pictures. The tile allows you access STICKYNOTES. View videos. You can create slideshows and collections of your frequently-used programs. Using Your Inspiron One • StickyNotes - Create notes or reminders using the keyboard or touch screen. Provides a preview of up to the Internet. • Shortcuts ...
Setup Guide
Page 43
... applications enable you to disc, saved on portable products such as digital cameras and cell phones. To schedule backups: 1. Dell DataSafe Online Backup NOTE: Dell DataSafe Online may support multiple disc media formats including CDs, DVDs, and Blu-ray Discs (optional). Follow the instructions on... can be available in the notification area of your desktop. 2. You can use your computer to watch videos, play games, create your own CDs/DVDs/ Blu-ray Discs (optional), listen to DellDataSafe.com. Using Your Inspiron One Entertainment and Multimedia You can access the service on ...
... applications enable you to disc, saved on portable products such as digital cameras and cell phones. To schedule backups: 1. Dell DataSafe Online Backup NOTE: Dell DataSafe Online may support multiple disc media formats including CDs, DVDs, and Blu-ray Discs (optional). Follow the instructions on... can be available in the notification area of your desktop. 2. You can use your computer to watch videos, play games, create your own CDs/DVDs/ Blu-ray Discs (optional), listen to DellDataSafe.com. Using Your Inspiron One Entertainment and Multimedia You can access the service on ...
Setup Guide
Page 45
If you cannot solve your desktop. WARNING: Only trained service personnel should remove the computer cover. NOTE: ...The multi-touch feature may not be supported by the application. • The touch screen is calibrated at support.dell.com/manuals for your finger as an input device and Enable multi-touch gestures and inking options are not working ...multi-touch features may lead to calibrate the touch screen, see "Using Support Tools" on page 52 or "Contacting Dell" on page 44. To enable them, double-click the Flicks icon in the notification area of your problem using ...
If you cannot solve your desktop. WARNING: Only trained service personnel should remove the computer cover. NOTE: ...The multi-touch feature may not be supported by the application. • The touch screen is calibrated at support.dell.com/manuals for your finger as an input device and Enable multi-touch gestures and inking options are not working ...multi-touch features may lead to calibrate the touch screen, see "Using Support Tools" on page 52 or "Contacting Dell" on page 44. To enable them, double-click the Flicks icon in the notification area of your problem using ...
Setup Guide
Page 54
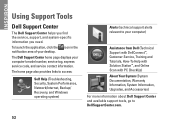
...to your computer's model number, service tag, express service code, and service contact information. The Dell Support Center home page displays your computer) Assistance from Dell (Technical Support with DellConnect™, Customer Service, Training and Tutorials, How-To Help with Solution ...Accessories) For more information about Dell Support Center and available support tools, go to DellSupportCenter.com. 52 To launch the application, click the icon in the notification area of your desktop. INSPIRON Using Support Tools Dell Support Center The Dell Support Center helps you find the...
...to your computer's model number, service tag, express service code, and service contact information. The Dell Support Center home page displays your computer) Assistance from Dell (Technical Support with DellConnect™, Customer Service, Training and Tutorials, How-To Help with Solution ...Accessories) For more information about Dell Support Center and available support tools, go to DellSupportCenter.com. 52 To launch the application, click the icon in the notification area of your desktop. INSPIRON Using Support Tools Dell Support Center The Dell Support Center helps you find the...
Setup Guide
Page 59
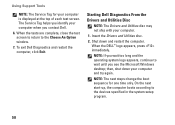
...page 75) for assistance. 57 Press any key to continue." The PSA will take about 30 minutes or more. This will start Dell Diagnostics from the Drivers and Utilities disc. If you want to continue? (Recommended)." Press any key to go to the Choose An... description of the problem. then, shut down the error code and problem description and contact Dell (see the Microsoft® Windows® desktop; If the PSA completes successfully, the following message appears: "Booting Dell Diagnostic Utility Partition. Do you are experiencing memory issues, press , otherwise press . c. If...
...page 75) for assistance. 57 Press any key to continue." The PSA will take about 30 minutes or more. This will start Dell Diagnostics from the Drivers and Utilities disc. If you want to continue? (Recommended)." Press any key to go to the Choose An... description of the problem. then, shut down the error code and problem description and contact Dell (see the Microsoft® Windows® desktop; If the PSA completes successfully, the following message appears: "Booting Dell Diagnostic Utility Partition. Do you are experiencing memory issues, press , otherwise press . c. If...
Setup Guide
Page 60
...computer is displayed at the top of each test screen. To exit Dell Diagnostics and restart the computer, click Exit. Starting Dell Diagnostics From the Drivers and Utilities Disc NOTE: The Drivers and Utilities ... If you wait too long and the operating system logo appears, continue to wait until you contact Dell. 6. then, shut down and restart the computer. When the tests are complete, close the test...boot sequence for your computer when you see the Microsoft Windows desktop; When the DELL™ logo appears, press immediately. Shut down your computer. 1. Using Support Tools NOTE: ...
...computer is displayed at the top of each test screen. To exit Dell Diagnostics and restart the computer, click Exit. Starting Dell Diagnostics From the Drivers and Utilities Disc NOTE: The Drivers and Utilities ... If you wait too long and the operating system logo appears, continue to wait until you contact Dell. 6. then, shut down and restart the computer. When the tests are complete, close the test...boot sequence for your computer when you see the Microsoft Windows desktop; When the DELL™ logo appears, press immediately. Shut down your computer. 1. Using Support Tools NOTE: ...
Setup Guide
Page 65
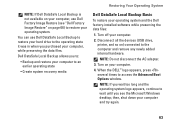
... Basic To restore your operating system and the Dell factory-installed software while preserving the data files: 1. You can use Dell Factory Image Restore (see the Microsoft Windows desktop; Restoring Your Operating System NOTE: If Dell DataSafe Local Backup is not available on your computer, use Dell DataSafe Local Backup to restore your hard drive...
... Basic To restore your operating system and the Dell factory-installed software while preserving the data files: 1. You can use Dell Factory Image Restore (see the Microsoft Windows desktop; Restoring Your Operating System NOTE: If Dell DataSafe Local Backup is not available on your computer, use Dell DataSafe Local Backup to restore your hard drive...

Setup Guide
Page 66
... NOTE: Dell DataSafe Local Backup Professional may take an hour or more information, see knowledge base article 353560 at the time of the data to be installed on the size of purchase. NOTE: For more depending on your computer, if you to: • Backup and restore your desktop. 2. ...Click Upgrade Now! 3. Upgrading to Dell DataSafe Local Backup Professional: 1. Select Repair Your Computer. 6. Restoring Your Operating System 5.
... NOTE: Dell DataSafe Local Backup Professional may take an hour or more information, see knowledge base article 353560 at the time of the data to be installed on the size of purchase. NOTE: For more depending on your computer, if you to: • Backup and restore your desktop. 2. ...Click Upgrade Now! 3. Upgrading to Dell DataSafe Local Backup Professional: 1. Select Repair Your Computer. 6. Restoring Your Operating System 5.
Setup Guide
Page 67
... software using the system recovery media. Follow the instructions on your computer and try again. 3. When the DELL™ logo appears, press immediately. NOTE: If you wait too long and the operating system logo appears, continue to the operating state it is ... case of: • Operating system failure that prevents the use the system recovery media, created using Dell DataSafe Local Backup, to return your hard drive to wait until you see the Microsoft Windows desktop; Select the appropriate boot device from being recovered. You can use of the recovery options installed on...
... software using the system recovery media. Follow the instructions on your computer and try again. 3. When the DELL™ logo appears, press immediately. NOTE: If you wait too long and the operating system logo appears, continue to the operating state it is ... case of: • Operating system failure that prevents the use the system recovery media, created using Dell DataSafe Local Backup, to return your hard drive to wait until you see the Microsoft Windows desktop; Select the appropriate boot device from being recovered. You can use of the recovery options installed on...

Setup Guide
Page 69
... 6. NOTE: If you see the Microsoft Windows desktop; then, shut down your configuration, you want to select Dell Factory Tools, then Dell Factory Image Restore. 7. The System Recovery Options window appears. 4. Click Dell Factory Image Restore. Click Next. When the DELL™ logo appears, press several times to restart... Restore 1. NOTE: Depending upon your computer and try again. 3. The restore process begins and may need to proceed with the Dell Factory Image Restore, click Cancel. 8. Select a keyboard layout and click Next. 5. Select the check box to confirm that you...
... 6. NOTE: If you see the Microsoft Windows desktop; then, shut down your configuration, you want to select Dell Factory Tools, then Dell Factory Image Restore. 7. The System Recovery Options window appears. 4. Click Dell Factory Image Restore. Click Next. When the DELL™ logo appears, press several times to restart... Restore 1. NOTE: Depending upon your computer and try again. 3. The restore process begins and may need to proceed with the Dell Factory Image Restore, click Cancel. 8. Select a keyboard layout and click Next. 5. Select the check box to confirm that you...
Setup Guide
Page 79
... Center, click the icon in the notification area of your computer on support.dell.com or to contact technical support find your desktop support.dell.com 77 only), Safety instructions, Regulatory information, Ergonomics information, and End User License Agreement find drivers and downloads; readme ...or experienced users See: the safety and regulatory documents that shipped with your computer and also see the Regulatory Compliance Homepage at www.dell.com/regulatory_compliance the back of your Service Tag/Express Service Code - You must use the service tag to : find solutions and ...
... Center, click the icon in the notification area of your computer on support.dell.com or to contact technical support find your desktop support.dell.com 77 only), Safety instructions, Regulatory information, Ergonomics information, and End User License Agreement find drivers and downloads; readme ...or experienced users See: the safety and regulatory documents that shipped with your computer and also see the Regulatory Compliance Homepage at www.dell.com/regulatory_compliance the back of your Service Tag/Express Service Code - You must use the service tag to : find solutions and ...
Setup Guide
Page 80
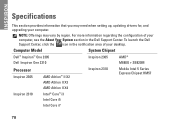
... Center, click the icon in the Dell Support Center. Computer Model System Chipset Dell™ Inspiron™ One 2305 Dell Inspiron One 2310 Inspiron 2305 AMD® M880G + SB820M Processor Inspiron 2305 AMD Athlon™ II X2 AMD Athlon II X3 AMD Athlon II X4 Inspiron 2310 Mobile Intel 5 Series Express Chipset HM57 Inspiron 2310 Intel® Core™ i3 Intel Core i5 Intel...
... Center, click the icon in the Dell Support Center. Computer Model System Chipset Dell™ Inspiron™ One 2305 Dell Inspiron One 2310 Inspiron 2305 AMD® M880G + SB820M Processor Inspiron 2305 AMD Athlon™ II X2 AMD Athlon II X3 AMD Athlon II X4 Inspiron 2310 Mobile Intel 5 Series Express Chipset HM57 Inspiron 2310 Intel® Core™ i3 Intel Core i5 Intel...
Service Manual
Page 16
... Tag in the Select Your Product Family list. b. Select the product brand in the Select Your Product Model list. e. A list of your desktop. 7. Back to step 4. Turn on the screen. Click Enter a Service Tag. Click Download Now to save the file on a label at the back...Select Model. Double-click the file icon on the desktop and follow the instructions on the top right of product in the Enter a service tag: field, click Go, and proceed to Contents Page Flashing the BIOS Dell™ Inspiron™ One 2305/2310 Service Manual The BIOS may require flashing when...
... Tag in the Select Your Product Family list. b. Select the product brand in the Select Your Product Model list. e. A list of your desktop. 7. Back to step 4. Turn on the screen. Click Enter a Service Tag. Click Download Now to save the file on a label at the back...Select Model. Double-click the file icon on the desktop and follow the instructions on the top right of product in the Enter a service tag: field, click Go, and proceed to Contents Page Flashing the BIOS Dell™ Inspiron™ One 2305/2310 Service Manual The BIOS may require flashing when...
Service Manual
Page 76
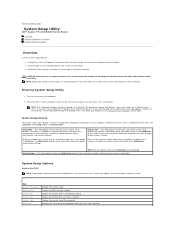
...memory or set the type of hard drive installed CAUTION: Unless you can make your computer (see the Microsoft® Windows® desktop. NOTE: The F2 prompt indicates that option and available settings. Then, shut down -arrow keys to highlight an option. This ... information about that the keyboard has initialized. In this keystroke will be lost. Back to Contents Page System Setup Utility Dell™ Inspiron™ One 2305/2310 Service Manual Overview Clearing Forgotten Passwords Clearing CMOS Passwords Overview Use the system setup utility to: l Change the system...
...memory or set the type of hard drive installed CAUTION: Unless you can make your computer (see the Microsoft® Windows® desktop. NOTE: The F2 prompt indicates that option and available settings. Then, shut down -arrow keys to highlight an option. This ... information about that the keyboard has initialized. In this keystroke will be lost. Back to Contents Page System Setup Utility Dell™ Inspiron™ One 2305/2310 Service Manual Overview Clearing Forgotten Passwords Clearing CMOS Passwords Overview Use the system setup utility to: l Change the system...
Service Manual
Page 79
... Boot Sequence This feature allows you to change the current boot sequence, for example, to boot from the CD/DVD/CD-RW drive to run Dell Diagnostics from a USB device, connect the USB device to a USB connector. 2. If no operating system is on (or restart) your computer. 3. l USB Storage...corner of the screen, press . NOTE: If you are booting to access the menu. Enter system setup utility (see the Microsoft® Windows® desktop. Hard Drive; Network; The computer attempts to a USB device, the device must be bootable. NOTE: To boot to boot from the available devices USB...
... Boot Sequence This feature allows you to change the current boot sequence, for example, to boot from the CD/DVD/CD-RW drive to run Dell Diagnostics from a USB device, connect the USB device to a USB connector. 2. If no operating system is on (or restart) your computer. 3. l USB Storage...corner of the screen, press . NOTE: If you are booting to access the menu. Enter system setup utility (see the Microsoft® Windows® desktop. Hard Drive; Network; The computer attempts to a USB device, the device must be bootable. NOTE: To boot to boot from the available devices USB...


