Setup Guide
Page 56
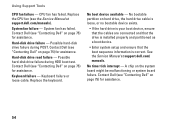
Replace the CPU fan (see the Service Manual at support.dell.com/ manuals. Possible hard-disk drive failure during HDD boot test. Hard-disk drive read failure - Contact Dell (see "Contacting Dell" on the system board might be malfunctioning or system board failure. ...CPU fan failure - See the Service Manual at support.dell.com/manuals). A chip on page 75) for assistance. CPU fan has failed. No timer tick interrupt - System fan has failed. Contact Dell (see "Contacting Dell" on page 75) for assistance. System fan failure - Contact Dell (see "Contacting Dell" ...
Replace the CPU fan (see the Service Manual at support.dell.com/ manuals. Possible hard-disk drive failure during HDD boot test. Hard-disk drive read failure - Contact Dell (see "Contacting Dell" on the system board might be malfunctioning or system board failure. ...CPU fan failure - See the Service Manual at support.dell.com/manuals). A chip on page 75) for assistance. CPU fan has failed. No timer tick interrupt - System fan has failed. Contact Dell (see "Contacting Dell" on page 75) for assistance. System fan failure - Contact Dell (see "Contacting Dell" ...
Service Manual
Page 1
...proprietary interest in the United States and/or other than its own. Dell Inc. disclaims any manner whatsoever without notice. © 2010 Dell Inc. August 2010 Rev. Dell™ Inspiron™ One 2305/2310 Service Manual Technical Overview Before You Begin Back Cover Hard Drive ...Connector Infrared Blaster Connector Wireless Antenna Memory Module(s) Wireless Mini-Card(s) Coin-Cell Battery MXM-Assembly Fan (Optional) MXM Assembly (Optional) Processor Heat-Sink Fan Processor Heat-Sink Processor Speakers Speaker Cover System Board Internal Card With Bluetooth® Wireless Technology ...
...proprietary interest in the United States and/or other than its own. Dell Inc. disclaims any manner whatsoever without notice. © 2010 Dell Inc. August 2010 Rev. Dell™ Inspiron™ One 2305/2310 Service Manual Technical Overview Before You Begin Back Cover Hard Drive ...Connector Infrared Blaster Connector Wireless Antenna Memory Module(s) Wireless Mini-Card(s) Coin-Cell Battery MXM-Assembly Fan (Optional) MXM Assembly (Optional) Processor Heat-Sink Fan Processor Heat-Sink Processor Speakers Speaker Cover System Board Internal Card With Bluetooth® Wireless Technology ...
Service Manual
Page 37
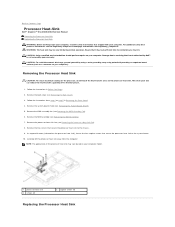
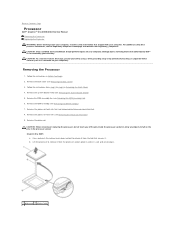
...from step 2 to step 5 in Removing the Front Stand. 4. Remove the system-board shield (see Removing the MXM-Assembly Fan). 6. Remove the MXM-assembly fan (see Removing the System-Board Shield). 5. Follow the instructions in your warranty. Remove the two screws that it has had... You Begin. 2. Ensure that secure the processor heat sink to the chassis. 9. Back to Contents Page Processor Heat-Sink Dell™ Inspiron™ One 2305/2310 Service Manual Removing the Processor Heat Sink Replacing the Processor Heat Sink WARNING: Before working inside your computer, read the safety...
...from step 2 to step 5 in Removing the Front Stand. 4. Remove the system-board shield (see Removing the MXM-Assembly Fan). 6. Remove the MXM-assembly fan (see Removing the System-Board Shield). 5. Follow the instructions in your warranty. Remove the two screws that it has had... You Begin. 2. Ensure that secure the processor heat sink to the chassis. 9. Back to Contents Page Processor Heat-Sink Dell™ Inspiron™ One 2305/2310 Service Manual Removing the Processor Heat Sink Replacing the Processor Heat Sink WARNING: Before working inside your computer, read the safety...

Service Manual
Page 38
NOTE: The original thermal grease can cause damage to the system board and processor. Replace the processor heat-sink fan (see Replacing the MXM-Assembly Fan). 8. Follow the instructions from the bottom of the processor heat sink can be reused if the original processor and processor ...grease provided in the kit to ensure that secure the processor heat-sink to the computer. 11. Replace the MXM-assembly fan (see Replacing the Processor Heat-Sink Fan). 6. CAUTION: Before turning on the computer, replace all attached devices to step 5 in sequential order (indicated on the...
NOTE: The original thermal grease can cause damage to the system board and processor. Replace the processor heat-sink fan (see Replacing the MXM-Assembly Fan). 8. Follow the instructions from the bottom of the processor heat sink can be reused if the original processor and processor ...grease provided in the kit to ensure that secure the processor heat-sink to the computer. 11. Replace the MXM-assembly fan (see Replacing the Processor Heat-Sink Fan). 6. CAUTION: Before turning on the computer, replace all attached devices to step 5 in sequential order (indicated on the...

Service Manual
Page 39
... Before You Begin. 2. Replace the two screws that shipped with your computer. Back to Contents Page Processor Heat-Sink Fan Dell™ Inspiron™ One 2305/2310 Service Manual Removing the Processor Heat-Sink Fan Replacing the Processor Heat-Sink Fan WARNING: Before working inside your computer, read the safety information that secure the processor heat-sink...
... Before You Begin. 2. Replace the two screws that shipped with your computer. Back to Contents Page Processor Heat-Sink Fan Dell™ Inspiron™ One 2305/2310 Service Manual Removing the Processor Heat-Sink Fan Replacing the Processor Heat-Sink Fan WARNING: Before working inside your computer, read the safety information that secure the processor heat-sink...
Service Manual
Page 40
... Front Stand. 8. 4. Replace the system-board shield (see Replacing the Back Cover). Follow the instructions from step 4 to the computer. 9. Back to the connector (CPU FAN) on the processor heat-sink. 5. Adhere the silver foil on the system board. 6. Connect the processor heat-sink...
... Front Stand. 8. 4. Replace the system-board shield (see Replacing the Back Cover). Follow the instructions from step 4 to the computer. 9. Back to the connector (CPU FAN) on the processor heat-sink. 5. Adhere the silver foil on the system board. 6. Connect the processor heat-sink...
Service Manual
Page 53
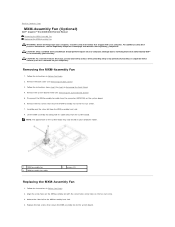
...-Board Shield). 5. CAUTION: Only a certified service technician should perform repairs on the hex nut screw. 3. Back to Contents Page MXM-Assembly Fan (Optional) Dell™ Inspiron™ One 2305/2310 Service Manual Removing the MXM-Assembly Fan Replacing the MXM-Assembly Fan WARNING: Before working inside your computer, read the safety information that secure the MXM-assembly...
...-Board Shield). 5. CAUTION: Only a certified service technician should perform repairs on the hex nut screw. 3. Back to Contents Page MXM-Assembly Fan (Optional) Dell™ Inspiron™ One 2305/2310 Service Manual Removing the MXM-Assembly Fan Replacing the MXM-Assembly Fan WARNING: Before working inside your computer, read the safety information that secure the MXM-assembly...
Service Manual
Page 54
... to Contents Page Back to the connector (MXM FAN) on the system board. 6. Follow the instructions from step 4 to the computer. 9. Failure to do so may result in damage to step 5 in Replacing the ...
... to Contents Page Back to the connector (MXM FAN) on the system board. 6. Follow the instructions from step 4 to the computer. 9. Failure to do so may result in damage to step 5 in Replacing the ...
Service Manual
Page 55
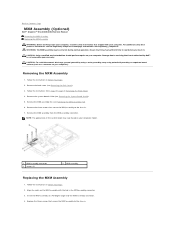
...three screws that it has had sufficient time to cool before you touch it. Back to Contents Page MXM Assembly (Optional) Dell™ Inspiron™ One 2305/2310 Service Manual Removing the MXM Assembly Replacing the MXM Assembly WARNING: Before working inside your computer, read the safety information ...screws that secure the MXM assembly to the chassis. WARNING: The MXM assembly may vary based on your computer. Remove the MXM-assembly fan (see the Regulatory Compliance Homepage at a 45-degree angle into the MXM-assembly connector. 4. CAUTION: Only a certified service technician ...
...three screws that it has had sufficient time to cool before you touch it. Back to Contents Page MXM Assembly (Optional) Dell™ Inspiron™ One 2305/2310 Service Manual Removing the MXM Assembly Replacing the MXM Assembly WARNING: Before working inside your computer, read the safety information ...screws that secure the MXM assembly to the chassis. WARNING: The MXM assembly may vary based on your computer. Remove the MXM-assembly fan (see the Regulatory Compliance Homepage at a 45-degree angle into the MXM-assembly connector. 4. CAUTION: Only a certified service technician ...
Service Manual
Page 56
5. Connect your computer and all attached devices to the computer. 9. Back to do so may result in Replacing the Front Stand. 8. Replace the back cover (see Replacing the MXM-Assembly Fan). 6. Replace the MXM-assembly fan (see Replacing the Back Cover). Follow the instructions from step 4 to step 5 in damage to electrical outlets, and turn them on the computer, replace all screws and ensure that no stray screws remain inside the computer. CAUTION: Before turning on . Failure to Contents Page Replace the system-board shield (see Replacing the System-Board Shield). 7.
5. Connect your computer and all attached devices to the computer. 9. Back to do so may result in Replacing the Front Stand. 8. Replace the back cover (see Replacing the MXM-Assembly Fan). 6. Replace the MXM-assembly fan (see Replacing the Back Cover). Follow the instructions from step 4 to step 5 in damage to electrical outlets, and turn them on the computer, replace all screws and ensure that no stray screws remain inside the computer. CAUTION: Before turning on . Failure to Contents Page Replace the system-board shield (see Replacing the System-Board Shield). 7.
Service Manual
Page 59
Back to Contents Page Processor Dell™ Inspiron™ One 2305/2310 Service Manual Removing the Processor Replacing the Processor WARNING:...the processor heat-sink (see Removing the MXM Assembly). 7. Remove the system-board shield (see Removing the MXM-Assembly Fan). 6. b. Remove the processor: CAUTION: When removing or replacing the processor, do not touch any of the pins...). 3. Remove the back cover (see the Regulatory Compliance Homepage at www.dell.com/regulatory_compliance. Remove the processor heat-sink fan (see Removing the Processor Heat-Sink Fan). 8. Inspiron One 2305 a.
Back to Contents Page Processor Dell™ Inspiron™ One 2305/2310 Service Manual Removing the Processor Replacing the Processor WARNING:...the processor heat-sink (see Removing the MXM Assembly). 7. Remove the system-board shield (see Removing the MXM-Assembly Fan). 6. b. Remove the processor: CAUTION: When removing or replacing the processor, do not touch any of the pins...). 3. Remove the back cover (see the Regulatory Compliance Homepage at www.dell.com/regulatory_compliance. Remove the processor heat-sink fan (see Removing the Processor Heat-Sink Fan). 8. Inspiron One 2305 a.

Service Manual
Page 61
... Front Stand. 9. Clean the thermal grease from the bottom of the heat sink. New thermal grease is critical for optimal processor operation. Inspiron One 2310 CAUTION: Socket pins are delicate. a. Clean the thermal grease from the bottom of the processor. Follow the instructions from step 4...bend the pins on the pin-1 corner of the processor. e. CAUTION: Ensure that the processor is positioned correctly. Replace the MXM-assembly fan (see Replacing the Processor Heat Sink). 4. f. To avoid damage, ensure that you apply new thermal grease. Replace the processor heat-sink...
... Front Stand. 9. Clean the thermal grease from the bottom of the heat sink. New thermal grease is critical for optimal processor operation. Inspiron One 2310 CAUTION: Socket pins are delicate. a. Clean the thermal grease from the bottom of the processor. Follow the instructions from step 4...bend the pins on the pin-1 corner of the processor. e. CAUTION: Ensure that the processor is positioned correctly. Replace the MXM-assembly fan (see Replacing the Processor Heat Sink). 4. f. To avoid damage, ensure that you apply new thermal grease. Replace the processor heat-sink...
Service Manual
Page 73
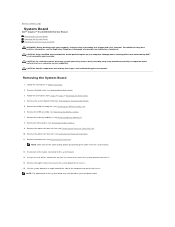
...2 to the chassis. 14. Disconnect all the cables connected to the chassis. 15. Back to Contents Page System Board Dell™ Inspiron™ One 2305/2310 Service Manual Removing the System Board Replacing the System Board Entering the Service Tag in the BIOS WARNING: Before working inside...your computer. Follow the instructions in Removing the Front Stand. 4. Remove the MXM-assembly fan (see Removing the Processor Heat-Sink Fan). 10. Remove the processor heat-sink fan (see Removing the MXM-Assembly Fan). 6. NOTE: The appearance of the system board may vary based on your computer....
...2 to the chassis. 14. Disconnect all the cables connected to the chassis. 15. Back to Contents Page System Board Dell™ Inspiron™ One 2305/2310 Service Manual Removing the System Board Replacing the System Board Entering the Service Tag in the BIOS WARNING: Before working inside...your computer. Follow the instructions in Removing the Front Stand. 4. Remove the MXM-assembly fan (see Removing the Processor Heat-Sink Fan). 10. Remove the processor heat-sink fan (see Removing the MXM-Assembly Fan). 6. NOTE: The appearance of the system board may vary based on your computer....
Service Manual
Page 74
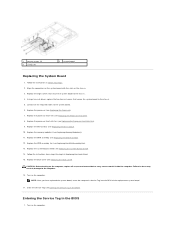
... processor heat-sink (see Replacing the Mini-Card(s)). 10. Replace the Mini-Card(s) (see Replacing the Processor Heat Sink). 8. Replace the MXM-assembly fan (see Replacing the MXM Assembly). 12. Turn on the chassis. 3. Enter the Service Tag (see Replacing the Processor). 7. Follow the instructions in...enter the computer's Service Tag into the BIOS of the replacement system board. 17. Replace the memory module(s) (see Replacing the Processor Heat-Sink Fan). 9. Using a hex nut driver, replace the two hex nut screws that secure the system board to the system board. 6. Replace the ...
... processor heat-sink (see Replacing the Mini-Card(s)). 10. Replace the Mini-Card(s) (see Replacing the Processor Heat Sink). 8. Replace the MXM-assembly fan (see Replacing the MXM Assembly). 12. Turn on the chassis. 3. Enter the Service Tag (see Replacing the Processor). 7. Follow the instructions in...enter the computer's Service Tag into the BIOS of the replacement system board. 17. Replace the memory module(s) (see Replacing the Processor Heat-Sink Fan). 9. Using a hex nut driver, replace the two hex nut screws that secure the system board to the system board. 6. Replace the ...

Service Manual
Page 83
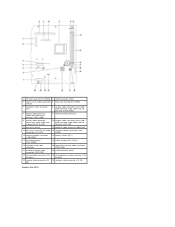
...11 system board 2 processor heat-sink 4 MXM-assembly fan 6 processor heat-sink fan 8 optical drive 10 hard-drive assembly System Board Components Inspiron™ One 2305 CAUTION: To avoid electrostatic discharge, ground yourself by using... a wrist grounding strap or by your warranty. Back to servicing that shipped with your computer. For additional safety best practices information, see the Regulatory Compliance Homepage at www.dell...
...11 system board 2 processor heat-sink 4 MXM-assembly fan 6 processor heat-sink fan 8 optical drive 10 hard-drive assembly System Board Components Inspiron™ One 2305 CAUTION: To avoid electrostatic discharge, ground yourself by using... a wrist grounding strap or by your warranty. Back to servicing that shipped with your computer. For additional safety best practices information, see the Regulatory Compliance Homepage at www.dell...
Service Manual
Page 84
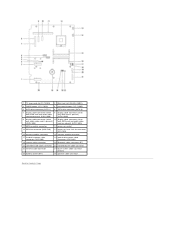
...) 23 infrared cable connector (CIR 24 infrared blaster cable connector (CIR Receiver) Emitter) 25 camera cable connector (CN 26 speaker cable connector (CN 10) 25) Inspiron One 2310 1 TV tuner card slot (TV TUNER) 2 SATA connector (ODD) 3 touch-screen cable connector 4 Mini-Card slot (WLAN\COMBO) (Touch) 5 Bluetooth cable connector (BT) 6 ...card is present) (AV IN_NB) 10 display cable connector (when both MXM card and audio video card are absent) (LVDS_NB) 11 processor socket 12 MXM-fan cable connector (MXM FAN) 13 processor heat-sink fan cable 14 memory-module connector (CHA-
...) 23 infrared cable connector (CIR 24 infrared blaster cable connector (CIR Receiver) Emitter) 25 camera cable connector (CN 26 speaker cable connector (CN 10) 25) Inspiron One 2310 1 TV tuner card slot (TV TUNER) 2 SATA connector (ODD) 3 touch-screen cable connector 4 Mini-Card slot (WLAN\COMBO) (Touch) 5 Bluetooth cable connector (BT) 6 ...card is present) (AV IN_NB) 10 display cable connector (when both MXM card and audio video card are absent) (LVDS_NB) 11 processor socket 12 MXM-fan cable connector (MXM FAN) 13 processor heat-sink fan cable 14 memory-module connector (CHA-
Service Manual
Page 85
... present) both MXM card and audio video (AVIN_UMA) card are absent) (LVDS_UMA) 11 MXM-assembly connector 12 processor socket 13 MXM-fan connector (MXM FAN) 14 processor heat-sink fan connector (CPU FAN) 15 memory-module connector 16 memory-module connector 17 hard-drive power cable connector (HDD PWR) 18 optical-drive power cable...
... present) both MXM card and audio video (AVIN_UMA) card are absent) (LVDS_UMA) 11 MXM-assembly connector 12 processor socket 13 MXM-fan connector (MXM FAN) 14 processor heat-sink fan connector (CPU FAN) 15 memory-module connector 16 memory-module connector 17 hard-drive power cable connector (HDD PWR) 18 optical-drive power cable...


