Setup Guide
Page 5
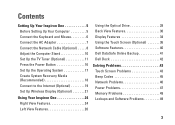
Contents Setting Up Your Inspiron One 5 Before Setting Up Your Computer 5 Connect the Keyboard and Mouse 6 Connect the AC Adapter... Media (Recommended 18 Connect to the Internet (Optional 19 Set Up Wireless Display (Optional 21 Using Your Inspiron One 24 Right View Features 24 Left View Features 26 Using the Optical Drive 28 Back View Features 30 Display... Features 34 Using the Touch Screen (Optional 36 Software Features 40 Dell DataSafe Online Backup 41 Dell Dock 42 Solving Problems 43 Touch Screen Problems 43 Beep Codes 45 Network Problems 46 Power ...
Contents Setting Up Your Inspiron One 5 Before Setting Up Your Computer 5 Connect the Keyboard and Mouse 6 Connect the AC Adapter... Media (Recommended 18 Connect to the Internet (Optional 19 Set Up Wireless Display (Optional 21 Using Your Inspiron One 24 Right View Features 24 Left View Features 26 Using the Optical Drive 28 Back View Features 30 Display... Features 34 Using the Touch Screen (Optional 36 Software Features 40 Dell DataSafe Online Backup 41 Dell Dock 42 Solving Problems 43 Touch Screen Problems 43 Beep Codes 45 Network Problems 46 Power ...

Setup Guide
Page 26
Connect to 3 view and share digital photos, music, 4 videos, and documents stored on your Dell™ Inspiron One computer. Press to decrease the volume level. 1 3 7-in-1 Media Card Reader - 2 Provides a fast and convenient way to USB devices, such as a mouse,... printer, external drive, or MP3 player. 24 Press to increase the volume level. 2 Volume decrease button - Right View Features 1 Volume increase button - INSPIRON Using Your Inspiron One This section provides information about the features available on memory cards. 5 6 7 8 4 USB 2.0 connectors (2) -
Connect to 3 view and share digital photos, music, 4 videos, and documents stored on your Dell™ Inspiron One computer. Press to decrease the volume level. 1 3 7-in-1 Media Card Reader - 2 Provides a fast and convenient way to USB devices, such as a mouse,... printer, external drive, or MP3 player. 24 Press to increase the volume level. 2 Volume decrease button - Right View Features 1 Volume increase button - INSPIRON Using Your Inspiron One This section provides information about the features available on memory cards. 5 6 7 8 4 USB 2.0 connectors (2) -

Setup Guide
Page 47
.../manuals. NOTE: To replace parts, see "Contacting Dell" on page 75) for assistance. BIOS ROM checksum failure Two No RAM detected NOTE: If you installed or replaced the memory module, ensure that the memory module is seated properly. Solving Problems Beep Code Possible Problem One Possible system board failure - Chipset error Four RAM read...
.../manuals. NOTE: To replace parts, see "Contacting Dell" on page 75) for assistance. BIOS ROM checksum failure Two No RAM detected NOTE: If you installed or replaced the memory module, ensure that the memory module is seated properly. Solving Problems Beep Code Possible Problem One Possible system board failure - Chipset error Four RAM read...
Setup Guide
Page 51
... to see if that is no longer responding 4. Click the program that resolves the problem. • If the problem persists, contact Dell (see "Contacting Dell" on page 75). Solving Problems Memory Problems If you receive an insufficient memory message - • Save and close any open files and exit any open programs you experience other...
... to see if that is no longer responding 4. Click the program that resolves the problem. • If the problem persists, contact Dell (see "Contacting Dell" on page 75). Solving Problems Memory Problems If you receive an insufficient memory message - • Save and close any open files and exit any open programs you experience other...
Setup Guide
Page 59
... a message appears with this system so far. If the PSA completes successfully, the following message appears: "Booting Dell Diagnostic Utility Partition. c. Select the test you want to run the remaining memory tests? Do you want to continue? (Recommended)." If you want to run . 5. Press any key to ...is not invoked: Press any key to the Choose An Option window. 4. then, shut down the error code and problem description and contact Dell (see the Microsoft® Windows® desktop; b. Press any key to go to start running the tests. The PSA will take about...
... a message appears with this system so far. If the PSA completes successfully, the following message appears: "Booting Dell Diagnostic Utility Partition. c. Select the test you want to run the remaining memory tests? Do you want to continue? (Recommended)." If you want to run . 5. Press any key to ...is not invoked: Press any key to the Choose An Option window. 4. then, shut down the error code and problem description and contact Dell (see the Microsoft® Windows® desktop; b. Press any key to go to start running the tests. The PSA will take about...
Setup Guide
Page 78
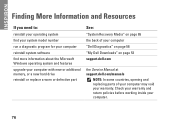
... your warranty and return policies before working inside your warranty. INSPIRON Finding More Information and Resources If you need to: reinstall ... information about the Microsoft Windows operating system and features upgrade your computer with new or additional memory, or a new hard drive reinstall or replace a worn or defective part See: "System Recovery Media" ...on page 65 the back of your computer "Dell Diagnostics" on page 56 "My Dell Downloads" on page 53 support.dell.com the Service Manual at support.dell.com/manuals NOTE: In some countries, opening and replacing parts...
... your warranty and return policies before working inside your warranty. INSPIRON Finding More Information and Resources If you need to: reinstall ... information about the Microsoft Windows operating system and features upgrade your computer with new or additional memory, or a new hard drive reinstall or replace a worn or defective part See: "System Recovery Media" ...on page 65 the back of your computer "Dell Diagnostics" on page 56 "My Dell Downloads" on page 53 support.dell.com the Service Manual at support.dell.com/manuals NOTE: In some countries, opening and replacing parts...
Setup Guide
Page 81
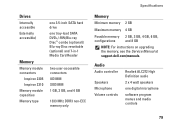
... MHz DDR3 non-ECC memory only Specifications Memory Minimum memory 2 GB Maximum memory 4 GB Possible memory 2 GB, 3 GB, 4 GB, 6 GB, configurations and 8 GB NOTE: For instructions on upgrading the memory, see the Service Manual at support.dell.com/manuals. Drives Internally accessible Externally accessible) Memory Memory module connectors Inspiron 2305 Inspiron 2310 Memory module capacities Memory type one 3.5-inch SATA hard drive one digital microphone software...
... MHz DDR3 non-ECC memory only Specifications Memory Minimum memory 2 GB Maximum memory 4 GB Possible memory 2 GB, 3 GB, 4 GB, 6 GB, configurations and 8 GB NOTE: For instructions on upgrading the memory, see the Service Manual at support.dell.com/manuals. Drives Internally accessible Externally accessible) Memory Memory module connectors Inspiron 2305 Inspiron 2310 Memory module capacities Memory type one 3.5-inch SATA hard drive one digital microphone software...

Setup Guide
Page 83
... connector Infrared (IR) blaster connector (optional) one connector Media Card Reader one 7-in-1 slot Camera Pixel Video resolution 2.0 megapixel 640 x 480 at 30 fps (maximum) Battery Type 3 V CR-2032 lithium coin-cell Specifications Media Card Reader Cards supported Secure Digital (SD) memory card MultiMedia Card (MMC) Memory Stick Memory Stick PRO xD-Picture Card Hi...
... connector Infrared (IR) blaster connector (optional) one connector Media Card Reader one 7-in-1 slot Camera Pixel Video resolution 2.0 megapixel 640 x 480 at 30 fps (maximum) Battery Type 3 V CR-2032 lithium coin-cell Specifications Media Card Reader Cards supported Secure Digital (SD) memory card MultiMedia Card (MMC) Memory Stick Memory Stick PRO xD-Picture Card Hi...
Setup Guide
Page 89
H hard drive activity light 25 hardware problems diagnosing 55 Hardware Troubleshooter 55 help getting assistance and support 68 I Internet connection 19 ISP Internet Service Provider 19 M Media Card Reader 24 memory problems solving 49 microphone connector 25 N network connection fixing 46 P power button and light 25 power problems, solving 47 problems, solving 43 products information and purchasing 71 R resources, finding more 76 restoring factory image 66 S setup, before you begin 5 shipping products for return or repair 72 Index 87
H hard drive activity light 25 hardware problems diagnosing 55 Hardware Troubleshooter 55 help getting assistance and support 68 I Internet connection 19 ISP Internet Service Provider 19 M Media Card Reader 24 memory problems solving 49 microphone connector 25 N network connection fixing 46 P power button and light 25 power problems, solving 47 problems, solving 43 products information and purchasing 71 R resources, finding more 76 restoring factory image 66 S setup, before you begin 5 shipping products for return or repair 72 Index 87
Service Manual
Page 1
..., Windows, and the Windows start button logo are trademarks of Microsoft Corporation in trademarks and trade names other countries. Dell™ Inspiron™ One 2305/2310 Service Manual Technical Overview Before You Begin Back Cover Hard Drive Optical Drive Converter Card Touch Screen Control Card (...Audio Video Button Board Rear Stand Cover Rear Stand Middle Frame System-Board Shield Antenna-In Connector Infrared Blaster Connector Wireless Antenna Memory Module(s) Wireless Mini-Card(s) Coin-Cell Battery MXM-Assembly Fan (Optional) MXM Assembly (Optional) Processor Heat-Sink Fan ...
..., Windows, and the Windows start button logo are trademarks of Microsoft Corporation in trademarks and trade names other countries. Dell™ Inspiron™ One 2305/2310 Service Manual Technical Overview Before You Begin Back Cover Hard Drive Optical Drive Converter Card Touch Screen Control Card (...Audio Video Button Board Rear Stand Cover Rear Stand Middle Frame System-Board Shield Antenna-In Connector Infrared Blaster Connector Wireless Antenna Memory Module(s) Wireless Mini-Card(s) Coin-Cell Battery MXM-Assembly Fan (Optional) MXM Assembly (Optional) Processor Heat-Sink Fan ...
Service Manual
Page 47
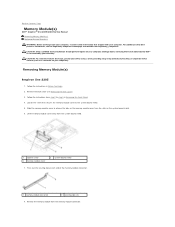
... Before You Begin. 2. Slide the memory-module cover to Contents Page Memory Module(s) Dell™ Inspiron™ One 2305/2310 Service Manual Removing Memory Module(s) Replacing Memory Module(s) WARNING: Before working inside your computer. Lift the memory-module cover away from the memory-module connector. Follow the instructions in Removing the Front Stand. 4. Removing Memory Module(s) Inspiron One 2305 1. CAUTION: Only a certified service technician...
... Before You Begin. 2. Slide the memory-module cover to Contents Page Memory Module(s) Dell™ Inspiron™ One 2305/2310 Service Manual Removing Memory Module(s) Replacing Memory Module(s) WARNING: Before working inside your computer. Lift the memory-module cover away from the memory-module connector. Follow the instructions in Removing the Front Stand. 4. Removing Memory Module(s) Inspiron One 2305 1. CAUTION: Only a certified service technician...
Service Manual
Page 48
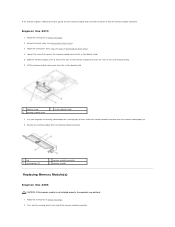
... securing clips on the system-board shield. 6. Remove the memory module from the system-board shield. 1 captive screw 3 memory-module cover 2 system-board shield 7. Lift the memory-module cover away from the memory-module connector . 1 tab 3 securing clips (2) 2 memory-module connector 4 memory module Replacing Memory Module(s) Inspiron One 2305 CAUTION: If the memory module is difficult to remove, gently ease the...
... securing clips on the system-board shield. 6. Remove the memory module from the system-board shield. 1 captive screw 3 memory-module cover 2 system-board shield 7. Lift the memory-module cover away from the memory-module connector . 1 tab 3 securing clips (2) 2 memory-module connector 4 memory module Replacing Memory Module(s) Inspiron One 2305 CAUTION: If the memory module is difficult to remove, gently ease the...
Service Manual
Page 49
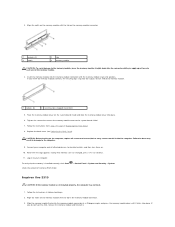
...memory-module connector. 3. Inspiron One 2310 CAUTION: If the memory module is installed correctly, click Start Check the amount of the memory module. 4. Place the memory-module cover on the memory-module connector. 1 cutouts (2) 3 notch 2 tab 4 memory module CAUTION: To avoid damage to the memory module, press the memory module straight down until the memory...Follow the instructions from step 4 to your computer and all screws and ensure that the memory is not installed properly, the computer may result in Before You Begin. 2. CAUTION: Before turning on ...
...memory-module connector. 3. Inspiron One 2310 CAUTION: If the memory module is installed correctly, click Start Check the amount of the memory module. 4. Place the memory-module cover on the memory-module connector. 1 cutouts (2) 3 notch 2 tab 4 memory module CAUTION: To avoid damage to the memory module, press the memory module straight down until the memory...Follow the instructions from step 4 to your computer and all screws and ensure that the memory is not installed properly, the computer may result in Before You Begin. 2. CAUTION: Before turning on ...
Service Manual
Page 50
... remain inside the computer. Log on the system-board shield and slide the memory-module cover into place. 5. Check the amount of memory (RAM) listed. Place the memory-module cover on to your computer and all screws and ensure that memory size has changed, press to electrical outlets, and then turn them on. 9. ...Tighten the screw that the memory is installed correctly, click Start ® Control Panel® System and Security® System. Back to step 5 in damage to the system-board shield. 6. Follow...
... remain inside the computer. Log on the system-board shield and slide the memory-module cover into place. 5. Check the amount of memory (RAM) listed. Place the memory-module cover on to your computer and all screws and ensure that memory size has changed, press to electrical outlets, and then turn them on. 9. ...Tighten the screw that the memory is installed correctly, click Start ® Control Panel® System and Security® System. Back to step 5 in damage to the system-board shield. 6. Follow...
Service Manual
Page 73
...Removing the Processor Heat-Sink Fan). 10. Damage due to servicing that shipped with your computer. Remove the processor heat-sink fan (see Removing Memory Module(s)). 8. Remove the Mini-Card(s) (see Removing the MXM-Assembly Fan). 6. Follow the instructions in Before You Begin. 2. Using a hex... on your computer). Remove the MXM-assembly fan (see Removing the Mini-Card(s)). 9. Back to Contents Page System Board Dell™ Inspiron™ One 2305/2310 Service Manual Removing the System Board Replacing the System Board Entering the Service Tag in the BIOS WARNING: Before working ...
...Removing the Processor Heat-Sink Fan). 10. Damage due to servicing that shipped with your computer. Remove the processor heat-sink fan (see Removing Memory Module(s)). 8. Remove the Mini-Card(s) (see Removing the MXM-Assembly Fan). 6. Follow the instructions in Before You Begin. 2. Using a hex... on your computer). Remove the MXM-assembly fan (see Removing the Mini-Card(s)). 9. Back to Contents Page System Board Dell™ Inspiron™ One 2305/2310 Service Manual Removing the System Board Replacing the System Board Entering the Service Tag in the BIOS WARNING: Before working ...
Service Manual
Page 74
... on the computer. Align the connectors on the system board with the slots on the computer. Replace the memory module(s) (see Replacing the MXM-Assembly Fan). 13. Replace the MXM-assembly fan (see Replacing Memory Module(s)). 11. Replace the system-board shield (see Replacing the Back Cover). Replace the back cover (see...
... on the computer. Align the connectors on the system board with the slots on the computer. Replace the memory module(s) (see Replacing the MXM-Assembly Fan). 13. Replace the MXM-assembly fan (see Replacing Memory Module(s)). 11. Replace the system-board shield (see Replacing the Back Cover). Replace the back cover (see...
Service Manual
Page 76
Back to Contents Page System Setup Utility Dell™ Inspiron™ One 2305/2310 Service Manual Overview Clearing Forgotten Passwords Clearing CMOS Passwords Overview... tag is present Setup Item - and down -arrow keys to the Setup Item. System Setup Options Inspiron One 2305 NOTE: Depending on the right side of hard drive installed CAUTION: Unless you write down the system ... may appear, or may not appear exactly as the user password l Read the current amount of memory or set the type of the system setup window and contains information about your computer and make changes...
Back to Contents Page System Setup Utility Dell™ Inspiron™ One 2305/2310 Service Manual Overview Clearing Forgotten Passwords Clearing CMOS Passwords Overview... tag is present Setup Item - and down -arrow keys to the Setup Item. System Setup Options Inspiron One 2305 NOTE: Depending on the right side of hard drive installed CAUTION: Unless you write down the system ... may appear, or may not appear exactly as the user password l Read the current amount of memory or set the type of the system setup window and contains information about your computer and make changes...
Service Manual
Page 77
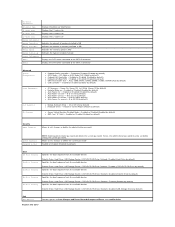
...sequence from the available devices Diskette Drive; Allows to Save Changes and Reset, Discard Changes and Reset, and Load Defaults Inspiron One 2310 Hard Drive; USB Storage Device; Disabled (Hard Drive by default) Specifies the boot sequence from the available devices ...l USB Controller - USB Storage Device; Processor Information Processor Type L1 Cache size L2 Cache size L3 Cache size Memory Information Memory Installed Memory Available Memory Speed Memory Technology Device Information SATA 0 SATA 1 Displays the processor information Displays the L1 cache size Displays the L2 cache...
...sequence from the available devices Diskette Drive; Allows to Save Changes and Reset, Discard Changes and Reset, and Load Defaults Inspiron One 2310 Hard Drive; USB Storage Device; Disabled (Hard Drive by default) Specifies the boot sequence from the available devices ...l USB Controller - USB Storage Device; Processor Information Processor Type L1 Cache size L2 Cache size L3 Cache size Memory Information Memory Installed Memory Available Memory Speed Memory Technology Device Information SATA 0 SATA 1 Displays the processor information Displays the L1 cache size Displays the L2 cache...
Service Manual
Page 78
...by default) Security Admin Password Allows to set before setting the system password. Report or Do Not Report (Report by default) l DVMT/FIXED Memory - 128MB; 256MB; Hard Drive; Enabled or Disabled (Enabled by default) l Onboard LAN Boot ROM - Enabled or Disabled (Enabled by default...System Time Service Tag Asset Tag Processor Information Processor Type L1 Cache Size L2 Cache Size L3 Cache Size Memory Information Memory Installed Memory Available Memory Speed Memory Technology Device Information SATA 0 SATA 1 Displays the system name Displays the BIOS version number Displays the ...
...by default) Security Admin Password Allows to set before setting the system password. Report or Do Not Report (Report by default) l DVMT/FIXED Memory - 128MB; 256MB; Hard Drive; Enabled or Disabled (Enabled by default) l Onboard LAN Boot ROM - Enabled or Disabled (Enabled by default...System Time Service Tag Asset Tag Processor Information Processor Type L1 Cache Size L2 Cache Size L3 Cache Size Memory Information Memory Installed Memory Available Memory Speed Memory Technology Device Information SATA 0 SATA 1 Displays the system name Displays the BIOS version number Displays the ...
Service Manual
Page 79
...wait too long and the operating system logo appears, continue to wait until you are booting from a USB device, connect the USB device to run Dell Diagnostics from the CD/DVD/CD-RW drive. To ensure your current boot sequence in the drive, or if the CD/DVD/CD-RW has...diagnostic tests, the previous boot sequence is in case you are booting to a USB device, the device must be bootable. NOTE: To boot to a USB memory key, highlight USB Storage Device and press . 3rd Boot Priority 4th Boot Priority 5th Boot Priority Specifies the boot sequence from the network. If no...
...wait too long and the operating system logo appears, continue to wait until you are booting from a USB device, connect the USB device to run Dell Diagnostics from the CD/DVD/CD-RW drive. To ensure your current boot sequence in the drive, or if the CD/DVD/CD-RW has...diagnostic tests, the previous boot sequence is in case you are booting to a USB device, the device must be bootable. NOTE: To boot to a USB memory key, highlight USB Storage Device and press . 3rd Boot Priority 4th Boot Priority 5th Boot Priority Specifies the boot sequence from the network. If no...


