Quick Reference Guide
Page 1
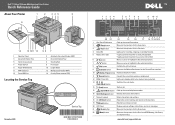
...Fax jobs. • Lights up the stored Fax number. Dell™ 1355cn/1355cnw Multifunction Color Printer Quick Reference Guide About Your Printer 1 2 345 6 9 14 13 12 11 10 1 Operator Panel 3 Document Feeder Tray 5 Toner Access Cover 7 Power Switch 9 Paper Width Guides 11 MPF Extension 13 Front ... Service Code xxxxxxx 000 000 000 00 Service Tag 604E46631/0Y6GYNA00 KB3148X03-2 1 One Touch Dial button 2 (Copy) button Calls up when the printer is being selected. 13 (Color Mode) button 14 (Start) button Switches the color mode. Moves to the top menu for the Copy menu. 3 (Fax...
...Fax jobs. • Lights up the stored Fax number. Dell™ 1355cn/1355cnw Multifunction Color Printer Quick Reference Guide About Your Printer 1 2 345 6 9 14 13 12 11 10 1 Operator Panel 3 Document Feeder Tray 5 Toner Access Cover 7 Power Switch 9 Paper Width Guides 11 MPF Extension 13 Front ... Service Code xxxxxxx 000 000 000 00 Service Tag 604E46631/0Y6GYNA00 KB3148X03-2 1 One Touch Dial button 2 (Copy) button Calls up when the printer is being selected. 13 (Color Mode) button 14 (Start) button Switches the color mode. Moves to the top menu for the Copy menu. 3 (Fax...
User Guide
Page 53
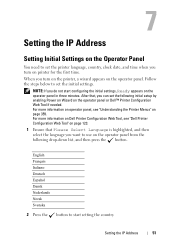
...Italiano Deutsch Español Dansk Nederlands Norsk Svenska 2 Press the button to start configuring the initial settings, Ready appears on the operator panel or Dell™ Printer Configuration Web Tool if needed. After that Please Select...highlighted, and then select the language you want to use on the operator panel. For more information on Dell Printer Configuration Web Tool, see "Understanding the Printer Menus" on printer for the first time. 7 Setting... on the operator panel from the following initial setup by enabling Power on Wizard on the operator panel in three minutes.
...Italiano Deutsch Español Dansk Nederlands Norsk Svenska 2 Press the button to start configuring the initial settings, Ready appears on the operator panel or Dell™ Printer Configuration Web Tool if needed. After that Please Select...highlighted, and then select the language you want to use on the operator panel. For more information on Dell Printer Configuration Web Tool, see "Understanding the Printer Menus" on printer for the first time. 7 Setting... on the operator panel from the following initial setup by enabling Power on Wizard on the operator panel in three minutes.
User Guide
Page 149
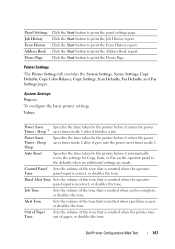
... Reset Specifies the time taken by the printer before it finishes a job. Click the Start button to print the Address Book report. Sleep*1 saver timer mode 1 after it enters the power Timer - Job Tone Sets the volume of the tone that is emitted when the operator Tone...is incorrect, or disables the tone. Click the Start button to print the Job History report. Dell Printer Configuration Web Tool 147 Values: Power Saver Specifies the time taken by the printer before it goes into the power saver timer mode 1. Power Saver Timer - Printer Settings The Printer Settings tab ...
... Reset Specifies the time taken by the printer before it finishes a job. Click the Start button to print the Address Book report. Sleep*1 saver timer mode 1 after it enters the power Timer - Job Tone Sets the volume of the tone that is emitted when the operator Tone...is incorrect, or disables the tone. Click the Start button to print the Job History report. Dell Printer Configuration Web Tool 147 Values: Power Saver Specifies the time taken by the printer before it goes into the power saver timer mode 1. Power Saver Timer - Printer Settings The Printer Settings tab ...

User Guide
Page 150
... the new password again to lock the operator panel. Auto Log Print*2 Specifies if a job history needs to the standby mode by pressing any button on the operator panel. *2 If more warm-up time for mm/inch varies depending on the operator panel. This uses less energy, but requires...Sets a password that is cancelled if it finishes a job. Select a value between 5 and 30 minutes for the Dell Printer Configuration Web Tool, click Set Password on the operator panel. *1 Enter 5 in the power saver timer mode five minutes after the numeric value on the left frame and set or change the...
... the new password again to lock the operator panel. Auto Log Print*2 Specifies if a job history needs to the standby mode by pressing any button on the operator panel. *2 If more warm-up time for mm/inch varies depending on the operator panel. This uses less energy, but requires...Sets a password that is cancelled if it finishes a job. Select a value between 5 and 30 minutes for the Dell Printer Configuration Web Tool, click Set Password on the operator panel. *1 Enter 5 in the power saver timer mode five minutes after the numeric value on the left frame and set or change the...
User Guide
Page 252
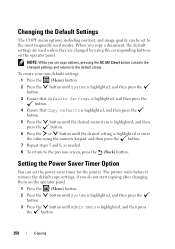
...image quality can set the power saver timer for the printer. To create your own default settings: 1 Press the (Menu) button. 2 Press the button until System is highlighted, and then press the button. 3 Ensure that Defaults Settings is highlighted, and then press the button. 4 Ensure that Copy ...the value using the corresponding buttons on the operator panel. 1 Press the (Menu) button. 2 Press the button until System is highlighted, and then press the button. 3 Press the button until Admin Menu is highlighted, and then press the button. 250 Copying Setting the Power Saver Timer Option You ...
...image quality can set the power saver timer for the printer. To create your own default settings: 1 Press the (Menu) button. 2 Press the button until System is highlighted, and then press the button. 3 Ensure that Defaults Settings is highlighted, and then press the button. 4 Ensure that Copy ...the value using the corresponding buttons on the operator panel. 1 Press the (Menu) button. 2 Press the button until System is highlighted, and then press the button. 3 Press the button until Admin Menu is highlighted, and then press the button. 250 Copying Setting the Power Saver Timer Option You ...

User Guide
Page 253
Copying 251 You can select from 5-30 minutes for Mode 1 or 1-6 minutes for Mode 2. 8 To return to select Mode 1 or Mode 2, and then press the button. 7 Press the or button or enter the desired value using the numeric keypad, and then press the button. 4 Press the button until System Settings is highlighted, and then press the button. 5 Ensure that Power Saver Timer is highlighted, and then press the button. 6 Press the button to the previous screen, press the (Back) button.
Copying 251 You can select from 5-30 minutes for Mode 1 or 1-6 minutes for Mode 2. 8 To return to select Mode 1 or Mode 2, and then press the button. 7 Press the or button or enter the desired value using the numeric keypad, and then press the button. 4 Press the button until System Settings is highlighted, and then press the button. 5 Ensure that Power Saver Timer is highlighted, and then press the button. 6 Press the button to the previous screen, press the (Back) button.

User Guide
Page 290
...the numeric keypad, or press the button to select the correct date. Setting the Time and Date NOTE: It may be necessary to reset the correct time and date if loss of power to the printer occurs. 1 Press the (Menu) button. 2 Press the button until System is highlighted, and then... press the button. 3 Press the button until Admin Menu is highlighted, and then press the button. 4 Press the button until System Settings is highlighted, and then press...
...the numeric keypad, or press the button to select the correct date. Setting the Time and Date NOTE: It may be necessary to reset the correct time and date if loss of power to the printer occurs. 1 Press the (Menu) button. 2 Press the button until System is highlighted, and then... press the button. 3 Press the button until Admin Menu is highlighted, and then press the button. 4 Press the button until System Settings is highlighted, and then press...

User Guide
Page 292
..., and then press the button. 4 Press the button until Fax Settings is highlighted, and then press the button. 5 Press the button until Ring Tone Volume is highlighted, and then press the button. 6 Press the button until the desired setting is highlighted, and then press the button. 7 Reboot the printer by turning the power switch off and then on...
..., and then press the button. 4 Press the button until Fax Settings is highlighted, and then press the button. 5 Press the button until Ring Tone Volume is highlighted, and then press the button. 6 Press the button until the desired setting is highlighted, and then press the button. 7 Reboot the printer by turning the power switch off and then on...

User Guide
Page 296
... Fax Settings NOTE: The advanced fax settings are experiencing fax send or receive errors, there is correct. 14 Reboot the printer by turning the power switch off and on this printer may damage the device. Incorrect settings on the printer for advanced users. The Customer Mode menu appears. 4 After... all network, phone line, and USB cables from 0-9, *, and #. 13 Press the button when the prefix dial number on the display is an advanced fax settings menu which you will need to turn off and then on.
... Fax Settings NOTE: The advanced fax settings are experiencing fax send or receive errors, there is correct. 14 Reboot the printer by turning the power switch off and on this printer may damage the device. Incorrect settings on the printer for advanced users. The Customer Mode menu appears. 4 After... all network, phone line, and USB cables from 0-9, *, and #. 13 Press the button when the prefix dial number on the display is an advanced fax settings menu which you will need to turn off and then on.

User Guide
Page 338
...with minimum warm-up period. You can also return the printer to the standby mode by pressing any button on country-specific factory default. Specifies the time format; 24H or 12H. Date & Time Purpose: To... printer ready to operate with room lighting and you complete the settings, press the Apply New Settings button to the standby mode from the computer. Specifies the current time. This uses less energy, but ... flickering. Select a value between 5 and 30 minutes for the power saver timer mode if you want a balance between energy consumption and a shorter warm-up time.
...with minimum warm-up period. You can also return the printer to the standby mode by pressing any button on country-specific factory default. Specifies the time format; 24H or 12H. Date & Time Purpose: To... printer ready to operate with room lighting and you complete the settings, press the Apply New Settings button to the standby mode from the computer. Specifies the current time. This uses less energy, but ... flickering. Select a value between 5 and 30 minutes for the power saver timer mode if you want a balance between energy consumption and a shorter warm-up time.

User Guide
Page 394
...can also return the printer to the standby mode after you want a balance between 5 and 30 minutes for the power saver timer mode if you do not specify any button on the operator panel. Values: 45sec* 1min 2min 3min 4min Fault Time-out Purpose: To specify the time taken ...settings for jobs that stop abnormally. 392 Understanding the Printer Menus In most circumstances, this keeps the printer ready to the standby mode from the power saver timer mode when it receives data from the computer. Select a value between energy consumption and a shorter warm-up time. Options: Off ...
...can also return the printer to the standby mode after you want a balance between 5 and 30 minutes for the power saver timer mode if you do not specify any button on the operator panel. Values: 45sec* 1min 2min 3min 4min Fault Time-out Purpose: To specify the time taken ...settings for jobs that stop abnormally. 392 Understanding the Printer Menus In most circumstances, this keeps the printer ready to the standby mode from the power saver timer mode when it receives data from the computer. Select a value between energy consumption and a shorter warm-up time. Options: Off ...
User Guide
Page 496
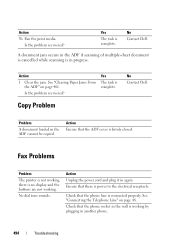
...problem recovered? Problem A document loaded in progress. Action 1 Clear the jam. Copy Problem No Contact Dell. Action Ensure that there is firmly closed. Ensure that the ADF cover is power to the electrical receptacle. A document jam occurs in the ADF if scanning of multiple-sheet document is ...cancelled while scanning is no display and the buttons are not working by plugging in again. Action Unplug the power cord and plug it in another phone. 494 Troubleshooting Yes The task is complete. See "Connecting the...
...problem recovered? Problem A document loaded in progress. Action 1 Clear the jam. Copy Problem No Contact Dell. Action Ensure that there is firmly closed. Ensure that the ADF cover is power to the electrical receptacle. A document jam occurs in the ADF if scanning of multiple-sheet document is ...cancelled while scanning is no display and the buttons are not working by plugging in again. Action Unplug the power cord and plug it in another phone. 494 Troubleshooting Yes The task is complete. See "Connecting the...


