Quick Reference Guide
Page 2
...: CAUTION: To avoid permanent damage to your printer, do not attempt to clear paper jams using any tools or instruments. 1 2 3 1 Scanner Unit 2 Fuser 4 3 Fuser Release Lever 4 Rear Cover 5 ADF Cover 6 Front Cover 7 Multipurpose Feeder (MPF) 7 6 5 CAUTION: Do not attempt to clear jams using tools or.... Multipurpose Feeder (MPF) Priority Sheet Inserter (PSI) Loading Envelopes Load envelopes in the User's Guide support.dell.com Ensure that System Settings is printed. This may occur at any of Paper Jams The paper jams may permanently damage the printer.
...: CAUTION: To avoid permanent damage to your printer, do not attempt to clear paper jams using any tools or instruments. 1 2 3 1 Scanner Unit 2 Fuser 4 3 Fuser Release Lever 4 Rear Cover 5 ADF Cover 6 Front Cover 7 Multipurpose Feeder (MPF) 7 6 5 CAUTION: Do not attempt to clear jams using tools or.... Multipurpose Feeder (MPF) Priority Sheet Inserter (PSI) Loading Envelopes Load envelopes in the User's Guide support.dell.com Ensure that System Settings is printed. This may occur at any of Paper Jams The paper jams may permanently damage the printer.
User Guide
Page 13
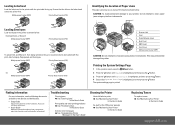
...Settings 331 Printer Maintenance 333 System Settings 333 Date & Time 336 Paper Density 336 Adjust BTR 337 Adjust Fuser 338 Registration Adjustment 338 Adjust Altitude 340 Reset Defaults 340 Non-Dell Toner 341 BTR Refresh Mode 341 Web Link Customization 342 TCP/IP Settings 342 Tray Settings 343 EWS (Embedded... Web Server or Dell Printer Configuration Web Tool 345 Scan Defaults 345 Fax Defaults 347 Copy Defaults 348 Fax Settings 351 Diagnosis 356 Chart Print 356 ...
...Settings 331 Printer Maintenance 333 System Settings 333 Date & Time 336 Paper Density 336 Adjust BTR 337 Adjust Fuser 338 Registration Adjustment 338 Adjust Altitude 340 Reset Defaults 340 Non-Dell Toner 341 BTR Refresh Mode 341 Web Link Customization 342 TCP/IP Settings 342 Tray Settings 343 EWS (Embedded... Web Server or Dell Printer Configuration Web Tool 345 Scan Defaults 345 Fax Defaults 347 Copy Defaults 348 Fax Settings 351 Diagnosis 356 Chart Print 356 ...

User Guide
Page 36
Rear View 1 12 11 2 10 9 3 8 4 5 7 6 1 ADF Cover 3 USB Port 5 Phone Connector 7 Rear Cover 9 Paper Chute 11 Transfer Belt 2 Ethernet Port 4 Wall Jack Connector 6 Security Slot 8 Transfer Roller 10 Paper Feed Roller 12 Fuser Release Lever Space Requirements Place the printer at a location such that there is adequate space for using the printer feeder and covers. 34 About the Printer
Rear View 1 12 11 2 10 9 3 8 4 5 7 6 1 ADF Cover 3 USB Port 5 Phone Connector 7 Rear Cover 9 Paper Chute 11 Transfer Belt 2 Ethernet Port 4 Wall Jack Connector 6 Security Slot 8 Transfer Roller 10 Paper Feed Roller 12 Fuser Release Lever Space Requirements Place the printer at a location such that there is adequate space for using the printer feeder and covers. 34 About the Printer

User Guide
Page 147
... whether to use toner cartridge of the transfer roller for thick plain paper. Dell Printer Configuration Web Tool 145 Displays the voltage setting of the fuser for recycled paper. Displays the voltage setting of the fuser for coated paper. Displays the temperature setting of the transfer roller for cover... cover paper. Displays the temperature setting of the transfer roller for labels. Displays the voltage setting of the fuser for labels. Displays whether to automatically adjust color registration. Displays the voltage setting of the location where the printer is ...
... whether to use toner cartridge of the transfer roller for thick plain paper. Dell Printer Configuration Web Tool 145 Displays the voltage setting of the fuser for recycled paper. Displays the voltage setting of the fuser for coated paper. Displays the temperature setting of the transfer roller for cover... cover paper. Displays the temperature setting of the transfer roller for labels. Displays the voltage setting of the fuser for labels. Displays whether to automatically adjust color registration. Displays the voltage setting of the location where the printer is ...
User Guide
Page 157
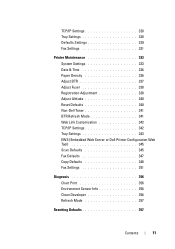
... occurs. Printer Maintenance The Printer Maintenance tab contains the Paper Density, Adjust BTR, Adjust Fuser, Auto Registration Adjustment, Color Registration Adjustment, Clean Developer, Adjust Altitude, Reset Defaults, Non-Dell Toner, Clock Settings, and Web Link Customization pages. To use the ECM, the remote...must also support the ECM. Sets whether to print a transmission report after every 50 incoming and outgoing fax communications. Values: Dell Printer Configuration Web Tool 155 Sets whether to set a prefix dial number. Prefix Dial Prefix Dial Number Discard Size ECM Modem ...
... occurs. Printer Maintenance The Printer Maintenance tab contains the Paper Density, Adjust BTR, Adjust Fuser, Auto Registration Adjustment, Color Registration Adjustment, Clean Developer, Adjust Altitude, Reset Defaults, Non-Dell Toner, Clock Settings, and Web Link Customization pages. To use the ECM, the remote...must also support the ECM. Sets whether to print a transmission report after every 50 incoming and outgoing fax communications. Values: Dell Printer Configuration Web Tool 155 Sets whether to set a prefix dial number. Prefix Dial Prefix Dial Number Discard Size ECM Modem ...

User Guide
Page 158
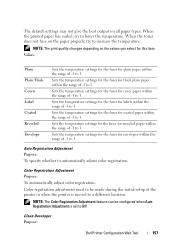
To increase, set positive values. 156 Dell Printer Configuration Web Tool The default settings may not give the best output on the print output, try to increase the voltage. Values: Plain Plain ... coated paper within the range of -3 to 3. To lower the voltage, set negative values. Sets the reference voltage setting for the transfer roller for the fuser. Adjust Fuser Purpose: To specify the optimum temperature settings for printing for thick plain paper within the range of -3 to 3. Adjust BTR Purpose: To specify the...
To increase, set positive values. 156 Dell Printer Configuration Web Tool The default settings may not give the best output on the print output, try to increase the voltage. Values: Plain Plain ... coated paper within the range of -3 to 3. To lower the voltage, set negative values. Sets the reference voltage setting for the transfer roller for the fuser. Adjust Fuser Purpose: To specify the optimum temperature settings for printing for thick plain paper within the range of -3 to 3. Adjust BTR Purpose: To specify the...
User Guide
Page 159
...The Color Registration Adjustment feature can be made during the initial setup of -3 to 3. Sets the temperature settings for the fuser for thick plain paper within the range of the printer or when the printer is set to automatically adjust color registration. Clean ...Developer Purpose: Dell Printer Configuration Web Tool 157 Sets the temperature settings for the fuser for envelopes within the range of -3 to 3. Auto Registration Adjustment Purpose: To specify whether to...
...The Color Registration Adjustment feature can be made during the initial setup of -3 to 3. Sets the temperature settings for the fuser for thick plain paper within the range of the printer or when the printer is set to automatically adjust color registration. Clean ...Developer Purpose: Dell Printer Configuration Web Tool 157 Sets the temperature settings for the fuser for envelopes within the range of -3 to 3. Auto Registration Adjustment Purpose: To specify whether to...

User Guide
Page 193
... yourself. This information is usually indicated on the paper package. • Do not use paper that you can be affected by the temperature in the fuser • Preprinted paper that require a registration (the precise print location on the page) greater than 25% post-consumer waste that may cause wrinkle Selecting Paper...
... yourself. This information is usually indicated on the paper package. • Do not use paper that you can be affected by the temperature in the fuser • Preprinted paper that require a registration (the precise print location on the page) greater than 25% post-consumer waste that may cause wrinkle Selecting Paper...

User Guide
Page 194
... affected by the resin in toner or the silicone in the same source. • Do not mix print media sizes, weights, or types in the fuser. latex inks might not. If you have selected is properly loaded in xerographic copiers. Straighten the edges of 225°C (437°F) without melting or...
... affected by the resin in toner or the silicone in the same source. • Do not mix print media sizes, weights, or types in the fuser. latex inks might not. If you have selected is properly loaded in xerographic copiers. Straighten the edges of 225°C (437°F) without melting or...

User Guide
Page 329
.... Adjustment Adjust Altitude Displays the altitude of the fuser for recycled paper. Customization Reorder URL Regular Displays the regular web address (http://accessories.us.dell.com/sna). Coated Displays the temperature setting of the fuser for coated paper. Premier Displays the premier web address... (http://premier.dell.com). *1 If more than 20 jobs are printed in the ...
.... Adjustment Adjust Altitude Displays the altitude of the fuser for recycled paper. Customization Reorder URL Regular Displays the regular web address (http://accessories.us.dell.com/sna). Coated Displays the temperature setting of the fuser for coated paper. Premier Displays the premier web address... (http://premier.dell.com). *1 If more than 20 jobs are printed in the ...

User Guide
Page 335
... operator panel input is correct. Printer Maintenance The Printer Maintenance tab contains the System Settings, Date & Time, Paper Density, Adjust BTR, Adjust Fuser, Registration Adjustment, Adjust Altitude, Reset Defaults, Non-Dell Toner, BTR Refresh Mode, Web Link Customization, TCP/IP Settings, Tray Settings, EWS, Scan Defaults, Fax Defaults, Copy Defaults, and Fax...
... operator panel input is correct. Printer Maintenance The Printer Maintenance tab contains the System Settings, Date & Time, Paper Density, Adjust BTR, Adjust Fuser, Registration Adjustment, Adjust Altitude, Reset Defaults, Non-Dell Toner, BTR Refresh Mode, Web Link Customization, TCP/IP Settings, Tray Settings, EWS, Scan Defaults, Fax Defaults, Copy Defaults, and Fax...

User Guide
Page 340
... registration by 338 Understanding the Tool Box Menus Values: Plain Plain Thick Recycled Covers Coated Envelope Label Apply New Settings 0* -3 - +3 0* -3 - +3 0* -3 - +3 0* -3 - +3 0* -3 - +3 0* -3 - +3 0* -3 - +3 After you select for the fuser. Adjust Fuser Purpose: To specify the optimum temperature settings for printing for this item.
... registration by 338 Understanding the Tool Box Menus Values: Plain Plain Thick Recycled Covers Coated Envelope Label Apply New Settings 0* -3 - +3 0* -3 - +3 0* -3 - +3 0* -3 - +3 0* -3 - +3 0* -3 - +3 0* -3 - +3 After you select for the fuser. Adjust Fuser Purpose: To specify the optimum temperature settings for printing for this item.

User Guide
Page 400
... the best output on the paper properly, try to increase the temperature. When the toner does not fuse on all paper types. Recycled Envelope 0* -3 - +3 0* -3 - +3 Adjust Fuser Purpose: To specify the optimum temperature settings for printing for this item. Values: Plain Plain Thick Covers Coated Label Recycled Envelope 0* -3 - +3 0* -3 - +3 0* -3 - +3 0* -3 - +3 0* -3 - +3 0* -3 - +3 0* -3 - +3 398 Understanding the Printer...
... the best output on the paper properly, try to increase the temperature. When the toner does not fuse on all paper types. Recycled Envelope 0* -3 - +3 0* -3 - +3 Adjust Fuser Purpose: To specify the optimum temperature settings for printing for this item. Values: Plain Plain Thick Covers Coated Label Recycled Envelope 0* -3 - +3 0* -3 - +3 0* -3 - +3 0* -3 - +3 0* -3 - +3 0* -3 - +3 0* -3 - +3 398 Understanding the Printer...

User Guide
Page 462
The following illustration shows where paper jams may permanently damage the printer. This may occur along the print media path. 3 1 2 4 7 6 5 1 Scanner Unit 2 Fuser 3 Fuser Release Lever 4 Rear Cover 460 Clearing Jams • Ensure that all cables that connect to the printer are correctly attached. • Overtightening the guides may cause jams. Identifying the Location of Paper Jams CAUTION: Do not attempt to clear any jams using tools or instruments.
The following illustration shows where paper jams may permanently damage the printer. This may occur along the print media path. 3 1 2 4 7 6 5 1 Scanner Unit 2 Fuser 3 Fuser Release Lever 4 Rear Cover 460 Clearing Jams • Ensure that all cables that connect to the printer are correctly attached. • Overtightening the guides may cause jams. Identifying the Location of Paper Jams CAUTION: Do not attempt to clear any jams using tools or instruments.

User Guide
Page 463
... it passes through the Automatic Document Feeder (ADF), remove jams in the following procedures, read and follow the safety instructions in the following illustration. The fuser becomes extremely hot during use. 5 ADF Cover 6 Front Cover 7 Multipurpose Feeder (MPF) Clearing Paper Jams From the ADF When a document jams while it in the...
... it passes through the Automatic Document Feeder (ADF), remove jams in the following procedures, read and follow the safety instructions in the following illustration. The fuser becomes extremely hot during use. 5 ADF Cover 6 Front Cover 7 Multipurpose Feeder (MPF) Clearing Paper Jams From the ADF When a document jams while it in the...

User Guide
Page 469
NOTE: To resolve the error displayed on the operator panel, you must clear all print media from the grounded outlet before performing maintenance. The fuser becomes extremely hot during use. CAUTION: To prevent electric shock, always turn off the printer and disconnect the power cable from the print media path. 1 ...
NOTE: To resolve the error displayed on the operator panel, you must clear all print media from the grounded outlet before performing maintenance. The fuser becomes extremely hot during use. CAUTION: To prevent electric shock, always turn off the printer and disconnect the power cable from the print media path. 1 ...

User Guide
Page 470
2 Lift up the fuser release levers. 3 Remove any paper jammed from the back of the printer. 468 Clearing Jams
2 Lift up the fuser release levers. 3 Remove any paper jammed from the back of the printer. 468 Clearing Jams

User Guide
Page 471
4 Lower the fuser release levers to their original position. 5 Close the rear cover. Clearing Jams 469
4 Lower the fuser release levers to their original position. 5 Close the rear cover. Clearing Jams 469

User Guide
Page 472
... and disconnect the power cable from the print media path. 1 Push the rear cover release handle and open the rear cover. 470 Clearing Jams The fuser becomes extremely hot during use. CAUTION: To avoid burns, do not clear paper jams immediately after printing.
... and disconnect the power cable from the print media path. 1 Push the rear cover release handle and open the rear cover. 470 Clearing Jams The fuser becomes extremely hot during use. CAUTION: To avoid burns, do not clear paper jams immediately after printing.

User Guide
Page 473
Clearing Jams 471 If no paper is found in the paper path, face the front of the printer. 2 Lift up the fuser release levers. 3 Remove any paper jammed from the back of the printer and check the output tray.
Clearing Jams 471 If no paper is found in the paper path, face the front of the printer. 2 Lift up the fuser release levers. 3 Remove any paper jammed from the back of the printer and check the output tray.


