Quick Reference Guide
Page 2
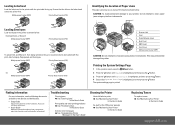
Loading Letterhead Load the letterhead in the User's Guide support.dell.com Ensure that System Settings is printed. Printing the System Settings Page 1 In the operator panel, press the (Menu) button. 2 Press the button until System... blanks in prints Æ See "Maintaining Your Printer" in the User's Guide An alert for printer hardware. This may occur at any tools or instruments. 1 2 3 1 Scanner Unit 2 Fuser 4 3 Fuser Release Lever 4 Rear Cover 5 ADF Cover 6 Front Cover 7 Multipurpose Feeder (MPF) 7 6 5 CAUTION: Do not attempt to clear jams using any of ...
Loading Letterhead Load the letterhead in the User's Guide support.dell.com Ensure that System Settings is printed. Printing the System Settings Page 1 In the operator panel, press the (Menu) button. 2 Press the button until System... blanks in prints Æ See "Maintaining Your Printer" in the User's Guide An alert for printer hardware. This may occur at any tools or instruments. 1 2 3 1 Scanner Unit 2 Fuser 4 3 Fuser Release Lever 4 Rear Cover 5 ADF Cover 6 Front Cover 7 Multipurpose Feeder (MPF) 7 6 5 CAUTION: Do not attempt to clear jams using any of ...

User Guide
Page 10
... Scanning Overview 253 Scanning From the Operator Panel 254 Scanning Using the TWAIN Driver 255 Scanning Using the Windows Image Acquisition (WIA) Driver 257 Using a Scanner on the Network 259 Overview 259 Confirming a Login name and Password 261 Specifying a Destination to Store the Document . 262 Configuring the Printer Settings 271 Sending...
... Scanning Overview 253 Scanning From the Operator Panel 254 Scanning Using the TWAIN Driver 255 Scanning Using the Windows Image Acquisition (WIA) Driver 257 Using a Scanner on the Network 259 Overview 259 Confirming a Login name and Password 261 Specifying a Destination to Store the Document . 262 Configuring the Printer Settings 271 Sending...

User Guide
Page 16
Memory 430 Page Description Language (PDL)/Emulation, Operating System, and Interface 430 MIB Compatibility 430 Environment 431 Cables 431 Copier Specifications 432 Scanner Specifications 433 Facsimile Specifications 434 Maintaining Your Printer 437 25 Maintaining Your Printer 439 Determining the Status of Supplies 439 Conserving Supplies 439 Storing Print ...
Memory 430 Page Description Language (PDL)/Emulation, Operating System, and Interface 430 MIB Compatibility 430 Environment 431 Cables 431 Copier Specifications 432 Scanner Specifications 433 Facsimile Specifications 434 Maintaining Your Printer 437 25 Maintaining Your Printer 439 Determining the Status of Supplies 439 Conserving Supplies 439 Storing Print ...

User Guide
Page 17
Performing Auto Adjust 450 Printing the Color Registration Chart 451 Determining Values 452 Entering Values 453 Cleaning the Scanner 454 Cleaning the ADF Feed Roller 456 26 Clearing Jams 459 Avoiding Jams 459 Identifying the Location of Paper Jams 460 Clearing Paper Jams From ...
Performing Auto Adjust 450 Printing the Color Registration Chart 451 Determining Values 452 Entering Values 453 Cleaning the Scanner 454 Cleaning the ADF Feed Roller 456 26 Clearing Jams 459 Avoiding Jams 459 Identifying the Location of Paper Jams 460 Clearing Paper Jams From ...

User Guide
Page 18
... of alignment 490 Protrudent / Bumpy paper 491 Jam 492 Misfeed jam 492 Multi-feed jam 493 Copy Problem 494 Fax Problems 494 Scanning Problems 496 Scanner Driver/Printer Utility Problems 499 Other Problems 500 Contacting Service 500 Appendix 501 B Appendix 503...
... of alignment 490 Protrudent / Bumpy paper 491 Jam 492 Misfeed jam 492 Multi-feed jam 493 Copy Problem 494 Fax Problems 494 Scanning Problems 496 Scanner Driver/Printer Utility Problems 499 Other Problems 500 Contacting Service 500 Appendix 501 B Appendix 503...

User Guide
Page 223
NOTE: When you pull out envelopes or small size print media, lift up the scanner unit. Before printing a document, ensure that the output tray extension is complete. Loading Print Media 221 Using the Output Tray Extension The output tray extension is designed to prevent print media from falling from the printer after the print job is fully extended. NOTE: Printing on both sides of the paper is not possible if the document consists of various sizes of papers.
NOTE: When you pull out envelopes or small size print media, lift up the scanner unit. Before printing a document, ensure that the output tray extension is complete. Loading Print Media 221 Using the Output Tray Extension The output tray extension is designed to prevent print media from falling from the printer after the print job is fully extended. NOTE: Printing on both sides of the paper is not possible if the document consists of various sizes of papers.

User Guide
Page 237
... gray scale images, use the document glass or the Automatic Document Feeder (ADF) to 35 sheets of the ADF. For more details, see "Cleaning the Scanner" on the copy printout. If any document is detected in ADF. You can use the document glass instead of 75 g/m2 (20 lb) documents for...
... gray scale images, use the document glass or the Automatic Document Feeder (ADF) to 35 sheets of the ADF. For more details, see "Cleaning the Scanner" on the copy printout. If any document is detected in ADF. You can use the document glass instead of 75 g/m2 (20 lb) documents for...

User Guide
Page 257
... Scan Button Manager, and then click OK. NOTE: You must use this program for this action check box when selecting 1355cn/1355cnw MFP Scan Button Manager, the selected application is automatically used without displaying the program selection window. NOTE: If the following dialog box appears on your ... the standard components provided by Microsoft® Windows XP, Windows Server® 2003, Windows Server 2008, Windows Vista®, and Windows 7, and works with various scanners. TWAIN is connected to change the settings for scanning images. Scanning 255
... Scan Button Manager, and then click OK. NOTE: You must use this program for this action check box when selecting 1355cn/1355cnw MFP Scan Button Manager, the selected application is automatically used without displaying the program selection window. NOTE: If the following dialog box appears on your ... the standard components provided by Microsoft® Windows XP, Windows Server® 2003, Windows Server 2008, Windows Vista®, and Windows 7, and works with various scanners. TWAIN is connected to change the settings for scanning images. Scanning 255

User Guide
Page 258
... page 296. 2 On the Windows Start menu, click Nuance PaperPort 12 from All Programs, and then click PaperPort. 3 Click Select, then select TWAIN: Dell 1355cn/cnw MFP Scanner, and then click OK. 4 Select your scanning preferences and click Preview to your computer. 256 Scanning For details about loading a document, see "Loading an...
... page 296. 2 On the Windows Start menu, click Nuance PaperPort 12 from All Programs, and then click PaperPort. 3 Click Select, then select TWAIN: Dell 1355cn/cnw MFP Scanner, and then click OK. 4 Select your scanning preferences and click Preview to your computer. 256 Scanning For details about loading a document, see "Loading an...
User Guide
Page 259
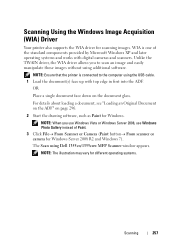
... software, such as Paint for scanning images. NOTE: When you to the computer using Dell 1355cn/1355cnw MFP Scanner window appears. The Scan using the USB cable. 1 Load the document(s) face up with digital cameras and scanners. WIA is connected to scan an image and easily manipulate those images without using additional ...(WIA) Driver Your printer also supports the WIA driver for Windows. NOTE: Ensure that the printer is one of Paint. 3 Click File From Scanner or Camera (Paint button From scanner or camera for different operating systems. Scanning 257
... software, such as Paint for scanning images. NOTE: When you to the computer using Dell 1355cn/1355cnw MFP Scanner window appears. The Scan using the USB cable. 1 Load the document(s) face up with digital cameras and scanners. WIA is connected to scan an image and easily manipulate those images without using additional ...(WIA) Driver Your printer also supports the WIA driver for Windows. NOTE: Ensure that the printer is one of Paint. 3 Click File From Scanner or Camera (Paint button From scanner or camera for different operating systems. Scanning 257
User Guide
Page 261
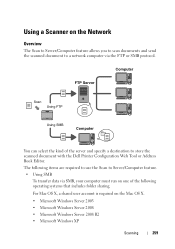
Using a Scanner on the Mac OS X. • Microsoft Windows Server 2003 • Microsoft Windows Server 2008 • Microsoft Windows Server 2008 R2 • Microsoft Windows XP Scanning ... Using SMB Computer You can select the kind of the following items are required to use the Scan to store the scanned document with the Dell Printer Configuration Web Tool or Address Book Editor.
Using a Scanner on the Mac OS X. • Microsoft Windows Server 2003 • Microsoft Windows Server 2008 • Microsoft Windows Server 2008 R2 • Microsoft Windows XP Scanning ... Using SMB Computer You can select the kind of the following items are required to use the Scan to store the scanned document with the Dell Printer Configuration Web Tool or Address Book Editor.

User Guide
Page 297
You can change the modem receive encoding with the following instructions. 1 When the printer is in Customer Mode, select Fax/Scanner Diag and press the button. 2 Press the button until Parameter is highlighted, and then press the button. 3 Press the button until FAX Parameter...JBIG) data encoding method. You can change the modem transmission encoding with the following instructions. 1 When the printer is in Customer Mode, select Fax/Scanner Diag and press the button. 2 Press the button until Parameter is highlighted, and then press the button. 3 Press the button until FAX Parameter is...
You can change the modem receive encoding with the following instructions. 1 When the printer is in Customer Mode, select Fax/Scanner Diag and press the button. 2 Press the button until Parameter is highlighted, and then press the button. 3 Press the button until FAX Parameter...JBIG) data encoding method. You can change the modem transmission encoding with the following instructions. 1 When the printer is in Customer Mode, select Fax/Scanner Diag and press the button. 2 Press the button until Parameter is highlighted, and then press the button. 3 Press the button until FAX Parameter is...

User Guide
Page 366
... middle margin. Values: 4 mm*/0.2 inch* Specify the value in increments of 1 mm/0.1 inch. 0-50 mm/0.0-2.0 inch Margin Left/Right Purpose: To specify the value of scanner features. Values: 364 Understanding the Printer Menus Scan to configure a variety of the left and right margins.
... middle margin. Values: 4 mm*/0.2 inch* Specify the value in increments of 1 mm/0.1 inch. 0-50 mm/0.0-2.0 inch Margin Left/Right Purpose: To specify the value of scanner features. Values: 364 Understanding the Printer Menus Scan to configure a variety of the left and right margins.

User Guide
Page 435
...%, ADF: 25% - 400% 1 - 99 pages Text, Text & Photo, Photo Platen: Document-fixed flatbed scanning method ADF: Carriage-fixed, document-feeding scanning method (one side scanning) Scanner Specifications Item Compatibility Scan Resolution Color bit depth Mono bit depth Description Tool Without An Interesting Name (TWAIN), Windows Image Acquisition (WIA) TWAIN: 75 x 75...
...%, ADF: 25% - 400% 1 - 99 pages Text, Text & Photo, Photo Platen: Document-fixed flatbed scanning method ADF: Carriage-fixed, document-feeding scanning method (one side scanning) Scanner Specifications Item Compatibility Scan Resolution Color bit depth Mono bit depth Description Tool Without An Interesting Name (TWAIN), Windows Image Acquisition (WIA) TWAIN: 75 x 75...

User Guide
Page 456
..., do not turn off the printer until all straight lines are at the left side of before and after adjustment will help. Cleaning the Scanner Keeping the scanner clean helps ensure the best possible copies. The registration adjustment page is displayed. 4 Select the value with water. 2 Open the document cover....Show image of the page. 3 Select Registration Adjustment from the list at the value of 0. The color registration chart is recommended to clean the scanner at the start of each day and during the day, as needed. 1 Slightly dampen a soft lint-free cloth or paper towel with the ...
..., do not turn off the printer until all straight lines are at the left side of before and after adjustment will help. Cleaning the Scanner Keeping the scanner clean helps ensure the best possible copies. The registration adjustment page is displayed. 4 Select the value with water. 2 Open the document cover....Show image of the page. 3 Select Registration Adjustment from the list at the value of 0. The color registration chart is recommended to clean the scanner at the start of each day and during the day, as needed. 1 Slightly dampen a soft lint-free cloth or paper towel with the ...

User Guide
Page 462
• Ensure that all cables that connect to the printer are correctly attached. • Overtightening the guides may permanently damage the printer. This may cause jams. Identifying the Location of Paper Jams CAUTION: Do not attempt to clear any jams using tools or instruments. The following illustration shows where paper jams may occur along the print media path. 3 1 2 4 7 6 5 1 Scanner Unit 2 Fuser 3 Fuser Release Lever 4 Rear Cover 460 Clearing Jams
• Ensure that all cables that connect to the printer are correctly attached. • Overtightening the guides may permanently damage the printer. This may cause jams. Identifying the Location of Paper Jams CAUTION: Do not attempt to clear any jams using tools or instruments. The following illustration shows where paper jams may occur along the print media path. 3 1 2 4 7 6 5 1 Scanner Unit 2 Fuser 3 Fuser Release Lever 4 Rear Cover 460 Clearing Jams

User Guide
Page 474
4 Lift and open the scanner unit. 5 Remove any paper jammed out of the output tray. 472 Clearing Jams
4 Lift and open the scanner unit. 5 Remove any paper jammed out of the output tray. 472 Clearing Jams

User Guide
Page 475
6 Lower and close the scanner unit. 7 Lower the fuser release levers to their original position. Clearing Jams 473
6 Lower and close the scanner unit. 7 Lower the fuser release levers to their original position. Clearing Jams 473
User Guide
Page 497
... the document is received in correctly. spaces or is of paper, or cannot answer incoming calls. Replace the toner cartridge. document jam. See "Cleaning the Scanner" on the documents you send. Documents are sending to, to see if the display shows Memory Full. quality. If the display shows a Memory Full message...
... the document is received in correctly. spaces or is of paper, or cannot answer incoming calls. Replace the toner cartridge. document jam. See "Cleaning the Scanner" on the documents you send. Documents are sending to, to see if the display shows Memory Full. quality. If the display shows a Memory Full message...
User Guide
Page 498
You may not be scanned face down from the document feeder glass, or face up in the user option setting. Check that the scanner is connected properly. Switch the cable with a small strip of text at the top. If necessary, replace the cable. Check that the USB cable.... See "Connecting the Telephone Line" on page 189. Action Ensure that you want to use to make certain that the scanner job is connected properly. Scanning Problems Problem The scanner does not work. Try the Prescan function to be enough available memory to hold the document you place the document to...
You may not be scanned face down from the document feeder glass, or face up in the user option setting. Check that the scanner is connected properly. Switch the cable with a small strip of text at the top. If necessary, replace the cable. Check that the USB cable.... See "Connecting the Telephone Line" on page 189. Action Ensure that you want to use to make certain that the scanner job is connected properly. Scanning Problems Problem The scanner does not work. Try the Prescan function to be enough available memory to hold the document you place the document to...


