
User Guide
Page 10
...250 Setting the Power Saver Timer Option 250 17 Scanning 253 Scanning Overview 253 Scanning From the Operator Panel 254 Scanning Using the TWAIN Driver 255 Scanning Using the Windows Image Acquisition (WIA) Driver 257 Using a Scanner on the Network 259 Overview 259 Confirming a Login name and Password... . 262 Configuring the Printer Settings 271 Sending the Scanned File on the Network . . . . . 279 Scanning to USB Storage Device 280 Sending an E-Mail with the Scanned Image 281 Setting an E-Mail Address Book 281 Sending an E-mail With the Scanned File . . . . . 282 18 Faxing ...
...250 Setting the Power Saver Timer Option 250 17 Scanning 253 Scanning Overview 253 Scanning From the Operator Panel 254 Scanning Using the TWAIN Driver 255 Scanning Using the Windows Image Acquisition (WIA) Driver 257 Using a Scanner on the Network 259 Overview 259 Confirming a Login name and Password... . 262 Configuring the Printer Settings 271 Sending the Scanned File on the Network . . . . . 279 Scanning to USB Storage Device 280 Sending an E-Mail with the Scanned Image 281 Setting an E-Mail Address Book 281 Sending an E-mail With the Scanned File . . . . . 282 18 Faxing ...

User Guide
Page 14
20 Understanding the Printer Menus . . . . . 359 Defaults Settings 359 Copy Defaults 359 Scan Defaults 364 Fax Defaults 369 USB Print Defaults 371 Tray Settings 371 MPF 371 Reports/List 373 System Settings 373 Panel Settings 373 Job History 374 Error History 374 Color Test Page 374 Protocol Monitor 374 Address Book 374 Fax Activity 374 Admin Menu 374 Phone Book 375 Network 375 Fax Settings 381 System Settings 391 Maintenance 396 Secure Settings 402 Scan to EMail 404 USB Settings 404 Panel Language 405 Panel Lock Function 405 Enabling the Panel Lock 405 12 Contents
20 Understanding the Printer Menus . . . . . 359 Defaults Settings 359 Copy Defaults 359 Scan Defaults 364 Fax Defaults 369 USB Print Defaults 371 Tray Settings 371 MPF 371 Reports/List 373 System Settings 373 Panel Settings 373 Job History 374 Error History 374 Color Test Page 374 Protocol Monitor 374 Address Book 374 Fax Activity 374 Admin Menu 374 Phone Book 375 Network 375 Fax Settings 381 System Settings 391 Maintenance 396 Secure Settings 402 Scan to EMail 404 USB Settings 404 Panel Language 405 Panel Lock Function 405 Enabling the Panel Lock 405 12 Contents
User Guide
Page 137
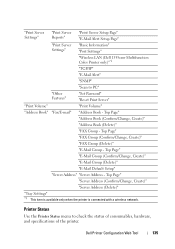
...Page" "E-Mail Alert Setup Page" "Print Server Settings" "Basic Information" "Port Settings" "Wireless LAN (Dell 1355cnw Multifunction Color Printer only)"*1 "TCP/IP" "E-Mail Alert" "SNMP" "Scan to check the status of consumables, hardware, and specifications of the printer. Top Page" "Server Address ...(Confirm/Change, Create)" "Server Address (Delete)" "Tray Settings" *1 This item is available only when the printer is connected with a wireless network. Dell Printer ...
...Page" "E-Mail Alert Setup Page" "Print Server Settings" "Basic Information" "Port Settings" "Wireless LAN (Dell 1355cnw Multifunction Color Printer only)"*1 "TCP/IP" "E-Mail Alert" "SNMP" "Scan to check the status of consumables, hardware, and specifications of the printer. Top Page" "Server Address ...(Confirm/Change, Create)" "Server Address (Delete)" "Tray Settings" *1 This item is available only when the printer is connected with a wireless network. Dell Printer ...

User Guide
Page 144
... goes into the fax receive mode after the external answering machine receives an incoming call. 142 Dell Printer Configuration Web Tool Lighter/Darker Displays the default scan density level. Compression Max E-Mail Size Displays the maximum size of the middle margin. Delayed ... printer goes into the fax receive mode after receiving an incoming call . Scan Defaults Fax Defaults Fax Settings Scan To Network Displays whether to store scanned image on a network server or on the scanned image. Sharpness Displays the default sharpness level. Margin Top/Bottom Displays the ...
... goes into the fax receive mode after the external answering machine receives an incoming call. 142 Dell Printer Configuration Web Tool Lighter/Darker Displays the default scan density level. Compression Max E-Mail Size Displays the maximum size of the middle margin. Delayed ... printer goes into the fax receive mode after receiving an incoming call . Scan Defaults Fax Defaults Fax Settings Scan To Network Displays whether to store scanned image on a network server or on the scanned image. Sharpness Displays the default sharpness level. Margin Top/Bottom Displays the ...
User Guide
Page 153
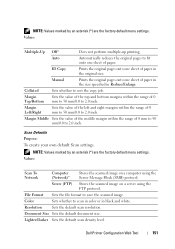
... range of 0 mm to 50 mm/0.0 to 2.0 inch. Values: Scan To Network Computer (Network)* Stores the scanned image on a server using the Server Message Block (SMB) protocol. Collated Sets whether to save the scanned image. Margin Middle Sets the value of the middle margin within the ... factory default menu settings. NOTE: Values marked by an asterisk (*) are the factory default menu settings. Resolution Sets the default scan resolution. Dell Printer Configuration Web Tool 151 ID Copy Prints the original pages onto one sheet of paper in the original size. Document Size...
... range of 0 mm to 50 mm/0.0 to 2.0 inch. Values: Scan To Network Computer (Network)* Stores the scanned image on a server using the Server Message Block (SMB) protocol. Collated Sets whether to save the scanned image. Margin Middle Sets the value of the middle margin within the ... factory default menu settings. NOTE: Values marked by an asterisk (*) are the factory default menu settings. Resolution Sets the default scan resolution. Dell Printer Configuration Web Tool 151 ID Copy Prints the original pages onto one sheet of paper in the original size. Document Size...
User Guide
Page 234
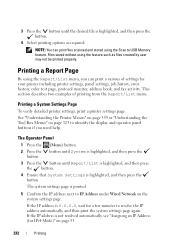
...settings page. See "Understanding the Printer Menus" on page 359 or "Understanding the Tool Box Menus" on page 323 to IP Address under Wired Network on page 53. 232 Printing The system settings page is not resolved automatically, see "Assigning an IP Address (for a few minutes to USB Memory...IP address is printed. 5 Confirm the IP address next to identify the display and operator panel buttons if you can print files scanned and stored using the Scan to resolve the IP address automatically, and then print the system settings page again. Files saved without using the Report/List menu,...
...settings page. See "Understanding the Printer Menus" on page 359 or "Understanding the Tool Box Menus" on page 323 to IP Address under Wired Network on page 53. 232 Printing The system settings page is not resolved automatically, see "Assigning an IP Address (for a few minutes to USB Memory...IP address is printed. 5 Confirm the IP address next to identify the display and operator panel buttons if you can print files scanned and stored using the Scan to resolve the IP address automatically, and then print the system settings page again. Files saved without using the Report/List menu,...
User Guide
Page 261
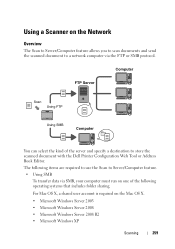
... FTP Using SMB Computer You can select the kind of the following items are required to use the Scan to store the scanned document with the Dell Printer Configuration Web Tool or Address Book Editor. For Mac OS X, a shared user account is required on one of the server... or SMB protocol. The following operating systems that includes folder sharing. Using a Scanner on the Network Overview The Scan to Server/Computer feature allows you to scan documents and send the scanned document to a network computer via SMB, your computer must run on the Mac OS X. • Microsoft Windows Server...
... FTP Using SMB Computer You can select the kind of the following items are required to use the Scan to store the scanned document with the Dell Printer Configuration Web Tool or Address Book Editor. For Mac OS X, a shared user account is required on one of the server... or SMB protocol. The following operating systems that includes folder sharing. Using a Scanner on the Network Overview The Scan to Server/Computer feature allows you to scan documents and send the scanned document to a network computer via SMB, your computer must run on the Mac OS X. • Microsoft Windows Server...

User Guide
Page 263
... you need to create a password on page 279 Confirming a Login name and Password When using SMB: The Scan to Computer/Server feature requires a user login account with the following procedure. For Microsoft Windows XP: 1 Click startControl Panel&#... a login user name and password. For Windows Vista and Windows 7: 1 Click StartControl Panel. 2 Click User Accounts and Family Safety. "Sending the Scanned File on the Network" on your user login account.
... you need to create a password on page 279 Confirming a Login name and Password When using SMB: The Scan to Computer/Server feature requires a user login account with the following procedure. For Microsoft Windows XP: 1 Click startControl Panel&#... a login user name and password. For Windows Vista and Windows 7: 1 Click StartControl Panel. 2 Click User Accounts and Family Safety. "Sending the Scanned File on the Network" on your user login account.

User Guide
Page 265
... directory on your computer (Example of folder name, MyShare). 2 Right-click on the folder, and then select Properties. 3 Click on the network. 4 Enter a shared name in the next setting procedure. Scanning 263 NOTE: When the following screen appears, click If you will use this folder on the Sharing tab, and then select...
... directory on your computer (Example of folder name, MyShare). 2 Right-click on the folder, and then select Properties. 3 Click on the network. 4 Enter a shared name in the next setting procedure. Scanning 263 NOTE: When the following screen appears, click If you will use this folder on the Sharing tab, and then select...

User Guide
Page 266
5 Select Allow network users to "Configuring the Printer Settings" on page 271. 264 Scanning NOTE: To add sub-folders, create new folders in your directory After you have created. Example: Folder name, MyShare, Second-level folder name: MyPic, Third-level folder name: John You should now see MyShare\MyPic\John in the shared folder you created a folder, go to change my files. 6 Click OK.
5 Select Allow network users to "Configuring the Printer Settings" on page 271. 264 Scanning NOTE: To add sub-folders, create new folders in your directory After you have created. Example: Folder name, MyShare, Second-level folder name: MyPic, Third-level folder name: John You should now see MyShare\MyPic\John in the shared folder you created a folder, go to change my files. 6 Click OK.
User Guide
Page 277
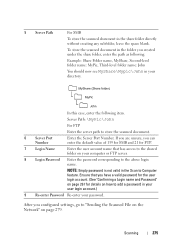
...-enter Password Re-enter your computer or FTP server. 8 Login Password Enter the password corresponding to the above login name. Scanning 275 Ensure that has access to "Sending the Scanned File on the Network" on your password. Example: Share Folder name, MyShare, Second-level folder name: MyPic, Third-level folder name: John You...
...-enter Password Re-enter your computer or FTP server. 8 Login Password Enter the password corresponding to the above login name. Scanning 275 Ensure that has access to "Sending the Scanned File on the Network" on your password. Example: Share Folder name, MyShare, Second-level folder name: MyPic, Third-level folder name: John You...

User Guide
Page 281
.... For details about loading a document, see "Loading an Original Document on the ADF" on page 296. 2 Press the (Scan) button. 3 Press the button until Scan to Network is highlighted, and then press the button. 4 Ensure that you have a valid password for the user login account. (See ...Address Book. NOTE: NOTE: Empty password is highlighted, press the button. 5 Press the button to the above login name. Network (Server): Stores the scanned image on the computer by using the SMB protocol. Search Address Book: Select the server address registered in first into the ADF...
.... For details about loading a document, see "Loading an Original Document on the ADF" on page 296. 2 Press the (Scan) button. 3 Press the button until Scan to Network is highlighted, and then press the button. 4 Ensure that you have a valid password for the user login account. (See ...Address Book. NOTE: NOTE: Empty password is highlighted, press the button. 5 Press the button to the above login name. Network (Server): Stores the scanned image on the computer by using the SMB protocol. Search Address Book: Select the server address registered in first into the ADF...

User Guide
Page 326
... disabled. Displays the time taken by the printer before it automatically resets the settings for Copy, Scan, or Fax on the operator panel to the defaults when no additional settings are made. Processor Speed Firmware Version Network Firmware Version MCU Firmware Version Printing Speed (Color) Printing Speed (Monochrome) Displays the processing speed...
... disabled. Displays the time taken by the printer before it automatically resets the settings for Copy, Scan, or Fax on the operator panel to the defaults when no additional settings are made. Processor Speed Firmware Version Network Firmware Version MCU Firmware Version Printing Speed (Color) Printing Speed (Monochrome) Displays the processing speed...

User Guide
Page 331
... the user to use a popup menu that can be sent. File Format Displays the file format to store scanned image on a network server or on the scanned image. Color Displays whether to enhance text on a computer. Auto Exposure Displays whether to suppress the background of...Left/Right Margin Middle Displays the value of the left and right margins. Values: Scan Defaults Scan To Network Displays whether to save the scanned image. Defaults Settings Purpose: To display the default scan, fax, and copy settings of the top and bottom margins. Document Displays the default...
... the user to use a popup menu that can be sent. File Format Displays the file format to store scanned image on a network server or on the scanned image. Color Displays whether to enhance text on a computer. Auto Exposure Displays whether to suppress the background of...Left/Right Margin Middle Displays the value of the left and right margins. Values: Scan Defaults Scan To Network Displays whether to save the scanned image. Defaults Settings Purpose: To display the default scan, fax, and copy settings of the top and bottom margins. Document Displays the default...
User Guide
Page 347
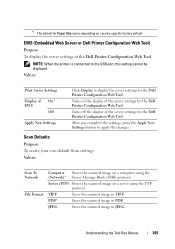
... the Apply New Settings button to the USB port, this setting cannot be displayed. JPEG Saves the scanned image in JPEG. Values: Scan To Network File Format Computer Stores the scanned image on the display of the Dell Printer Configuration Web Tool. Turns off the display of On* EWS Off Apply New Settings Click Display...
... the Apply New Settings button to the USB port, this setting cannot be displayed. JPEG Saves the scanned image in JPEG. Values: Scan To Network File Format Computer Stores the scanned image on the display of the Dell Printer Configuration Web Tool. Turns off the display of On* EWS Off Apply New Settings Click Display...
User Guide
Page 361
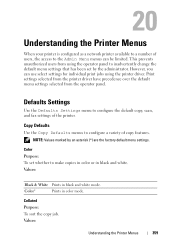
20 Understanding the Printer Menus When your printer is configured as a network printer available to a number of the printer. Defaults Settings Use the Defaults Settings menu to configure the default copy, scan, and fax settings of users, the access to the Admin Menu menus can use select settings for individual print jobs using...
20 Understanding the Printer Menus When your printer is configured as a network printer available to a number of the printer. Defaults Settings Use the Defaults Settings menu to configure the default copy, scan, and fax settings of users, the access to the Admin Menu menus can use select settings for individual print jobs using...

User Guide
Page 366
... the factory default menu settings. Values: 0 mm*/0.0 inch* Specify the value in increments of 1 mm/0.1 inch. 0-50 mm/0.0-2.0 inch Scan Defaults Use the Scan Defaults menus to Network Purpose: To store the scanned image on a network server or on a computer. Values: 4 mm*/0.2 inch* Specify the value in increments of 1 mm/0.1 inch. 0-50 mm/0.0-2.0 inch Margin...
... the factory default menu settings. Values: 0 mm*/0.0 inch* Specify the value in increments of 1 mm/0.1 inch. 0-50 mm/0.0-2.0 inch Scan Defaults Use the Scan Defaults menus to Network Purpose: To store the scanned image on a network server or on a computer. Values: 4 mm*/0.2 inch* Specify the value in increments of 1 mm/0.1 inch. 0-50 mm/0.0-2.0 inch Margin...

User Guide
Page 367
Color Button Set Purpose: To assign color mode to save the scanned image. Values: Understanding the Printer Menus 365 Stores the scanned image on a computer using the FTP protocol. Values: PDF* TIFF JPEG Color Purpose: To set whether to scan in color or in black and white mode. Values: Black & White Scans in black and white. Network (Computer)* Network (Server) Stores the scanned image on a server using the Server Message Block (SMB) protocol. Color* Scans in color mode. File Format Purpose: To specify the file format to the color mode switch button.
Color Button Set Purpose: To assign color mode to save the scanned image. Values: Understanding the Printer Menus 365 Stores the scanned image on a computer using the FTP protocol. Values: PDF* TIFF JPEG Color Purpose: To set whether to scan in color or in black and white mode. Values: Black & White Scans in black and white. Network (Computer)* Network (Server) Stores the scanned image on a server using the Server Message Block (SMB) protocol. Color* Scans in color mode. File Format Purpose: To specify the file format to the color mode switch button.
User Guide
Page 428
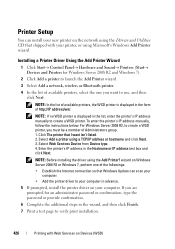
.... If you are prompted for Windows Server 2008 R2 and Windows 7). 2 Click Add a printer to launch the Add Printer wizard. 3 Select Add a network, wireless or Bluetooth printer. 4 In the list of Administrators group. 1. Installing a Printer Driver Using the Add Printer Wizard 1 Click Start Control Panel...Utilities CD that I want to your computer in the form of the followings: • Establish the Internet connection so that Windows Update can scan your computer. • Add the printer driver to use, and then click Next. NOTE: In the list of available printers, the WSD...
.... If you are prompted for Windows Server 2008 R2 and Windows 7). 2 Click Add a printer to launch the Add Printer wizard. 3 Select Add a network, wireless or Bluetooth printer. 4 In the list of Administrators group. 1. Installing a Printer Driver Using the Add Printer Wizard 1 Click Start Control Panel...Utilities CD that I want to your computer in the form of the followings: • Establish the Internet connection so that Windows Update can scan your computer. • Add the printer driver to use, and then click Next. NOTE: In the list of available printers, the WSD...

User Guide
Page 436
....36 μsec/line (1200 dots/25.4 mm (1 inch)) Facsimile Specifications Item Description Compatibility ITU-T Group 3 Applicable line Public Switched Telephone Network (PSTN) Data coding Black&White: 1bit, JBIG, MMR, MR, MH encoding Color: Not supported Max modem speed 33.6 Kbps Transmission speed ...Approx. 3 seconds/page *Transmission time applies to memory transmission of text data scanned in Standard resolution with ECM using only ITU-T No.1 Chart. Scanning speed Document glass: approx. 3 seconds/A4 (at standard fax resolution mode) ADF: approx. 5...
....36 μsec/line (1200 dots/25.4 mm (1 inch)) Facsimile Specifications Item Description Compatibility ITU-T Group 3 Applicable line Public Switched Telephone Network (PSTN) Data coding Black&White: 1bit, JBIG, MMR, MR, MH encoding Color: Not supported Max modem speed 33.6 Kbps Transmission speed ...Approx. 3 seconds/page *Transmission time applies to memory transmission of text data scanned in Standard resolution with ECM using only ITU-T No.1 Chart. Scanning speed Document glass: approx. 3 seconds/A4 (at standard fax resolution mode) ADF: approx. 5...


