
User Manual
Page 1
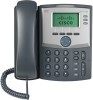
USER GUIDE Cisco Small Business Cisco Unified Communications Manager Express for IP Phone Models 30X
USER GUIDE Cisco Small Business Cisco Unified Communications Manager Express for IP Phone Models 30X
User Manual
Page 3
... (Optional) Mounting Your Cisco SPA 30X Phone to the Wall 19 Reversing the Handset Retention Tab 25 Verifying Phone Startup 26 Upgrading Your Phone's Firmware 27 Chapter 3: Using Basic Phone Functions 28 Using Phone Hardware and Accessories (Cisco SPA 303) 29 Using the Speakerphone 29 Using the Headset with Your IP Phone 29 Cisco Small Business IP Phone SPA 30X User Guide...
... (Optional) Mounting Your Cisco SPA 30X Phone to the Wall 19 Reversing the Handset Retention Tab 25 Verifying Phone Startup 26 Upgrading Your Phone's Firmware 27 Chapter 3: Using Basic Phone Functions 28 Using Phone Hardware and Accessories (Cisco SPA 303) 29 Using the Speakerphone 29 Using the Headset with Your IP Phone 29 Cisco Small Business IP Phone SPA 30X User Guide...
User Manual
Page 4
... the Missed Calls, Received Calls, or Placed Calls List 38 Accessing Voicemail 39 Chapter 4: Using Advanced Phone Features 40 Logging in to Your Phone/Extension Mobility (Cisco SPA 303) 40 Adding and Using Speed Dials (Cisco SPA 303) 42 Monitoring/Accessing Another Phone from Your Phone (Cisco SPA 303) 44 Cisco Small Business IP Phone SPA 30X User Guide (SPCP) 2
... the Missed Calls, Received Calls, or Placed Calls List 38 Accessing Voicemail 39 Chapter 4: Using Advanced Phone Features 40 Logging in to Your Phone/Extension Mobility (Cisco SPA 303) 40 Adding and Using Speed Dials (Cisco SPA 303) 42 Monitoring/Accessing Another Phone from Your Phone (Cisco SPA 303) 44 Cisco Small Business IP Phone SPA 30X User Guide (SPCP) 2
User Manual
Page 5
Customizing Your LCD Screen (Cisco SPA 303) Changing the LCD Screen Contrast Configuring the Phone Screen Saver Turning on the Screen Saver Immediately Updating Your Ring Tone Using the Interactive Voice Response Menu on the Cisco SPA 301 Advanced Procedures for Technical Support Personnel Viewing Status Information and Statistics Rebooting, Restarting, and Resetting a Phone Appendix A: Where to Go From Here Contents 44 44 44 45 46 46 47 48 48 50 Cisco Small Business IP Phone SPA 30X User Guide (SPCP) 3
Customizing Your LCD Screen (Cisco SPA 303) Changing the LCD Screen Contrast Configuring the Phone Screen Saver Turning on the Screen Saver Immediately Updating Your Ring Tone Using the Interactive Voice Response Menu on the Cisco SPA 301 Advanced Procedures for Technical Support Personnel Viewing Status Information and Statistics Rebooting, Restarting, and Resetting a Phone Appendix A: Where to Go From Here Contents 44 44 44 45 46 46 47 48 48 50 Cisco Small Business IP Phone SPA 30X User Guide (SPCP) 3

User Manual
Page 6
... document describes using your Cisco Small Business IP Phone. If you are using the Cisco Small Business IP Phones with a Cisco SPA 9000 Voice System or a BroadSoft or Asterisk system, see the Cisco Small Business IP Phone SPA 30X (SIP) User Guide. NOTE The Cisco Small Business IP Phone features vary, depending on the type of the Cisco Small Business IP Phones, page 6 • Getting to...
... document describes using your Cisco Small Business IP Phone. If you are using the Cisco Small Business IP Phones with a Cisco SPA 9000 Voice System or a BroadSoft or Asterisk system, see the Cisco Small Business IP Phone SPA 30X (SIP) User Guide. NOTE The Cisco Small Business IP Phone features vary, depending on the type of the Cisco Small Business IP Phones, page 6 • Getting to...

User Manual
Page 7
... full benefits of this document and basic information about your phone's basic functions. This chapter provides instructions on your Cisco Small Business IP phone. Cisco provides a wide range of resources to Go From Here Description This chapter provides an overview of the Cisco SPA 30X phones. Cisco Small Business IP Phone SPA 30X User Guide (SPCP) 5 Getting Started About This...
... full benefits of this document and basic information about your phone's basic functions. This chapter provides instructions on your Cisco Small Business IP phone. Cisco provides a wide range of resources to Go From Here Description This chapter provides an overview of the Cisco SPA 30X phones. Cisco Small Business IP Phone SPA 30X User Guide (SPCP) 5 Getting Started About This...
User Manual
Page 8
As stated in Appendix A, "Where to the computer network. The Cisco Unified Communications 500 Series uses a protocol called Smart Phone Control Protocol (SPCP) to the network through the IP phone. Cisco Small Business IP Phone SPA 30X User Guide (SPCP) 6 IP phones also have additional Ethernet ports that allow them to be connected to manage voice, data, and video traffic...
As stated in Appendix A, "Where to the computer network. The Cisco Unified Communications 500 Series uses a protocol called Smart Phone Control Protocol (SPCP) to the network through the IP phone. Cisco Small Business IP Phone SPA 30X User Guide (SPCP) 6 IP phones also have additional Ethernet ports that allow them to be connected to manage voice, data, and video traffic...

User Manual
Page 9
... their respective features: Screen Lines Softkeys Navigation Button Cisco SPA 301 None 1 None None Cisco SPA 303 128 X 64 monochrome LCD 3 4 dynamic Four-way navigation key Caring for Your Phone The Cisco Small Business IP phones are electronic devices that should not be exposed to Know the Cisco SPA 301 Cisco Small Business IP Phone SPA 30X User Guide (SPCP) 7
... their respective features: Screen Lines Softkeys Navigation Button Cisco SPA 301 None 1 None None Cisco SPA 303 128 X 64 monochrome LCD 3 4 dynamic Four-way navigation key Caring for Your Phone The Cisco Small Business IP phones are electronic devices that should not be exposed to Know the Cisco SPA 301 Cisco Small Business IP Phone SPA 30X User Guide (SPCP) 7
User Manual
Page 10
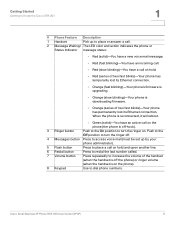
... the Off position to turn the ringer on. Cisco Small Business IP Phone SPA 30X User Guide (SPCP) 8 Getting Started Getting to Know the Cisco SPA 301 1 # Phone Feature Description 1 Handset Pick up by your phone administrator). 5 Flash button Press to place a call on the phone (the phone is off the phone) or ringer volume (when the handset is...
... the Off position to turn the ringer on. Cisco Small Business IP Phone SPA 30X User Guide (SPCP) 8 Getting Started Getting to Know the Cisco SPA 301 1 # Phone Feature Description 1 Handset Pick up by your phone administrator). 5 Flash button Press to place a call on the phone (the phone is off the phone) or ringer volume (when the handset is...

User Manual
Page 11
Flashes red during an incoming call . 2 Message Waiting Displays solid red when you have a new Indicator voice mail message. Cisco Small Business IP Phone SPA 30X User Guide (SPCP) 9 Getting Started Getting to Know the Cisco SPA 303 1 Getting to Know the Cisco SPA 303 # Phone Feature Description 1 Handset Pick up to place or answer a call or when the phone's firmware is being updated. 3 LCD Screen Displays date and time, phone station name, line extensions, and softkey options.
Flashes red during an incoming call . 2 Message Waiting Displays solid red when you have a new Indicator voice mail message. Cisco Small Business IP Phone SPA 30X User Guide (SPCP) 9 Getting Started Getting to Know the Cisco SPA 303 1 Getting to Know the Cisco SPA 303 # Phone Feature Description 1 Handset Pick up to place or answer a call or when the phone's firmware is being updated. 3 LCD Screen Displays date and time, phone station name, line extensions, and softkey options.
User Manual
Page 12
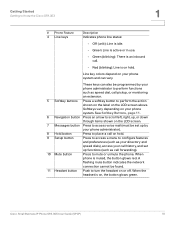
...action shown on the label on or off. When the headset is on your phone system and can also be set up by your phone administrator). 8 Hold button Press to place a call on hold . Cisco Small Business IP Phone SPA 30X User Guide (SPCP) 10 Getting Started Getting to mute or unmute... the phone. See Softkey Buttons, page 11. 6 Navigation button Press an arrow to scroll left, right,...
...action shown on the label on or off. When the headset is on your phone system and can also be set up by your phone administrator). 8 Hold button Press to place a call on hold . Cisco Small Business IP Phone SPA 30X User Guide (SPCP) 10 Getting Started Getting to mute or unmute... the phone. See Softkey Buttons, page 11. 6 Navigation button Press an arrow to scroll left, right,...
User Manual
Page 13
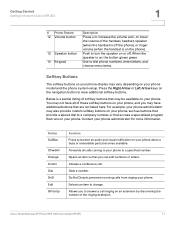
... call ringing on an extension by discovering the number of these softkey buttons on your phone. Dials a number. prevents incoming calls from ringing your phone administrator for more information. Cisco Small Business IP Phone SPA 30X User Guide (SPCP) 11 Do Not Disturb; Push to turn the speaker... on the navigation button to your phone, and you may have additional buttons that may ...
... call ringing on an extension by discovering the number of these softkey buttons on your phone. Dials a number. prevents incoming calls from ringing your phone administrator for more information. Cisco Small Business IP Phone SPA 30X User Guide (SPCP) 11 Do Not Disturb; Push to turn the speaker... on the navigation button to your phone, and you may have additional buttons that may ...
User Manual
Page 14
... to answer a call ringing on the LCD screen. Allows you to log in to any physical phone and retrieve your ring settings, press the Setup button, then press 3 for Settings and 2 for Ring Type. Cisco Small Business IP Phone SPA 30X User Guide (SPCP) 12 Performs a call transfer. Displays a list of the call system...
... to answer a call ringing on the LCD screen. Allows you to log in to any physical phone and retrieve your ring settings, press the Setup button, then press 3 for Settings and 2 for Ring Type. Cisco Small Business IP Phone SPA 30X User Guide (SPCP) 12 Performs a call transfer. Displays a list of the call system...
User Manual
Page 15
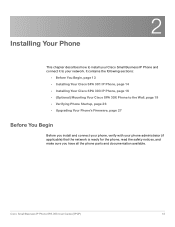
... sections: • Before You Begin, page 13 • Installing Your Cisco SPA 301 IP Phone, page 14 • Installing Your Cisco SPA 303 IP Phone, page 16 • (Optional) Mounting Your Cisco SPA 30X Phone to your phone administrator (if applicable) that the network is ready for the phone, read the safety notices, and make sure you have all the...
... sections: • Before You Begin, page 13 • Installing Your Cisco SPA 301 IP Phone, page 14 • Installing Your Cisco SPA 303 IP Phone, page 16 • (Optional) Mounting Your Cisco SPA 30X Phone to your phone administrator (if applicable) that the network is ready for the phone, read the safety notices, and make sure you have all the...
User Manual
Page 16
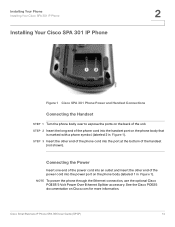
... outlet and insert the other end of the unit. Cisco Small Business IP Phone SPA 30X User Guide (SPCP) 14 Installing Your Phone Installing Your Cisco SPA 301 IP Phone 2 Installing Your Cisco SPA 301 IP Phone Figure 1 Cisco SPA 301 Phone Power and Handset Connections Connecting the Handset STEP 1 Turn the phone body over to expose the ports on the back of...
... outlet and insert the other end of the unit. Cisco Small Business IP Phone SPA 30X User Guide (SPCP) 14 Installing Your Phone Installing Your Cisco SPA 301 IP Phone 2 Installing Your Cisco SPA 301 IP Phone Figure 1 Cisco SPA 301 Phone Power and Handset Connections Connecting the Handset STEP 1 Turn the phone body over to expose the ports on the back of...

User Manual
Page 17
... Installing Your Phone Installing Your Cisco SPA 301 IP Phone 2 Connecting Your Cisco SPA 301 to the back of the IP phone base station into the slot marked "WAN." STEP 2 During the Setup Wizard process, connect the Ethernet network cable of the wired local network. Cisco Small Business IP Phone SPA 30X ...cable into the network port on the phone body marked "WAN" (labeled 3 in the Wireless-G Bridge for Phone Adapters to connect the IP phone to the power port on cisco.com. See Appendix A, "Where to the Cisco WBP54G: STEP 1 Configure the Cisco WBP54G using an Ethernet connection: STEP ...
... Installing Your Phone Installing Your Cisco SPA 301 IP Phone 2 Connecting Your Cisco SPA 301 to the back of the IP phone base station into the slot marked "WAN." STEP 2 During the Setup Wizard process, connect the Ethernet network cable of the wired local network. Cisco Small Business IP Phone SPA 30X ...cable into the network port on the phone body marked "WAN" (labeled 3 in the Wireless-G Bridge for Phone Adapters to connect the IP phone to the power port on cisco.com. See Appendix A, "Where to the Cisco WBP54G: STEP 1 Configure the Cisco WBP54G using an Ethernet connection: STEP ...

User Manual
Page 18
... bottom of the handset (not shown). Installing Your Cisco SPA 303 IP Phone Figure 3 Cisco SPA 303 Phone Connections Connecting the Handset STEP 1 Turn the phone body over to expose the ports on the phone body that is marked with a phone symbol. (labeled 5 in Figure 3). Installing Your Phone Installing Your Cisco SPA 303 IP Phone 2 STEP 5 Plug the other end of the...
... bottom of the handset (not shown). Installing Your Cisco SPA 303 IP Phone Figure 3 Cisco SPA 303 Phone Connections Connecting the Handset STEP 1 Turn the phone body over to expose the ports on the phone body that is marked with a phone symbol. (labeled 5 in Figure 3). Installing Your Phone Installing Your Cisco SPA 303 IP Phone 2 STEP 5 Plug the other end of the...
User Manual
Page 19
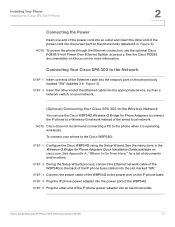
... Ethernet network cable of the WBP54G to the Cisco WBP54G: STEP 1 Configure the Cisco WBP54G using the Setup Wizard. STEP 4 Plug the IP phone power adapter into the power port of the IP phone power adapter into an electrical outlet. Connecting Your Cisco SPA 303 to a Wireless-G network instead of... 5 Plug the other end of the Ethernet cable into the appropriate device, such as a network switch, on the phone body (labeled 6 in Figure 3). Installing Your Phone Installing Your Cisco SPA 303 IP Phone 2 Connecting the Power Insert one end of the Ethernet cable into the network port on the...
... Ethernet network cable of the WBP54G to the Cisco WBP54G: STEP 1 Configure the Cisco WBP54G using the Setup Wizard. STEP 4 Plug the IP phone power adapter into the power port of the IP phone power adapter into an electrical outlet. Connecting Your Cisco SPA 303 to a Wireless-G network instead of... 5 Plug the other end of the Ethernet cable into the appropriate device, such as a network switch, on the phone body (labeled 6 in Figure 3). Installing Your Phone Installing Your Cisco SPA 303 IP Phone 2 Connecting the Power Insert one end of the Ethernet cable into the network port on the...
User Manual
Page 20
Cisco Small Business IP Phone SPA 30X User Guide (SPCP) 18 It should easily slide into the lower slots on your phone (optional): NOTE Cisco does not recommend connecting a PC to the wall. For the latest supported models, contact your particular headset for more information. ... the bottom tabs into the upper stand slots. Installing Your Phone Installing Your Cisco SPA 303 IP Phone 2 (Optional) Installing the Cisco SPA 303 Stand NOTE Do not attach the desk stand if you want to mount the phone to the phone when it is operating wirelessly. Additional information can be found at...
Cisco Small Business IP Phone SPA 30X User Guide (SPCP) 18 It should easily slide into the lower slots on your phone (optional): NOTE Cisco does not recommend connecting a PC to the wall. For the latest supported models, contact your particular headset for more information. ... the bottom tabs into the upper stand slots. Installing Your Phone Installing Your Cisco SPA 303 IP Phone 2 (Optional) Installing the Cisco SPA 303 Stand NOTE Do not attach the desk stand if you want to mount the phone to the phone when it is operating wirelessly. Additional information can be found at...

User Manual
Page 21
Cisco Small Business IP Phone SPA 30X User Guide (SPCP) 19 Installing Your Phone (Optional) Mounting Your Cisco SPA 30X Phone to the Wall 2 In general, to the wall, you must purchase the MB100 wall mount bracket kit. connect the 2.5mm connector from the headset into the headset port on the right side of the IP phone as shown in the following graphic: (Optional) Mounting Your Cisco SPA 30X Phone to the Wall To mount the phone to connect a headset.
Cisco Small Business IP Phone SPA 30X User Guide (SPCP) 19 Installing Your Phone (Optional) Mounting Your Cisco SPA 30X Phone to the Wall 2 In general, to the wall, you must purchase the MB100 wall mount bracket kit. connect the 2.5mm connector from the headset into the headset port on the right side of the IP phone as shown in the following graphic: (Optional) Mounting Your Cisco SPA 30X Phone to the Wall To mount the phone to connect a headset.


