
User Manual
Page 5
Customizing Your LCD Screen (Cisco SPA 303) Changing the LCD Screen Contrast Configuring the Phone Screen Saver Turning on the Screen Saver Immediately Updating Your Ring Tone Using the Interactive Voice Response Menu on the Cisco SPA 301 Advanced Procedures for Technical Support Personnel Viewing Status Information and Statistics Rebooting, Restarting, and Resetting a Phone Appendix A: Where to Go From Here Contents 44 44 44 45 46 46 47 48 48 50 Cisco Small Business IP Phone SPA 30X User Guide (SPCP) 3
Customizing Your LCD Screen (Cisco SPA 303) Changing the LCD Screen Contrast Configuring the Phone Screen Saver Turning on the Screen Saver Immediately Updating Your Ring Tone Using the Interactive Voice Response Menu on the Cisco SPA 301 Advanced Procedures for Technical Support Personnel Viewing Status Information and Statistics Rebooting, Restarting, and Resetting a Phone Appendix A: Where to Go From Here Contents 44 44 44 45 46 46 47 48 48 50 Cisco Small Business IP Phone SPA 30X User Guide (SPCP) 3
User Manual
Page 10
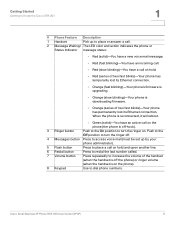
... IP Phone SPA 30X User Guide (SPCP) 8 Push to the Off position to turn the ringer on. Getting Started Getting to Know the Cisco SPA 301 1 # Phone Feature Description 1 Handset Pick up by your phone administrator). 5 Flash button Press to place a call on hold . • Red (series...is upgrading. • Orange (slow blinking)-Your phone is on the phone). 8 Keypad Use to dial phone numbers. When the phone is reconnected, it will reboot. • Green (solid)-You have a call on hold and open another line. 6 Redial button Press to redial the last number called. 7 Volume button ...
... IP Phone SPA 30X User Guide (SPCP) 8 Push to the Off position to turn the ringer on. Getting Started Getting to Know the Cisco SPA 301 1 # Phone Feature Description 1 Handset Pick up by your phone administrator). 5 Flash button Press to place a call on hold . • Red (series...is upgrading. • Orange (slow blinking)-Your phone is on the phone). 8 Keypad Use to dial phone numbers. When the phone is reconnected, it will reboot. • Green (solid)-You have a call on hold and open another line. 6 Redial button Press to redial the last number called. 7 Volume button ...

User Manual
Page 44
...softkey. STEP 2 Scroll to which they appear on the speed dial list. c. To edit a speed dial entry: STEP 1 Press the Setup button. STEP 8 Reboot your phone by unplugging the power, or: a. Press the Setup button. b. To add a speed dial: STEP 1 Press the Setup button. STEP 3 Scroll ...to add personal speed dial numbers. Using Advanced Phone Features Adding and Using Speed Dials (Cisco SPA 303) 4 Adding and Using Speed Dials (Cisco SPA 303) Use the phone menu to My Phone Apps and press the Select softkey. Enter the destination number...
...softkey. STEP 2 Scroll to which they appear on the speed dial list. c. To edit a speed dial entry: STEP 1 Press the Setup button. STEP 8 Reboot your phone by unplugging the power, or: a. Press the Setup button. b. To add a speed dial: STEP 1 Press the Setup button. STEP 3 Scroll ...to add personal speed dial numbers. Using Advanced Phone Features Adding and Using Speed Dials (Cisco SPA 303) 4 Adding and Using Speed Dials (Cisco SPA 303) Use the phone menu to My Phone Apps and press the Select softkey. Enter the destination number...

User Manual
Page 45
... changed speed dials appear next to the line buttons to Reboot and press the Select softkey. STEP 5 Scroll to the entry that you would normally use to change and press the Submit softkey. Cisco Small Business IP Phone SPA 30X User Guide (SPCP) 43 Scroll to which they are assigned....and press the Select softkey. STEP 2 Scroll to confirm the reboot. STEP 2 If the speed dial is assigned to Speed Dial Buttons and press the Select softkey. STEP 8 If you want to delete. Using Advanced Phone Features Adding and Using Speed Dials (Cisco SPA 303) 4 STEP 4 Scroll to a line button, ...
... changed speed dials appear next to the line buttons to Reboot and press the Select softkey. STEP 5 Scroll to the entry that you would normally use to change and press the Submit softkey. Cisco Small Business IP Phone SPA 30X User Guide (SPCP) 43 Scroll to which they are assigned....and press the Select softkey. STEP 2 Scroll to confirm the reboot. STEP 2 If the speed dial is assigned to Speed Dial Buttons and press the Select softkey. STEP 8 If you want to delete. Using Advanced Phone Features Adding and Using Speed Dials (Cisco SPA 303) 4 STEP 4 Scroll to a line button, ...
User Manual
Page 49
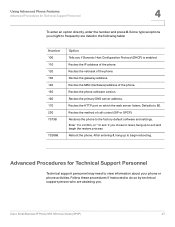
... the phone. Recites the gateway address. Recites the primary DNS server address. Restores the phone to 80. Reboot the phone. Recites the phone software version. After entering #, hang up to begin the restore process. Cisco Small Business IP Phone SPA 30X User Guide (SPCP) 47 Recites the netmask of the phone. Recites... table: Number 100 110 120 130 140 150 160 170 220 73738 732668 Option Tells you chose to reset, hang up to exit and begin rebooting.
... the phone. Recites the gateway address. Recites the primary DNS server address. Restores the phone to 80. Reboot the phone. Recites the phone software version. After entering #, hang up to begin the restore process. Cisco Small Business IP Phone SPA 30X User Guide (SPCP) 47 Recites the netmask of the phone. Recites... table: Number 100 110 120 130 140 150 160 170 220 73738 732668 Option Tells you chose to reset, hang up to exit and begin rebooting.
User Manual
Page 50
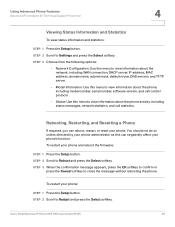
...the Setup button. STEP 2 Scroll to close the message without rebooting the phone. STEP 3 When the confirmation message appears, press the OK softkey to confirm or press the Cancel softkey to Reboot and press the Select softkey. Cisco Small Business IP Phone SPA 30X User Guide (SPCP) 48 ...To restart your phone and reboot the firmware: STEP 1 Press the Setup button. STEP 3 Choose from the ...
...the Setup button. STEP 2 Scroll to close the message without rebooting the phone. STEP 3 When the confirmation message appears, press the OK softkey to confirm or press the Cancel softkey to Reboot and press the Select softkey. Cisco Small Business IP Phone SPA 30X User Guide (SPCP) 48 ...To restart your phone and reboot the firmware: STEP 1 Press the Setup button. STEP 3 Choose from the ...

User Manual
Page 51
...your phone to Factory Reset and press the Select softkey. STEP 1 Press the Setup button. STEP 2 Scroll to the factory default values and reboot with the settings from your phone extension will change. STEP 3 When the confirmation message appears, press the OK softkey to confirm or press the ... factory settings and will return the phone to close the message without resetting the phone. It is also possible that your phone system (Cisco CME): ! Cisco Small Business IP Phone SPA 30X User Guide (SPCP) 49 CAUTION If you choose factory reset, you will erase ALL current settings, ...
...your phone to Factory Reset and press the Select softkey. STEP 1 Press the Setup button. STEP 2 Scroll to the factory default values and reboot with the settings from your phone extension will change. STEP 3 When the confirmation message appears, press the OK softkey to confirm or press the ... factory settings and will return the phone to close the message without resetting the phone. It is also possible that your phone system (Cisco CME): ! Cisco Small Business IP Phone SPA 30X User Guide (SPCP) 49 CAUTION If you choose factory reset, you will erase ALL current settings, ...
