
User Manual
Page 8
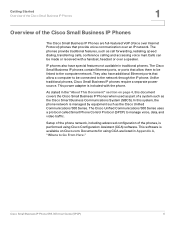
... network. IP phones also have additional Ethernet ports that provide voice communication over an IP network. The Cisco Unified Communications 500 Series uses a protocol called Smart Phone Control Protocol (SPCP) to Go From Here." Setup of the phone network, including advanced configuration of the phones, is included with a handset, headset or over...
... network. IP phones also have additional Ethernet ports that provide voice communication over an IP network. The Cisco Unified Communications 500 Series uses a protocol called Smart Phone Control Protocol (SPCP) to Go From Here." Setup of the phone network, including advanced configuration of the phones, is included with a handset, headset or over...
User Manual
Page 12
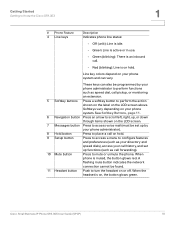
...access voice mail (must be found. 11 Headset button Push to turn the headset on or off. When the headset is on hold . 9 Setup button Press to access a menu to configure features and preferences (such as your directory and speed dials), access your phone administrator to perform functions ... Press to mute or unmute the phone. Line key colors depend on your phone system. These keys can vary. Getting Started Getting to Know the Cisco SPA 303 1 # Phone Feature 4 Line keys Description Indicates phone line status: • Off (unlit): Line is idle. • Green: Line is ...
...access voice mail (must be found. 11 Headset button Push to turn the headset on or off. When the headset is on hold . 9 Setup button Press to access a menu to configure features and preferences (such as your directory and speed dials), access your phone administrator to perform functions ... Press to mute or unmute the phone. Line key colors depend on your phone system. These keys can vary. Getting Started Getting to Know the Cisco SPA 303 1 # Phone Feature 4 Line keys Description Indicates phone line status: • Off (unlit): Line is idle. • Green: Line is ...
User Manual
Page 13
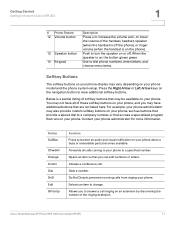
.... Initiates a conference call ringing on your phone, and you can edit numbers or letters. Selects an item to increase the volume and - Cisco Small Business IP Phone SPA 30X User Guide (SPCP) 11 When the speaker is a partial listing of these softkey buttons on the phone). Opens...button to dial phone numbers, enter letters, and choose menu items. Softkey Buttons The softkey buttons on your phone model and the phone system setup. Below is on your phone to your phone. Dials a number. Use to view additional softkey buttons. Forwards all of softkey buttons that...
.... Initiates a conference call ringing on your phone, and you can edit numbers or letters. Selects an item to increase the volume and - Cisco Small Business IP Phone SPA 30X User Guide (SPCP) 11 When the speaker is a partial listing of these softkey buttons on the phone). Opens...button to dial phone numbers, enter letters, and choose menu items. Softkey Buttons The softkey buttons on your phone model and the phone system setup. Below is on your phone to your phone. Dials a number. Use to view additional softkey buttons. Forwards all of softkey buttons that...
User Manual
Page 14
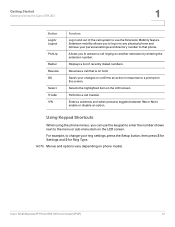
... call transfer. Selects the highlighted item on the screen. For example, to change your personal settings and directory number to that is on hold. Cisco Small Business IP Phone SPA 30X User Guide (SPCP) 12 Resumes a call system to use the keypad to enter the number shown next to ... pressed, toggles between Yes or No to any physical phone and retrieve your ring settings, press the Setup button, then press 3 for Settings and 2 for Ring Type. Getting Started Getting to Know the Cisco SPA 303 1 Button Login/ Logout PickUp Redial Resume OK Select Trnsfer Y/N Function Log in and out...
... call transfer. Selects the highlighted item on the screen. For example, to change your personal settings and directory number to that is on hold. Cisco Small Business IP Phone SPA 30X User Guide (SPCP) 12 Resumes a call system to use the keypad to enter the number shown next to ... pressed, toggles between Yes or No to any physical phone and retrieve your ring settings, press the Setup button, then press 3 for Settings and 2 for Ring Type. Getting Started Getting to Know the Cisco SPA 303 1 Button Login/ Logout PickUp Redial Resume OK Select Trnsfer Y/N Function Log in and out...

User Manual
Page 17
... the WBP54G to the power port on cisco.com. Installing Your Phone Installing Your Cisco SPA 301 IP Phone 2 Connecting Your Cisco SPA 301 to the Network Figure 2 Cisco SPA 301 Phone Ethernet Connection If you are using the Setup Wizard. To connect your network. (Optional) Connecting Your Cisco SPA 301 to the Wireless Network You...
... the WBP54G to the power port on cisco.com. Installing Your Phone Installing Your Cisco SPA 301 IP Phone 2 Connecting Your Cisco SPA 301 to the Network Figure 2 Cisco SPA 301 Phone Ethernet Connection If you are using the Setup Wizard. To connect your network. (Optional) Connecting Your Cisco SPA 301 to the Wireless Network You...
User Manual
Page 19
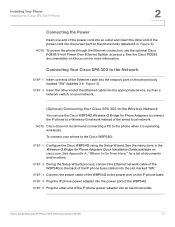
...of documents and locations. STEP 3 Connect the power cable of the WBP54G to the power port on your phone to the Cisco WBP54G: STEP 1 Configure the Cisco WBP54G using the Setup Wizard. STEP 4 Plug the IP phone power adapter into an electrical outlet. Installing Your Phone Installing Your... Cisco SPA 303 IP Phone 2 Connecting the Power Insert one end of the Ethernet cable into the network port on Cisco.com for more ...
...of documents and locations. STEP 3 Connect the power cable of the WBP54G to the power port on your phone to the Cisco WBP54G: STEP 1 Configure the Cisco WBP54G using the Setup Wizard. STEP 4 Plug the IP phone power adapter into an electrical outlet. Installing Your Phone Installing Your... Cisco SPA 303 IP Phone 2 Connecting the Power Insert one end of the Ethernet cable into the network port on Cisco.com for more ...

User Manual
Page 35
... transfer the call without waiting for the other person, press the Trnsfer softkey at any time during the conversation. Cisco SPA 301 To redial the last number called number: STEP 1 Press the Setup button. To redial a recently-called , press the Redial softkey. NOTE If the call was from an outside or ... called. The call and use the softkey buttons and keypad to Call History and press the Select softkey. Redialing a Number Cisco SPA 301 Press the Redial button to ring. Cisco Small Business IP Phone SPA 30X User Guide (SPCP) 33 Press the EditDial softkey to edit the call is placed on...
... transfer the call without waiting for the other person, press the Trnsfer softkey at any time during the conversation. Cisco SPA 301 To redial the last number called number: STEP 1 Press the Setup button. To redial a recently-called , press the Redial softkey. NOTE If the call was from an outside or ... called. The call and use the softkey buttons and keypad to Call History and press the Select softkey. Redialing a Number Cisco SPA 301 Press the Redial button to ring. Cisco Small Business IP Phone SPA 30X User Guide (SPCP) 33 Press the EditDial softkey to edit the call is placed on...
User Manual
Page 36
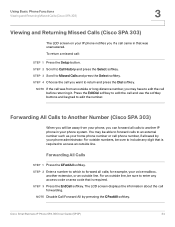
.... NOTE If the call was unanswered. Press the EditDial softkey to edit the call before returning it. STEP 4 Choose the call : STEP 1 Press the Setup button. STEP 2 Enter a number to which to forward all calls to another extension, or an outside or long distance number, you may have to edit...external number such as your home phone number or cell phone number, if allowed by pressing the CFwdAll softkey. Forwarding All Calls to Another Number (Cisco SPA 303) When you will be able to forward calls to return and press the Dial softkey. Forwarding All Calls STEP 1 Press the CFwdAll ...
.... NOTE If the call was unanswered. Press the EditDial softkey to edit the call before returning it. STEP 4 Choose the call : STEP 1 Press the Setup button. STEP 2 Enter a number to which to forward all calls to another extension, or an outside or long distance number, you may have to edit...external number such as your home phone number or cell phone number, if allowed by pressing the CFwdAll softkey. Forwarding All Calls to Another Number (Cisco SPA 303) When you will be able to forward calls to return and press the Dial softkey. Forwarding All Calls STEP 1 Press the CFwdAll ...

User Manual
Page 39
...by entering a last name, a first name, or both names, or leave the fields blank. To use the local directory: STEP 1 Press the Setup button. STEP 4 When the search form appears, you can leave the fields blank. Click the Submit softkey to change the number before connecting the ... Press the Cancel softkey to Local Directory and press the Select softkey. STEP 2 Dial the second person's telephone number. Using the Local Directory (Cisco SPA 303) The local directory lists the phones and extension numbers in the conference call is placed on hold, a second line is opened, and...
...by entering a last name, a first name, or both names, or leave the fields blank. To use the local directory: STEP 1 Press the Setup button. STEP 4 When the search form appears, you can leave the fields blank. Click the Submit softkey to change the number before connecting the ... Press the Cancel softkey to Local Directory and press the Select softkey. STEP 2 Dial the second person's telephone number. Using the Local Directory (Cisco SPA 303) The local directory lists the phones and extension numbers in the conference call is placed on hold, a second line is opened, and...

User Manual
Page 40
... softkey to delete all numbers from your phone. STEP 4 To call was from the Missed Calls, Received Calls, or Placed Calls List STEP 1 Press the Setup button. Press the Edit Dial softkey to change the number before dialing it. STEP 3 Scroll to the list from which you may have to edit... the call and use the Call History lists: STEP 1 Press the Setup button. Cisco Small Business IP Phone SPA 30X User Guide (SPCP) 38 Press the Cancel softkey to the main screen. Press the Cancel softkey to return to...
... softkey to delete all numbers from your phone. STEP 4 To call was from the Missed Calls, Received Calls, or Placed Calls List STEP 1 Press the Setup button. Press the Edit Dial softkey to change the number before dialing it. STEP 3 Scroll to the list from which you may have to edit... the call and use the Call History lists: STEP 1 Press the Setup button. Cisco Small Business IP Phone SPA 30X User Guide (SPCP) 38 Press the Cancel softkey to the main screen. Press the Cancel softkey to return to...
User Manual
Page 43
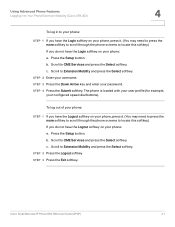
... screens to locate this softkey.) If you do not have the Login softkey on your phone: a. Press the Setup button. Scroll to Extension Mobility and press the Select softkey. Cisco Small Business IP Phone SPA 30X User Guide (SPCP) 41 c. b. Scroll to CME Services and press the Select... softkey. Press the Setup button. STEP 2 Enter your password. The phone is loaded with your user profile (for example, ...
... screens to locate this softkey.) If you do not have the Login softkey on your phone: a. Press the Setup button. Scroll to Extension Mobility and press the Select softkey. Cisco Small Business IP Phone SPA 30X User Guide (SPCP) 41 c. b. Scroll to CME Services and press the Select... softkey. Press the Setup button. STEP 2 Enter your password. The phone is loaded with your user profile (for example, ...

User Manual
Page 44
.... To add a speed dial: STEP 1 Press the Setup button. STEP 8 Reboot your phone by unplugging the power, or: a. Scroll to enter the Label (name or other identifier for this speed dial entry). STEP 7 Press the Submit softkey. Cisco Small Business IP Phone SPA 30X User Guide (SPCP) 42 ... 4 Adding and Using Speed Dials (Cisco SPA 303) Use the phone menu to reach the Number field. The new entry appears in the order they are assigned to unused line buttons in the list, along with the assigned speed dial number. Press the Setup button. b. Enter the destination number....
.... To add a speed dial: STEP 1 Press the Setup button. STEP 8 Reboot your phone by unplugging the power, or: a. Scroll to enter the Label (name or other identifier for this speed dial entry). STEP 7 Press the Submit softkey. Cisco Small Business IP Phone SPA 30X User Guide (SPCP) 42 ... 4 Adding and Using Speed Dials (Cisco SPA 303) Use the phone menu to reach the Number field. The new entry appears in the order they are assigned to unused line buttons in the list, along with the assigned speed dial number. Press the Setup button. b. Enter the destination number....

User Manual
Page 45
...would normally use to a line button, press the number for the speed dial (for example, 3), then press the AbbrDial softkey. Press the Setup button. Press the OK softkey to My Phone Apps and press the Select softkey. STEP 3 Scroll to confirm the reboot. c. Using Advanced... Phone Features Adding and Using Speed Dials (Cisco SPA 303) 4 STEP 4 Scroll to Speed Dial Buttons and press the Select softkey. STEP 4 Scroll to Speed Dial Buttons and press the...
...would normally use to a line button, press the number for the speed dial (for example, 3), then press the AbbrDial softkey. Press the Setup button. Press the OK softkey to My Phone Apps and press the Select softkey. STEP 3 Scroll to confirm the reboot. c. Using Advanced... Phone Features Adding and Using Speed Dials (Cisco SPA 303) 4 STEP 4 Scroll to Speed Dial Buttons and press the Select softkey. STEP 4 Scroll to Speed Dial Buttons and press the...
User Manual
Page 46
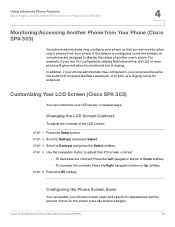
... the Phone Screen Saver You can press the same line button (3) to speed dial Bob's extension, or to display the status of another user's phone. Cisco Small Business IP Phone SPA 30X User Guide (SPCP) 44 Using Advanced Phone Features Monitoring/Accessing Another Phone from Your Phone... line is configured, some line buttons on your phone's screen saver and specify its appearance and the amount of the LCD screen: STEP 1 Press the Setup button. STEP 2 Scroll to Contrast and press the Select softkey. STEP 3 Scroll to Settings and press Select. If this feature is ringing. For example, if...
... the Phone Screen Saver You can press the same line button (3) to speed dial Bob's extension, or to display the status of another user's phone. Cisco Small Business IP Phone SPA 30X User Guide (SPCP) 44 Using Advanced Phone Features Monitoring/Accessing Another Phone from Your Phone... line is configured, some line buttons on your phone's screen saver and specify its appearance and the amount of the LCD screen: STEP 1 Press the Setup button. STEP 2 Scroll to Contrast and press the Select softkey. STEP 3 Scroll to Settings and press Select. If this feature is ringing. For example, if...

User Manual
Page 47
... softkey. Press the Save softkey to Enable Screen Saver and press the Edit softkey. Scroll to save your screen saver: STEP 1 Press the Setup button. Press the OK softkey. Press the Save softkey to Screen Saver Mode and press the Select softkey. d. c. STEP 3 Press the ...the Clear softkey. e. b. Scroll to disable this feature. Enter the idle time period in order to immediately activate it. STEP 1 Press the Setup button. Cisco Small Business IP Phone SPA 30X User Guide (SPCP) 45 b. d. Press the Y/N softkey until the desired option appears: Yes to enable a...
... softkey. Press the Save softkey to Enable Screen Saver and press the Edit softkey. Scroll to save your screen saver: STEP 1 Press the Setup button. Press the OK softkey. Press the Save softkey to Screen Saver Mode and press the Select softkey. d. c. STEP 3 Press the ...the Clear softkey. e. b. Scroll to disable this feature. Enter the idle time period in order to immediately activate it. STEP 1 Press the Setup button. Cisco Small Business IP Phone SPA 30X User Guide (SPCP) 45 b. d. Press the Y/N softkey until the desired option appears: Yes to enable a...

User Manual
Page 48
...You can have a different ring tone. STEP 3 Scroll to close the screen. Using the Interactive Voice Response Menu on the Cisco SPA 301 The Cisco SPA 301 provides an interactive voice response menu. Cisco Small Business IP Phone SPA 30X User Guide (SPCP) 46 STEP 4 Use the Up Arrow key or Down Arrow key... to choose the phone line for help, or directly enter the number of the menu option you want to change a ring tone: STEP 1 Press the Setup button. STEP...
...You can have a different ring tone. STEP 3 Scroll to close the screen. Using the Interactive Voice Response Menu on the Cisco SPA 301 The Cisco SPA 301 provides an interactive voice response menu. Cisco Small Business IP Phone SPA 30X User Guide (SPCP) 46 STEP 4 Use the Up Arrow key or Down Arrow key... to choose the phone line for help, or directly enter the number of the menu option you want to change a ring tone: STEP 1 Press the Setup button. STEP...
User Manual
Page 50
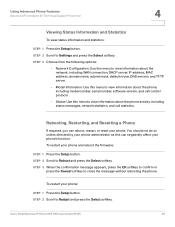
...Phone Features Advanced Procedures for Technical Support Personnel 4 Viewing Status Information and Statistics To view status information and statistics: STEP 1 Press the Setup button. STEP 3 When the confirmation message appears, press the OK softkey to confirm or press the Cancel softkey to Settings and press... the Select softkey. Cisco Small Business IP Phone SPA 30X User Guide (SPCP) 48 STEP 3 Choose from the following options: • Network Configuration: Use ...
...Phone Features Advanced Procedures for Technical Support Personnel 4 Viewing Status Information and Statistics To view status information and statistics: STEP 1 Press the Setup button. STEP 3 When the confirmation message appears, press the OK softkey to confirm or press the Cancel softkey to Settings and press... the Select softkey. Cisco Small Business IP Phone SPA 30X User Guide (SPCP) 48 STEP 3 Choose from the following options: • Network Configuration: Use ...

User Manual
Page 51
CAUTION If you choose factory reset, you will return the phone to the original factory settings and will change. STEP 1 Press the Setup button. Cisco Small Business IP Phone SPA 30X User Guide (SPCP) 49 STEP 3 When the confirmation message appears, press the OK softkey to confirm or press the ...Cancel softkey to close the message without resetting the phone. It is also possible that your phone system (Cisco CME): ! STEP 2 Scroll to Factory Reset and press the Select softkey. To reset your phone to the factory default values and reboot with the ...
CAUTION If you choose factory reset, you will return the phone to the original factory settings and will change. STEP 1 Press the Setup button. Cisco Small Business IP Phone SPA 30X User Guide (SPCP) 49 STEP 3 When the confirmation message appears, press the OK softkey to confirm or press the ...Cancel softkey to close the message without resetting the phone. It is also possible that your phone system (Cisco CME): ! STEP 2 Scroll to Factory Reset and press the Select softkey. To reset your phone to the factory default values and reboot with the ...
Brochure
Page 3
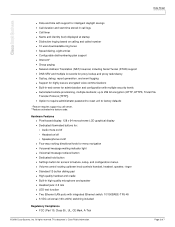
...LAN ports with multiple security levels ● Automated remote provisioning, multiple methods; All rights reserved. Page 3 of 7 This document is Cisco Public Information. Hardware Features ● Pixel-based display: 128 x 64 monochrome LCD graphical display ● Dedicated illuminated buttons for: ... waiting indicator light ● Voicemail message retrieval button ● Dedicated hold button ● Settings button for access to feature, setup, and configuration menus ● Volume control rocking up to 256 bit encryption (HTTP, HTTPS, Trivial File Transfer Protocol [TFTP])...
...LAN ports with multiple security levels ● Automated remote provisioning, multiple methods; All rights reserved. Page 3 of 7 This document is Cisco Public Information. Hardware Features ● Pixel-based display: 128 x 64 monochrome LCD graphical display ● Dedicated illuminated buttons for: ... waiting indicator light ● Voicemail message retrieval button ● Dedicated hold button ● Settings button for access to feature, setup, and configuration menus ● Volume control rocking up to 256 bit encryption (HTTP, HTTPS, Trivial File Transfer Protocol [TFTP])...


