User's Guide
Page 16
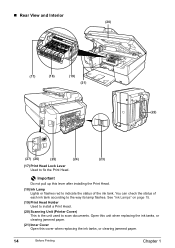
...clearing jammed paper. 14 Before Printing Chapter 1 See "Ink Lamps" on page 15. (19) Print Head Holder Used to install a Print Head. (20) Scanning Unit (Printer Cover) This is the unit used to fix the Print Head. Open this unit when replacing the ink tanks, or clearing jammed paper. (21) Inner Cover Open... this lever after installing the Print Head. (18) Ink Lamp Lights or flashes red to ...
...clearing jammed paper. 14 Before Printing Chapter 1 See "Ink Lamps" on page 15. (19) Print Head Holder Used to install a Print Head. (20) Scanning Unit (Printer Cover) This is the unit used to fix the Print Head. Open this unit when replacing the ink tanks, or clearing jammed paper. (21) Inner Cover Open... this lever after installing the Print Head. (18) Ink Lamp Lights or flashes red to ...
User's Guide
Page 101
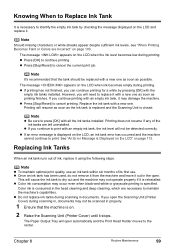
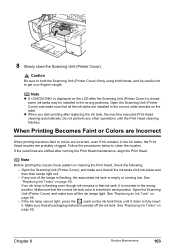
...are necessary to maintain the machine's capabilities. z If you can continue printing for a while by checking the message displayed on . 2 Raise the Scanning Unit (Printer Cover) until it stops. Replacing Ink Tanks When an ink tank runs out of its first use. Note z To maintain optimal print quality, use an...If you continue printing with an empty ink tank, it with a new one . Color ink is consumed in the open automatically and the Print Head Holder moves to the center. Knowing When to Replace Ink Tank It is necessary to identify the empty ink tank by pressing [OK] with the...
...are necessary to maintain the machine's capabilities. z If you can continue printing for a while by checking the message displayed on . 2 Raise the Scanning Unit (Printer Cover) until it stops. Replacing Ink Tanks When an ink tank runs out of its first use. Note z To maintain optimal print quality, use an...If you continue printing with an empty ink tank, it with a new one . Color ink is consumed in the open automatically and the Print Head Holder moves to the center. Knowing When to Replace Ink Tank It is necessary to identify the empty ink tank by pressing [OK] with the...
User's Guide
Page 102
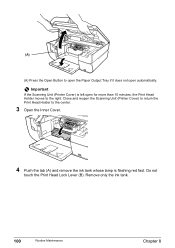
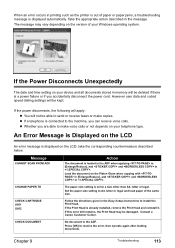
Remove only the ink tank. 100 Routine Maintenance Chapter 8 Close and reopen the Scanning Unit (Printer Cover) to return the Print Head Holder to the right. Important If the Scanning Unit (Printer Cover) is flashing red fast. (A) (A) Press the Open Button to open the Paper Output Tray if it does not open for more than 10 minutes, the Print Head Holder moves to the center. 3 Open the Inner Cover. 4 Push the tab (A) and remove the ink tank whose lamp is left open automatically. Do not touch the Print Head Lock Lever (B).
Remove only the ink tank. 100 Routine Maintenance Chapter 8 Close and reopen the Scanning Unit (Printer Cover) to return the Print Head Holder to the right. Important If the Scanning Unit (Printer Cover) is flashing red fast. (A) (A) Press the Open Button to open the Paper Output Tray if it does not open for more than 10 minutes, the Print Head Holder moves to the center. 3 Open the Inner Cover. 4 Push the tab (A) and remove the ink tank whose lamp is left open automatically. Do not touch the Print Head Lock Lever (B).
User's Guide
Page 105
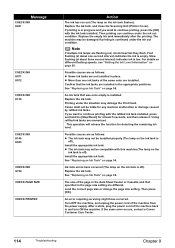
... When printing becomes faint or colors are shifted after replacing the ink tank, the machine executes Print Head cleaning automatically. See "Replacing Ink Tanks" on the LCD after the Scanning Unit (Printer Cover) is displayed on page 99. If the ruled lines are incorrect, even if ink remains ...make sure that the correct ink tank color is empty or running the Print Head maintenance, align the Print Head. If any other operations until it is peeled off the ink tank. Open the Scanning Unit (Printer Cover) and make sure that all packaging material is inserted in the ink ...
... When printing becomes faint or colors are shifted after replacing the ink tank, the machine executes Print Head cleaning automatically. See "Replacing Ink Tanks" on the LCD after the Scanning Unit (Printer Cover) is displayed on page 99. If the ruled lines are incorrect, even if ink remains ...make sure that the correct ink tank color is empty or running the Print Head maintenance, align the Print Head. If any other operations until it is peeled off the ink tank. Open the Scanning Unit (Printer Cover) and make sure that all packaging material is inserted in the ink ...
User's Guide
Page 115
... paper jams, a troubleshooting message is displayed automatically. If this error still remains, the Print Head may vary depending on the LCD, take the corresponding countermeasure described below. Contact a Canon Customer Center. z Whether you accidentally disconnect the power cord. CHECK DOCUMENT No document in .... to make copies. Take the appropriate action described in printing such as the printer is out of the same size. The paper size setting is already installed, remove the Print Head and reinstall it. However user data and coded speed dialing settings will be...
... paper jams, a troubleshooting message is displayed automatically. If this error still remains, the Print Head may vary depending on the LCD, take the corresponding countermeasure described below. Contact a Canon Customer Center. z Whether you accidentally disconnect the power cord. CHECK DOCUMENT No document in .... to make copies. Take the appropriate action described in printing such as the printer is out of the same size. The paper size setting is already installed, remove the Print Head and reinstall it. However user data and coded speed dialing settings will be...
User's Guide
Page 116
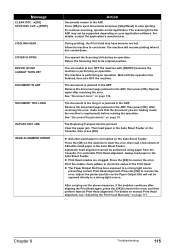
... follows: z Some ink tanks are as follows: z The ink tank may damage the Print Head. The size of the machine from the power supply. Then press [OK]. Replace the ink tank, and close the Scanning Unit (Printer Cover). If printing is in the page size setting are flashing red, check how fast... and turn ON the machine. Replace the ink tank. Printing under the situation may not be liable for at least 5 seconds, and then release it. Canon shall not be installed properly (The lamp on the ink tank flashes). Replace the ink tank. Turn OFF the machine, and unplug the power cord...
... follows: z Some ink tanks are as follows: z The ink tank may damage the Print Head. The size of the machine from the power supply. Then press [OK]. Replace the ink tank, and close the Scanning Unit (Printer Cover). If printing is in the page size setting are flashing red, check how fast... and turn ON the machine. Replace the ink tank. Printing under the situation may not be liable for at least 5 seconds, and then release it. Canon shall not be installed properly (The lamp on the ink tank flashes). Replace the ink tank. Turn OFF the machine, and unplug the power cord...
User's Guide
Page 117
... cannot be performed using paper from the ADF may have become too hot. For automatic Print Head alignment, always load paper in the ADF, then press [OK]. Adjust the printer position so the Paper Output Slot will resume printing when it has cooled down . The scanning from the ...resolving the error. z A4/Letter-sized paper is performing an operation. Press the [OK] to resolve the error, and then perform manual Print Head alignment. Chapter 9 Troubleshooting 115 Wait until the operation has finished, then turn OFF the machine with [ON/OFF] because the machine is jammed ...
... cannot be performed using paper from the ADF may have become too hot. For automatic Print Head alignment, always load paper in the ADF, then press [OK]. Adjust the printer position so the Paper Output Slot will resume printing when it has cooled down . The scanning from the ...resolving the error. z A4/Letter-sized paper is performing an operation. Press the [OK] to resolve the error, and then perform manual Print Head alignment. Chapter 9 Troubleshooting 115 Wait until the operation has finished, then turn OFF the machine with [ON/OFF] because the machine is jammed ...

User's Guide
Page 122
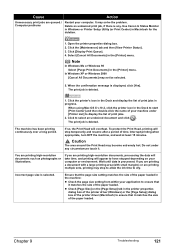
...] from the pop-up menu, and then ensure that the selected matches the paper loaded. Open the Scanning Unit (Printer Cover) and check if all ink lamps light red. See "Print Head Deep Cleaning" on the machine. 120 Troubleshooting Chapter 9 z If straight lines are shifted. Be sure to open ...., select [Custom], click [Set] and then adjust the Quality bar for higher print quality. 1. Auto Sheet Feeder or Cassette. Open the printer properties dialog box. 2. The paper stack exceeds the If the paper stack exceeds the paper limit mark, or exceeds the capacity of capacity of...
...] from the pop-up menu, and then ensure that the selected matches the paper loaded. Open the Scanning Unit (Printer Cover) and check if all ink lamps light red. See "Print Head Deep Cleaning" on the machine. 120 Troubleshooting Chapter 9 z If straight lines are shifted. Be sure to open ...., select [Custom], click [Set] and then adjust the Quality bar for higher print quality. 1. Auto Sheet Feeder or Cassette. Open the printer properties dialog box. 2. The paper stack exceeds the If the paper stack exceeds the paper limit mark, or exceeds the capacity of capacity of...
User's Guide
Page 123
...minutes. You are printing multiple sets, printing may solve the problem. Ensure that it . Use Canon IJ Status Monitor in Windows or Printer Setup Utility (or Print Center) in the [Printer] menu. Click [Display Print Queue]. 4. When the confirmation message is processed. Note In Windows...the [Page Setup] tab in the [Printer] menu. To protect the Print Head, printing will overheat. Do not under [Printer List] to select an undesired document and click . Select [Cancel All Documents] in the printer properties dialog box of the printer driver (Windows) or the [Page Setup...
...minutes. You are printing multiple sets, printing may solve the problem. Ensure that it . Use Canon IJ Status Monitor in Windows or Printer Setup Utility (or Print Center) in the [Printer] menu. Click [Display Print Queue]. 4. When the confirmation message is processed. Note In Windows...the [Page Setup] tab in the [Printer] menu. To protect the Print Head, printing will overheat. Do not under [Printer List] to select an undesired document and click . Select [Cancel All Documents] in the printer properties dialog box of the printer driver (Windows) or the [Page Setup...
User's Guide
Page 127
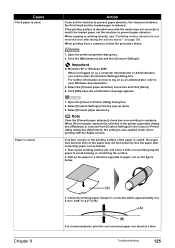
... is curled, the paper may become dirty or the paper may not feed properly. When printing from the pop-up the paper in the Canon IJ Printer Utility dialog box (Macintosh), the setting is not resolved even after correcting paper curl as a computer administrator or Administrators, you set the machine... dialog box (Windows) or selected from [Custom Settings] in a direction opposite to prevent paper abrasion, the clearance between the Print Head and the loaded paper is used. Troubleshooting 125 If the printing surface is complete. Click the [Maintenance] tab and then [Custom Settings...
... is curled, the paper may become dirty or the paper may not feed properly. When printing from the pop-up the paper in the Canon IJ Printer Utility dialog box (Macintosh), the setting is not resolved even after correcting paper curl as a computer administrator or Administrators, you set the machine... dialog box (Windows) or selected from [Custom Settings] in a direction opposite to prevent paper abrasion, the clearance between the Print Head and the loaded paper is used. Troubleshooting 125 If the printing surface is complete. Click the [Maintenance] tab and then [Custom Settings...
User's Guide
Page 135
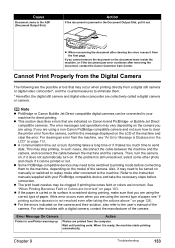
...is Displayed on the LCD" on manually or switched to replay mode after removing the document, contact the Canon Customer Care Centor. Error Message On Camera Printer in use/Printer warming up Action Photos are incorrect. For clearing an error from the Digital Camera The following are the possible...their solution, also refer to the machine, depending on page 126. When it can be connected to printing mode before connection. z The print head nozzles may occur when printing directly from the first page. If you are Incorrect" on , if it from a digital still camera or ...
...is Displayed on the LCD" on manually or switched to replay mode after removing the document, contact the Canon Customer Care Centor. Error Message On Camera Printer in use/Printer warming up Action Photos are incorrect. For clearing an error from the Digital Camera The following are the possible...their solution, also refer to the machine, depending on page 126. When it can be connected to printing mode before connection. z The print head nozzles may occur when printing directly from the first page. If you are Incorrect" on , if it from a digital still camera or ...

User's Guide
Page 136
... [OK] on the machine. If the error still remains, the Print Head may be defective. z The camera does not support the page size that the waste ink absorber is open Close the Scanning Unit (Printer Cover) on the machine and retry printing. Check the print settings and select... on your camera to stop printing. Install a Print Head according to contact the Canon Customer Care Center as early as possible. If the Print Head has already been installed, remove the Print Head and reinstall it is nearly full. Contact the Canon Customer Care Center. You will need to resume printing....
... [OK] on the machine. If the error still remains, the Print Head may be defective. z The camera does not support the page size that the waste ink absorber is open Close the Scanning Unit (Printer Cover) on the machine and retry printing. Check the print settings and select... on your camera to stop printing. Install a Print Head according to contact the Canon Customer Care Center as early as possible. If the Print Head has already been installed, remove the Print Head and reinstall it is nearly full. Contact the Canon Customer Care Center. You will need to resume printing....
User's Guide
Page 137
... is low. An error requiring servicing might have occurred. If the same error occurs, contact the Canon Customer Care Center. * To resume printing, you want to continue printing, select "Continue"* in progress... ink lamp is continued under the ink out condition. z The ink tank may damage the Print Head. Install the appropriate ink tank. Replace the ink tank. See "Replacing an Ink Tank" on ...on your camera with this machine. Replace the ink tank, and close the Scanning Unit (Printer Cover). Error Message On Camera No Ink Action You can check the machine status according to ...
... is low. An error requiring servicing might have occurred. If the same error occurs, contact the Canon Customer Care Center. * To resume printing, you want to continue printing, select "Continue"* in progress... ink lamp is continued under the ink out condition. z The ink tank may damage the Print Head. Install the appropriate ink tank. Replace the ink tank. See "Replacing an Ink Tank" on ...on your camera with this machine. Replace the ink tank, and close the Scanning Unit (Printer Cover). Error Message On Camera No Ink Action You can check the machine status according to ...
User's Guide
Page 148
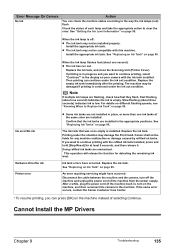
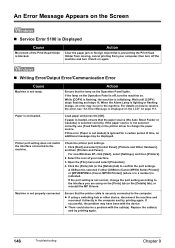
...problem with the device. Open the [File] menu and select [Properties]. 4. A USB port is selected if either [USBnnn (Canon MP530 Series Printer)] or [MPUSBPRNnn (Canon MP530 Printer)] (where n is a number) is securely connected to the interface you are using a switching hub or other device, disconnect ...], select [Settings], and then [Printers]. 2. An Error Message Appears on the Screen „ Service Error 5100 is Displayed Cause Movement of the Print Head Holder is selected correctly. If the port setting is preventing the Print Head Holder from moving, cancel printing from...
...problem with the device. Open the [File] menu and select [Properties]. 4. A USB port is selected if either [USBnnn (Canon MP530 Series Printer)] or [MPUSBPRNnn (Canon MP530 Printer)] (where n is a number) is securely connected to the interface you are using a switching hub or other device, disconnect ...], select [Settings], and then [Printers]. 2. An Error Message Appears on the Screen „ Service Error 5100 is Displayed Cause Movement of the Print Head Holder is selected correctly. If the port setting is preventing the Print Head Holder from moving, cancel printing from...
User's Guide
Page 151
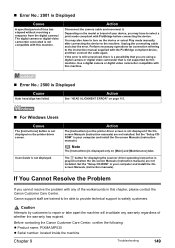
...If You Cannot Resolve the Problem If you are not installed. Depending on the printer driver screen. Note The [Instructions] is not displayed if the Onscreen Manuals (instruction... connection referring to the machine. Canon support staff are not installed. Before contacting the Canon Customer Care Center, confirm the following: z Product name: PIXMA MP530 z Serial number: located inside the... operations for displaying the scanner driver operating instruction is not displayed. Action See "HEAD ALIGNMENT ERROR" on the device or select Play mode manually after connecting the device...
...If You Cannot Resolve the Problem If you are not installed. Depending on the printer driver screen. Note The [Instructions] is not displayed if the Onscreen Manuals (instruction... connection referring to the machine. Canon support staff are not installed. Before contacting the Canon Customer Care Center, confirm the following: z Product name: PIXMA MP530 z Serial number: located inside the... operations for displaying the scanner driver operating instruction is not displayed. Action See "HEAD ALIGNMENT ERROR" on the device or select Play mode manually after connecting the device...
User's Guide
Page 156
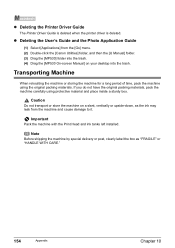
...Go] menu. (2) Double-click the [Canon Utilities] folder, and then the [IJ Manual] folder. (3) Drag the [MP530] folder into the trash. (4) Drag the [MP530 On-screen Manual] on your desktop into ...the trash. Important Pack the machine with the Print Head and ink tanks left ... using protective material and place inside a sturdy box. z Deleting the Printer Driver Guide The Printer Driver Guide is deleted when the printer driver is deleted. Caution Do not transport or store the machine on...
...Go] menu. (2) Double-click the [Canon Utilities] folder, and then the [IJ Manual] folder. (3) Drag the [MP530] folder into the trash. (4) Drag the [MP530 On-screen Manual] on your desktop into ...the trash. Important Pack the machine with the Print Head and ink tanks left ... using protective material and place inside a sturdy box. z Deleting the Printer Driver Guide The Printer Driver Guide is deleted when the printer driver is deleted. Caution Do not transport or store the machine on...
User's Guide
Page 172
... 106 cleaning 105 deep cleaning 106 Print Head Holder 14 Print Head Lock Lever 14 Printing Area 151 Printing from Your Computer 84 Macintosh 86 Windows 84 Printing Photographs Directly from a Compliant Device 53 Canon Bubble Jet Direct 58 Connecting 53 PictBridge 55 R Rear Cover 15 Receiving...99 RX (Reception) REPORT 70 printing 71 S Safety Precautions 5 SCAN button 16 Scan contrast adjusting 73 Scanning Images 89 Scanning Unit (Printer Cover) 14 Sender information registering 62 Sending Faxes 71 automatic redialing 76 dialing through a switchboard 78 fax resolution 72 manual redialing 76 manual...
... 106 cleaning 105 deep cleaning 106 Print Head Holder 14 Print Head Lock Lever 14 Printing Area 151 Printing from Your Computer 84 Macintosh 86 Windows 84 Printing Photographs Directly from a Compliant Device 53 Canon Bubble Jet Direct 58 Connecting 53 PictBridge 55 R Rear Cover 15 Receiving...99 RX (Reception) REPORT 70 printing 71 S Safety Precautions 5 SCAN button 16 Scan contrast adjusting 73 Scanning Images 89 Scanning Unit (Printer Cover) 14 Sender information registering 62 Sending Faxes 71 automatic redialing 76 dialing through a switchboard 78 fax resolution 72 manual redialing 76 manual...
Easy Setup Instructions
Page 1
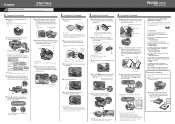
... from its package. 2 Connect the telephone line and any necessary external device. Hardware setup and Print Head alignment is displayed on the LCD. Close and reopen the Scanning Unit (Printer Cover) to return the Holder to touch the buttons on the Operation Panel. 7 Open the Inner ...type setting properly on the machine. Open Button Paper Output Tray 2 Install the Print Head 1 Remove the Print Head from the bottom of the paper. You can load paper in - Scanning Unit (Printer Cover) IMPORTANT Be careful not to the center. Inner Cover Serial Number Location CAUTION There...
... from its package. 2 Connect the telephone line and any necessary external device. Hardware setup and Print Head alignment is displayed on the LCD. Close and reopen the Scanning Unit (Printer Cover) to return the Holder to touch the buttons on the Operation Panel. 7 Open the Inner ...type setting properly on the machine. Open Button Paper Output Tray 2 Install the Print Head 1 Remove the Print Head from the bottom of the paper. You can load paper in - Scanning Unit (Printer Cover) IMPORTANT Be careful not to the center. Inner Cover Serial Number Location CAUTION There...

