User's Guide
Page 19
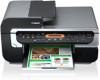
... Lamp Lights when the Cassette is selected. (26) Auto Sheet Feeder Lamp Lights when the Auto Sheet Feeder is pressed during printing, the machine aborts printing. Chapter 1 Before Printing 17 Press this button is selected. If this toggle switch to change the paper source between characters. (17) [Back] Returns...copies, for the intensity, and on . Also enables you set some menus. (19) [Color] Starts color copying or faxing. (20) [Black] Starts black & white copying or faxing. (21) [Paper] Sets the page size and media type for copying, and for the menu or setting item.
... Lamp Lights when the Cassette is selected. (26) Auto Sheet Feeder Lamp Lights when the Auto Sheet Feeder is pressed during printing, the machine aborts printing. Chapter 1 Before Printing 17 Press this button is selected. If this toggle switch to change the paper source between characters. (17) [Back] Returns...copies, for the intensity, and on . Also enables you set some menus. (19) [Color] Starts color copying or faxing. (20) [Black] Starts black & white copying or faxing. (21) [Paper] Sets the page size and media type for copying, and for the menu or setting item.

User's Guide
Page 46
Note When you perform black & white copying for two-sided copy, print intensity may be used in the ADF: The ... sheet of document is scanned in. z This function cannot be scanned, the message below is not available for black & white copying. You cannot change this setting. 44 Copying Chapter 2 z When the document was loaded on ...the Platen Glass and press [Start]. SCAN NEXT [START] START PRINT [OK] If you do not need more scanning, press [OK]. z This function can only be different from when performing black & white copying for single-sided copy. z The media type is...
Note When you perform black & white copying for two-sided copy, print intensity may be used in the ADF: The ... sheet of document is scanned in. z This function cannot be scanned, the message below is not available for black & white copying. You cannot change this setting. 44 Copying Chapter 2 z When the document was loaded on ...the Platen Glass and press [Start]. SCAN NEXT [START] START PRINT [OK] If you do not need more scanning, press [OK]. z This function can only be different from when performing black & white copying for single-sided copy. z The media type is...
User's Guide
Page 48
... copying. If you copy the second sheet of document, press the same [Start] button ([Black] or [Color]) as the first operation after one sheet of paper by reducing each image. SCAN NEXT [START] START PRINT [OK] If you have another sheet of document to scan, load it on -1 copy) This feature enables...
... copying. If you copy the second sheet of document, press the same [Start] button ([Black] or [Color]) as the first operation after one sheet of paper by reducing each image. SCAN NEXT [START] START PRINT [OK] If you have another sheet of document to scan, load it on -1 copy) This feature enables...
User's Guide
Page 49
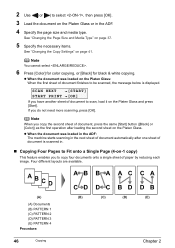
... you copy more scanning, press [OK]. z This function can easily make stickers from 4" x 6" / 101.6 x 152.4 mm photos or graphics using Canon Photo Stickers. See "Changing the Page Size and Media Type" on page 37. 6 Specify the necessary items. See "Changing the Copy Settings" on the Platen... black & white copying. If you have another sheet of document to or and try copying again. PATTERN 1 / PATTERN 2 / PATTERN 3 / PATTERN 4 5 Specify the page size and media type. SCAN NEXT [START] START PRINT [OK] If you do not need more than one sheet of document finishes to be scanned, the ...
... you copy more scanning, press [OK]. z This function can easily make stickers from 4" x 6" / 101.6 x 152.4 mm photos or graphics using Canon Photo Stickers. See "Changing the Page Size and Media Type" on page 37. 6 Specify the necessary items. See "Changing the Copy Settings" on the Platen... black & white copying. If you have another sheet of document to or and try copying again. PATTERN 1 / PATTERN 2 / PATTERN 3 / PATTERN 4 5 Specify the page size and media type. SCAN NEXT [START] START PRINT [OK] If you do not need more than one sheet of document finishes to be scanned, the ...

User's Guide
Page 50
... LCD. Note z You cannot specify the page size, media type, or as necessary after creating stickers. 7 Press [Color] for color copying, or [Black] for black & white copying. Note z Load stickers in the Auto Sheet Feeder when using this function. Change the setting of stickers. 5 Press [OK]. 6 Specify...41. You can only load one sheet of stickers at a time in the Auto Sheet Feeder when using this function. z You can only print in conjunction with other layouts appear on the Platen Glass. Procedure: 1 Display the Special copy screen. Note The document loaded in the ADF ...
... LCD. Note z You cannot specify the page size, media type, or as necessary after creating stickers. 7 Press [Color] for color copying, or [Black] for black & white copying. Note z Load stickers in the Auto Sheet Feeder when using this function. Change the setting of stickers. 5 Press [OK]. 6 Specify...41. You can only load one sheet of stickers at a time in the Auto Sheet Feeder when using this function. z You can only print in conjunction with other layouts appear on the Platen Glass. Procedure: 1 Display the Special copy screen. Note The document loaded in the ADF ...

User's Guide
Page 53
...documents to copy should be no larger than one page you have them again. Chapter 2 Copying 51 11 Press [Color] for color copying, or [Black] for black & white copying. z Using this function might cause a reduction in the ADF when using collation. Procedure: 1 Display the Special Copy screen. z... The size of sheets you copy four documents at the same size, their sizes must be used in the ADF. For best results, print without using ...
...documents to copy should be no larger than one page you have them again. Chapter 2 Copying 51 11 Press [Color] for color copying, or [Black] for black & white copying. z Using this function might cause a reduction in the ADF when using collation. Procedure: 1 Display the Special Copy screen. z... The size of sheets you copy four documents at the same size, their sizes must be used in the ADF. For best results, print without using ...
User's Guide
Page 65
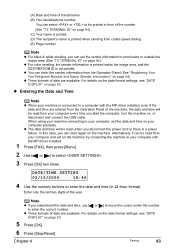
... ] to select . 3 Press [OK] two times. When using your machine connecting to your computer, set the sender information to print inside the image area, and the DESTINATION ID is not printed. Chapter 4 Faxing 63 In this case, you start the computer, turn the machine on, or disconnect and connect the USB...time on your computer with the MP driver installed, even if the date and time are entered from coded speed dialing. (E) Page number Note z For black & white sending, you misentered the date and time, use [ ] or [ ] to move the cursor under the number to enter the correct number....
... ] to select . 3 Press [OK] two times. When using your machine connecting to your computer, set the sender information to print inside the image area, and the DESTINATION ID is not printed. Chapter 4 Faxing 63 In this case, you start the computer, turn the machine on, or disconnect and connect the USB...time on your computer with the MP driver installed, even if the date and time are entered from coded speed dialing. (E) Page number Note z For black & white sending, you misentered the date and time, use [ ] or [ ] to move the cursor under the number to enter the correct number....
User's Guide
Page 80
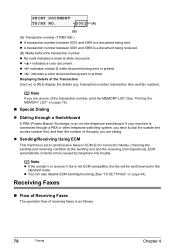
z indicates a black & white document being sent or printed. Displaying Details of receiving faxes is set to send/receive faxes in the standard mode. Note If you are unsure of the transaction number, print the MEMORY LIST (See "Printing the MEMORY LIST" on page 76). „ Special Dialing ...and then the number of the party you are calling. transaction number, transaction time and fax number). z indicates a color document being sent or printed. z < > indicates a color document. z A transaction number between 0001 and 4999 is not ECM-compatible, the fax will be sent/received...
z indicates a black & white document being sent or printed. Displaying Details of receiving faxes is set to send/receive faxes in the standard mode. Note If you are unsure of the transaction number, print the MEMORY LIST (See "Printing the MEMORY LIST" on page 76). „ Special Dialing ...and then the number of the party you are calling. transaction number, transaction time and fax number). z indicates a color document being sent or printed. z < > indicates a color document. z A transaction number between 0001 and 4999 is not ECM-compatible, the fax will be sent/received...
User's Guide
Page 82
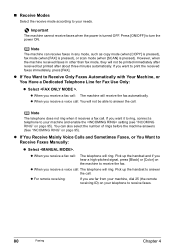
...Your Machine, or You Have a Dedicated Telephone Line for Fax Use Only: z Select . z For remote receiving: If you hear a high-pitched signal, press [Black] or [Color] on your machine, dial 25 (the remote receiving ID) on the machine to answer the call . Pick up the handset and if you... are far from your telephone to print the received faxes immediately, press [FAX]. Important The machine cannot receive faxes when the power is pressed). Pick up the handset to receive the...
...Your Machine, or You Have a Dedicated Telephone Line for Fax Use Only: z Select . z For remote receiving: If you hear a high-pitched signal, press [Black] or [Color] on your machine, dial 25 (the remote receiving ID) on the machine to answer the call . Pick up the handset and if you... are far from your telephone to print the received faxes immediately, press [FAX]. Important The machine cannot receive faxes when the power is pressed). Pick up the handset to receive the...

User's Guide
Page 96
... is not hung up properly. SET WEEK Specify the week. SET WEEK Specify the week. z UNIT TEL NUMBER Enters the fax/telephone number printed on faxes you send. z RX RING LEVEL Selects the ring type for color faxes). z VOLUME CONTROL Sets the RX RING VOLUME and LINE...the week. MARK: Selects the position of the sender information (outside or inside the image area) when sending black & white faxes (Automatically set to appear before the fax/telephone number printed on faxes you send. z OFFHOOK ALARM Enables/disables the alarm that alerts you send (The ON/OFF ...
... is not hung up properly. SET WEEK Specify the week. SET WEEK Specify the week. z UNIT TEL NUMBER Enters the fax/telephone number printed on faxes you send. z RX RING LEVEL Selects the ring type for color faxes). z VOLUME CONTROL Sets the RX RING VOLUME and LINE...the week. MARK: Selects the position of the sender information (outside or inside the image area) when sending black & white faxes (Automatically set to appear before the fax/telephone number printed on faxes you send. z OFFHOOK ALARM Enables/disables the alarm that alerts you send (The ON/OFF ...
User's Guide
Page 97
...as , enables setting the length of time between redialings. z COLOR TX When faxing in US and Canada. z TX REPORT Enables/disables automatic printing of redialings. z DIAL TONE DETECT If you select as , enables setting the number of a transmission report after confirming the dial tone. If ... the machine switches to check whether a call is only available in color from the ADF, enables/disables automatic converting the image into black and white before sending if the destination fax device does not support color. Enables/disables Error Correction Mode (ECM) sending. z PAUSE...
...as , enables setting the length of time between redialings. z COLOR TX When faxing in US and Canada. z TX REPORT Enables/disables automatic printing of redialings. z DIAL TONE DETECT If you select as , enables setting the number of a transmission report after confirming the dial tone. If ... the machine switches to check whether a call is only available in color from the ADF, enables/disables automatic converting the image into black and white before sending if the destination fax device does not support color. Enables/disables Error Correction Mode (ECM) sending. z PAUSE...
User's Guide
Page 100
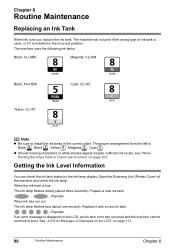
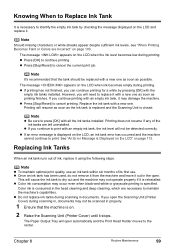
...ink tank. z Should missing characters or white streaks appear despite sufficient ink levels, see "When Printing Becomes Faint or Colors are Incorrect" on page 113. 98 Routine Maintenance Chapter 8 Replace it ...Error Message is installed in the correct order. Black: CLI-8BK Magenta: CLI-8M Black: PGI-5BK Yellow: CLI-8Y Cyan: CLI-8C Note z Be sure to print. Open the Scanning Unit (Printer Cover) ...in the incorrect position. The machine will not print if the wrong type of the machine and check the ink lamp. When the ink level is Black , Black , Yellow , Magenta , Cyan . Getting...
...ink tank. z Should missing characters or white streaks appear despite sufficient ink levels, see "When Printing Becomes Faint or Colors are Incorrect" on page 113. 98 Routine Maintenance Chapter 8 Replace it ...Error Message is installed in the correct order. Black: CLI-8BK Magenta: CLI-8M Black: PGI-5BK Yellow: CLI-8Y Cyan: CLI-8C Note z Be sure to print. Open the Scanning Unit (Printer Cover) ...in the incorrect position. The machine will not print if the wrong type of the machine and check the ink lamp. When the ink level is Black , Black , Yellow , Magenta , Cyan . Getting...
User's Guide
Page 101
.... 2 Raise the Scanning Unit (Printer Cover) until it may occur even when black-and-white or grayscale printing is specified. Color ink is consumed in documents. The Paper Output Tray will not ...ink consumption may damage the machine. The message appears on the LCD when ink becomes empty during printing. If you open the Scanning Unit (Printer Cover) during scanning in the head cleaning and deep... may not operate properly if it out in the open automatically and the Print Head Holder moves to cancel printing. Printing does not resume if any of its first use an ink tank within six...
.... 2 Raise the Scanning Unit (Printer Cover) until it may occur even when black-and-white or grayscale printing is specified. Color ink is consumed in documents. The Paper Output Tray will not ...ink consumption may damage the machine. The message appears on the LCD when ink becomes empty during printing. If you open the Scanning Unit (Printer Cover) during scanning in the head cleaning and deep... may not operate properly if it out in the open automatically and the Print Head Holder moves to cancel printing. Printing does not resume if any of its first use an ink tank within six...

User's Guide
Page 109
... mild detergent (for cleaning. Note z The Cassette does not feed paper for your machine. A pattern is printed and the Print Head is printed in black and blue. When Automatic Print Head Aligning Cannot Be Executed Correctly z When automatic Print Head aligning cannot be executed correctly, the message is closed. 1 Press [ON/OFF] to turn on the...
... mild detergent (for cleaning. Note z The Cassette does not feed paper for your machine. A pattern is printed and the Print Head is printed in black and blue. When Automatic Print Head Aligning Cannot Be Executed Correctly z When automatic Print Head aligning cannot be executed correctly, the message is closed. 1 Press [ON/OFF] to turn on the...
User's Guide
Page 118
... supplied with this machine. Press [OK] to continue printing or press [Stop/Reset] to contact a Canon Customer Care Center as soon as possible. Reload the paper correctly and press [OK]. After you tried to select a print mode compliant with PictBridge before connecting the camera. Press [Black]. [Black] is replaced. Once the waste ink absorber becomes...
... supplied with this machine. Press [OK] to continue printing or press [Stop/Reset] to contact a Canon Customer Care Center as soon as possible. Reload the paper correctly and press [OK]. After you tried to select a print mode compliant with PictBridge before connecting the camera. Press [Black]. [Black] is replaced. Once the waste ink absorber becomes...

User's Guide
Page 120
... does not answer. Contact the other party's fax machine is out of paper or its memory is full. Register the coded speed dialing code. Press [Black] to the registered number. Write the number down if you still cannot send the fax, set to . Check the fax number and dial again. Contact... a G3 machine. If you will need it assigns a unique identification number (nnnn). Try dialing again after a while. The fax number dialed was not able to print the received fax either because the paper size setting is incorrect or the ink has run out, and the fax is stored in properly, or...
... does not answer. Contact the other party's fax machine is out of paper or its memory is full. Register the coded speed dialing code. Press [Black] to the registered number. Write the number down if you still cannot send the fax, set to . Check the fax number and dial again. Contact... a G3 machine. If you will need it assigns a unique identification number (nnnn). Try dialing again after a while. The fax number dialed was not able to print the received fax either because the paper size setting is incorrect or the ink has run out, and the fax is stored in properly, or...
User's Guide
Page 157
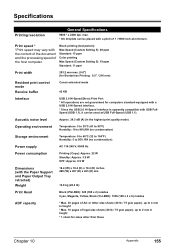
...(W) x 467 (D) x 263 (H) mm 12.8 kg (28.2 lb) Print Head Black (PGI-5BK): 320 (160 x 2) nozzles Cyan, Magenta, Yellow, Black (CLI-8BK): 1536 (128 x 2 x 6) nozzles ADF capacity * Max. 30 pages of the host computer. Black printing (text pattern) Max Speed (Custom Setting 5): 29 ppm Standard: 15 ppm... Color printing Max Speed (Custom Setting 5): 19 ppm Standard: 11 ppm Print width 203.2 mm max. (8.0") (for Borderless Printing: 8.5" / 216 mm) Resident print control mode Receive buffer Canon extended ...
...(W) x 467 (D) x 263 (H) mm 12.8 kg (28.2 lb) Print Head Black (PGI-5BK): 320 (160 x 2) nozzles Cyan, Magenta, Yellow, Black (CLI-8BK): 1536 (128 x 2 x 6) nozzles ADF capacity * Max. 30 pages of the host computer. Black printing (text pattern) Max Speed (Custom Setting 5): 29 ppm Standard: 15 ppm... Color printing Max Speed (Custom Setting 5): 19 ppm Standard: 11 ppm Print width 203.2 mm max. (8.0") (for Borderless Printing: 8.5" / 216 mm) Resident print control mode Receive buffer Canon extended ...
User's Guide
Page 171
... ADF (Auto Document Feeder) 12 Alarm Lamp 16 Appendix 151 Auto Sheet Feeder 12 Auto Sheet Feeder Lamp 17 B Back button 17 Before Printing 12 Black button 17 C Cassette 13 Cassette Lamp 17 Changing the Machine Settings 91 audible tones 96 country select 96 fax settings 92 language setting 96 load ...config 97 print settings 91 pwr save setting 96 restore default 96 save config 97 Changing the Page Size and Media Type 37 Recommended Paper and Requirements 37 Cleaning 109 ADF (Automatic Document Feeder) 108 bottom plate 109 platen glass and document cover 107 roller 108 CLI-8BK Black 98 CLI...
... ADF (Auto Document Feeder) 12 Alarm Lamp 16 Appendix 151 Auto Sheet Feeder 12 Auto Sheet Feeder Lamp 17 B Back button 17 Before Printing 12 Black button 17 C Cassette 13 Cassette Lamp 17 Changing the Machine Settings 91 audible tones 96 country select 96 fax settings 92 language setting 96 load ...config 97 print settings 91 pwr save setting 96 restore default 96 save config 97 Changing the Page Size and Media Type 37 Recommended Paper and Requirements 37 Cleaning 109 ADF (Automatic Document Feeder) 108 bottom plate 109 platen glass and document cover 107 roller 108 CLI-8BK Black 98 CLI...
User's Guide
Page 172
... Pattern examining 105 printing 104 Numeric Buttons 16 O OK button 17 ON/OFF button 16 Open button 13 Operation Panel 13, 16 P Paper button 17 Paper Guide 12 Paper Output Tray 13 Paper Support 12 PGI-5BK Black 98 Platen Glass ...13 Power Cord Connection 15 Power save setting 96 Print Head adjusting the print head manually 117 aligning print head automatically 106 cleaning 105 deep cleaning 106 Print Head Holder 14 Print Head Lock Lever 14 Printing Area 151 Printing from Your Computer 84 Macintosh 86 Windows 84 Printing Photographs Directly from a Compliant Device 53 Canon...
... Pattern examining 105 printing 104 Numeric Buttons 16 O OK button 17 ON/OFF button 16 Open button 13 Operation Panel 13, 16 P Paper button 17 Paper Guide 12 Paper Output Tray 13 Paper Support 12 PGI-5BK Black 98 Platen Glass ...13 Power Cord Connection 15 Power save setting 96 Print Head adjusting the print head manually 117 aligning print head automatically 106 cleaning 105 deep cleaning 106 Print Head Holder 14 Print Head Lock Lever 14 Printing Area 151 Printing from Your Computer 84 Macintosh 86 Windows 84 Printing Photographs Directly from a Compliant Device 53 Canon...
Easy Setup Instructions
Page 1
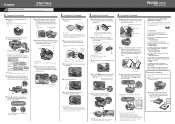
... the Cassette from the ink tank. ink port 3 Insert the ink tank into the back of the bag the print head comes in black and blue. • Print Head alignment will need to the color guide on the Print Head Lock Lever. Refer to set the Paper Output Tray extension by the illustration... printed on the flapped lid of the Cover Guide, then slide the Paper Guide toward the left . Hardware setup and Print Head...
... the Cassette from the ink tank. ink port 3 Insert the ink tank into the back of the bag the print head comes in black and blue. • Print Head alignment will need to the color guide on the Print Head Lock Lever. Refer to set the Paper Output Tray extension by the illustration... printed on the flapped lid of the Cover Guide, then slide the Paper Guide toward the left . Hardware setup and Print Head...


