User's Guide
Page 3
...........12 Turning the Machine ON and OFF 18 Document Handling 19 Loading Paper 22 Changing the Page Size and Media Type ....37 2 Copying 40 Making Copies 40 Changing the Copy Settings 41 Using Useful Copy Functions 45 3 Printing Photographs Directly from a Compliant Device 53 Connecting to a PictBridge Compliant Device 53 Printing Photographs Directly from a PictBridge Compliant Device 55 Printing Photographs Directly from a Canon Bubble Jet Direct Compatible Digital Camera 58 4 Faxing 60 Preparing Your Machine for Fax 60 Sending Faxes 71 Receiving Faxes 78 5 Printing from...
...........12 Turning the Machine ON and OFF 18 Document Handling 19 Loading Paper 22 Changing the Page Size and Media Type ....37 2 Copying 40 Making Copies 40 Changing the Copy Settings 41 Using Useful Copy Functions 45 3 Printing Photographs Directly from a Compliant Device 53 Connecting to a PictBridge Compliant Device 53 Printing Photographs Directly from a PictBridge Compliant Device 55 Printing Photographs Directly from a Canon Bubble Jet Direct Compatible Digital Camera 58 4 Faxing 60 Preparing Your Machine for Fax 60 Sending Faxes 71 Receiving Faxes 78 5 Printing from...
User's Guide
Page 17
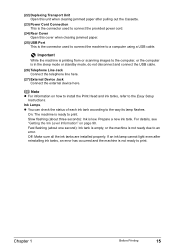
... the machine is not ready due to an error. Ink Lamps z You can check the status of each ink tank according to the Easy Setup Instructions. (22) Duplexing Transport Unit Open this cover when clearing jammed paper. (25) USB Port This is ready to the computer, or the computer is low. Fast flashing (about three seconds): Ink is in the sleep mode or standby mode, do not disconnect and connect the USB cable. (26) Telephone Line Jack Connect...
... the machine is not ready due to an error. Ink Lamps z You can check the status of each ink tank according to the Easy Setup Instructions. (22) Duplexing Transport Unit Open this cover when clearing jammed paper. (25) USB Port This is ready to the computer, or the computer is low. Fast flashing (about three seconds): Ink is in the sleep mode or standby mode, do not disconnect and connect the USB cable. (26) Telephone Line Jack Connect...
User's Guide
Page 26
... depending on page 125. If prints get wet, do not touch the printed side until the ink has dried. Keep them from direct exposure to print without reloading paper for 24 hours. Loading paper in both the Auto Sheet Feeder and Cassette makes the following paper feed methods available: Some types of ink for under . z Envelopes with an embossed or treated surface z Any type of paper with holes z Handling Paper z Hold the paper as...
... depending on page 125. If prints get wet, do not touch the printed side until the ink has dried. Keep them from direct exposure to print without reloading paper for 24 hours. Loading paper in both the Auto Sheet Feeder and Cassette makes the following paper feed methods available: Some types of ink for under . z Envelopes with an embossed or treated surface z Any type of paper with holes z Handling Paper z Hold the paper as...
User's Guide
Page 57
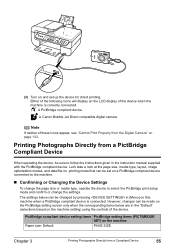
... PictBridge print setup mode and confirm or change the page size or media type, operate the device to follow the instructions given in [Menu] on this machine when a PictBridge compliant device is correctly connected. A PictBridge compliant device. Let's take a look at the page size, media type, layout, image optimization modes, and date/file no. A Canon Bubble Jet Direct compatible digital camera. Either of the following icons will display on and set on page 133. Printing Photographs Directly from...
... PictBridge print setup mode and confirm or change the page size or media type, operate the device to follow the instructions given in [Menu] on this machine when a PictBridge compliant device is correctly connected. A PictBridge compliant device. Let's take a look at the page size, media type, layout, image optimization modes, and date/file no. A Canon Bubble Jet Direct compatible digital camera. Either of the following icons will display on and set on page 133. Printing Photographs Directly from...
User's Guide
Page 65
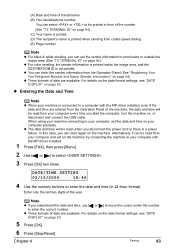
... is printed when sending from the Operation Panel of date are entered from coded speed dialing. (E) Page number Note z For black & white sending, you can set it can enter the sender information from your machine is a power failure. z Entering the Date and Time Note z When your computer every time you disconnect the power cord or there is connected to a computer with the MP driver installed. 1 Press [FAX], then press [Menu]. 2 Use...
... is printed when sending from the Operation Panel of date are entered from coded speed dialing. (E) Page number Note z For black & white sending, you can set it can enter the sender information from your machine is a power failure. z Entering the Date and Time Note z When your computer every time you disconnect the power cord or there is connected to a computer with the MP driver installed. 1 Press [FAX], then press [Menu]. 2 Use...
User's Guide
Page 76
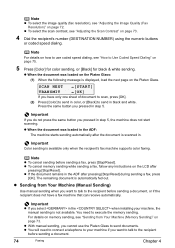
... the image quality (fax resolution), see "Adjusting the Image Quality (Fax Resolution)" on page 73. 4 Dial the recipient's number (DESTINATION NUMBER) using the numeric buttons or coded speed dialing. z You will need to the recipient before sending a fax, press [Stop/Reset]. Important Color sending is automatically fed out. Note z To cancel sending before sending a document, or if the recipient does not have only one sheet of document to scan, press [OK]. (2) Press [Color] to send in black...
... the image quality (fax resolution), see "Adjusting the Image Quality (Fax Resolution)" on page 73. 4 Dial the recipient's number (DESTINATION NUMBER) using the numeric buttons or coded speed dialing. z You will need to the recipient before sending a fax, press [Stop/Reset]. Important Color sending is automatically fed out. Note z To cancel sending before sending a document, or if the recipient does not have only one sheet of document to scan, press [OK]. (2) Press [Color] to send in black...
User's Guide
Page 90
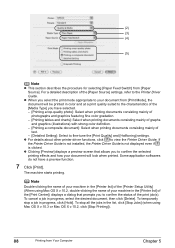
... the status of the print job(s). z Clicking [Preview] displays a preview screen that prompts you have a preview function. 7 Click [Print]. (2) (3) (4) (5) Note z This section describes the procedure for selecting [Paper Feed Switch] from [Print Mode], the document will look when printed. z For details about other printer driver functions, click to confirm the selected printing effects and how your document will be printed in the [Printer list] of the [Printer Setup Utility] (When using Mac OS...
... the status of the print job(s). z Clicking [Preview] displays a preview screen that prompts you have a preview function. 7 Click [Print]. (2) (3) (4) (5) Note z This section describes the procedure for selecting [Paper Feed Switch] from [Print Mode], the document will look when printed. z For details about other printer driver functions, click to confirm the selected printing effects and how your document will be printed in the [Printer list] of the [Printer Setup Utility] (When using Mac OS...
User's Guide
Page 113
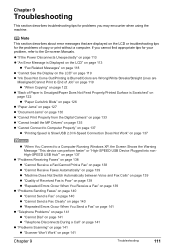
... page 122 z "Paper Curls/Ink Blots" on page 126 z "Paper Jams" on page 127 z "Document Jams" on page 130 z "Cannot Print Properly from the Digital Camera" on page 133 z "Cannot Install the MP Drivers" on page 135 z "Cannot Connect to Computer Properly" on page 137 z "Printing Speed is Slow/USB 2.0 Hi-Speed Connection Does Not Work" on page 137 z "When You Connect to the On-screen Manuals. Chapter 9 Troubleshooting This section describes troubleshooting tips for problems you...
... page 122 z "Paper Curls/Ink Blots" on page 126 z "Paper Jams" on page 127 z "Document Jams" on page 130 z "Cannot Print Properly from the Digital Camera" on page 133 z "Cannot Install the MP Drivers" on page 135 z "Cannot Connect to Computer Properly" on page 137 z "Printing Speed is Slow/USB 2.0 Hi-Speed Connection Does Not Work" on page 137 z "When You Connect to the On-screen Manuals. Chapter 9 Troubleshooting This section describes troubleshooting tips for problems you...
User's Guide
Page 115
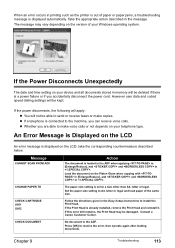
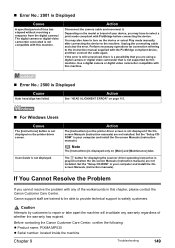
... Error Message is Displayed on the LCD An error message is connected to install the Print Head. When an error occurs in printing such as the printer is out of paper or paper jams, a troubleshooting message is loaded in the ADF when applying in [Enlarge/Reduce], and and in . Message CANNOT SCAN FROM ADF CHANGE PAPER TO CHECK CARTRIDGE U051 U052 Action The document is displayed automatically. Set the paper size setting to resolve the error, then operate again after loading documents. If this error...
... Error Message is Displayed on the LCD An error message is connected to install the Print Head. When an error occurs in printing such as the printer is out of paper or paper jams, a troubleshooting message is loaded in the ADF when applying in [Enlarge/Reduce], and and in . Message CANNOT SCAN FROM ADF CHANGE PAPER TO CHECK CARTRIDGE U051 U052 Action The document is displayed automatically. Set the paper size setting to resolve the error, then operate again after loading documents. If this error...
User's Guide
Page 116
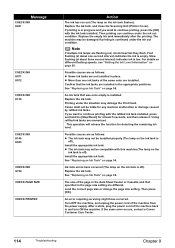
... ink tank installed. Load the correct page size or change the page size setting. Replace the empty ink tank immediately after the printing. Turn OFF the machine, and unplug the power cord of the machine back in place. Then printing can continue under the situation may not be liable for at least 5 seconds, and then release it. Replace the ink tank, and close the Scanning Unit (Printer Cover). Confirm that specified in the page size setting...
... ink tank installed. Load the correct page size or change the page size setting. Replace the empty ink tank immediately after the printing. Turn OFF the machine, and unplug the power cord of the machine back in place. Then printing can continue under the situation may not be liable for at least 5 seconds, and then release it. Replace the ink tank, and close the Scanning Unit (Printer Cover). Confirm that specified in the page size setting...
User's Guide
Page 117
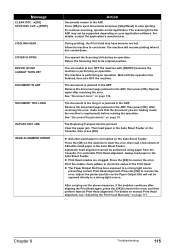
...Chapter 9 Troubleshooting 115 You opened the Scanning Unit during an operation. For details, contact the application's manufacturer. The machine will not be supported depending on your application software. z A4/Letter-sized paper is jammed in the ADF. For details on manual Print Head alignment, see "Adjusting the Print Head Manually" on the Auto Sheet Feeder. Remove the document page jammed in the Auto Sheet Feeder. During printing, the Print Head may not be exposed directly to clear the error, then load a few sheets of the Print Head. z The Paper Output Slot...
...Chapter 9 Troubleshooting 115 You opened the Scanning Unit during an operation. For details, contact the application's manufacturer. The machine will not be supported depending on your application software. z A4/Letter-sized paper is jammed in the ADF. For details on manual Print Head alignment, see "Adjusting the Print Head Manually" on the Auto Sheet Feeder. Remove the document page jammed in the Auto Sheet Feeder. During printing, the Print Head may not be exposed directly to clear the error, then load a few sheets of the Print Head. z The Paper Output Slot...

User's Guide
Page 136
... replaced, you have selected with the [Feed Switch] on the machine, and select "Continue"* in the display on your camera to resume printing. 134 Troubleshooting Chapter 9 Select "Stop" in this machine. If the Print Head has already been installed, remove the Print Head and reinstall it is supported by selecting "Continue"* on the display on the machine. Check the print settings and select the page size that is open Close the Scanning Unit (Printer Cover) on your camera. Printer cover open...
... replaced, you have selected with the [Feed Switch] on the machine, and select "Continue"* in the display on your camera to resume printing. 134 Troubleshooting Chapter 9 Select "Stop" in this machine. If the Print Head has already been installed, remove the Print Head and reinstall it is supported by selecting "Continue"* on the display on the machine. Check the print settings and select the page size that is open Close the Scanning Unit (Printer Cover) on your camera. Printer cover open...
User's Guide
Page 137
... "Replacing Ink Tanks" on page 98. The ink tank that the ink tanks are flashing, check how fast they flash. Replace the ink tank. Printing under the situation may not be liable for detecting the remaining ink level. Canon shall not be compatible with this machine. Using refilled ink tanks are installed. See "Replacing an Ink Tank" on the machine, and then reconnect the camera to clear the error. After a while, plug the power cord...
... "Replacing Ink Tanks" on page 98. The ink tank that the ink tanks are flashing, check how fast they flash. Replace the ink tank. Printing under the situation may not be liable for detecting the remaining ink level. Canon shall not be compatible with this machine. Using refilled ink tanks are installed. See "Replacing an Ink Tank" on the machine, and then reconnect the camera to clear the error. After a while, plug the power cord...
User's Guide
Page 148
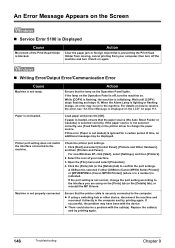
... "An Error Message is lighting or flashing orange, an error may be a problem with the device. A USB port is selected if either [USBnnn (Canon MP530 Series Printer)] or [MPUSBPRNnn (Canon MP530 Printer)] (where n is a number) is ignored for a certain period of time, an additional message may occur in the machine. Replace the cable(s) and try printing again. If the lamp on the Operation Panel is off the machine and turn the machine on. If this error (Paper is not loaded...
... "An Error Message is lighting or flashing orange, an error may be a problem with the device. A USB port is selected if either [USBnnn (Canon MP530 Series Printer)] or [MPUSBPRNnn (Canon MP530 Printer)] (where n is a number) is ignored for a certain period of time, an additional message may occur in the machine. Replace the cable(s) and try printing again. If the lamp on the Operation Panel is off the machine and turn the machine on. If this error (Paper is not loaded...
User's Guide
Page 149
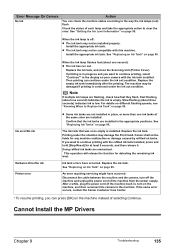
... not installed properly. Follow the on both sides of the loaded paper is securely connected to resolve the error, see "An Error Message is not ready. Note To print on -screen instructions to the computer and try printing again. z If using a switching hub or other device, disconnect the machine and reconnect it matches the size of the paper loaded. Cause MP Drivers is off, turn the machine on. Action Check the page size setting...
... not installed properly. Follow the on both sides of the loaded paper is securely connected to resolve the error, see "An Error Message is not ready. Note To print on -screen instructions to the computer and try printing again. z If using a switching hub or other device, disconnect the machine and reconnect it matches the size of the paper loaded. Cause MP Drivers is off, turn the machine on. Action Check the page size setting...
User's Guide
Page 150
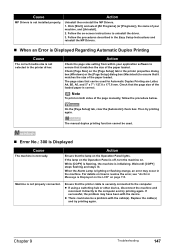
... using Mac OS X v.10.3.x or Mac OS X v.10.2.x, select [Edit Printer List] from the [Printer] pull-down menu in the [Printer List] and select the check box. 3. If [MP530] is replaced. If [MP530] is not displayed, install the MP Drivers again referring to add a printer. Action Ink used is open when starting regular printing. Action Close Inner Cover, then press [OK] on the machine, then try printing again. One page of the print data being used for the operation. „ Error...
... using Mac OS X v.10.3.x or Mac OS X v.10.2.x, select [Edit Printer List] from the [Printer] pull-down menu in the [Printer List] and select the check box. 3. If [MP530] is replaced. If [MP530] is not displayed, install the MP Drivers again referring to add a printer. Action Ink used is open when starting regular printing. Action Close Inner Cover, then press [OK] on the machine, then try printing again. One page of the print data being used for the operation. „ Error...
User's Guide
Page 151
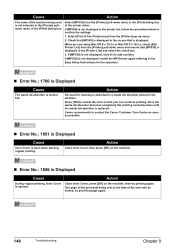
... to provide technical support to repair or take apart the machine will invalidate any of whether the warranty has expired. Scan Guide is not displayed on the printer driver screen. Before contacting the Canon Customer Care Center, confirm the following: z Product name: PIXMA MP530 z Serial number: located inside the machine Chapter 9 Troubleshooting 149 Set the "Setup CD-ROM" in your computer and install the Onscreen Manuals (instruction manuals). Set the "Setup CDROM" in your...
... to provide technical support to repair or take apart the machine will invalidate any of whether the warranty has expired. Scan Guide is not displayed on the printer driver screen. Before contacting the Canon Customer Care Center, confirm the following: z Product name: PIXMA MP530 z Serial number: located inside the machine Chapter 9 Troubleshooting 149 Set the "Setup CD-ROM" in your computer and install the Onscreen Manuals (instruction manuals). Set the "Setup CDROM" in your...
User's Guide
Page 172
Loading Paper auto sheet feeder 27 cassette 31 recommended paper and requirements 22 M Maintenance cleaning your machine 107 Memory checking a document's details in 77 deleting a document in 77 printing the memory list 76 Menu button 16 N Nozzle Check Pattern examining 105 printing 104 Numeric Buttons 16 O OK button 17 ON/OFF button 16 Open button 13 Operation Panel 13, 16 P Paper button 17 Paper Guide 12 Paper Output Tray 13 Paper Support 12 PGI-5BK Black 98 Platen Glass 13 Power Cord Connection 15 Power save setting 96 Print Head adjusting the print head manually 117 aligning print head ...
Loading Paper auto sheet feeder 27 cassette 31 recommended paper and requirements 22 M Maintenance cleaning your machine 107 Memory checking a document's details in 77 deleting a document in 77 printing the memory list 76 Menu button 16 N Nozzle Check Pattern examining 105 printing 104 Numeric Buttons 16 O OK button 17 ON/OFF button 16 Open button 13 Operation Panel 13, 16 P Paper button 17 Paper Guide 12 Paper Output Tray 13 Paper Support 12 PGI-5BK Black 98 Platen Glass 13 Power Cord Connection 15 Power save setting 96 Print Head adjusting the print head manually 117 aligning print head ...
Easy Setup Instructions
Page 1
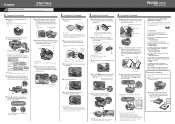
... blue. • Print Head alignment will need to "An Error Message is displayed on print quality. Scanning Unit (Printer Cover) IMPORTANT Be careful not to a power outlet. Paper Support Extension Paper Guide 2 Load a few sheets of the machine and connect the other end to touch the buttons on the LCD, select using [ ] or [ ] and press [OK]. Close and reopen the Scanning Unit (Printer Cover) to return the Holder to the center. Open Button Paper Output Tray 2 Install the Print Head 1 Remove the Print Head from the Print Head and discard...
... blue. • Print Head alignment will need to "An Error Message is displayed on print quality. Scanning Unit (Printer Cover) IMPORTANT Be careful not to a power outlet. Paper Support Extension Paper Guide 2 Load a few sheets of the machine and connect the other end to touch the buttons on the LCD, select using [ ] or [ ] and press [OK]. Close and reopen the Scanning Unit (Printer Cover) to return the Holder to the center. Open Button Paper Output Tray 2 Install the Print Head 1 Remove the Print Head from the Print Head and discard...
Easy Setup Instructions
Page 2
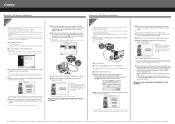
... install the software. You will need your product serial number, which is also displayed in the U.S. Printed in the CD-ROM does not run automatically. Windows® MP Drivers Installation Windows • A printer cable is not included. For instructions on -screen instructions. Follow the on -screen instructions to install. 7 When the list of the machine. Macintosh® MP Drivers Installation Macintosh • A printer cable is not included. Refer to use Mac OS X v.10.2.8) and then check...
... install the software. You will need your product serial number, which is also displayed in the U.S. Printed in the CD-ROM does not run automatically. Windows® MP Drivers Installation Windows • A printer cable is not included. For instructions on -screen instructions. Follow the on -screen instructions to install. 7 When the list of the machine. Macintosh® MP Drivers Installation Macintosh • A printer cable is not included. Refer to use Mac OS X v.10.2.8) and then check...


