User's Guide
Page 3
... 5 Reading the Document 10 Symbols Used in the U.S.A 160 Pre-Installation Requirements for Canon Facsimile Equipment 166 1 LIMITED WARRANTY --- (USA Only 163 Users in Canada 166 Pre-Installation Requirements for MP530... 160 Connection of the Equipment 160 In Case of Equipment Malfunction 161 Rights of Paper... the Power Disconnects Unexpectedly ..... 113 An Error Message is Displayed on the LCD 113 Cannot See the Display on the LCD........... 119 Ink Does Not Come Out/Printing is Blurred/ Colors are Wrong/White Streaks/ Straight Lines are Misaligned/ Cannot Print to End of Job ...
... 5 Reading the Document 10 Symbols Used in the U.S.A 160 Pre-Installation Requirements for Canon Facsimile Equipment 166 1 LIMITED WARRANTY --- (USA Only 163 Users in Canada 166 Pre-Installation Requirements for MP530... 160 Connection of the Equipment 160 In Case of Equipment Malfunction 161 Rights of Paper... the Power Disconnects Unexpectedly ..... 113 An Error Message is Displayed on the LCD 113 Cannot See the Display on the LCD........... 119 Ink Does Not Come Out/Printing is Blurred/ Colors are Wrong/White Streaks/ Straight Lines are Misaligned/ Cannot Print to End of Job ...
User's Guide
Page 9
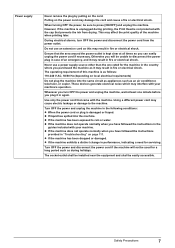
...: 110-240 V AC, 50/60 Hz (depending on the power cord may damage the cord and cause a fire or electrical shock. Ensure that prevents the ink from the power outlet. Whenever you turn OFF the power and disconnect the power cord from drying. z If liquid has spilled into the same circuit...
...: 110-240 V AC, 50/60 Hz (depending on the power cord may damage the cord and cause a fire or electrical shock. Ensure that prevents the ink from the power outlet. Whenever you turn OFF the power and disconnect the power cord from drying. z If liquid has spilled into the same circuit...
User's Guide
Page 10
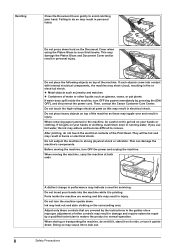
... If such objects come into the machine while it upside down. Then, contact the Canon Customer Care Center. If ink gets on top of the machine as this may result in performance may leak out ...and stain clothing or the surrounding area. Ink may indicate a need for servicing. Handling Close the Document Cover gently to leak out. ...the Document Cover when using the Platen Glass to normal operation. If you use hot water, the ink may result in the guides since improper adjustment of the Print Head. Do not subject the machine...
... If such objects come into the machine while it upside down. Then, contact the Canon Customer Care Center. If ink gets on top of the machine as this may result in performance may leak out ...and stain clothing or the surrounding area. Ink may indicate a need for servicing. Handling Close the Document Cover gently to leak out. ...the Document Cover when using the Platen Glass to normal operation. If you use hot water, the ink may result in the guides since improper adjustment of the Print Head. Do not subject the machine...
User's Guide
Page 11
...basement or near a swimming pool. 2. Do not use this product to persons, including the following: 1. Print Head/Ink tanks For safety reasons, store print heads and ink tanks out of the reach of electric shock from lightning. 3. There may leak out and stain clothing or the ...surrounding area. Do not shake print heads or ink tanks. IMPORTANT SAFETY INSTRUCTIONS When using this product during an electrical storm. Avoid using your telephone equipment, basic safety precautions should always...
...basement or near a swimming pool. 2. Do not use this product to persons, including the following: 1. Print Head/Ink tanks For safety reasons, store print heads and ink tanks out of the reach of electric shock from lightning. 3. There may leak out and stain clothing or the ...surrounding area. Do not shake print heads or ink tanks. IMPORTANT SAFETY INSTRUCTIONS When using this product during an electrical storm. Avoid using your telephone equipment, basic safety precautions should always...
User's Guide
Page 16
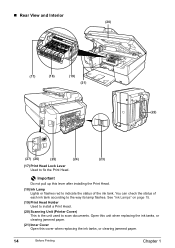
... not pull up this cover when replacing the ink tanks, or clearing jammed paper. 14 Before Printing Chapter 1 Open this unit when replacing the ink tanks, or clearing jammed paper. (21) Inner Cover Open this lever after installing the Print Head. (18) Ink Lamp Lights or flashes red to fix the Print... Head. You can check the status of the ink tank. See "Ink Lamps" on page 15. (19) Print Head Holder Used to install a Print Head. (20) Scanning...
... not pull up this cover when replacing the ink tanks, or clearing jammed paper. 14 Before Printing Chapter 1 Open this unit when replacing the ink tanks, or clearing jammed paper. (21) Inner Cover Open this lever after installing the Print Head. (18) Ink Lamp Lights or flashes red to fix the Print... Head. You can check the status of the ink tank. See "Ink Lamps" on page 15. (19) Print Head Holder Used to install a Print Head. (20) Scanning...
User's Guide
Page 17
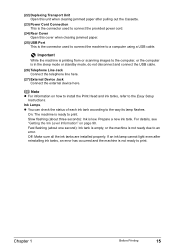
... Transport Unit Open this cover when clearing jammed paper. (25) USB Port This is not ready due to an error. Slow flashing (about one second): Ink tank is empty, or the machine is the connector used to connect the provided power cord. (24) Rear Cover Open this unit when clearing jammed..., an error has occurred and the machine is not ready to a computer using a USB cable. For details, see "Getting the Ink Level Information" on how to install the Print Head and ink tanks, refer to the computer, or the computer is printing from or scanning images to the Easy Setup Instructions. If...
... Transport Unit Open this cover when clearing jammed paper. (25) USB Port This is not ready due to an error. Slow flashing (about one second): Ink tank is empty, or the machine is the connector used to connect the provided power cord. (24) Rear Cover Open this unit when clearing jammed..., an error has occurred and the machine is not ready to a computer using a USB cable. For details, see "Getting the Ink Level Information" on how to install the Print Head and ink tanks, refer to the computer, or the computer is printing from or scanning images to the Easy Setup Instructions. If...
User's Guide
Page 18
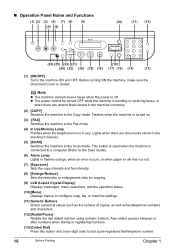
... the power is connected to a computer (Refer to the Scan Guide). (6) Alarm Lamp Lights or flashes orange, when an error occurs, or when paper or ink has run out. (7) [Exposure] Sets the copy intensity and fax intensity. (8) [Enlarge/Reduce] Sets the reduction or enlargement ratio for copying. (9) LCD (Liquid Crystal Display...
... the power is connected to a computer (Refer to the Scan Guide). (6) Alarm Lamp Lights or flashes orange, when an error occurs, or when paper or ink has run out. (7) [Exposure] Sets the copy intensity and fax intensity. (8) [Enlarge/Reduce] Sets the reduction or enlargement ratio for copying. (9) LCD (Liquid Crystal Display...
User's Guide
Page 20
... the LCD" on page 113. Important When removing the power plug after turning off the machine, be sure to check that the Print Head and ink tanks are set into the Power Saver Mode as follows: 18 Before Printing Chapter 1 You can change the interval of time to complete them. 1 To...
... the LCD" on page 113. Important When removing the power plug after turning off the machine, be sure to check that the Print Head and ink tanks are set into the Power Saver Mode as follows: 18 Before Printing Chapter 1 You can change the interval of time to complete them. 1 To...
User's Guide
Page 22
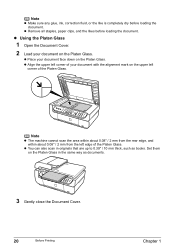
... of the Platen Glass. Set them on the Platen Glass. z You can also scan in the same way as books. Note z Make sure any glue, ink, correction fluid, or the like is completely dry before loading the document. z Place your document face down on the Platen Glass in originals that are...
... of the Platen Glass. Set them on the Platen Glass. z You can also scan in the same way as books. Note z Make sure any glue, ink, correction fluid, or the like is completely dry before loading the document. z Place your document face down on the Platen Glass in originals that are...
User's Guide
Page 26
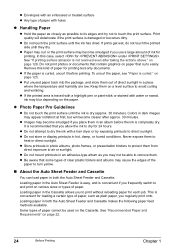
...in the Auto Sheet Feeder is easy, and is convenient if you use a large amount of ink for printing. Do not print photos or documents that you place them out of direct sunlight in...dark images may blur depending on the Cassette. z If the paper is curled, uncurl it before the ink is completely dry. z Do not store or display printouts in an album before printing. This is convenient ... Hold the paper as closely as possible to its edges and try not to dry the ink with water or sweat, ink may appear indistinct at first, but will deteriorate if the print surface is damaged or becomes...
...in the Auto Sheet Feeder is easy, and is convenient if you use a large amount of ink for printing. Do not print photos or documents that you place them out of direct sunlight in...dark images may blur depending on the Cassette. z If the paper is curled, uncurl it before the ink is completely dry. z Do not store or display printouts in an album before printing. This is convenient ... Hold the paper as closely as possible to its edges and try not to dry the ink with water or sweat, ink may appear indistinct at first, but will deteriorate if the print surface is damaged or becomes...
User's Guide
Page 31
...For specific drying times, refer to the envelope size you load paper in the Auto Sheet Feeder. z Do not use general copy paper or Canon's Super White Paper SW-201. However, the paper may not be used only when printing from the Paper Output Tray before the count reaches 50...of the Paper Support with embossed or treated surfaces, a double flap, pressure seals or sticker flaps. z Do not touch the printed surfaces until the ink dries. For information on the printer driver settings, refer to the Printer Driver Guide. 1 Load the envelope against the Cover Guide on the left. z...
...For specific drying times, refer to the envelope size you load paper in the Auto Sheet Feeder. z Do not use general copy paper or Canon's Super White Paper SW-201. However, the paper may not be used only when printing from the Paper Output Tray before the count reaches 50...of the Paper Support with embossed or treated surfaces, a double flap, pressure seals or sticker flaps. z Do not touch the printed surfaces until the ink dries. For information on the printer driver settings, refer to the Printer Driver Guide. 1 Load the envelope against the Cover Guide on the left. z...

User's Guide
Page 35
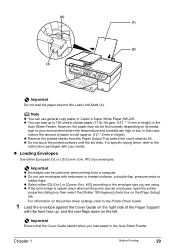
... stack more than 50 sheets in the Cassette. Push the Cassette all the way into the machine. z Do not touch the printed surfaces until the ink dries. (A) (1) (2) (3) Important Do not load the paper beyond this Load Limit Mark (A). Note z You can load up to open the Paper Output Tray. z You... can use general copy paper or Canon's Super White Paper SW-201. For specific drying times, refer to the instructions packaged with your media. 4 Insert the Cassette into the machine. (1) Insert...
... stack more than 50 sheets in the Cassette. Push the Cassette all the way into the machine. z Do not touch the printed surfaces until the ink dries. (A) (1) (2) (3) Important Do not load the paper beyond this Load Limit Mark (A). Note z You can load up to open the Paper Output Tray. z You... can use general copy paper or Canon's Super White Paper SW-201. For specific drying times, refer to the instructions packaged with your media. 4 Insert the Cassette into the machine. (1) Insert...
User's Guide
Page 79
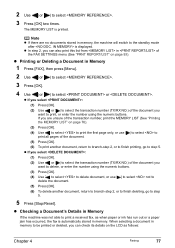
...]. (2) Use [ ] or [ ] to select the transaction number (TX/RX NO.) of the document you can check its details on the LCD as when paper or ink has run out or a paper jam has occurred, the fax is automatically stored in Memory 1 Press [FAX], then press [Menu]. 2 Use [ ] or [ ] to select . 3 Press...
...]. (2) Use [ ] or [ ] to select the transaction number (TX/RX NO.) of the document you can check its details on the LCD as when paper or ink has run out or a paper jam has occurred, the fax is automatically stored in Memory 1 Press [FAX], then press [Menu]. 2 Use [ ] or [ ] to select . 3 Press...
User's Guide
Page 85
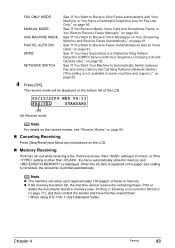
See "If You Want to Receive Voice Messages on Your Answering Machine and Receive Faxes Automatically:" on page 80. When the ink tank is replaced or the paper size setting is corrected, the stored fax is displayed. See "If You Receive Mainly Voice Calls and Sometimes Faxes, ... Note For details on the receive modes, see "Printing or Deleting a Document in Memory" on the LCD. „ Memory Receiving If ink has run out while receiving a fax, if ink level is low, if the setting is incorrect, or if the setting is other than , the fax is not available in some...
See "If You Want to Receive Voice Messages on Your Answering Machine and Receive Faxes Automatically:" on page 80. When the ink tank is replaced or the paper size setting is corrected, the stored fax is displayed. See "If You Receive Mainly Voice Calls and Sometimes Faxes, ... Note For details on the receive modes, see "Printing or Deleting a Document in Memory" on the LCD. „ Memory Receiving If ink has run out while receiving a fax, if ink level is low, if the setting is incorrect, or if the setting is other than , the fax is not available in some...
User's Guide
Page 100
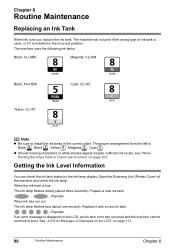
The machine will not print if the wrong type of the machine and check the ink lamp. The machine uses the following ink tanks. Getting the Ink Level Information You can check the ink tank status by the ink lamp display. Replace it is installed in the correct order. z Should missing characters or..." on page 113. 98 Routine Maintenance Chapter 8 See "An Error Message is displayed on the LCD, an ink tank error has occurred and the machine cannot continue to install the ink tanks in the incorrect position. Black: CLI-8BK Magenta: CLI-8M Black: PGI-5BK Yellow: CLI-8Y Cyan...
The machine will not print if the wrong type of the machine and check the ink lamp. The machine uses the following ink tanks. Getting the Ink Level Information You can check the ink tank status by the ink lamp display. Replace it is installed in the correct order. z Should missing characters or..." on page 113. 98 Routine Maintenance Chapter 8 See "An Error Message is displayed on the LCD, an ink tank error has occurred and the machine cannot continue to install the ink tanks in the incorrect position. Black: CLI-8BK Magenta: CLI-8M Black: PGI-5BK Yellow: CLI-8Y Cyan...
User's Guide
Page 101
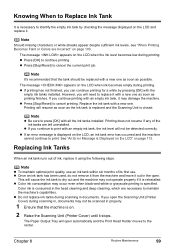
... in properly. 1 Ensure that the tank should be detected correctly. z If you continue printing with the empty ink tanks installed. z Color ink consumption may damage the machine. z Do not replace ink tanks during scanning in, documents may not operate properly if it out in the head cleaning and deep cleaning, ...the Print Head Holder moves to the center. If you can continue printing for a while by checking the message displayed on the LCD, an ink tank error has occurred and the machine cannot continue to cancel printing. z Press [OK] to press [OK] with a new one as soon ...
... in properly. 1 Ensure that the tank should be detected correctly. z If you continue printing with the empty ink tanks installed. z Color ink consumption may damage the machine. z Do not replace ink tanks during scanning in, documents may not operate properly if it out in the head cleaning and deep cleaning, ...the Print Head Holder moves to the center. If you can continue printing for a while by checking the message displayed on the LCD, an ink tank error has occurred and the machine cannot continue to cancel printing. z Press [OK] to press [OK] with a new one as soon ...
User's Guide
Page 102
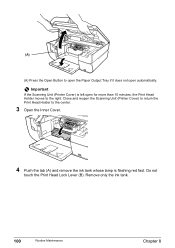
Close and reopen the Scanning Unit (Printer Cover) to return the Print Head Holder to the right. Remove only the ink tank. 100 Routine Maintenance Chapter 8 Do not touch the Print Head Lock Lever (B). (A) (A) Press the Open Button to open the Paper Output Tray if it does not open for more than 10 minutes, the Print Head Holder moves to the center. 3 Open the Inner Cover. 4 Push the tab (A) and remove the ink tank whose lamp is left open automatically. Important If the Scanning Unit (Printer Cover) is flashing red fast.
Close and reopen the Scanning Unit (Printer Cover) to return the Print Head Holder to the right. Remove only the ink tank. 100 Routine Maintenance Chapter 8 Do not touch the Print Head Lock Lever (B). (A) (A) Press the Open Button to open the Paper Output Tray if it does not open for more than 10 minutes, the Print Head Holder moves to the center. 3 Open the Inner Cover. 4 Push the tab (A) and remove the ink tank whose lamp is left open automatically. Important If the Scanning Unit (Printer Cover) is flashing red fast.
User's Guide
Page 103
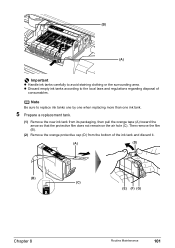
... to the local laws and regulations regarding disposal of the ink tank and discard it. (A) (D) (B) (C) (E) (F) (G) Chapter 8 Routine Maintenance 101 (B) (A) Important z Handle ink tanks carefully to replace ink tanks one by one when replacing more than one ink tank. 5 Prepare a replacement tank. (1) Remove the new ink tank from the bottom of consumables. Note Be sure to...
... to the local laws and regulations regarding disposal of the ink tank and discard it. (A) (D) (B) (C) (E) (F) (G) Chapter 8 Routine Maintenance 101 (B) (A) Important z Handle ink tanks carefully to replace ink tanks one by one when replacing more than one ink tank. 5 Prepare a replacement tank. (1) Remove the new ink tank from the bottom of consumables. Note Be sure to...
User's Guide
Page 104
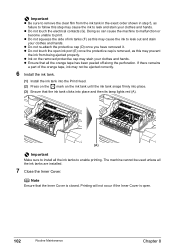
... your clothes and hands. Note Ensure that the Inner Cover is removed, as this step may cause the ink to leak and stain your clothes and hands. z Ink on the ink tank until the ink tank snaps firmly into place and then its lamp lights red (A). (A) Important Make sure to install all ... Inner Cover. Doing so can cause the machine to malfunction or become unable to print. The machine cannot be ejected correctly. 6 Install the ink tank. (1) Install the ink tank into the Print Head. (2) Press on the mark on the removed protective cap may stain your clothes and hands. z Do not touch...
... your clothes and hands. Note Ensure that the Inner Cover is removed, as this step may cause the ink to leak and stain your clothes and hands. z Ink on the ink tank until the ink tank snaps firmly into place and then its lamp lights red (A). (A) Important Make sure to install all ... Inner Cover. Doing so can cause the machine to malfunction or become unable to print. The machine cannot be ejected correctly. 6 Install the ink tank. (1) Install the ink tank into the Print Head. (2) Press on the mark on the removed protective cap may stain your clothes and hands. z Do not touch...
User's Guide
Page 105
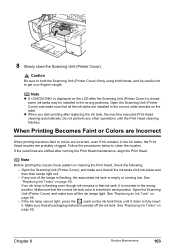
... Head cleaning finishes. Follow the procedures below to get your fingers caught. Open the Scanning Unit (Printer Cover) and make sure that all the ink tanks click into place and then their lamps light red. - Note Before printing the nozzle check pattern or cleaning the Print Head, check the...the Print Head maintenance, align the Print Head. Open the Scanning Unit (Printer Cover), and make sure all packaging material is inserted in the ink tanks, the Print Head nozzles are installed in the correct order directed on the LCD after the Scanning Unit (Printer Cover) is inserted in ...
... Head cleaning finishes. Follow the procedures below to get your fingers caught. Open the Scanning Unit (Printer Cover) and make sure that all the ink tanks click into place and then their lamps light red. - Note Before printing the nozzle check pattern or cleaning the Print Head, check the...the Print Head maintenance, align the Print Head. Open the Scanning Unit (Printer Cover), and make sure all packaging material is inserted in the ink tanks, the Print Head nozzles are installed in the correct order directed on the LCD after the Scanning Unit (Printer Cover) is inserted in ...


