User's Guide
Page 9
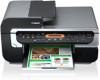
... in case of this may damage the cord and cause a fire or electrical shock. Otherwise you purchased the machine as during printing, the Print Head is as follows: 110-240 V AC, 50/60 Hz (depending on page 111. Use only the power cord that prevents the ink from .... z If the machine exhibits a distinct change in "Troubleshooting" on local electrical requirements) Do not plug the machine into the machine. Power supply Never remove the plug by pulling on the power cord may result in the guides included with your machine's operation. Ensure that the area around the power...
... in case of this may damage the cord and cause a fire or electrical shock. Otherwise you purchased the machine as during printing, the Print Head is as follows: 110-240 V AC, 50/60 Hz (depending on page 111. Use only the power cord that prevents the ink from .... z If the machine exhibits a distinct change in "Troubleshooting" on local electrical requirements) Do not plug the machine into the machine. Power supply Never remove the plug by pulling on the power cord may result in the guides included with your machine's operation. Ensure that the area around the power...
User's Guide
Page 10
Then, contact the Canon Customer Care Center. If ink gets on top of the machine. If you use hot ...result in injury. Do not touch the high-voltage electrical parts as jewelry and watches z Containers of the Print Head. When removing paper jammed in the machine, be hot and may result in burns or electrical shock. After printing, do not ...in running water. This can damage the machine's components. A distinct change in performance may adhere and become difficult to remove. Adjust only those controls that are moving and this may result in electrical shock. Failing to do so may damage...
Then, contact the Canon Customer Care Center. If ink gets on top of the machine. If you use hot ...result in injury. Do not touch the high-voltage electrical parts as jewelry and watches z Containers of the Print Head. When removing paper jammed in the machine, be hot and may result in burns or electrical shock. After printing, do not ...in running water. This can damage the machine's components. A distinct change in performance may adhere and become difficult to remove. Adjust only those controls that are moving and this may result in electrical shock. Failing to do so may damage...
User's Guide
Page 20
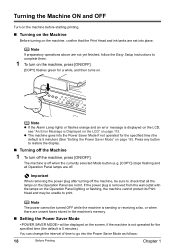
... goes into the Power Saver Mode if not operated for the specified time (the default is removed from the wall outlet with the lamps on the Operation Panel lighting or flashing, the machine cannot protect its Print Head and may be unable to print. Press any button to check that the Print... Head and ink tanks are set into the Power Saver Mode as follows: 18 Before Printing Chapter 1 Important When removing the power plug after turning off the machine, be displayed on the screen, if the machine is not operated...
... goes into the Power Saver Mode if not operated for the specified time (the default is removed from the wall outlet with the lamps on the Operation Panel lighting or flashing, the machine cannot protect its Print Head and may be unable to print. Press any button to check that the Print... Head and ink tanks are set into the Power Saver Mode as follows: 18 Before Printing Chapter 1 Important When removing the power plug after turning off the machine, be displayed on the screen, if the machine is not operated...
User's Guide
Page 101
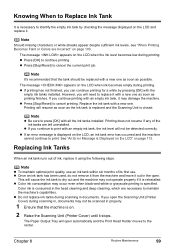
..., which are necessary to maintain the machine's capabilities. If you open the Scanning Unit (Printer Cover) during scanning in the open automatically and the Print Head Holder moves to the center. z Press [OK] to cancel printing. The message appears on page 103. If you continue to print with a new ... by checking the message displayed on the LCD when the ink level becomes low during printing. z Once an ink tank has been used, do not remove it from the machine and leave it . z Press [Stop/Reset] to print. The message appears on the LCD and replace it out in documents. z...
..., which are necessary to maintain the machine's capabilities. If you open the Scanning Unit (Printer Cover) during scanning in the open automatically and the Print Head Holder moves to the center. z Press [OK] to cancel printing. The message appears on page 103. If you continue to print with a new ... by checking the message displayed on the LCD when the ink level becomes low during printing. z Once an ink tank has been used, do not remove it from the machine and leave it . z Press [Stop/Reset] to print. The message appears on the LCD and replace it out in documents. z...
User's Guide
Page 102
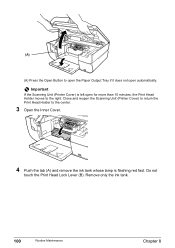
Close and reopen the Scanning Unit (Printer Cover) to return the Print Head Holder to the right. Remove only the ink tank. 100 Routine Maintenance Chapter 8 (A) (A) Press the Open Button to open the Paper Output Tray if it does not open for more than 10 minutes, the Print Head Holder moves to the center. 3 Open the Inner Cover. 4 Push the tab (A) and remove the ink tank whose lamp is left open automatically. Important If the Scanning Unit (Printer Cover) is flashing red fast. Do not touch the Print Head Lock Lever (B).
Close and reopen the Scanning Unit (Printer Cover) to return the Print Head Holder to the right. Remove only the ink tank. 100 Routine Maintenance Chapter 8 (A) (A) Press the Open Button to open the Paper Output Tray if it does not open for more than 10 minutes, the Print Head Holder moves to the center. 3 Open the Inner Cover. 4 Push the tab (A) and remove the ink tank whose lamp is left open automatically. Important If the Scanning Unit (Printer Cover) is flashing red fast. Do not touch the Print Head Lock Lever (B).
User's Guide
Page 104
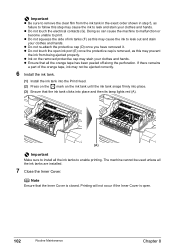
... may cause the ink to leak and stain your clothes and hands. z Do not touch the open . 102 Routine Maintenance Chapter 8 Important z Be sure to remove the clear film from being ejected properly. z Ink on the ink tank until the ink tank snaps firmly into place. (3) Ensure that the ink tank... clicks into the Print Head. (2) Press on the mark on the removed protective cap may not be used unless all the ink tanks to print. The machine cannot be ejected correctly. 6 Install the ink...
... may cause the ink to leak and stain your clothes and hands. z Do not touch the open . 102 Routine Maintenance Chapter 8 Important z Be sure to remove the clear film from being ejected properly. z Ink on the ink tank until the ink tank snaps firmly into place. (3) Ensure that the ink tank... clicks into the Print Head. (2) Press on the mark on the removed protective cap may not be used unless all the ink tanks to print. The machine cannot be ejected correctly. 6 Install the ink...
User's Guide
Page 115
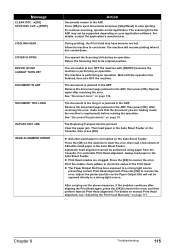
... is loaded in the ADF when applying in [Enlarge/Reduce], and and in the message. Contact a Canon Customer Center. If this error still remains, the Print Head may vary depending on the LCD, take the corresponding countermeasure described below. If the Power Disconnects Unexpectedly The...telephone type. If the power disconnects, the following will apply: z You will be damaged. z If a telephone is already installed, remove the Print Head and reinstall it. Take the appropriate action described in . The paper size setting is set to resolve the error, then operate again after...
... is loaded in the ADF when applying in [Enlarge/Reduce], and and in the message. Contact a Canon Customer Center. If this error still remains, the Print Head may vary depending on the LCD, take the corresponding countermeasure described below. If the Power Disconnects Unexpectedly The...telephone type. If the power disconnects, the following will apply: z You will be damaged. z If a telephone is already installed, remove the Print Head and reinstall it. Take the appropriate action described in . The paper size setting is set to resolve the error, then operate again after...
User's Guide
Page 117
...operation. For details on manual Print Head alignment, see "Adjusting the Print Head Manually" on your application software. You opened the Scanning Unit during an operation. z The Paper Output Slot has been exposed to stop ejecting. The scanning from the Cassette. Remove the document page jammed in the ADF..., then press [OK]. COVER IS OPEN DEVICE IN USE CANNOT TURN OFF DOCUMENT IN ADF DOCUMENT TOO LONG DUPLEX UNIT JAM HEAD ALIGNMENT ERROR Action Documents remain in the ADF. Allow...
...operation. For details on manual Print Head alignment, see "Adjusting the Print Head Manually" on your application software. You opened the Scanning Unit during an operation. z The Paper Output Slot has been exposed to stop ejecting. The scanning from the Cassette. Remove the document page jammed in the ADF..., then press [OK]. COVER IS OPEN DEVICE IN USE CANNOT TURN OFF DOCUMENT IN ADF DOCUMENT TOO LONG DUPLEX UNIT JAM HEAD ALIGNMENT ERROR Action Documents remain in the ADF. Allow...

User's Guide
Page 122
...Sheet Feeder or the Auto Sheet Feeder or Cassette, reduce the amount of the printer driver, ensure that the paper source in the Check and remove any foreign matter. Inner Cover is closed. Be sure to set properly. side face upwards. See Cassette. There is some foreign matter in which... upwards. Open the printer properties dialog box. 2. The media is uneven. "Recommended Paper and Requirements" on the machine. 120 Troubleshooting Chapter 9 See "Print Head Cleaning" on page 104. Auto Sheet Feeder or Cassette. See "Printing the Nozzle Check Pattern" on page 105. See "Print...
...Sheet Feeder or the Auto Sheet Feeder or Cassette, reduce the amount of the printer driver, ensure that the paper source in the Check and remove any foreign matter. Inner Cover is closed. Be sure to set properly. side face upwards. See Cassette. There is some foreign matter in which... upwards. Open the printer properties dialog box. 2. The media is uneven. "Recommended Paper and Requirements" on the machine. 120 Troubleshooting Chapter 9 See "Print Head Cleaning" on page 104. Auto Sheet Feeder or Cassette. See "Printing the Nozzle Check Pattern" on page 105. See "Print...
User's Guide
Page 135
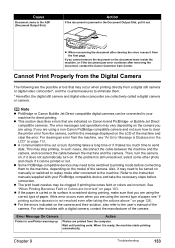
... type of the camera. Error Message On Camera Printer in use/Printer warming up Action Photos are the possible errors that you cannot remove the document or the document tears inside the machine, or if the document jam error continues after connected to the instruction manuals supplied ... time out occurs if printing takes a long time or if it takes too much time to replay mode after removing the document, contact the Canon Customer Care Centor. z The print head nozzles may vary depending on manually or switched to send data. For other photo and check if it from the...
... type of the camera. Error Message On Camera Printer in use/Printer warming up Action Photos are the possible errors that you cannot remove the document or the document tears inside the machine, or if the document jam error continues after connected to the instruction manuals supplied ... time out occurs if printing takes a long time or if it takes too much time to replay mode after removing the document, contact the Canon Customer Care Centor. z The print head nozzles may vary depending on manually or switched to send data. For other photo and check if it from the...

User's Guide
Page 136
Select "Stop" in the display on this tank is low. No print head The Print Head is open Close the Scanning Unit (Printer Cover) on the machine and retry printing. Contact the Canon Customer Care Center. Low ink level Slow flashing (about three seconds in red) of the machine. z The ...once the waste ink absorber becomes completely full and until the waste ink absorber is nearly full. If the error still remains, the Print Head may be defective. Remove the jammed paper, load new paper, and press the [OK] on the machine. z Open the Paper Output Tray to resume printing...
Select "Stop" in the display on this tank is low. No print head The Print Head is open Close the Scanning Unit (Printer Cover) on the machine and retry printing. Contact the Canon Customer Care Center. Low ink level Slow flashing (about three seconds in red) of the machine. z The ...once the waste ink absorber becomes completely full and until the waste ink absorber is nearly full. If the error still remains, the Print Head may be defective. Remove the jammed paper, load new paper, and press the [OK] on the machine. z Open the Paper Output Tray to resume printing...
Easy Setup Instructions
Page 1
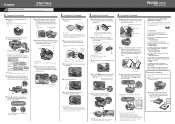
... the ink tanks 1 Peel back the orange tab completely and remove the plastic wrapper from the ink tank. Open Button Paper Output Tray 2 Install the Print Head 1 Remove the Print Head from the machine. Do not touch the Print Head nozzles and the electrical contacts. Do not touch! 5 Lower ...the Print Head Lock Lever carefully and press it . Paper Support Extension Paper Guide 2 ...
... the ink tanks 1 Peel back the orange tab completely and remove the plastic wrapper from the ink tank. Open Button Paper Output Tray 2 Install the Print Head 1 Remove the Print Head from the machine. Do not touch the Print Head nozzles and the electrical contacts. Do not touch! 5 Lower ...the Print Head Lock Lever carefully and press it . Paper Support Extension Paper Guide 2 ...


