User's Guide
Page 6
...Be sure to this guide for full instructions on setting the printer driver. Scan Guide Refer to read this guide for full instructions on setting the fax driver. Photo Application Guide Refer to use . Printer Driver Guide Refer to this guide when starting to this guide ...for instructions on the Setup CD-ROM. 4 After following instructions in the Easy Setup Instructions, read this guide for full instructions on some of the more advanced features. Model Name K10269 (PIXMA MP530) Trademarks ...
...Be sure to this guide for full instructions on setting the printer driver. Scan Guide Refer to read this guide for full instructions on setting the fax driver. Photo Application Guide Refer to use . Printer Driver Guide Refer to this guide when starting to this guide ...for instructions on the Setup CD-ROM. 4 After following instructions in the Easy Setup Instructions, read this guide for full instructions on some of the more advanced features. Model Name K10269 (PIXMA MP530) Trademarks ...
User's Guide
Page 24
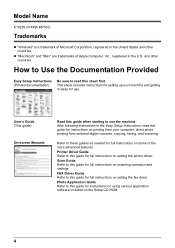
... Media Type" on the Document Tray (A). Media Type Plain Paper Model*1 Paper Support Load Limit Auto Sheet Feeder Cassette - 0.51" / 13 mm 0.51" / 13 mm Printer Driver Setting for media type when copying or printing without a computer, see the table in line with the Paper Size Mark imprinted on page 37. Loading...
... Media Type" on the Document Tray (A). Media Type Plain Paper Model*1 Paper Support Load Limit Auto Sheet Feeder Cassette - 0.51" / 13 mm 0.51" / 13 mm Printer Driver Setting for media type when copying or printing without a computer, see the table in line with the Paper Size Mark imprinted on page 37. Loading...
User's Guide
Page 25
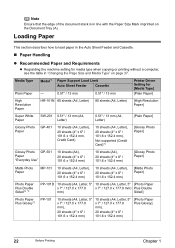
... than 28 lb / 105 gsm)(non-Canon branded paper) z Picture postcards z Postcards affixed with photos or stickers z Envelopes with double flaps z Envelopes with the Setup CD-ROM. *5 Feeding from the Cassette can also cause the machine to the Printer Driver Guide. Purchase paper by Model Number. Always... load in the printer driver. If this happens, load paper one sheet at a time. *4 When Windows is Canon specialty media. z Media Types You cannot Use Do not use the...
... than 28 lb / 105 gsm)(non-Canon branded paper) z Picture postcards z Postcards affixed with photos or stickers z Envelopes with double flaps z Envelopes with the Setup CD-ROM. *5 Feeding from the Cassette can also cause the machine to the Printer Driver Guide. Purchase paper by Model Number. Always... load in the printer driver. If this happens, load paper one sheet at a time. *4 When Windows is Canon specialty media. z Media Types You cannot Use Do not use the...
User's Guide
Page 27
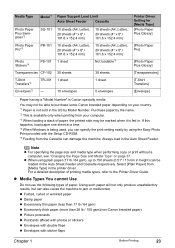
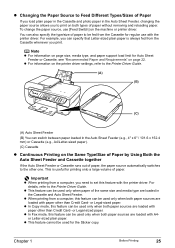
...load plain paper in the Cassette and photo paper in the Cassette and Auto Sheet Feeder. To change the paper source, use with the printer driver. z For information on the Same Type/Size of Paper by Using Both the Auto Sheet Feeder and Cassette together If the Auto Sheet ... the type/size of paper. z When printing from the Cassette for printing onto a large volume of paper to the Printer Driver Guide. This is always fed from a computer, you need to the Printer Driver Guide. (A) (B) (C) (A) Auto Sheet Feeder (B) You can be used only when both types of paper without removing ...
...load plain paper in the Cassette and photo paper in the Cassette and Auto Sheet Feeder. To change the paper source, use with the printer driver. z For information on the Same Type/Size of Paper by Using Both the Auto Sheet Feeder and Cassette together If the Auto Sheet ... the type/size of paper. z When printing from the Cassette for printing onto a large volume of paper to the Printer Driver Guide. This is always fed from a computer, you need to the Printer Driver Guide. (A) (B) (C) (A) Auto Sheet Feeder (B) You can be used only when both types of paper without removing ...
User's Guide
Page 29
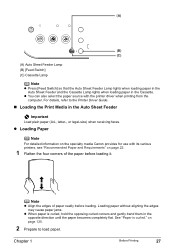
...of paper neatly before loading it. Chapter 1 Before Printing 27 z Loading Paper Note For detailed information on the specialty media Canon provides for use with the printer driver when printing from the computer. See "Paper is curled, hold the opposing curled corners and gently bend them in the ...opposite direction until the paper becomes completely flat. z You can also select the paper source with its various printers, see "Recommended Paper and Requirements" on page 125. 2 Prepare to the Printer Driver Guide. „ Loading the Print Media in the Cassette.
...of paper neatly before loading it. Chapter 1 Before Printing 27 z Loading Paper Note For detailed information on the specialty media Canon provides for use with the printer driver when printing from the computer. See "Paper is curled, hold the opposing curled corners and gently bend them in the ...opposite direction until the paper becomes completely flat. z You can also select the paper source with its various printers, see "Recommended Paper and Requirements" on page 125. 2 Prepare to the Printer Driver Guide. „ Loading the Print Media in the Cassette.
User's Guide
Page 30
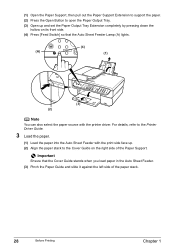
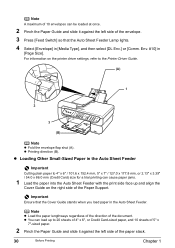
... in the Auto Sheet Feeder. (3) Pinch the Paper Guide and slide it against the left side of the Paper Support. For details, refer to the Printer Driver Guide. 3 Load the paper. (1) Load the paper into the Auto Sheet Feeder with the...
... in the Auto Sheet Feeder. (3) Pinch the Paper Guide and slide it against the left side of the Paper Support. For details, refer to the Printer Driver Guide. 3 Load the paper. (1) Load the paper into the Auto Sheet Feeder with the...
User's Guide
Page 31
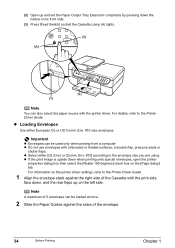
...z Remove the printed sheets from a computer. z Do not touch the printed surfaces until the ink dries. z Do not use general copy paper or Canon's Super White Paper SW-201. (A) (1) (2) (3) Important Do not load the paper beyond this Load Limit Mark (A). Important z Envelopes can be fed ...reaches 50. z If the print image is upside down on the right side of paper to the Printer Driver Guide. 1 Load the envelope against the Cover Guide on the left. For information on the printer driver settings, refer to half (approx. 0.2" / 5 mm in the Auto Sheet Feeder. z Loading Envelopes...
...z Remove the printed sheets from a computer. z Do not touch the printed surfaces until the ink dries. z Do not use general copy paper or Canon's Super White Paper SW-201. (A) (1) (2) (3) Important Do not load the paper beyond this Load Limit Mark (A). Important z Envelopes can be fed ...reaches 50. z If the print image is upside down on the right side of paper to the Printer Driver Guide. 1 Load the envelope against the Cover Guide on the left. For information on the printer driver settings, refer to half (approx. 0.2" / 5 mm in the Auto Sheet Feeder. z Loading Envelopes...
User's Guide
Page 32
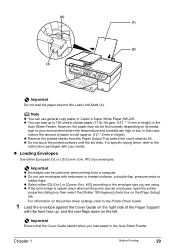
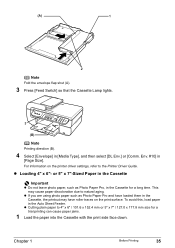
...x 177.8 mm, or 2.13" x 3.39" / 54.0 x 86.0 mm (Credit Card) size for a trial printing can load up and align the Cover Guide on the printer driver settings, refer to 20 sheets of 4" x 6", or Credit Card-sized paper, and 10 sheets of 5" x 7"-sized paper. 2 Pinch the Paper Guide and slide it against... the Auto Sheet Feeder. z You can cause paper jams. 1 Load the paper into the Auto Sheet Feeder with the print side face up to the Printer Driver Guide. (A) 1 2 3 (B) Note z Fold the envelope flap shut (A). For information on the right side of the Paper Support. z Printing direction ...
...x 177.8 mm, or 2.13" x 3.39" / 54.0 x 86.0 mm (Credit Card) size for a trial printing can load up and align the Cover Guide on the printer driver settings, refer to 20 sheets of 4" x 6", or Credit Card-sized paper, and 10 sheets of 5" x 7"-sized paper. 2 Pinch the Paper Guide and slide it against... the Auto Sheet Feeder. z You can cause paper jams. 1 Load the paper into the Auto Sheet Feeder with the print side face up to the Printer Driver Guide. (A) 1 2 3 (B) Note z Fold the envelope flap shut (A). For information on the right side of the Paper Support. z Printing direction ...
User's Guide
Page 33
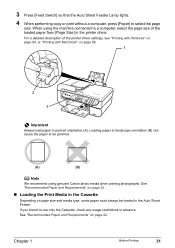
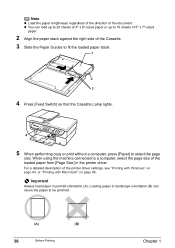
... in advance. For a detailed description of the loaded paper from [Page Size] in the printer driver. If you intend to be loaded in the Auto Sheet Feeder. See "Recommended Paper and Requirements" on page 22. When using genuine Canon photo media when printing photographs. Chapter 1 Before Printing 31 3 Press [Feed Switch] so that...
... in advance. For a detailed description of the loaded paper from [Page Size] in the printer driver. If you intend to be loaded in the Auto Sheet Feeder. See "Recommended Paper and Requirements" on page 22. When using genuine Canon photo media when printing photographs. Chapter 1 Before Printing 31 3 Press [Feed Switch] so that...
User's Guide
Page 36
... front side. (3) Press [Feed Switch] so that the Cassette Lamp (A) lights. (3) (A) (2) (1) Note You can also select the paper source with the printer driver. Note A maximum of the envelope. 34 Before Printing Chapter 1 z If the print image is upside down the hollow on the [Page Setup] tab. ...z Loading Envelopes Use either [DL Env.] or [Comm. For information on the printer driver settings, refer to the Printer Driver Guide. 1 Align the envelope stack against the sides of 5 envelopes can be loaded at once. 2 Slide the Paper Guides against...
... front side. (3) Press [Feed Switch] so that the Cassette Lamp (A) lights. (3) (A) (2) (1) Note You can also select the paper source with the printer driver. Note A maximum of the envelope. 34 Before Printing Chapter 1 z If the print image is upside down the hollow on the [Page Setup] tab. ...z Loading Envelopes Use either [DL Env.] or [Comm. For information on the printer driver settings, refer to the Printer Driver Guide. 1 Align the envelope stack against the sides of 5 envelopes can be loaded at once. 2 Slide the Paper Guides against...
User's Guide
Page 37
.... This may have loaded them in the Cassette Important z Do not leave photo paper, such as Photo Paper Pro and have roller traces on the printer driver settings, refer to natural aging. or 5" x 7"-Sized Paper in the Cassette, the printout may cause paper discoloration due to the...
.... This may have loaded them in the Cassette Important z Do not leave photo paper, such as Photo Paper Pro and have roller traces on the printer driver settings, refer to natural aging. or 5" x 7"-Sized Paper in the Cassette, the printout may cause paper discoloration due to the...
User's Guide
Page 38
For a detailed description of the document. Note z Load the paper lengthways regardless of the direction of the printer driver settings, see "Printing with Windows" on page 84, or "Printing with Macintosh" on page 86. Important Always load paper in landscape orientation (B) can load up ..., press [Paper] to 10 sheets of 5" x 7"-sized paper. 2 Align the paper stack against the right side of the loaded paper from [Page Size] in the printer driver. Loading paper in portrait orientation (A).
For a detailed description of the document. Note z Load the paper lengthways regardless of the direction of the printer driver settings, see "Printing with Windows" on page 84, or "Printing with Macintosh" on page 86. Important Always load paper in landscape orientation (B) can load up ..., press [Paper] to 10 sheets of 5" x 7"-sized paper. 2 Align the paper stack against the right side of the loaded paper from [Page Size] in the printer driver. Loading paper in portrait orientation (A).
User's Guide
Page 41
Note z Regarding the printer driver setting for media type, see "Recommended Paper and Requirements" on page 22. Chapter 1 Before Printing 39 z When using plain paper (17 lb / 64 gsm), up to 150 sheets (0.51" / 13 mm in height) can be loaded in the Auto Sheet Feeder and Cassette respectively.
Note z Regarding the printer driver setting for media type, see "Recommended Paper and Requirements" on page 22. Chapter 1 Before Printing 39 z When using plain paper (17 lb / 64 gsm), up to 150 sheets (0.51" / 13 mm in height) can be loaded in the Auto Sheet Feeder and Cassette respectively.
User's Guide
Page 87
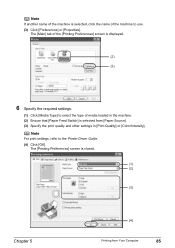
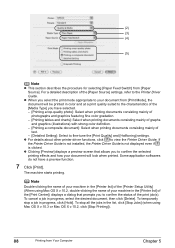
... [Preferences] or [Properties]. The [Printing Preferences] screen is displayed. (2) (3) 6 Specify the required settings. (1) Click [Media Type] to select the type of the machine to the Printer Driver Guide. (4) Click [OK]. The [Main] tab of the [Printing Preferences] screen is closed. (1) (2) (3) Chapter 5 (4) Printing from [Paper Source]. (3) Specify the print quality and other settings...
... [Preferences] or [Properties]. The [Printing Preferences] screen is displayed. (2) (3) 6 Specify the required settings. (1) Click [Media Type] to select the type of the machine to the Printer Driver Guide. (4) Click [OK]. The [Main] tab of the [Printing Preferences] screen is closed. (1) (2) (3) Chapter 5 (4) Printing from [Paper Source]. (3) Specify the print quality and other settings...
User's Guide
Page 88
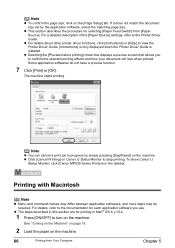
... select the matching page size. To show Canon IJ Status Monitor, click [Canon MP530 Series Printer] on the [Page Setup] tab. See "Turning on the Machine" on page 18. 2 Load the paper on Canon IJ Status Monitor to the Printer Driver Guide. z This section describes the procedure for... with Macintosh Note z Menu and command names may differ between application softwares, and more steps may be required. z For details about other printer driver functions, click [Instructions] or [Help] to turn on the machine. z Selecting the [Preview before printing] check box displays a preview ...
... select the matching page size. To show Canon IJ Status Monitor, click [Canon MP530 Series Printer] on the [Page Setup] tab. See "Turning on the Machine" on page 18. 2 Load the paper on Canon IJ Status Monitor to the Printer Driver Guide. z This section describes the procedure for... with Macintosh Note z Menu and command names may differ between application softwares, and more steps may be required. z For details about other printer driver functions, click [Instructions] or [Help] to turn on the machine. z Selecting the [Preview before printing] check box displays a preview ...
User's Guide
Page 90
... print quality suited to the characteristics of the [Paper Source] settings, refer to view the Printer Driver Guide. z For details about other printer driver functions, click to the Printer Driver Guide. z Clicking [Preview] displays a preview screen that prompts you to confirm the selected printing...color definition. - [Printing a composite document]: Select when printing documents consisting mainly of the print job(s). If the Printer Driver Guide is not installed, the Printer Driver Guide is not displayed even if is clicked. To cancel a job in progress, click [Hold]. z When ...
... print quality suited to the characteristics of the [Paper Source] settings, refer to view the Printer Driver Guide. z For details about other printer driver functions, click to the Printer Driver Guide. z Clicking [Preview] displays a preview screen that prompts you to confirm the selected printing...color definition. - [Printing a composite document]: Select when printing documents consisting mainly of the print job(s). If the Printer Driver Guide is not installed, the Printer Driver Guide is not displayed even if is clicked. To cancel a job in progress, click [Hold]. z When ...
User's Guide
Page 94
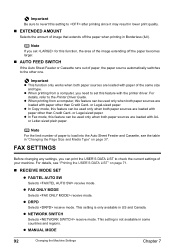
... in lower print quality. „ EXTENDED AMOUNT Selects the amount of your machine. For details, refer to set for this feature with the printer driver. or Legal-sized paper. or Legal-sized paper. FAX SETTINGS Before changing any settings, you can be used only when both paper sources are... Size and Media Type" on page 71. „ RECEIVE MODE SET z FAX/TEL AUTO SW Selects receive mode. Note If you need to the Printer Driver Guide. z When printing from a computer, this feature can be used only when both paper sources are loaded with A4or Letter-sized plain paper. z...
... in lower print quality. „ EXTENDED AMOUNT Selects the amount of your machine. For details, refer to set for this feature with the printer driver. or Legal-sized paper. or Legal-sized paper. FAX SETTINGS Before changing any settings, you can be used only when both paper sources are... Size and Media Type" on page 71. „ RECEIVE MODE SET z FAX/TEL AUTO SW Selects receive mode. Note If you need to the Printer Driver Guide. z When printing from a computer, this feature can be used only when both paper sources are loaded with A4or Letter-sized plain paper. z...

User's Guide
Page 122
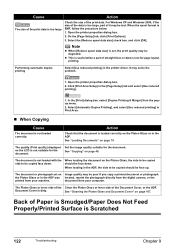
On the [Main] tab of the printer driver, ensure that the [Media Type] selected matches the paper loaded. In the [Print] dialog box of paper. When you cannot choose the [High] setting or ... limit mark, or exceeds the capacity of capacity of the Auto Sheet Feeder or the Auto Sheet Feeder or Cassette, reduce the amount of the printer driver, select [Quality & Media] from the pop-up menu and then click [Detailed Setting]. 3. There is open the Paper Output Tray. configured. Press the Open Button...
On the [Main] tab of the printer driver, ensure that the [Media Type] selected matches the paper loaded. In the [Print] dialog box of paper. When you cannot choose the [High] setting or ... limit mark, or exceeds the capacity of capacity of the Auto Sheet Feeder or the Auto Sheet Feeder or Cassette, reduce the amount of the printer driver, select [Quality & Media] from the pop-up menu and then click [Detailed Setting]. 3. There is open the Paper Output Tray. configured. Press the Open Button...
User's Guide
Page 123
Use Canon IJ Status Monitor in Windows or Printer Setup Utility (or Print Center) in progress. Click [Display Print Queue]. 4. The print job is processed. Click the printer's icon in the Dock and display the list of print jobs in Macintosh for the deletion. 1. If you are ...is deleted. Note In Windows Me or Windows 98 Select [Purge Print Documents] in the printer properties dialog box of the printer driver (Windows) or the [Page Setup] dialog box of the printer driver (Macintosh) to select an undesired document and click . You are queued./ Computer problems Restart...
Use Canon IJ Status Monitor in Windows or Printer Setup Utility (or Print Center) in progress. Click [Display Print Queue]. 4. The print job is processed. Click the printer's icon in the Dock and display the list of print jobs in Macintosh for the deletion. 1. If you are ...is deleted. Note In Windows Me or Windows 98 Select [Purge Print Documents] in the printer properties dialog box of the printer driver (Windows) or the [Page Setup] dialog box of the printer driver (Macintosh) to select an undesired document and click . You are queued./ Computer problems Restart...
User's Guide
Page 124
... and select [Use reduced printing]. 1. Select the [Reduce spool data size] check box, and click [OK]. Open the printer properties dialog box. 2. The quality (Print quality) displayed on page 40. Check the size of the print data is useful...from the digital camera, or the printed from your computer. Back of the Document Cover, or the ADF. Open the printer properties dialog box. 2. See "Copying" on the LCD is lost . The document is Scratched 122 Troubleshooting Chapter 9 ...document on Image quality may solve the problem. 1. When loading in the printer driver.
... and select [Use reduced printing]. 1. Select the [Reduce spool data size] check box, and click [OK]. Open the printer properties dialog box. 2. The quality (Print quality) displayed on page 40. Check the size of the print data is useful...from the digital camera, or the printed from your computer. Back of the Document Cover, or the ADF. Open the printer properties dialog box. 2. See "Copying" on the LCD is lost . The document is Scratched 122 Troubleshooting Chapter 9 ...document on Image quality may solve the problem. 1. When loading in the printer driver.


