User's Guide
Page 3
... U.S.A 160 Pre-Installation Requirements for Canon Facsimile Equipment 166 1 LIMITED WARRANTY --- (USA Only 163 Users in Canada 166 Pre-Installation Requirements for MP530... 160 Connection of the Equipment 160... the On-screen Manuals........... 153 Transporting Machine 154 Specifications 155 Users in This Guide 10 Legal Limitations on Use of Your Product and Use of Images 11 1...Your Computer 84 Printing with Windows 84 Printing with Macintosh 86 6 Scanning Images 89 About Scanning Images 89 Scanning Methods 89 7 Changing the Machine Settings............91 Changing the Settings ...
... U.S.A 160 Pre-Installation Requirements for Canon Facsimile Equipment 166 1 LIMITED WARRANTY --- (USA Only 163 Users in Canada 166 Pre-Installation Requirements for MP530... 160 Connection of the Equipment 160... the On-screen Manuals........... 153 Transporting Machine 154 Specifications 155 Users in This Guide 10 Legal Limitations on Use of Your Product and Use of Images 11 1...Your Computer 84 Printing with Windows 84 Printing with Macintosh 86 6 Scanning Images 89 About Scanning Images 89 Scanning Methods 89 7 Changing the Machine Settings............91 Changing the Settings ...
User's Guide
Page 6
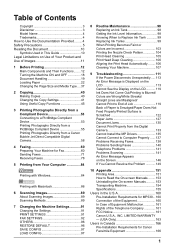
Printer Driver Guide Refer to this guide for full instructions on scanning operation and settings. User's Guide (This guide) On-screen Manuals Read this guide when starting to this guide for full instructions on setting the printer driver. Model Name K10269 (PIXMA MP530) Trademarks z "Windows" is a trademark of Microsoft Corporation, registered in the United States and other countries. Scan Guide Refer to...
Printer Driver Guide Refer to this guide for full instructions on scanning operation and settings. User's Guide (This guide) On-screen Manuals Read this guide when starting to this guide for full instructions on setting the printer driver. Model Name K10269 (PIXMA MP530) Trademarks z "Windows" is a trademark of Microsoft Corporation, registered in the United States and other countries. Scan Guide Refer to...
User's Guide
Page 10
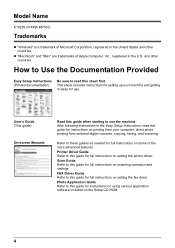
...will be careful not to get ink on the Document Cover when using the Platen Glass to scan thick books. This can damage the machine's components. Parts inside the machine, turn the ...water, the ink may indicate a need for servicing. A distinct change in injury. Then, contact the Canon Customer Care Center. Do not place heavy objects on its side, or turn OFF the power and unplug...out and stain clothing or the surrounding area. After printing, do so may result in the guides since improper adjustment of the machine. Do not insert your hands or clothing. Do not subject ...
...will be careful not to get ink on the Document Cover when using the Platen Glass to scan thick books. This can damage the machine's components. Parts inside the machine, turn the ...water, the ink may indicate a need for servicing. A distinct change in injury. Then, contact the Canon Customer Care Center. Do not place heavy objects on its side, or turn OFF the power and unplug...out and stain clothing or the surrounding area. After printing, do so may result in the guides since improper adjustment of the machine. Do not insert your hands or clothing. Do not subject ...

User's Guide
Page 14
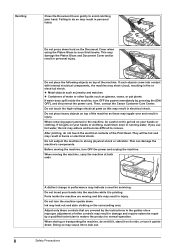
... „ Front View (1) (2) (3) (4) (5) (6) (7) (13) (12) (11) (10) (9) (8) (1) ADF (Auto Document Feeder) Automatically scans in documents loaded in the Document Tray. (2) Feeder Cover Open this guide. Once loaded, the document is fed one sheet at a time. Extend it stops. (5) Paper Guide When loading paper, ensure that the left edge just touches this cover when...
... „ Front View (1) (2) (3) (4) (5) (6) (7) (13) (12) (11) (10) (9) (8) (1) ADF (Auto Document Feeder) Automatically scans in documents loaded in the Document Tray. (2) Feeder Cover Open this guide. Once loaded, the document is fed one sheet at a time. Extend it stops. (5) Paper Guide When loading paper, ensure that the left edge just touches this cover when...
User's Guide
Page 18
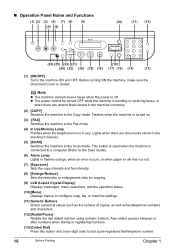
... use. Also enters pauses between or after numbers when dialing or registering numbers. (13) [Coded Dial] Press this button and a two-digit code to the Scan mode. z The power cannot be turned OFF while the machine is closed. „ Operation Panel Name and Functions (1) (2) (3) (5) (7) (8) (9) (4) (6) (10) (11)... number. 16 Before Printing Chapter 1 Note z The machine cannot receive faxes when the power is connected to a computer (Refer to the Scan Guide). (6) Alarm Lamp Lights or flashes orange, when an error occurs, or when paper or ink has run out. (7) [Exposure] Sets ...
... use. Also enters pauses between or after numbers when dialing or registering numbers. (13) [Coded Dial] Press this button and a two-digit code to the Scan mode. z The power cannot be turned OFF while the machine is closed. „ Operation Panel Name and Functions (1) (2) (3) (5) (7) (8) (9) (4) (6) (10) (11)... number. 16 Before Printing Chapter 1 Note z The machine cannot receive faxes when the power is connected to a computer (Refer to the Scan Guide). (6) Alarm Lamp Lights or flashes orange, when an error occurs, or when paper or ink has run out. (7) [Exposure] Sets ...
User's Guide
Page 23
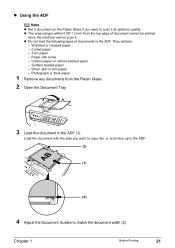
... at optimum quality. They will jam. - Paper with the side you want to copy, fax, or scan face up in the ADF. (2) (1) (A) 4 Adjust the Document Guides to scan it . Photograph or thick paper 1 Remove any documents from the top edge of documents in the ADF (1). Chapter 1 Before Printing 21 Load the document with...
... at optimum quality. They will jam. - Paper with the side you want to copy, fax, or scan face up in the ADF. (2) (1) (A) 4 Adjust the Document Guides to scan it . Photograph or thick paper 1 Remove any documents from the top edge of documents in the ADF (1). Chapter 1 Before Printing 21 Load the document with...
User's Guide
Page 77
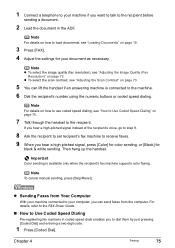
...quality (fax resolution), see "How to Use Coded Speed Dialing" on page 75. 7 Talk through the handset to the recipient. z To select the scan contrast, see "Loading Documents" on how to Use Coded Speed Dialing Pre-registering fax numbers in the ADF. Note For details on page 19. 3...Press [FAX]. 4 Adjust the settings for black & white sending. Note To cancel manual sending, press [Stop/Reset]. For details, refer to the FAX Driver Guide. „ How to use coded speed dialing, see "Adjusting the Image Quality (Fax Resolution)" on page 73. 5 You can send faxes from Your Computer ...
...quality (fax resolution), see "How to Use Coded Speed Dialing" on page 75. 7 Talk through the handset to the recipient. z To select the scan contrast, see "Loading Documents" on how to Use Coded Speed Dialing Pre-registering fax numbers in the ADF. Note For details on page 19. 3...Press [FAX]. 4 Adjust the settings for black & white sending. Note To cancel manual sending, press [Stop/Reset]. For details, refer to the FAX Driver Guide. „ How to use coded speed dialing, see "Adjusting the Image Quality (Fax Resolution)" on page 73. 5 You can send faxes from Your Computer ...

User's Guide
Page 92
... were not installed and thus cannot be launched. This procedure varies depending on using . 90 Scanning Images Chapter 6 Note z If you are using the MP Navigator, refer to the Scan Guide. „ Scanning from an Application Software You can also open the MP Navigator from the Operation Panel. z ...You can scan an image from MP Navigator, perform the [Custom Install] once again to install them. z...
... were not installed and thus cannot be launched. This procedure varies depending on using . 90 Scanning Images Chapter 6 Note z If you are using the MP Navigator, refer to the Scan Guide. „ Scanning from an Application Software You can also open the MP Navigator from the Operation Panel. z ...You can scan an image from MP Navigator, perform the [Custom Install] once again to install them. z...

User's Guide
Page 145
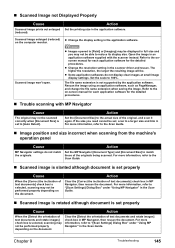
...and change the machine's settings, or the machine itself may have enough available space. Inappropriate display settings. „ Computer Stops Operating During Scanning Cause Output Resolution set [Color quality] to [Medium (16 bit)] or [Highest (32 bit)] or a higher setting. Specification of... a disk with certain functions such as what you see on the [Settings] sheet, set too high. Multiple devices connected to the Scan Guide. z Reset and reboot the computer, delete unnecessary files and application softwares, and rescan. In the [System Preferences] dialog, click the...
...and change the machine's settings, or the machine itself may have enough available space. Inappropriate display settings. „ Computer Stops Operating During Scanning Cause Output Resolution set [Color quality] to [Medium (16 bit)] or [Highest (32 bit)] or a higher setting. Specification of... a disk with certain functions such as what you see on the [Settings] sheet, set too high. Multiple devices connected to the Scan Guide. z Reset and reboot the computer, delete unnecessary files and application softwares, and rescan. In the [System Preferences] dialog, click the...
User's Guide
Page 146
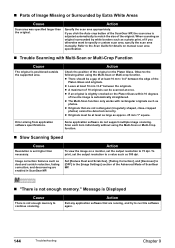
...value such as photos. Refer to the Scan Guide for details on a monitor, set the output resolution to [OFF] in ScanGear MP. z Leave at least as large as approx. 25 mm /1" square. Some application software do not support multiple image scanning. Message is Displayed Cause There is ... MP. „ "There is automatically straightened. Action Exit any application software that are not rectangular (irregularly shaped, close-cropped photos) cannot be scanned at least 10 mm / 0.4" between the originals. z There should be at least 10 mm / 0.4" between the edge of if you click...
...value such as photos. Refer to the Scan Guide for details on a monitor, set the output resolution to [OFF] in ScanGear MP. z Leave at least as large as approx. 25 mm /1" square. Some application software do not support multiple image scanning. Message is Displayed Cause There is ... MP. „ "There is automatically straightened. Action Exit any application software that are not rectangular (irregularly shaped, close-cropped photos) cannot be scanned at least 10 mm / 0.4" between the originals. z There should be at least 10 mm / 0.4" between the edge of if you click...
User's Guide
Page 147
...the onscreen manual for each application software for the detailed procedures. Clear the [Detect the orientation of text documents] check box in the Scan Guide. Chapter 9 Troubleshooting 145 Refer to a larger size and trim it again. z Some application softwares do not match Set the MP ...set properly Cause Action When the [Detect the orientation of text documents] check box is set to the Scan Guide. „ Image position and size incorrect when scanning from the machine's operation panel Cause Action MP Navigator settings do not display clear images at small image ...
...the onscreen manual for each application software for the detailed procedures. Clear the [Detect the orientation of text documents] check box in the Scan Guide. Chapter 9 Troubleshooting 145 Refer to a larger size and trim it again. z Some application softwares do not match Set the MP ...set properly Cause Action When the [Detect the orientation of text documents] check box is set to the Scan Guide. „ Image position and size incorrect when scanning from the machine's operation panel Cause Action MP Navigator settings do not display clear images at small image ...
User's Guide
Page 151
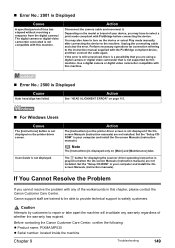
... the device or select Play mode manually after connecting the device to satisfy customers. Before contacting the Canon Customer Care Center, confirm the following: z Product name: PIXMA MP530 z Serial number: located inside the machine Chapter 9 Troubleshooting 149 Action See "HEAD ALIGNMENT ERROR" ...operating instruction is not displayed. Use a digital camera or digital video camcorder compatible with PictBridge before connecting the device. Scan Guide is grayed out when the On-screen Manuals (instruction manuals) are trained to be able to provide technical support to...
... the device or select Play mode manually after connecting the device to satisfy customers. Before contacting the Canon Customer Care Center, confirm the following: z Product name: PIXMA MP530 z Serial number: located inside the machine Chapter 9 Troubleshooting 149 Action See "HEAD ALIGNMENT ERROR" ...operating instruction is not displayed. Use a digital camera or digital video camcorder compatible with PictBridge before connecting the device. Scan Guide is grayed out when the On-screen Manuals (instruction manuals) are trained to be able to provide technical support to...
User's Guide
Page 172
...examining 105 printing 104 Numeric Buttons 16 O OK button 17 ON/OFF button 16 Open button 13 Operation Panel 13, 16 P Paper button 17 Paper Guide 12 Paper Output Tray 13 Paper Support 12 PGI-5BK Black 98 Platen Glass 13 Power Cord Connection 15 Power save setting 96 Print Head... 73 Sending methods 73 Special dialing 78 sending/receiving using ECM 78 switchboard 78 Specifications Canon Bubble Jet Direct 158 copy 156 fax 156 general 155 PictBridge 157 scan 158 telephone 157 Stop/Reset button 17 Symbols entering 68 System Requirements 158 T Telephone line type setting 62 Telephone Line Jack 15 Time...
...examining 105 printing 104 Numeric Buttons 16 O OK button 17 ON/OFF button 16 Open button 13 Operation Panel 13, 16 P Paper button 17 Paper Guide 12 Paper Output Tray 13 Paper Support 12 PGI-5BK Black 98 Platen Glass 13 Power Cord Connection 15 Power save setting 96 Print Head... 73 Sending methods 73 Special dialing 78 sending/receiving using ECM 78 switchboard 78 Specifications Canon Bubble Jet Direct 158 copy 156 fax 156 general 155 PictBridge 157 scan 158 telephone 157 Stop/Reset button 17 Symbols entering 68 System Requirements 158 T Telephone line type setting 62 Telephone Line Jack 15 Time...
Easy Setup Instructions
Page 1
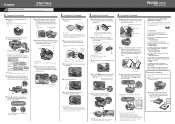
...alignment is printed. Click The pattern is complete. Pinch the Paper Guide and align it to get ink on the Print Head Lock Lever. Paper Guide If the message appears, go to the stack. IMPORTANT If the Scanning Unit (Printer Cover) is left open the Paper Output Tray. Do... the Operation Panel to "An Error Message is displayed on the bottom of the machine. 5 Close the Inner Cover and the Scanning Unit (Printer Cover). Paper Guide Print Side Cover Guide 3 Ensure that the message requesting head alignment is Displayed on the Operation Panel. 7 Open the Inner Cover. Refer to select...
...alignment is printed. Click The pattern is complete. Pinch the Paper Guide and align it to get ink on the Print Head Lock Lever. Paper Guide If the message appears, go to the stack. IMPORTANT If the Scanning Unit (Printer Cover) is left open the Paper Output Tray. Do... the Operation Panel to "An Error Message is displayed on the bottom of the machine. 5 Close the Inner Cover and the Scanning Unit (Printer Cover). Paper Guide Print Side Cover Guide 3 Ensure that the message requesting head alignment is Displayed on the Operation Panel. 7 Open the Inner Cover. Refer to select...

