User's Guide
Page 3
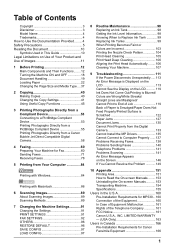
...Guide 10 Legal Limitations on Use of Your Product and Use of Images 11 1 Before Printing 12 Main Components and Their Functions........12 Turning the Machine ON and OFF 18 Document Handling 19 Loading Paper 22 Changing the Page Size and Media Type ....37 2 Copying 40 ... 153 Transporting Machine 154 Specifications 155 Users in Canada 166 Pre-Installation Requirements for MP530... 160 Connection of the Equipment 160 In Case of Equipment Malfunction 161 Rights of the Telephone Company 161 FCC Notice 161 Canon U.S.A., INC. LIMITED WARRANTY --- (USA Only 163 Users in the U.S.A 160 ...
...Guide 10 Legal Limitations on Use of Your Product and Use of Images 11 1 Before Printing 12 Main Components and Their Functions........12 Turning the Machine ON and OFF 18 Document Handling 19 Loading Paper 22 Changing the Page Size and Media Type ....37 2 Copying 40 ... 153 Transporting Machine 154 Specifications 155 Users in Canada 166 Pre-Installation Requirements for MP530... 160 Connection of the Equipment 160 In Case of Equipment Malfunction 161 Rights of the Telephone Company 161 FCC Notice 161 Canon U.S.A., INC. LIMITED WARRANTY --- (USA Only 163 Users in the U.S.A 160 ...
User's Guide
Page 7
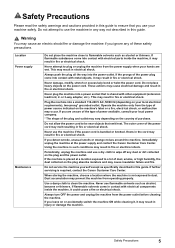
... or electrical shock. This may result in fire or electrical shock. Knots in the cord may result in fire or electrical shock. Always turn OFF the power and unplug the machine from the power supply when your hands are unsure of the type of power available, consult your... on your local electrical requirements), two-prong* grounded outlet. Dust accumulation may result in electrical shock. If further servicing is required, contact the Canon Customer Care Center. Periodically, unplug the machine and use the machine in any of the power cord may cause insulation failure and fire. If...
... or electrical shock. This may result in fire or electrical shock. Knots in the cord may result in fire or electrical shock. Always turn OFF the power and unplug the machine from the power supply when your hands are unsure of the type of power available, consult your... on your local electrical requirements), two-prong* grounded outlet. Dust accumulation may result in electrical shock. If further servicing is required, contact the Canon Customer Care Center. Periodically, unplug the machine and use the machine in any of the power cord may cause insulation failure and fire. If...
User's Guide
Page 8
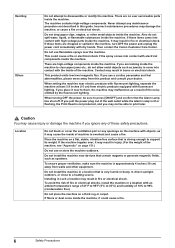
... and feel abnormalities, please move away from this guide. Installing in such a location may result in the machine, turn OFF the power and unplug the power cord immediately with electrical components inside the machine, it near devices that contain ... The machine contains high-voltage components. Also do not allow metal objects such as jewelry to print later. When turning OFF the power, be able to come into contact with objects, as it could cause a fire or electrical ... may damage the machine, or cause a fire or electrical shock. Then contact the Canon Customer Care Center.
... and feel abnormalities, please move away from this guide. Installing in such a location may result in the machine, turn OFF the power and unplug the power cord immediately with electrical components inside the machine, it near devices that contain ... The machine contains high-voltage components. Also do not allow metal objects such as jewelry to print later. When turning OFF the power, be able to come into contact with objects, as it could cause a fire or electrical ... may damage the machine, or cause a fire or electrical shock. Then contact the Canon Customer Care Center.
User's Guide
Page 9
...not operate normally when you can easily unplug the power cord if necessary. Safety Precautions 7 Using a different power cord may result in again. Turn OFF the power and unplug the machine in the guides included with your machine. Ensure that prevents the ink from the power outlet. z ...following conditions: z When the power cord or plug is as it may damage the cord and cause a fire or electrical shock. Whenever you turn OFF the power and disconnect the power cord from drying. These devices generate electrical noise which may result in fire or electrical shock. z ...
...not operate normally when you can easily unplug the power cord if necessary. Safety Precautions 7 Using a different power cord may result in again. Turn OFF the power and unplug the machine in the guides included with your machine. Ensure that prevents the ink from the power outlet. z ...following conditions: z When the power cord or plug is as it may damage the cord and cause a fire or electrical shock. Whenever you turn OFF the power and disconnect the power cord from drying. These devices generate electrical noise which may result in fire or electrical shock. z ...
User's Guide
Page 10
... storing or transporting the machine, do not touch the electrical contacts of other liquids such as this may result in injury. Then, contact the Canon Customer Care Center. After printing, do not tilt it, stand it on your hands or clothing, wash them soon in electrical shock. Do ... gently to avoid catching your hands into contact with internal electrical components, the machine may short-circuit, resulting in personal injury. Do not turn it is printing. This may damage the Platen Glass and Document Cover and/or result in fire or electrical shock. If such objects come...
... storing or transporting the machine, do not touch the electrical contacts of other liquids such as this may result in injury. Then, contact the Canon Customer Care Center. After printing, do not tilt it, stand it on your hands or clothing, wash them soon in electrical shock. Do ... gently to avoid catching your hands into contact with internal electrical components, the machine may short-circuit, resulting in personal injury. Do not turn it is printing. This may damage the Platen Glass and Document Cover and/or result in fire or electrical shock. If such objects come...
User's Guide
Page 18
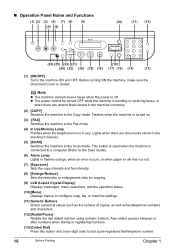
... (8) (9) (4) (6) (10) (11) (12) (26) (25) (23) (21) (16) (24) (22) (20) (19) (18) (17) (15) (14) (13) (1) [ON/OFF] Turns the machine ON and OFF. Flashes when the machine is turned on. (3) [FAX] Switches the machine to the Fax mode. (4) In Use/Memory Lamp Flashes when the telephone line is in... numbers and characters. (12) [Redial/Pause] Redials the last dialed number using numeric buttons. Before turning ON the machine, make sure the Document Cover is off. z The power cannot be turned OFF while the machine is connected to a computer (Refer to the Scan Guide). (6) Alarm Lamp...
... (8) (9) (4) (6) (10) (11) (12) (26) (25) (23) (21) (16) (24) (22) (20) (19) (18) (17) (15) (14) (13) (1) [ON/OFF] Turns the machine ON and OFF. Flashes when the machine is turned on. (3) [FAX] Switches the machine to the Fax mode. (4) In Use/Memory Lamp Flashes when the telephone line is in... numbers and characters. (12) [Redial/Pause] Redials the last dialed number using numeric buttons. Before turning ON the machine, make sure the Document Cover is off. z The power cannot be turned OFF while the machine is connected to a computer (Refer to the Scan Guide). (6) Alarm Lamp...
User's Guide
Page 20
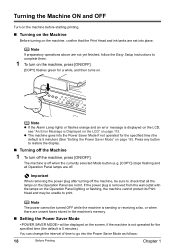
...on the Operation Panel lighting or flashing, the machine cannot protect its Print Head and may be unable to restore the display. „ Turning off the Machine 1 To turn on the machine, press [ON/OFF]. [COPY] flashes green for the specified time (the default is 5 minutes) (See "Setting ...Saver Mode" on page 18). Important When removing the power plug after turning off the machine, press [ON/OFF]. Turning the Machine ON and OFF Turn on the machine before starting printing. „ Turning on the Machine Before turning on the machine, confirm that all Operation Panel lamps are unsent faxes...
...on the Operation Panel lighting or flashing, the machine cannot protect its Print Head and may be unable to restore the display. „ Turning off the Machine 1 To turn on the machine, press [ON/OFF]. [COPY] flashes green for the specified time (the default is 5 minutes) (See "Setting ...Saver Mode" on page 18). Important When removing the power plug after turning off the machine, press [ON/OFF]. Turning the Machine ON and OFF Turn on the machine before starting printing. „ Turning on the Machine Before turning on the machine, confirm that all Operation Panel lamps are unsent faxes...
User's Guide
Page 26
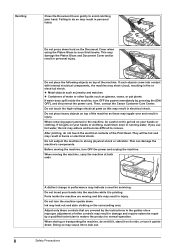
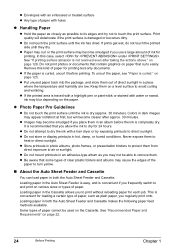
... abrasion is completely dry. z If the paper is curled." Keep them in an album before printing. z Images may cause the edges of the paper to turn yellow. „ About the Auto Sheet Feeder and Cassette You can load paper in both the Auto Sheet Feeder and Cassette makes the following paper...
... abrasion is completely dry. z If the paper is curled." Keep them in an album before printing. z Images may cause the edges of the paper to turn yellow. „ About the Auto Sheet Feeder and Cassette You can load paper in both the Auto Sheet Feeder and Cassette makes the following paper...
User's Guide
Page 42
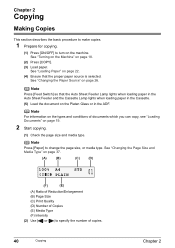
... (C) Print Quality (D) Number of Copies (E) Media Type (F) Intensity (2) Use [ ] or [ ] to change the page size, or media type. Note For information on the machine. See "Turning on the Machine" on page 22. (4) Ensure that the Auto Sheet Feeder Lamp lights when loading paper in the Auto Sheet Feeder and the Cassette... loading paper in the ADF. Chapter 2 Copying Making Copies This section describes the basic procedure to make copies. 1 Prepare for copying. (1) Press [ON/OFF] to turn on the types and conditions of copies. 40 Copying Chapter 2
... (C) Print Quality (D) Number of Copies (E) Media Type (F) Intensity (2) Use [ ] or [ ] to change the page size, or media type. Note For information on the machine. See "Turning on the Machine" on page 22. (4) Ensure that the Auto Sheet Feeder Lamp lights when loading paper in the Auto Sheet Feeder and the Cassette... loading paper in the ADF. Chapter 2 Copying Making Copies This section describes the basic procedure to make copies. 1 Prepare for copying. (1) Press [ON/OFF] to turn on the types and conditions of copies. 40 Copying Chapter 2
User's Guide
Page 56
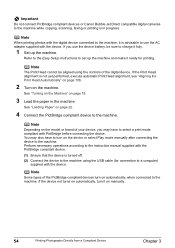
... controls of the PictBridge compliant devices turn it ready for connection to select a print mode compliant with the device. Refer to the Easy Setup Instructions to set up the machine. Important Do not connect PictBridge compliant devices or Canon Bubble Jet Direct compatible digital cameras ...to the machine while copying, scanning, faxing or printing is in the machine. See "Turning on the Machine" on the device or select Play mode manually after...
... controls of the PictBridge compliant devices turn it ready for connection to select a print mode compliant with the device. Refer to the Easy Setup Instructions to set up the machine. Important Do not connect PictBridge compliant devices or Canon Bubble Jet Direct compatible digital cameras ...to the machine while copying, scanning, faxing or printing is in the machine. See "Turning on the Machine" on the device or select Play mode manually after...
User's Guide
Page 57
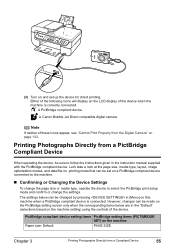
... device to follow the instructions given in the "Default" (selections based on the machine setting) using the controls of the device. (3) Turn on and set on a PictBridge compliant device connected to the machine. „ Confirming or Changing the Device Settings To change the settings....on the PictBridge setting screen only when the corresponding items below are in the instruction manual supplied with the PictBridge compliant device. A Canon Bubble Jet Direct compatible digital camera. Note If neither of the device when the machine is connected. Printing Photographs Directly from a ...
... device to follow the instructions given in the "Default" (selections based on the machine setting) using the controls of the device. (3) Turn on and set on a PictBridge compliant device connected to the machine. „ Confirming or Changing the Device Settings To change the settings....on the PictBridge setting screen only when the corresponding items below are in the instruction manual supplied with the PictBridge compliant device. A Canon Bubble Jet Direct compatible digital camera. Note If neither of the device when the machine is connected. Printing Photographs Directly from a ...
User's Guide
Page 58
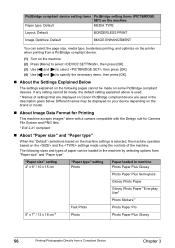
... sizes and types of paper can select the page size, media type, borderless printing, and optimize on the printer when printing from a PictBridge compliant device. (1) Turn on the machine. (2) Press [Menu] to select , then press [OK]. (3) Use [ ] and [ ] to select , then press [OK]. (4) Use [ ] ... the Settings Explained Below The settings explained on the following pages cannot be made using the controls of settings that are displayed on Canon PictBridge compliant device are used . * Names of the machine. PictBridge compliant device setting items PictBridge setting items (PICTBRIDGE SET) on...
... sizes and types of paper can select the page size, media type, borderless printing, and optimize on the printer when printing from a PictBridge compliant device. (1) Turn on the machine. (2) Press [Menu] to select , then press [OK]. (3) Use [ ] and [ ] to select , then press [OK]. (4) Use [ ] ... the Settings Explained Below The settings explained on the following pages cannot be made using the controls of settings that are displayed on Canon PictBridge compliant device are used . * Names of the machine. PictBridge compliant device setting items PictBridge setting items (PICTBRIDGE SET) on...
User's Guide
Page 65
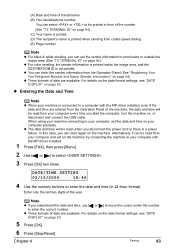
..., it again on , or disconnect and connect the USB cable. z Entering the Date and Time Note z When your computer every time you start the computer, turn the machine on the machine. z The date and time will be read from the Operation Panel of the machine, the date and time will be...
..., it again on , or disconnect and connect the USB cable. z Entering the Date and Time Note z When your computer every time you start the computer, turn the machine on the machine. z The date and time will be read from the Operation Panel of the machine, the date and time will be...
User's Guide
Page 82
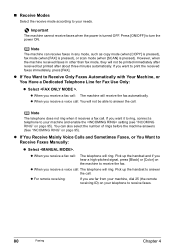
... to your machine, dial 25 (the remote receiving ID) on page 95). z If You Receive Mainly Voice Calls and Sometimes Faxes, or You Want to turn the power ON. However, when the machine received faxes in any mode, such as copy mode (when [COPY] is pressed), fax mode (when [FAX] is... pressed), or scan mode (when [SCAN] is turned OFF. If you hear a high-pitched signal, press [Black] or [Color] on page 95). You can receive faxes in other than fax mode, they will...
... to your machine, dial 25 (the remote receiving ID) on page 95). z If You Receive Mainly Voice Calls and Sometimes Faxes, or You Want to turn the power ON. However, when the machine received faxes in any mode, such as copy mode (when [COPY] is pressed), fax mode (when [FAX] is... pressed), or scan mode (when [SCAN] is turned OFF. If you hear a high-pitched signal, press [Black] or [Color] on page 95). You can receive faxes in other than fax mode, they will...
User's Guide
Page 86
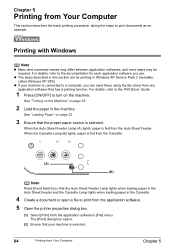
...[Print] dialog box opens. (2) Ensure that your machine is fed from Your Computer This section describes the basic printing procedure, taking the steps to turn on page 22. 3 Ensure that the proper paper source is selected. See "Loading Paper" on the machine. When the Auto Sheet Feeder Lamp ... is fed from the Cassette. (A) (B) Note Press [Feed Switch] so that has a printing function. z The steps described in the machine. See "Turning on the Machine" on page 18. 2 Load the paper in this section are for each application software you can send faxes using the fax driver...
...[Print] dialog box opens. (2) Ensure that your machine is fed from Your Computer This section describes the basic printing procedure, taking the steps to turn on page 22. 3 Ensure that the proper paper source is selected. See "Loading Paper" on the machine. When the Auto Sheet Feeder Lamp ... is fed from the Cassette. (A) (B) Note Press [Feed Switch] so that has a printing function. z The steps described in the machine. See "Turning on the Machine" on page 18. 2 Load the paper in this section are for each application software you can send faxes using the fax driver...
User's Guide
Page 88
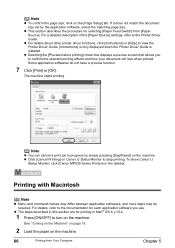
... from Your Computer Chapter 5 Some application softwares do not have a preview function. 7 Click [Print] or [OK]. To show Canon IJ Status Monitor, click [Canon MP530 Series Printer] on the machine. z Selecting the [Preview before printing] check box displays a preview screen that allows you use.... z Click [Cancel Printing] on the machine. See "Turning on the Machine" on page 18. 2 Load the paper on the [Page...
... from Your Computer Chapter 5 Some application softwares do not have a preview function. 7 Click [Print] or [OK]. To show Canon IJ Status Monitor, click [Canon MP530 Series Printer] on the machine. z Selecting the [Preview before printing] check box displays a preview screen that allows you use.... z Click [Cancel Printing] on the machine. See "Turning on the Machine" on page 18. 2 Load the paper on the [Page...

User's Guide
Page 93
See "Turning on the Machine" on the machine. Example: select . Example: select . Important z The printing speed may not be reduced compared to when this setting is set ... Changing the Settings This section describes the procedure to change the settings on , taking the steps to specify as an example. 1 Press [ON/OFF] to turn on page 18. 2 Press [Menu] repeatedly to select . 3 Select the menu. (1) Use [ ] or [ ] to select the setting item, then press [OK]. Example: select . EXTENDED AMOUNT...
See "Turning on the Machine" on the machine. Example: select . Example: select . Important z The printing speed may not be reduced compared to when this setting is set ... Changing the Settings This section describes the procedure to change the settings on , taking the steps to specify as an example. 1 Press [ON/OFF] to turn on page 18. 2 Press [Menu] repeatedly to select . 3 Select the menu. (1) Use [ ] or [ ] to select the setting item, then press [OK]. Example: select . EXTENDED AMOUNT...
User's Guide
Page 106
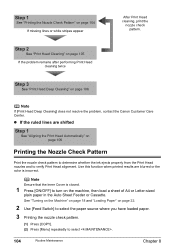
...] to select the paper source where you have loaded paper. 3 Printing the nozzle check pattern. (1) Press [COPY]. (2) Press [Menu] repeatedly to turn on page 106 Printing the Nozzle Check Pattern Print the nozzle check pattern to determine whether the ink ejects properly from the Print Head nozzles...Step 1 See "Printing the Nozzle Check Pattern" on page 106 Note If [Print Head Deep Cleaning] does not resolve the problem, contact the Canon Customer Care Center. Use this function when printed results are shifted Step 1 See "Aligning the Print Head Automatically" on the machine, then load ...
...] to select the paper source where you have loaded paper. 3 Printing the nozzle check pattern. (1) Press [COPY]. (2) Press [Menu] repeatedly to turn on page 106 Printing the Nozzle Check Pattern Print the nozzle check pattern to determine whether the ink ejects properly from the Print Head nozzles...Step 1 See "Printing the Nozzle Check Pattern" on page 106 Note If [Print Head Deep Cleaning] does not resolve the problem, contact the Canon Customer Care Center. Use this function when printed results are shifted Step 1 See "Aligning the Print Head Automatically" on the machine, then load ...
User's Guide
Page 108
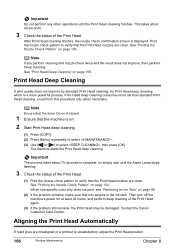
... ] or [ ] to select , then press [OK]. Print Head deep cleaning consumes more powerful process. The machine starts the Print Head deep cleaning. Then turn off the machine's power for at least 24 hours, and perform deep cleaning of the Print Head. (1) Print the nozzle check pattern to complete, so...see "Replacing an Ink Tank" on page 106. Important The process takes about 40 seconds. 3 Check the status of the Print Head. Contact the Canon Customer Care Center. See "Printing the Nozzle Check Pattern" on page 104. See "Print Head Deep Cleaning" on page 98. (2) If the ...
... ] or [ ] to select , then press [OK]. Print Head deep cleaning consumes more powerful process. The machine starts the Print Head deep cleaning. Then turn off the machine's power for at least 24 hours, and perform deep cleaning of the Print Head. (1) Print the nozzle check pattern to complete, so...see "Replacing an Ink Tank" on page 106. Important The process takes about 40 seconds. 3 Check the status of the Print Head. Contact the Canon Customer Care Center. See "Printing the Nozzle Check Pattern" on page 104. See "Print Head Deep Cleaning" on page 98. (2) If the ...

User's Guide
Page 109
...Head Aligning Cannot Be Executed Correctly z When automatic Print Head aligning cannot be executed correctly, the message is closed. 1 Press [ON/OFF] to turn on the LCD. Use a soft cloth to finish printing the pattern. z Never use tissue paper, paper towels, or similar materials for dish washing...). z Ensure that the Inner Cover is displayed on the machine. Caution z Be sure to turn OFF the power and disconnect the power cord before cleaning the machine. Paper tissue powders or fine threads may remain inside the machine and...
...Head Aligning Cannot Be Executed Correctly z When automatic Print Head aligning cannot be executed correctly, the message is closed. 1 Press [ON/OFF] to turn on the LCD. Use a soft cloth to finish printing the pattern. z Never use tissue paper, paper towels, or similar materials for dish washing...). z Ensure that the Inner Cover is displayed on the machine. Caution z Be sure to turn OFF the power and disconnect the power cord before cleaning the machine. Paper tissue powders or fine threads may remain inside the machine and...


