
Operation Manual
Page 7
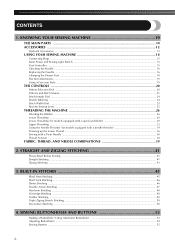
... Threading ...32 Using the Needle Threader (for models equipped with a needle threader 34 Drawing up the Lower Thread ...36 Sewing with a Twin Needle ...36 Thread Tension ...38 FABRIC, THREAD, AND NEEDLE COMBINATIONS 39 2. SEWING BUTTONHOLES AND BUTTONS 52 Making a Buttonhole (1-Step Automatic Buttonhole 52 Adjusting Buttonholes ...54 Sewing Buttons ...55 6 BUILT...
... Threading ...32 Using the Needle Threader (for models equipped with a needle threader 34 Drawing up the Lower Thread ...36 Sewing with a Twin Needle ...36 Thread Tension ...38 FABRIC, THREAD, AND NEEDLE COMBINATIONS 39 2. SEWING BUTTONHOLES AND BUTTONS 52 Making a Buttonhole (1-Step Automatic Buttonhole 52 Adjusting Buttonholes ...54 Sewing Buttons ...55 6 BUILT...
Operation Manual
Page 11
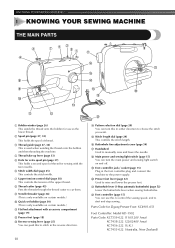
... on certain models.) A Flat bed attachment with the twin needle. 6 Stitch width dial (page 25) This controls the stitch width. 7 Upper tension-control dial (page 38) This controls the tension of the upper thread. 8 Thread cutter (page 43) Pass the threads through the thread cutter to stitch in the reverse direction. 10...
... on certain models.) A Flat bed attachment with the twin needle. 6 Stitch width dial (page 25) This controls the stitch width. 7 Upper tension-control dial (page 38) This controls the tension of the upper thread. 8 Thread cutter (page 43) Pass the threads through the thread cutter to stitch in the reverse direction. 10...
Operation Manual
Page 27
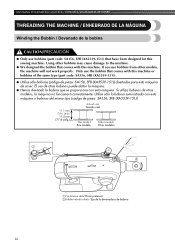
..., SFB (XA5539-151)). 11.5 mm (7/16 inch) 11,5 mm (7/16 pulg.) Actual size Tamaño real This model Este modelo Other models Otros modelos 1 2 1Pre-tension disk/ Disco pretensor 2Bobbin winder shaft / Eje de la devanadora de bobina 26 If you use bobbins (part code: SA156, SFB (XA5539-151)) that have...
..., SFB (XA5539-151)). 11.5 mm (7/16 inch) 11,5 mm (7/16 pulg.) Actual size Tamaño real This model Este modelo Other models Otros modelos 1 2 1Pre-tension disk/ Disco pretensor 2Bobbin winder shaft / Eje de la devanadora de bobina 26 If you use bobbins (part code: SA156, SFB (XA5539-151)) that have...
Operation Manual
Page 73
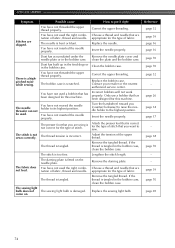
.... Fit the needle properly. The needle is too tight. Choose a thread and needle that is tangled in . Loosen the upper thread tension. You have not used the foot controller properly. Contact your retailer or the nearest authorized service center. The area around the hole in ...in the needle plate is not appropriate for this machine. Remove any knots or tangles. Insert the needle properly. left. The upper-thread tension is bent or blunt. The needle is turned off. page 38 - The upper thread breaks. Replace the presser foot. Contact your ...
.... Fit the needle properly. The needle is too tight. Choose a thread and needle that is tangled in . Loosen the upper thread tension. You have not used the foot controller properly. Contact your retailer or the nearest authorized service center. The area around the hole in ...in the needle plate is not appropriate for this machine. Remove any knots or tangles. Insert the needle properly. left. The upper-thread tension is bent or blunt. The needle is turned off. page 38 - The upper thread breaks. Replace the presser foot. Contact your ...

Operation Manual
Page 74
...Replace the bobbin case. Only use a bobbin that are using. Reset the bobbin thread correctly. page 39 sion is incorrect. Adjust the tension of the upper thread. Incorrect bobbins will not work properly. page 26 Bobbin is bent or blunt. page 39 The needle is set ...upper threading. page 28-33 You have not wound the bobbin thread properly. Sew with stabiliser material under the fabric. - The thread tension is wrinkled. Wind the bobbin properly. You have not threaded the right combination of fabric, thread and needle. The upper The area around...
...Replace the bobbin case. Only use a bobbin that are using. Reset the bobbin thread correctly. page 39 sion is incorrect. Adjust the tension of the upper thread. Incorrect bobbins will not work properly. page 26 Bobbin is bent or blunt. page 39 The needle is set ...upper threading. page 28-33 You have not wound the bobbin thread properly. Sew with stabiliser material under the fabric. - The thread tension is wrinkled. Wind the bobbin properly. You have not threaded the right combination of fabric, thread and needle. The upper The area around...
Operation Manual
Page 75
.... Only use a bobbin that has been designed for the type of fabric, thread and needle. You have not inserted the needle properly. Adjust the tension of fabric. Remove the tangled thread. Lengthen the stitch length. The thread is damaged. Remove the tangled thread. The sewing light bulb does not The... needle that is not correct for this machine. You have not used a bobbin that has been designed for the type of stitch. The thread tension is tangled in the bobbin case, clean the bobbin case. The darning plate is not sewn correctly. Remove the darning plate. The stitch is ...
.... Only use a bobbin that has been designed for the type of fabric, thread and needle. You have not inserted the needle properly. Adjust the tension of fabric. Remove the tangled thread. Lengthen the stitch length. The thread is damaged. Remove the tangled thread. The sewing light bulb does not The... needle that is not correct for this machine. You have not used a bobbin that has been designed for the type of stitch. The thread tension is tangled in the bobbin case, clean the bobbin case. The darning plate is not sewn correctly. Remove the darning plate. The stitch is ...
Operation Manual
Page 80
... 37 Stitch length dial 24 Stitch width dial 25 Stitches built-in 45 names 21 Straight stitching 41 Stretch stitching 24 T Thread cutter 43 Thread tension 38 Threading , lower 28 30 needle threader 34 twin needle 37 upper 32 Triple zigzag stretch stitching 50 Troubleshooting 72 Twin needle , attaching 17 37...
... 37 Stitch length dial 24 Stitch width dial 25 Stitches built-in 45 names 21 Straight stitching 41 Stretch stitching 24 T Thread cutter 43 Thread tension 38 Threading , lower 28 30 needle threader 34 twin needle 37 upper 32 Triple zigzag stretch stitching 50 Troubleshooting 72 Twin needle , attaching 17 37...

Accessory Catalog
Page 6
... facing up under the presser foot. 3. Position the edge of the foot. 5. Overlock Foot For vertical bobbin machines only. Increase upper thread tension. 2. Continue to sew to create a flat narrow hem on sheer and very lightweight fabrics. 1. Lower the needle into the fabric approximately 1/8"... the presser foot. 4. Position the edge of the foot. 7. Sew along the guide. Brother General Sewing Accessories 09 Narrow Hemmer Foot Non Stick Foot Overlock Foot Picot Foot Brother General Sewing Accessories 10 SA126 ABCDEFJKMN SA127 GHILOP Skirt Innov-is Project Book (See page 50 for...
... facing up under the presser foot. 3. Position the edge of the foot. 5. Overlock Foot For vertical bobbin machines only. Increase upper thread tension. 2. Continue to sew to create a flat narrow hem on sheer and very lightweight fabrics. 1. Lower the needle into the fabric approximately 1/8"... the presser foot. 4. Position the edge of the foot. 7. Sew along the guide. Brother General Sewing Accessories 09 Narrow Hemmer Foot Non Stick Foot Overlock Foot Picot Foot Brother General Sewing Accessories 10 SA126 ABCDEFJKMN SA127 GHILOP Skirt Innov-is Project Book (See page 50 for...

Accessory Catalog
Page 12
... with a single zigzag stitch. Its wide groove also helps you are using zigzag stitch with transparent thread. Also used for details.) Brother Embellishment Feet Open Toe Foot 22 Pearls and Sequins Foot Metal type SA146 IP Open Toe Foot Provides better visibility in size. For ...foot. Place the fabric to be gathered under the presser foot. 4. Select a straight stitch, left needle position. 2. Increase the upper thread tension. 3. Slide the fabric not to be gathered into the slit in the presser foot with the guideline and sew. For appliqué: 1. SA150...
... with a single zigzag stitch. Its wide groove also helps you are using zigzag stitch with transparent thread. Also used for details.) Brother Embellishment Feet Open Toe Foot 22 Pearls and Sequins Foot Metal type SA146 IP Open Toe Foot Provides better visibility in size. For ...foot. Place the fabric to be gathered under the presser foot. 4. Select a straight stitch, left needle position. 2. Increase the upper thread tension. 3. Slide the fabric not to be gathered into the slit in the presser foot with the guideline and sew. For appliqué: 1. SA150...

Accessory Catalog
Page 34
...are strong, soft and smooth, and perfectly balanced to hoop your machine. Available in a 5-pack sleeve) at selected dealers. 30-Pack: CYTPK30 Brother Countr y Yarn Embroider y Threads (30 Color Thread Pack) Attention all embroiderers, Quilters and Heirloom stitchers! Handles a variety of thread per spool...useful and decorative wooden thread rack that no stabilizer remains after the embroidery is completed. Dependable thread delivery through machine tensions. A and B (Black and White): The 1,100-meter (approx.1,200-yds) filament thread is a wonderful set as well as decorative...
...are strong, soft and smooth, and perfectly balanced to hoop your machine. Available in a 5-pack sleeve) at selected dealers. 30-Pack: CYTPK30 Brother Countr y Yarn Embroider y Threads (30 Color Thread Pack) Attention all embroiderers, Quilters and Heirloom stitchers! Handles a variety of thread per spool...useful and decorative wooden thread rack that no stabilizer remains after the embroidery is completed. Dependable thread delivery through machine tensions. A and B (Black and White): The 1,100-meter (approx.1,200-yds) filament thread is a wonderful set as well as decorative...

Accessory Catalog
Page 38
...folded edge. 6. Set the machine setting: 3/4 thread overlock, stitch length to 1.5 mm from 5 mm, and adjust the tension. 3. SA210 Party Bag SA212 Piping Foot Taping Foot Brother Serger/ Overlock Feet 74 Piping Foot Sews piping tapes with two pieces of pearls/beads onto the tunnel and then sew... and beads. 1. Pearls and Sequins Foot Attaches threaded pearls or beads on your machine. 2. Note: When the fabrics gather, tighten the thread tension. Retract the knife on the edge of the piping tape into the tape guide and then under the piping foot. 4. Set the machine setting:...
...folded edge. 6. Set the machine setting: 3/4 thread overlock, stitch length to 1.5 mm from 5 mm, and adjust the tension. 3. SA210 Party Bag SA212 Piping Foot Taping Foot Brother Serger/ Overlock Feet 74 Piping Foot Sews piping tapes with two pieces of pearls/beads onto the tunnel and then sew... and beads. 1. Pearls and Sequins Foot Attaches threaded pearls or beads on your machine. 2. Note: When the fabrics gather, tighten the thread tension. Retract the knife on the edge of the piping tape into the tape guide and then under the piping foot. 4. Set the machine setting:...


