
Users Manual - English
Page 2
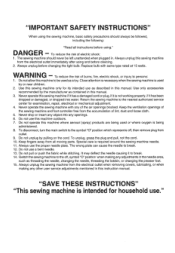
... removing covers, lubricating, or when making any other user service adjustments mentioned in this machine where aerosol (spray) products are being used by pulling on the cord. Replace bulb with any openings. 6. Use only accessories recommended by the manufacturer as described in this machineto be used as threading the needle, changing the needle, threading the bobbin. Return the sewing machine to the off , hen remove plug from all instructions before using and before changing the light bulb. Switch the sewing machine...
... removing covers, lubricating, or when making any other user service adjustments mentioned in this machine where aerosol (spray) products are being used by pulling on the cord. Replace bulb with any openings. 6. Use only accessories recommended by the manufacturer as described in this machineto be used as threading the needle, changing the needle, threading the bobbin. Return the sewing machine to the off , hen remove plug from all instructions before using and before changing the light bulb. Switch the sewing machine...
Users Manual - English
Page 6
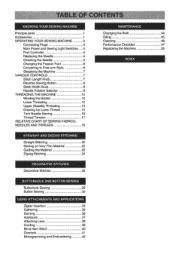
... parts 1 Changing the Bulb 44 Accessories 1 Oiling 45 OPERATING YOUR SEWING MACHINE 3 Cleaning 46 Connecting Plugs 3 Performance Checklist 47 Main Power and Sewing Light Switches 4 Repacking the Machine 52 Foot Controller 4 Replacing the Needle 5 Checking the Needle 5 INDEX Changing the Presser Foot 6 Converting to Free-arm Style 6 Steadying the Machine 7 VARIOUS CONTROLS 7 Stitch Length Knob 7 Reverse Sewing Button 8 Stitch Width Knob 8 Needle Position Selector 9 THREADING THE MACHINE 10 Winding the Bobbin 10 Lower Threading 12 Upper (Needle...
... parts 1 Changing the Bulb 44 Accessories 1 Oiling 45 OPERATING YOUR SEWING MACHINE 3 Cleaning 46 Connecting Plugs 3 Performance Checklist 47 Main Power and Sewing Light Switches 4 Repacking the Machine 52 Foot Controller 4 Replacing the Needle 5 Checking the Needle 5 INDEX Changing the Presser Foot 6 Converting to Free-arm Style 6 Steadying the Machine 7 VARIOUS CONTROLS 7 Stitch Length Knob 7 Reverse Sewing Button 8 Stitch Width Knob 8 Needle Position Selector 9 THREADING THE MACHINE 10 Winding the Bobbin 10 Lower Threading 12 Upper (Needle...
Users Manual - English
Page 11
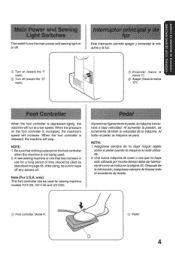
... para. Alpresionarligeramenteelpedal, la maquina funcionara a baja velocidad. NOTA: 1. Una nueva maquina de coser o una que no esta utilizada. 2. KNOWING YOUR SEWING MACHINE CONOZCA SU MAQUINA DE COSER Main Power and Sewing Light Switches Interruptor principal y cli luz This switch turns the main power and sewing light on the foot controller is increased, the machine's speed will increase. Despues de la lubricacion, asegurese siempre de limpiar todo el excedente de aceite. 4.\ C) Foot controller: Model N 0 Pedal...
... para. Alpresionarligeramenteelpedal, la maquina funcionara a baja velocidad. NOTA: 1. Una nueva maquina de coser o una que no esta utilizada. 2. KNOWING YOUR SEWING MACHINE CONOZCA SU MAQUINA DE COSER Main Power and Sewing Light Switches Interruptor principal y cli luz This switch turns the main power and sewing light on the foot controller is increased, the machine's speed will increase. Despues de la lubricacion, asegurese siempre de limpiar todo el excedente de aceite. 4.\ C) Foot controller: Model N 0 Pedal...
Users Manual - English
Page 12
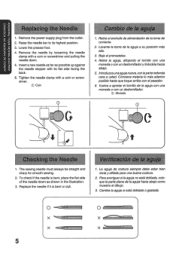
... aguja de costura siempre debe estar bien recta y afilada para una buena costura. 2. Remove the needle by loosening the needle clamp with a coin or screwdriver. Baje elprensatelas. 4. To check if the needle is bent or dull. Lower the presser foot. 4. Replace the needle if it is bent, place the flat side of the needle down . 5. Retire el enchufe de alimentaciOn de la toma...
... aguja de costura siempre debe estar bien recta y afilada para una buena costura. 2. Remove the needle by loosening the needle clamp with a coin or screwdriver. Baje elprensatelas. 4. To check if the needle is bent or dull. Lower the presser foot. 4. Replace the needle if it is bent, place the flat side of the needle down . 5. Retire el enchufe de alimentaciOn de la toma...
Users Manual - English
Page 15
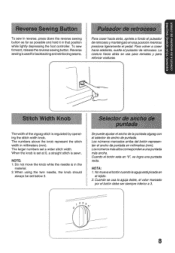
The larger numbers set below 3. When using the twin needle, the knob should always be set a wider stitch width. NOTA: 1. To sew forward, release the reverse sewing button. Cuando el botOn esta en "0", se logra una puntada recta. Nomueva elbotOncuandola aguja estepicada en el tejido. 2. KNOWING YOUR SEWING MACHINE CONOZCA SU MAOUINA DE COSER To sew in reverse, press down the reverse sewing button as far as possible and hold it...
The larger numbers set below 3. When using the twin needle, the knob should always be set a wider stitch width. NOTA: 1. To sew forward, release the reverse sewing button. Cuando el botOn esta en "0", se logra una puntada recta. Nomueva elbotOncuandola aguja estepicada en el tejido. 2. KNOWING YOUR SEWING MACHINE CONOZCA SU MAOUINA DE COSER To sew in reverse, press down the reverse sewing button as far as possible and hold it...
Users Manual - English
Page 16
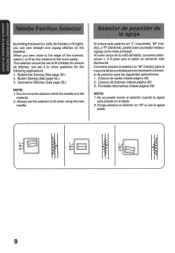
Button Sewing (See page 32.) 3. L M R L. Decorative Stitches (See page 26.) NOTE: 1. Always set it to other positions for almost all stitches, but set the selector to the edge of the material, select L or R so the material is...derecha), podra coserpuntadas rectas y zigzag como Linea principal. Costura de botones (vease pagina 32) 3. 1:13S00 30 FINIrlOVIN !7S VOZON00 3NIHOM ONIAA3S lino), ONIMONN By shifting thislever toL (left),M (middle) or R (right), you sew close to M when using the twin needle. When you can sew straight and zigzag stitches on the baseline. This selector ...
Button Sewing (See page 32.) 3. L M R L. Decorative Stitches (See page 26.) NOTE: 1. Always set it to other positions for almost all stitches, but set the selector to the edge of the material, select L or R so the material is...derecha), podra coserpuntadas rectas y zigzag como Linea principal. Costura de botones (vease pagina 32) 3. 1:13S00 30 FINIrlOVIN !7S VOZON00 3NIHOM ONIAA3S lino), ONIMONN By shifting thislever toL (left),M (middle) or R (right), you sew close to M when using the twin needle. When you can sew straight and zigzag stitches on the baseline. This selector ...
Users Manual - English
Page 17
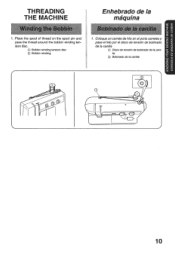
KNOWING YOUR SEWING MACHINE CONOZCA SU MAQUINA DE COSER THREADING THE MACHINE Winding the Bobbin 1. Coloque un carrete de hilo en elporta carretes y pase el hilo pore! Place the spool of thread on the spool pin and pass the thread around the bobbin winding tersion disc. ® Bobbin winding tension disc ® Bobbin winding Enhebrado de la maquina Bobinado de la canilla 1. disco de tension de bobinado de la canilla ® Disco de tension de bobinado de la canilla 0 Bobinado de la canilla 2 0 1 0 10
KNOWING YOUR SEWING MACHINE CONOZCA SU MAQUINA DE COSER THREADING THE MACHINE Winding the Bobbin 1. Coloque un carrete de hilo en elporta carretes y pase el hilo pore! Place the spool of thread on the spool pin and pass the thread around the bobbin winding tersion disc. ® Bobbin winding tension disc ® Bobbin winding Enhebrado de la maquina Bobinado de la canilla 1. disco de tension de bobinado de la canilla ® Disco de tension de bobinado de la canilla 0 Bobinado de la canilla 2 0 1 0 10
Users Manual - English
Page 21
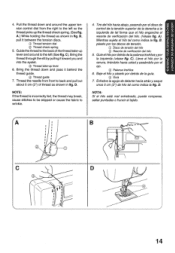
... lever and around the upper tension control dial from front to the left so the thread picks up lever 6. D. C). A). Pull the thread down and pass it between the tension discs. Guieelbibpordetras delapalanca tirahilosypor la izquierda (vOase fig. Bale el hilo y paselo por detras de la gula. • Gufa 7. C) Thread guide 7. Guide the thread tothe back of thread as shown in fig. Mientras sujeta el hilo tal como...
... lever and around the upper tension control dial from front to the left so the thread picks up lever 6. D. C). A). Pull the thread down and pass it between the tension discs. Guieelbibpordetras delapalanca tirahilosypor la izquierda (vOase fig. Bale el hilo y paselo por detras de la gula. • Gufa 7. C) Thread guide 7. Guide the thread tothe back of thread as shown in fig. Mientras sujeta el hilo tal como...
Users Manual - English
Page 25
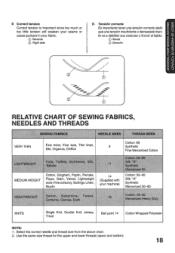
...Satin, Velvet, Lightweight wool,Finecorduroy, Suitings, Linen, Muslin 11 14 (Supplied with your fabric. 0 Reverse 0 Right side D. KNOWING YOUR SEWING MACHINE CONOZCA SU MAQUINA DE COSER D Correct tension Correct tension is important since too much or too little tension will weaken your seams or cause puckers in your machine...Single Knit, Double Knit, Jersey, Tricot Ball point 14 Cotton Wrapped Polyester NOTE: 1. Use the same size thread for the upper and lower threads (spool and bobbin). 18 Tension correcta Es importante tener una tension correcta dado que una tension insuficiente o...
...Satin, Velvet, Lightweight wool,Finecorduroy, Suitings, Linen, Muslin 11 14 (Supplied with your fabric. 0 Reverse 0 Right side D. KNOWING YOUR SEWING MACHINE CONOZCA SU MAQUINA DE COSER D Correct tension Correct tension is important since too much or too little tension will weaken your seams or cause puckers in your machine...Single Knit, Double Knit, Jersey, Tricot Ball point 14 Cotton Wrapped Polyester NOTE: 1. Use the same size thread for the upper and lower threads (spool and bobbin). 18 Tension correcta Es importante tener una tension correcta dado que una tension insuficiente o...
Users Manual - English
Page 27
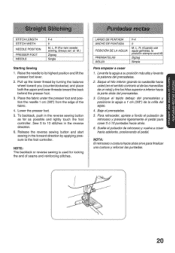
... start sewing in the reverse sewing button as far as possible and lightly touch the foot controller. R. (Cuando use aguja gemelas, la posici6n siempre sera M) Zigzag Simple Starting Sewing Para empezar a coser 1. Place the fabric under the presser foot and posi- 3. Lower the presser foot. 4. Para retroceder, apriete a fondo el pulsador de retroceso y presione ligeramente el pedal para coser 5 6 10 puntadas hacia atlas. 6. posicione la aguja a 1 cm (3/8") de la orilla del tejido. 1 STITCH LENGTH STITCH WIDTH NEEDLE POSITION PRESSER FOOT NEEDLE F-4 0 M, L, R (For twin needle sewing...
... start sewing in the reverse sewing button as far as possible and lightly touch the foot controller. R. (Cuando use aguja gemelas, la posici6n siempre sera M) Zigzag Simple Starting Sewing Para empezar a coser 1. Place the fabric under the presser foot and posi- 3. Lower the presser foot. 4. Para retroceder, apriete a fondo el pulsador de retroceso y presione ligeramente el pedal para coser 5 6 10 puntadas hacia atlas. 6. posicione la aguja a 1 cm (3/8") de la orilla del tejido. 1 STITCH LENGTH STITCH WIDTH NEEDLE POSITION PRESSER FOOT NEEDLE F-4 0 M, L, R (For twin needle sewing...
Users Manual - English
Page 28
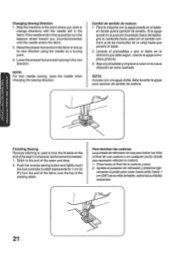
... stitch backwards for 1 cm (3/ 8") from the end of the fabric over the top of the seam or wherever reinforcement is used to lock the threads at the point where you wish to change directions with the needle still in the up position turn the fabric to line up its new direction using the needle as a turning point. 3. Apriete elpulsador de retrcceso ypresione lige- Raise the presser foot...
... stitch backwards for 1 cm (3/ 8") from the end of the fabric over the top of the seam or wherever reinforcement is used to lock the threads at the point where you wish to change directions with the needle still in the up position turn the fabric to line up its new direction using the needle as a turning point. 3. Apriete elpulsador de retrcceso ypresione lige- Raise the presser foot...
Users Manual - English
Page 30
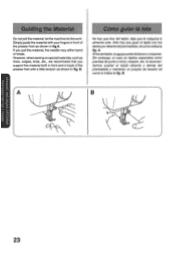
let the machine do the work. If you support the material both in front and in back of the presser foot as shown in fig.A. A. B. B OVZOIZ A SV_LO3H StIOV_LNI7c1 DNIH3IIIS OVZOIZ CINIV 1H9IVHIS 23 F II Do not pull the material; B. Simply guide the material with your fingers in front of the presser foot with a little tension as shown in fig. to...
let the machine do the work. If you support the material both in front and in back of the presser foot as shown in fig.A. A. B. B OVZOIZ A SV_LO3H StIOV_LNI7c1 DNIH3IIIS OVZOIZ CINIV 1H9IVHIS 23 F II Do not pull the material; B. Simply guide the material with your fingers in front of the presser foot with a little tension as shown in fig. to...

Users Manual - English
Page 32
...SATIN STITCH When the stitch length is set above 1, it produces a Satin Stitch (a close zigzag stitch). NOTE: It is set in the F range and the stitch width is recommended that a test sample be used for making buttonholes and decorative stitches or edging. Esa puntada de realce puede servirpare coser ojales o puntadas decorativas y para... de puntada es superior a 1, la maquina va a coser una puntada de realce (una puntada zigzagmuy cerrada). The Satin Stitch can be made on a fabric scrap before sewing on your project. NOTA: Se recomienda hacer una prueba de costura en un pedazo de ...
...SATIN STITCH When the stitch length is set above 1, it produces a Satin Stitch (a close zigzag stitch). NOTE: It is set in the F range and the stitch width is recommended that a test sample be used for making buttonholes and decorative stitches or edging. Esa puntada de realce puede servirpare coser ojales o puntadas decorativas y para... de puntada es superior a 1, la maquina va a coser una puntada de realce (una puntada zigzagmuy cerrada). The Satin Stitch can be made on a fabric scrap before sewing on your project. NOTA: Se recomienda hacer una prueba de costura en un pedazo de ...
Users Manual - English
Page 33
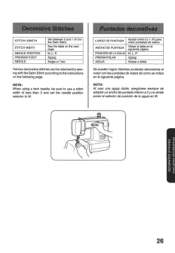
.... NOTA: Al usar una aguja doble, asegorese siempre de adoptar un ancho de puntada inferior a 3 y no olvide poner e/ selector de posici6n de la aguja en M. •I DECORATIVE STITCHES 26 STITCH LENGTH STITCH WIDTH NEEDLE POSITION PRESSER FOOT NEEDLE Set between 0 and 1 (F) for the Satin Stitch. Li LARGO DE PUNTADA Ajustar entre 0 y 1(F) para cosecpuntadas de realce. NOTE: When using a twin needle, be obtained by sewing with the Satin Stitch according to M. ANCHO...
.... NOTA: Al usar una aguja doble, asegorese siempre de adoptar un ancho de puntada inferior a 3 y no olvide poner e/ selector de posici6n de la aguja en M. •I DECORATIVE STITCHES 26 STITCH LENGTH STITCH WIDTH NEEDLE POSITION PRESSER FOOT NEEDLE Set between 0 and 1 (F) for the Satin Stitch. Li LARGO DE PUNTADA Ajustar entre 0 y 1(F) para cosecpuntadas de realce. NOTE: When using a twin needle, be obtained by sewing with the Satin Stitch according to M. ANCHO...
Users Manual - English
Page 40
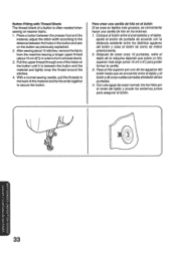
... stitches, remove the fabric anteriormente. Button Fitting with Thread Shank Para crear una canilla de Me en el bot6n The thread shank of a button is often needed when Si se cose en tejidos mas gruesos, es convenience sewing on superior mas largo (unos 15 cm o 6")para poder the button until it is between the button and the former la canilla. Place a button between the presser foot and the 1. After sewing...
... stitches, remove the fabric anteriormente. Button Fitting with Thread Shank Para crear una canilla de Me en el bot6n The thread shank of a button is often needed when Si se cose en tejidos mas gruesos, es convenience sewing on superior mas largo (unos 15 cm o 6")para poder the button until it is between the button and the former la canilla. Place a button between the presser foot and the 1. After sewing...
Users Manual - English
Page 51
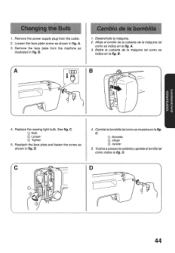
...: Changing the Bulb 1. Loosen the face plate screw as shown in fig. Remove the face plate from the outlet. 2. B. Carnbio de la bombilla 1. Retire la cubierta de la maquina tal como se indica en la fig. A U 4. C) Bulb C) Loosen C) Tighten 5. Vuelva a colocarla cubierta yapriete eltornillo tal como indica la fig. C. C. Remove the power supply plug from the machine as illustrated in fig. B. Replace the sewing light bulb. Reattach...
...: Changing the Bulb 1. Loosen the face plate screw as shown in fig. Remove the face plate from the outlet. 2. B. Carnbio de la bombilla 1. Retire la cubierta de la maquina tal como se indica en la fig. A U 4. C) Bulb C) Loosen C) Tighten 5. Vuelva a colocarla cubierta yapriete eltornillo tal como indica la fig. C. C. Remove the power supply plug from the machine as illustrated in fig. B. Replace the sewing light bulb. Reattach...
Users Manual - English
Page 52
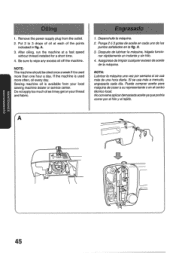
... each of oil at a fast speed without thread installed for a short time. 4. Be sure to 3 drops of the points indicated in fig. Sewing machine oil is used more often, oil every day. A. 3. Asegurese de limpiar cualquier exceso de aceite de la maquina. Noconvieneaplicardemasiada aceiteyaquepodria correr por el hilo y el tejido. NOTE: Themachine shouldbe oiled once a week if it may get onyourthread and fabric. 1. Donot apply...
... each of oil at a fast speed without thread installed for a short time. 4. Be sure to 3 drops of the points indicated in fig. Sewing machine oil is used more often, oil every day. A. 3. Asegurese de limpiar cualquier exceso de aceite de la maquina. Noconvieneaplicardemasiada aceiteyaquepodria correr por el hilo y el tejido. NOTE: Themachine shouldbe oiled once a week if it may get onyourthread and fabric. 1. Donot apply...
Users Manual - English
Page 53
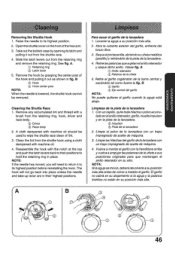
... the hook. Remove any accumulated lint and thread with a brush from the shuttle hook using a cloth dampened with machine oil. 4. como ilustra la fig. B. ladoenelanilloretenedor,garfio, muelleimpulsor y en la pista de la lanzadera. ©0 Impulsor Piste de la lanzadera 2. Limpielashilachas delgarfio dela lanzadera con un trapo impregnado de aceite de maquina. 4. Clean the lint from the retaining ring, hook, driver and race body . B 1 O 2 O Para...
... the hook. Remove any accumulated lint and thread with a brush from the shuttle hook using a cloth dampened with machine oil. 4. como ilustra la fig. B. ladoenelanilloretenedor,garfio, muelleimpulsor y en la pista de la lanzadera. ©0 Impulsor Piste de la lanzadera 2. Limpielashilachas delgarfio dela lanzadera con un trapo impregnado de aceite de maquina. 4. Clean the lint from the retaining ring, hook, driver and race body . B 1 O 2 O Para...
Users Manual - English
Page 57
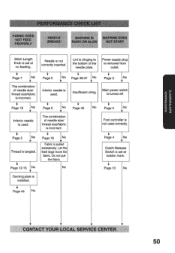
... to the bottom of needle size/ thread size/fabric is incorrect. 4 Page 45 Page 4 No • Foot controller is not used correctly. Page 46-47 No Power supply plug is turned off. IICUMffLMA ViUMMliliNUT7 PERFORMANCE CHECK LIST FABRIC DOES NOT FEED PROPERLY NEEDLE BREAKS MACHINE IS MACHINE DOES NOISY OR SLOW NOT START Stitch Length Knob is set at no feeding. Page 18 No V Inferior needle is used . is removed from outlet. Page 5 No...
... to the bottom of needle size/ thread size/fabric is incorrect. 4 Page 45 Page 4 No • Foot controller is not used correctly. Page 46-47 No Power supply plug is turned off. IICUMffLMA ViUMMliliNUT7 PERFORMANCE CHECK LIST FABRIC DOES NOT FEED PROPERLY NEEDLE BREAKS MACHINE IS MACHINE DOES NOISY OR SLOW NOT START Stitch Length Knob is set at no feeding. Page 18 No V Inferior needle is used . is removed from outlet. Page 5 No...
Users Manual - English
Page 61
... Checklist 47 Principal Parts 1, 2 R Relative Chart of Sewing Fabrics, Needles and Threads 18 Repacking 52 Reverse Sewing Button 8 S Satin Stitch 25 Sewing Light Switch 4 Bulb Replacement 44 Shuttle Hook Removal 46 Shuttle Race Cleaning 46 Simple Zigzag Stitch 24 Stitch Length Knob 7 Stitch Width Knob 8 Straight Stitch 20 T Thin Fabric Sewing Thread Tension Troubleshooting Twin Needle Sewing 22 17 48, 50 16 U Upper Tension Control Dial 17 Upper Threading 13 w Winding the Bobbin 10 14 Modalidad brazo libre Monogramas 0 Ojales Pedal Puntada de rebatido...
... Checklist 47 Principal Parts 1, 2 R Relative Chart of Sewing Fabrics, Needles and Threads 18 Repacking 52 Reverse Sewing Button 8 S Satin Stitch 25 Sewing Light Switch 4 Bulb Replacement 44 Shuttle Hook Removal 46 Shuttle Race Cleaning 46 Simple Zigzag Stitch 24 Stitch Length Knob 7 Stitch Width Knob 8 Straight Stitch 20 T Thin Fabric Sewing Thread Tension Troubleshooting Twin Needle Sewing 22 17 48, 50 16 U Upper Tension Control Dial 17 Upper Threading 13 w Winding the Bobbin 10 14 Modalidad brazo libre Monogramas 0 Ojales Pedal Puntada de rebatido...


