
Users Manual - English
Page 2
...: 1. Do not allow this machineto be used by pulling on the cord. Close attention is necessary when the sewing machine is used as contained in this sewing machine if it has a damaged cord or plug, if it is intended for examination, repair, electrical or mechanical adjustment..., not the cord. 10. Keep fingers away from the accumulation of electric shock: 1. Always unplug the sewing machine from outlet. 9. "SAVE THESE INSTRUCTIONS" "This sewing machine is not working properly, if it to the nearest authorized service center for household use." WARNING To reduce the...
...: 1. Do not allow this machineto be used by pulling on the cord. Close attention is necessary when the sewing machine is used as contained in this sewing machine if it has a damaged cord or plug, if it is intended for examination, repair, electrical or mechanical adjustment..., not the cord. 10. Keep fingers away from the accumulation of electric shock: 1. Always unplug the sewing machine from outlet. 9. "SAVE THESE INSTRUCTIONS" "This sewing machine is not working properly, if it to the nearest authorized service center for household use." WARNING To reduce the...
Users Manual - English
Page 4
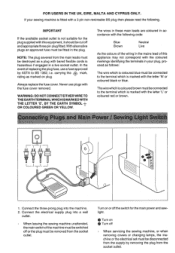
... be switched off the switch for the plug supplied with this appliance may not correspond with the coloured markings identifying the terminals in your sewing machine is fitted with the letter 'N' or coloured black or blue. Turn on or off or the plug must be connected to BS 1362, i.e. If... UK, EIRE, MALTA AND CYPRUS ONLY. With alternative plugs an approved fuse must be cut off When servicing the sewing machine, or when removing covers or changing lamps, the machine or the electrical set must be removed from the supply by ASTA to the terminal which is marked with bared flexible...
... be switched off the switch for the plug supplied with this appliance may not correspond with the coloured markings identifying the terminals in your sewing machine is fitted with the letter 'N' or coloured black or blue. Turn on or off or the plug must be connected to BS 1362, i.e. If... UK, EIRE, MALTA AND CYPRUS ONLY. With alternative plugs an approved fuse must be cut off When servicing the sewing machine, or when removing covers or changing lamps, the machine or the electrical set must be removed from the supply by ASTA to the terminal which is marked with bared flexible...
Users Manual - English
Page 6
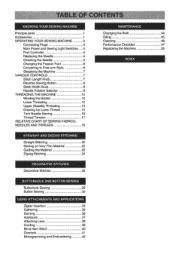
1-;;•),e ti .41 Lachki, . KNOWING YOUR SEWING MACHINE MAINTENANCE Principal parts 1 Changing the Bulb 44 Accessories 1 Oiling 45 OPERATING YOUR SEWING MACHINE 3 Cleaning 46 Connecting Plugs 3 Performance Checklist 47 Main Power and Sewing Light Switches 4 Repacking the Machine 52 Foot Controller 4 Replacing the Needle 5 Checking the Needle 5 INDEX Changing the Presser Foot 6 Converting to Free-arm Style...
1-;;•),e ti .41 Lachki, . KNOWING YOUR SEWING MACHINE MAINTENANCE Principal parts 1 Changing the Bulb 44 Accessories 1 Oiling 45 OPERATING YOUR SEWING MACHINE 3 Cleaning 46 Connecting Plugs 3 Performance Checklist 47 Main Power and Sewing Light Switches 4 Repacking the Machine 52 Foot Controller 4 Replacing the Needle 5 Checking the Needle 5 INDEX Changing the Presser Foot 6 Converting to Free-arm Style...
Users Manual - English
Page 11
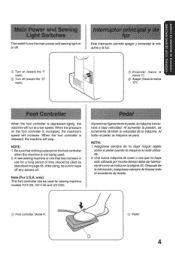
... de no dejar ningan objeto sobre elpedal cuando la maquina no haya sido utilizada pormucho tiempo debe serlubricada talcomoseindica enla pagina 45. Note (For U.S.A. A new sewing machine or one that nothing is placed on (toward the "I" mark) 0 Turn off (toward the 'O" 0 mark) Encender (hacia Ia marca "I") C) Apagar (hacia Ia marca "0") When the...
... de no dejar ningan objeto sobre elpedal cuando la maquina no haya sido utilizada pormucho tiempo debe serlubricada talcomoseindica enla pagina 45. Note (For U.S.A. A new sewing machine or one that nothing is placed on (toward the "I" mark) 0 Turn off (toward the 'O" 0 mark) Encender (hacia Ia marca "I") C) Apagar (hacia Ia marca "0") When the...
Users Manual - English
Page 15
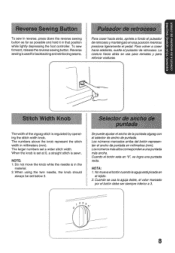
... esta en "0", se logra una puntada recta. The numbers above the knob represent the stitch width in the material. 2. KNOWING YOUR SEWING MACHINE CONOZCA SU MAOUINA DE COSER To sew in reverse, press down the reverse sewing button as far as possible and hold it in that position while lightly depressing the foot controller.
... esta en "0", se logra una puntada recta. The numbers above the knob represent the stitch width in the material. 2. KNOWING YOUR SEWING MACHINE CONOZCA SU MAOUINA DE COSER To sew in reverse, press down the reverse sewing button as far as possible and hold it in that position while lightly depressing the foot controller.
Users Manual - English
Page 17
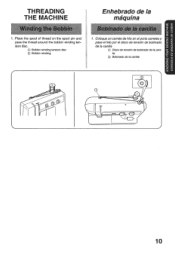
KNOWING YOUR SEWING MACHINE CONOZCA SU MAQUINA DE COSER THREADING THE MACHINE Winding the Bobbin 1. disco de tension de bobinado de la canilla ® Disco de tension de bobinado de la canilla 0 Bobinado de la canilla 2 0 1 0 10 Place the spool of thread on the spool pin and pass the thread around the bobbin winding tersion disc. ® Bobbin winding tension disc ® Bobbin winding Enhebrado de la maquina Bobinado de la canilla 1. Coloque un carrete de hilo en elporta carretes y pase el hilo pore!
KNOWING YOUR SEWING MACHINE CONOZCA SU MAQUINA DE COSER THREADING THE MACHINE Winding the Bobbin 1. disco de tension de bobinado de la canilla ® Disco de tension de bobinado de la canilla 0 Bobinado de la canilla 2 0 1 0 10 Place the spool of thread on the spool pin and pass the thread around the bobbin winding tersion disc. ® Bobbin winding tension disc ® Bobbin winding Enhebrado de la maquina Bobinado de la canilla 1. Coloque un carrete de hilo en elporta carretes y pase el hilo pore!
Users Manual - English
Page 21
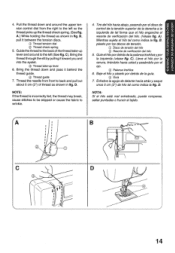
... eyelet. () Thread take -up lever and around the upper tension control dial from front to the left so the thread picks up lever 6. KNOWING YOUR SEWING MACHINE CONOZCA SU MAQUINA DE COSER OO 4.
... eyelet. () Thread take -up lever and around the upper tension control dial from front to the left so the thread picks up lever 6. KNOWING YOUR SEWING MACHINE CONOZCA SU MAQUINA DE COSER OO 4.
Users Manual - English
Page 25
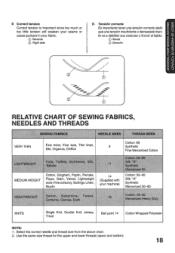
...Satin, Velvet, Lightweight wool,Finecorduroy, Suitings, Linen, Muslin 11 14 (Supplied with your fabric. 0 Reverse 0 Right side D. KNOWING YOUR SEWING MACHINE CONOZCA SU MAQUINA DE COSER D Correct tension Correct tension is important since too much or too little tension will weaken your seams or cause ...puckers in your machine) Cotton: 60-80 Silk: "A" Synthetic Mercerized 50 Cotton: 50-60 Silk: "A" Synthetic Merceri7eri 50-60 HEAVYWEIGHT Denim, Gabardine, Tweed...
...Satin, Velvet, Lightweight wool,Finecorduroy, Suitings, Linen, Muslin 11 14 (Supplied with your fabric. 0 Reverse 0 Right side D. KNOWING YOUR SEWING MACHINE CONOZCA SU MAQUINA DE COSER D Correct tension Correct tension is important since too much or too little tension will weaken your seams or cause ...puckers in your machine) Cotton: 60-80 Silk: "A" Synthetic Mercerized 50 Cotton: 50-60 Silk: "A" Synthetic Merceri7eri 50-60 HEAVYWEIGHT Denim, Gabardine, Tweed...
Users Manual - English
Page 28
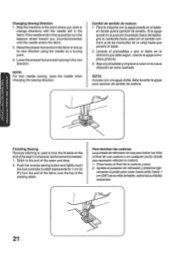
... el sentido contraria alde las manecillas de un reloj) hasta qua penetre el tejido. 2. Apriete elpulsador de retrcceso ypresione lige- Stop the machine at the end of tejido en la direcci0n que debe seguir, usandola aguja como p/aca giratoria. 3. Pare la maquina con la aguja picada... 1 cm(3/8") dela orilla deltejido, sobrelaspuntadas existences. 21 •'• .1 Cosa hasta el final de la costura y pare. 2. Push the reverse sewing bAton and lightly touch the foot controller to the end of the existing stitch. Stitch to stitch backwards for 1 cm (3/ 8") from the end of...
... el sentido contraria alde las manecillas de un reloj) hasta qua penetre el tejido. 2. Apriete elpulsador de retrcceso ypresione lige- Stop the machine at the end of tejido en la direcci0n que debe seguir, usandola aguja como p/aca giratoria. 3. Pare la maquina con la aguja picada... 1 cm(3/8") dela orilla deltejido, sobrelaspuntadas existences. 21 •'• .1 Cosa hasta el final de la costura y pare. 2. Push the reverse sewing bAton and lightly touch the foot controller to the end of the existing stitch. Stitch to stitch backwards for 1 cm (3/ 8") from the end of...
Users Manual - English
Page 30
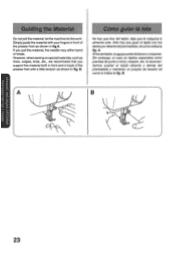
... OVZOIZ CINIV 1H9IVHIS 23 to cowmandamos sujetar e/ tejido delante y detras del prensatelas y mantener un poquito de tension tal corno lo indica la fig. However, when sewing on special materials, such as tricot, crepes, knits, etc., we recommend that you pull the material, the needle may either bend or break. If you... with your fingers in front of the presser foot with a little tension as shown in fig. deje que la maquina lo alimente sola. let the machine do the work. Sin embargo, si cose en tejidos especiales como prendas de punto o tricot, crespen, etc.
... OVZOIZ CINIV 1H9IVHIS 23 to cowmandamos sujetar e/ tejido delante y detras del prensatelas y mantener un poquito de tension tal corno lo indica la fig. However, when sewing on special materials, such as tricot, crepes, knits, etc., we recommend that you pull the material, the needle may either bend or break. If you... with your fingers in front of the presser foot with a little tension as shown in fig. deje que la maquina lo alimente sola. let the machine do the work. Sin embargo, si cose en tejidos especiales como prendas de punto o tricot, crespen, etc.
Users Manual - English
Page 40
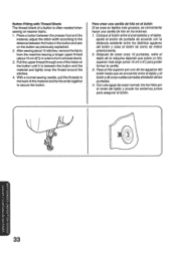
... entre elprensatelas y el tejido, material, adjust the stitch width according to form a thread shank. With a normal sewing needle, pull the threads to secure the button. 4. from the machine leaving a longer upper thread 2. tejido de la maquina dejando que sobre un hilo 3. Place a button between the...en el bot6n The thread shank of a button is between the button and the former la canilla. After sewing about 15 cm (6")) in the button and sew distancia existente entre los distintos agujeros on heavier fabric. material and tightly wrap the thread around the 3. ...
... entre elprensatelas y el tejido, material, adjust the stitch width according to form a thread shank. With a normal sewing needle, pull the threads to secure the button. 4. from the machine leaving a longer upper thread 2. tejido de la maquina dejando que sobre un hilo 3. Place a button between the...en el bot6n The thread shank of a button is between the button and the former la canilla. After sewing about 15 cm (6")) in the button and sew distancia existente entre los distintos agujeros on heavier fabric. material and tightly wrap the thread around the 3. ...
Users Manual - English
Page 51
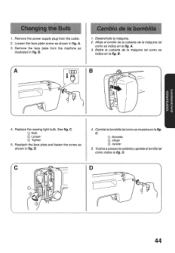
Remove the power supply plug from the machine as illustrated in fig. Remove the face plate from the outlet. 2. Afloje el tornillo de la cubierta de la maquina tal como se indica ...See fig. Cambie bombilla talcomosemuestra enla fig. D. B. Retire la cubierta de la maquina tal como se indica en la fig. C. A U 4. C) Bulb C) Loosen C) Tighten 5. A. 3. Replace the sewing light bulb. Vuelva a colocarla cubierta yapriete eltornillo tal como indica la fig. D 0 0 44 D. 4. Qi Dombilla 0 Afiojar @ Apretar 5. Carnbio de la bombilla 1. C. Reattach the face plate...
Remove the power supply plug from the machine as illustrated in fig. Remove the face plate from the outlet. 2. Afloje el tornillo de la cubierta de la maquina tal como se indica ...See fig. Cambie bombilla talcomosemuestra enla fig. D. B. Retire la cubierta de la maquina tal como se indica en la fig. C. A U 4. C) Bulb C) Loosen C) Tighten 5. A. 3. Replace the sewing light bulb. Vuelva a colocarla cubierta yapriete eltornillo tal como indica la fig. D 0 0 44 D. 4. Qi Dombilla 0 Afiojar @ Apretar 5. Carnbio de la bombilla 1. C. Reattach the face plate...
Users Manual - English
Page 52
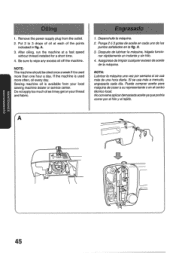
...the outlet. 2. Donot apply too muchoil as it is used more than one hour a day. A. 3. rifOffilMBMM1 IEIZIEUE 1. After oiling, run the machine at each of oil at a fast speed without thread installed for a short time. 4. NOTE: Themachine shouldbe oiled once a week if it may get...instante y sin hilo. 4. Put 2 to wipe any excess oil off the machine. Remove the power supply plug from your local sewing machine dealer or service center. Asegurese de limpiar cualquier exceso de aceite de la maquina. Sewing machine oil is used more often, oil every day. Si se usa mas a menudo...
...the outlet. 2. Donot apply too muchoil as it is used more than one hour a day. A. 3. rifOffilMBMM1 IEIZIEUE 1. After oiling, run the machine at each of oil at a fast speed without thread installed for a short time. 4. NOTE: Themachine shouldbe oiled once a week if it may get...instante y sin hilo. 4. Put 2 to wipe any excess oil off the machine. Remove the power supply plug from your local sewing machine dealer or service center. Asegurese de limpiar cualquier exceso de aceite de la maquina. Sewing machine oil is used more often, oil every day. Si se usa mas a menudo...


