
Users Manual - English
Page 2
... SAFETY INSTRUCTIONS" When using the sewing machine, basic safety precautions should never be left unattended when plugged in. It may deflect the needle causing it has been dropped or damaged, or dropped into any other user service adjustments mentioned in this sewing machine only for examination... (spray) products are being administered. 8. Never operate the sewing machine with same type rated at 15 watts. Do not use a bent needle. 13. Do not pull or push the fabric while stitching. Switch the sewing machine to the symbol "O" position which represents off , symbol...
... SAFETY INSTRUCTIONS" When using the sewing machine, basic safety precautions should never be left unattended when plugged in. It may deflect the needle causing it has been dropped or damaged, or dropped into any other user service adjustments mentioned in this sewing machine only for examination... (spray) products are being administered. 8. Never operate the sewing machine with same type rated at 15 watts. Do not use a bent needle. 13. Do not pull or push the fabric while stitching. Switch the sewing machine to the symbol "O" position which represents off , symbol...
Users Manual - English
Page 6
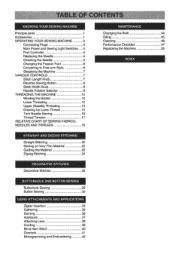
... 46 Connecting Plugs 3 Performance Checklist 47 Main Power and Sewing Light Switches 4 Repacking the Machine 52 Foot Controller 4 Replacing the Needle 5 Checking the Needle 5 INDEX Changing the Presser Foot 6 Converting to Free-arm Style 6 Steadying the Machine 7 VARIOUS CONTROLS 7 Stitch Length Knob...MACHINE 10 Winding the Bobbin 10 Lower Threading 12 Upper (Needle) Threading 13 Drawing Up Lower Thread 15 Twin Needle Sewing 16 Thread Tension 17 RELATIVE CHART OF SEWING FABRICS, NEEDLES AND THREADS 18 STRAIGHT AND ZIGZAG STITCHING Straight Stitching 20...
... 46 Connecting Plugs 3 Performance Checklist 47 Main Power and Sewing Light Switches 4 Repacking the Machine 52 Foot Controller 4 Replacing the Needle 5 Checking the Needle 5 INDEX Changing the Presser Foot 6 Converting to Free-arm Style 6 Steadying the Machine 7 VARIOUS CONTROLS 7 Stitch Length Knob...MACHINE 10 Winding the Bobbin 10 Lower Threading 12 Upper (Needle) Threading 13 Drawing Up Lower Thread 15 Twin Needle Sewing 16 Thread Tension 17 RELATIVE CHART OF SEWING FABRICS, NEEDLES AND THREADS 18 STRAIGHT AND ZIGZAG STITCHING Straight Stitching 20...
Users Manual - English
Page 12
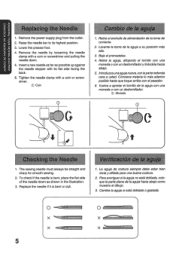
...esta doblada o gastada. Remove the needle by loosening the needle clamp with a coin or screwdriver and pulling the needle down as possible up against the needle stopper with a coin or screwdriver. C) Coin 1. To check if the needle is bent or dull. O X c X 5 Tighten the needle clamp with its highest position. ... de alimentaciOn de la toma de corriente. 2. Raise the needle bar to its flat side facing the back. 6. The sewing needle must always be straight and sharp for smooth sewing. 2. Insert a new needle as far as shown in the illustration. 3. Remove the power...
...esta doblada o gastada. Remove the needle by loosening the needle clamp with a coin or screwdriver and pulling the needle down as possible up against the needle stopper with a coin or screwdriver. C) Coin 1. To check if the needle is bent or dull. O X c X 5 Tighten the needle clamp with its highest position. ... de alimentaciOn de la toma de corriente. 2. Raise the needle bar to its flat side facing the back. 6. The sewing needle must always be straight and sharp for smooth sewing. 2. Insert a new needle as far as shown in the illustration. 3. Remove the power...
Users Manual - English
Page 15
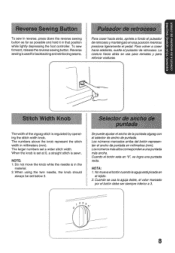
When using the twin needle, the knob should always be set a wider stitch width. Cuando el botOn esta en "0", se logra una puntada recta. Cuando se usa la aguja doble, ..., press down the reverse sewing button as far as possible and hold it in millimeters (mm). NOTE: 1. NOTA: 1. Do not move the knob while the needle is used for backtacking and reinforcing seams. Para coser hacia atras, apriete a fondo elpulsador de retrocesoymantengalo en esaposici6nmientras presiona ligeramente el pedal. The numbers above...
When using the twin needle, the knob should always be set a wider stitch width. Cuando el botOn esta en "0", se logra una puntada recta. Cuando se usa la aguja doble, ..., press down the reverse sewing button as far as possible and hold it in millimeters (mm). NOTE: 1. NOTA: 1. Do not move the knob while the needle is used for backtacking and reinforcing seams. Para coser hacia atras, apriete a fondo elpulsador de retrocesoymantengalo en esaposici6nmientras presiona ligeramente el pedal. The numbers above...
Users Manual - English
Page 16
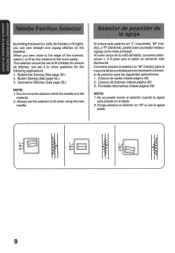
Do not move the selector while the needle is fed more easily. Alcoser cerca de la orilla del tejido, conviene seleccionar L 6 R para que el tejido se alimente mas facilmente. No se puede mover ... tejido. 2. L. When you can sew straight and zigzag stitches on the baseline. Button Sewing (See page 32.) 3. Always set it to M when using the twin needle. Ponga siempre el selector en "M" si usa la aguja doble. M • M • R • R • 9 Conviene colocar el selector en "M" (media) para la mayorla delaspuntadasperoesnecesariocambiarlo de...
Do not move the selector while the needle is fed more easily. Alcoser cerca de la orilla del tejido, conviene seleccionar L 6 R para que el tejido se alimente mas facilmente. No se puede mover ... tejido. 2. L. When you can sew straight and zigzag stitches on the baseline. Button Sewing (See page 32.) 3. Always set it to M when using the twin needle. Ponga siempre el selector en "M" si usa la aguja doble. M • M • R • R • 9 Conviene colocar el selector en "M" (media) para la mayorla delaspuntadasperoesnecesariocambiarlo de...
Users Manual - English
Page 21
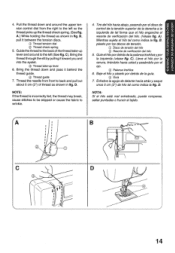
... 14 Guide the thread tothe back of thread as shown in fig. Bring the thread down and around to the left (See fig. Thread the needle from front to wrinkle. 4. A.) While holding the thread as shown in fig. QQ Palanca tirahilos 6. D. Lleve el bib por la ranura, tIrandolo hacla usted y pasandolo...
... 14 Guide the thread tothe back of thread as shown in fig. Bring the thread down and around to the left (See fig. Thread the needle from front to wrinkle. 4. A.) While holding the thread as shown in fig. QQ Palanca tirahilos 6. D. Lleve el bib por la ranura, tIrandolo hacla usted y pasandolo...
Users Manual - English
Page 25
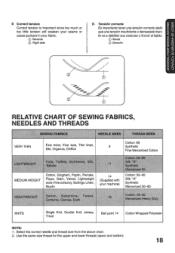
... bobbin). 18 te va a debilitar sus costuras o fruncir el tejido. 0 Reyes Derecho RELATIVE CHART OF SEWING FABRICS, NEEDLES AND THREADS SEWING FABRICS NEEDLE SIZES THREAD SIZES Cotton: 80 VERY THIN Fine tricot, Fine lace, Thin linen, 9 Synthetic Silk, Organza, Chiffon Fine... Velvet, Lightweight wool,Finecorduroy, Suitings, Linen, Muslin 11 14 (Supplied with your fabric. 0 Reverse 0 Right side D. Select the correct needle and thread size from the above chart. 2. Tension correcta Es importante tener una tension correcta dado que una tension insuficiente o demasiada tiran- ...
... bobbin). 18 te va a debilitar sus costuras o fruncir el tejido. 0 Reyes Derecho RELATIVE CHART OF SEWING FABRICS, NEEDLES AND THREADS SEWING FABRICS NEEDLE SIZES THREAD SIZES Cotton: 80 VERY THIN Fine tricot, Fine lace, Thin linen, 9 Synthetic Silk, Organza, Chiffon Fine... Velvet, Lightweight wool,Finecorduroy, Suitings, Linen, Muslin 11 14 (Supplied with your fabric. 0 Reverse 0 Right side D. Select the correct needle and thread size from the above chart. 2. Tension correcta Es importante tener una tension correcta dado que una tension insuficiente o demasiada tiran- ...
Users Manual - English
Page 27
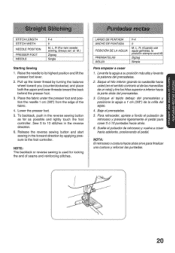
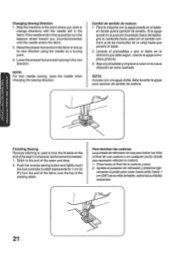
... 10 stitches in the reverse direction. 6. Coloque el tejido debajo del prensatelas y tion the needle 1 cm (3/8") from the edge of seams and reinforcing stitches. 5. Baje el prensate/as . 3. NOTE: The backtack or reverse sewing is used for locking... button and start sewing in the reverse sewing button as far as possible and lightly touch the foot controller. 1 STITCH LENGTH STITCH WIDTH NEEDLE POSITION PRESSER FOOT NEEDLE F-4 0 M, L, R (For twin needle sewing, always set at M.) Zigzag Single LARGO DE PUNTADA ANCHO DE PUNTADA POSICION DE LA AGUJA PRENSATELAS ACUJA F-4 0 M. Levante la ...
... 10 stitches in the reverse direction. 6. Coloque el tejido debajo del prensatelas y tion the needle 1 cm (3/8") from the edge of seams and reinforcing stitches. 5. Baje el prensate/as . 3. NOTE: The backtack or reverse sewing is used for locking... button and start sewing in the reverse sewing button as far as possible and lightly touch the foot controller. 1 STITCH LENGTH STITCH WIDTH NEEDLE POSITION PRESSER FOOT NEEDLE F-4 0 M, L, R (For twin needle sewing, always set at M.) Zigzag Single LARGO DE PUNTADA ANCHO DE PUNTADA POSICION DE LA AGUJA PRENSATELAS ACUJA F-4 0 M. Levante la ...
Users Manual - English
Page 28
...end of the fabric over the top of the seam or wherever reinforcement is used to line up its new direction using the needle as a turning point. 3. Apriete elpulsador de retrcceso ypresione lige- Levante el prensatelas y gire of the seam and stop. 2. NOTE: For twin... needle sewing, raise the needle when changing the sewing direction. NOTA: Alcosercon una aguja doble, debelevantarla aguja para cambiar de sentido de costura. Pare la maquina con la...
...end of the fabric over the top of the seam or wherever reinforcement is used to line up its new direction using the needle as a turning point. 3. Apriete elpulsador de retrcceso ypresione lige- Levante el prensatelas y gire of the seam and stop. 2. NOTE: For twin... needle sewing, raise the needle when changing the sewing direction. NOTA: Alcosercon una aguja doble, debelevantarla aguja para cambiar de sentido de costura. Pare la maquina con la...
Users Manual - English
Page 30
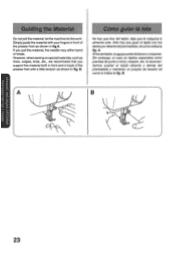
... de punto o tricot, crespen, etc. However, when sewing on special materials, such as tricot, crepes, knits, etc., we recommend that you pull the material, the needle may either bend or break. Sitire deltejido, la agujapuede doblarseoromperse. If you support the material both in front and in back of the presser foot...
... de punto o tricot, crespen, etc. However, when sewing on special materials, such as tricot, crepes, knits, etc., we recommend that you pull the material, the needle may either bend or break. Sitire deltejido, la agujapuede doblarseoromperse. If you support the material both in front and in back of the presser foot...
Users Manual - English
Page 33
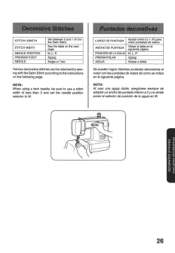
...Se pueden lograr distin as puntadas decorativas al coser con /aspuntadas de realce talcomo se indica en la siguiente pagina. NOTE: When using a twin needle, be obtained by sewing with the Satin Stitch according to M. M, L, R POSICIONDELA AGUJA M, L, R Zigzag PRENSATELAS Zigzag Sinolo or Twin ...AGUJA Simple o doblo Various decorative stitches can be sure to use a stitch width of less than 3 and set the needle position selector to the instructions on the next page. Li LARGO DE PUNTADA Ajustar entre 0 y 1(F) para cosecpuntadas de realce. See the ...
...Se pueden lograr distin as puntadas decorativas al coser con /aspuntadas de realce talcomo se indica en la siguiente pagina. NOTE: When using a twin needle, be obtained by sewing with the Satin Stitch according to M. M, L, R POSICIONDELA AGUJA M, L, R Zigzag PRENSATELAS Zigzag Sinolo or Twin ...AGUJA Simple o doblo Various decorative stitches can be sure to use a stitch width of less than 3 and set the needle position selector to the instructions on the next page. Li LARGO DE PUNTADA Ajustar entre 0 y 1(F) para cosecpuntadas de realce. See the ...

Users Manual - English
Page 34
R - .Iiir lIIII "Mil 'mill NOTE: For twin needle sewing, repeat- NOTE: For twin needle sewing, repeat- knob `rom 0 to 5, then from 3 to 0 while depressing the foot control at an even speed....el oil Nmo-olIDAIN-Mui-onp. Repeatedly move the stitch width illilkillillulllli...illlii. R iIIIIIIIIIIIIIPIIIIIMIIIIP NOTE: For twin needle sewing, repeat- Needle Single needle Twin needle Single needle Twin needle Single needle Twin needle Needle position Pattern sewn Adjustment of the stitch width L -llill.....IIIII-IIIII.....IIIII. edly move the stitch width ...
R - .Iiir lIIII "Mil 'mill NOTE: For twin needle sewing, repeat- NOTE: For twin needle sewing, repeat- knob `rom 0 to 5, then from 3 to 0 while depressing the foot control at an even speed....el oil Nmo-olIDAIN-Mui-onp. Repeatedly move the stitch width illilkillillulllli...illlii. R iIIIIIIIIIIIIIPIIIIIMIIIIP NOTE: For twin needle sewing, repeat- Needle Single needle Twin needle Single needle Twin needle Single needle Twin needle Needle position Pattern sewn Adjustment of the stitch width L -llill.....IIIII-IIIII.....IIIII. edly move the stitch width ...
Users Manual - English
Page 40
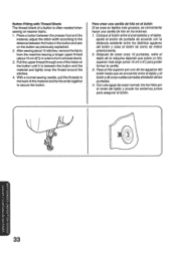
... elprensatelas y el tejido, material, adjust the stitch width according to form a thread shank. tejido de la maquina dejando que sobre un hilo 3. With a normal sewing needle, pull the threads to secure the button. 4. hacer una canilla de hilo en los botones. 1. Despues de coser unas 10 puntadas, retire el (about 10...
... elprensatelas y el tejido, material, adjust the stitch width according to form a thread shank. tejido de la maquina dejando que sobre un hilo 3. With a normal sewing needle, pull the threads to secure the button. 4. hacer una canilla de hilo en los botones. 1. Despues de coser unas 10 puntadas, retire el (about 10...

Users Manual - English
Page 42
... adjust the zipper foot just right or left of the foot as described above and tighten the screw. For best results, the needle should be close but not touch the needle. Sew through the fabric close to the edge of the zipper on the other side of the... aguja sin tocarla. 0 Aguja 2. S3NOlOvondv A SOltIOS3001130 OSn SNOIIV0IlddV 0NV $1N3LNH0d11V ONisn 1. The foot should be sewn from the bottom to the zipper. M Needle 2. Bajela aguja enunpedazo deLelaparahaceruna prueba y ajuste la pata de cremalleras justo a la derecha oa la izquierda dela aguja. Cosa el tejido cerca de la orilla...
... adjust the zipper foot just right or left of the foot as described above and tighten the screw. For best results, the needle should be close but not touch the needle. Sew through the fabric close to the edge of the zipper on the other side of the... aguja sin tocarla. 0 Aguja 2. S3NOlOvondv A SOltIOS3001130 OSn SNOIIV0IlddV 0NV $1N3LNH0d11V ONisn 1. The foot should be sewn from the bottom to the zipper. M Needle 2. Bajela aguja enunpedazo deLelaparahaceruna prueba y ajuste la pata de cremalleras justo a la derecha oa la izquierda dela aguja. Cosa el tejido cerca de la orilla...
Users Manual - English
Page 48
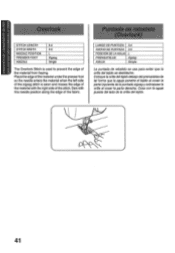
... S3N0101;0017dV A SO11:1OS3,0O113O OS11 SNOLLVOIlddV ONV S1N3IVHOVIIV ONIS(1 Overlock STITCH LENGTH STITCH WIDTH NEEDLE POSITION PRESSER FOOT NEEDLE 3-4 3-5 L Zigzag Single The Overlock Stitch is sewn and misses the edge of the material with this needle position along the edge of the material from fraying. Sew with the right side of the...derecha. Cosa con la aguja puesta del lado de la orilla del tejido. 1 41 Place the edge of thematerial under the presser foot so the needle enters the material when the left side of the zigzag stitch is used to prevent the edge of the fabric.
... S3N0101;0017dV A SO11:1OS3,0O113O OS11 SNOLLVOIlddV ONV S1N3IVHOVIIV ONIS(1 Overlock STITCH LENGTH STITCH WIDTH NEEDLE POSITION PRESSER FOOT NEEDLE 3-4 3-5 L Zigzag Single The Overlock Stitch is sewn and misses the edge of the material with this needle position along the edge of the material from fraying. Sew with the right side of the...derecha. Cosa con la aguja puesta del lado de la orilla del tejido. 1 41 Place the edge of thematerial under the presser foot so the needle enters the material when the left side of the zigzag stitch is used to prevent the edge of the fabric.
Users Manual - English
Page 53
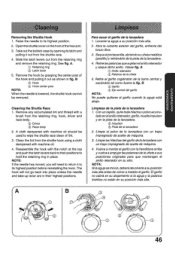
... Hook 1. Clean the lint from the retaining ring and remove the retaining ring. A. ® Anillo retenedor 0 Palanca de la ulieta 5. Raise the needle to wipe the shuttle race clean of the free arm. 3. See fig. Vease fig. Limpie el polvo de la lanzadera con un trapo impregnado de... it to hold the retaining ring in their positions to its highest position. 2. B. © Hook ® Hook center post NOTE: When the needle is lowered, the shuttle hook cannot be used to its highest position before reinstalling the hook. Remove any accumulated lint and thread with machine oil...
... Hook 1. Clean the lint from the retaining ring and remove the retaining ring. A. ® Anillo retenedor 0 Palanca de la ulieta 5. Raise the needle to wipe the shuttle race clean of the free arm. 3. See fig. Vease fig. Limpie el polvo de la lanzadera con un trapo impregnado de... it to hold the retaining ring in their positions to its highest position. 2. B. © Hook ® Hook center post NOTE: When the needle is lowered, the shuttle hook cannot be used to its highest position before reinstalling the hook. Remove any accumulated lint and thread with machine oil...
Users Manual - English
Page 55
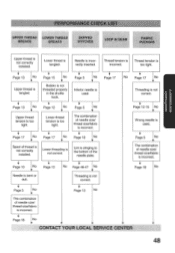
... in the shuttle hook. • Page 12 iNo Lower thread tension is too tight. • Page 17 No Inferior needle is used. • Page 5 No • The combina ion of needle size/ thread size/fabric is incorrect. • Page 15 iNo Threading is not correct. • Page 12-15 No... • Wrong needle is used. • Page 5 No Spool of needle size/ thread size/fabric is not correct. Page 13 No The combination of thread is not correctly installed. • Page 10 No...
... in the shuttle hook. • Page 12 iNo Lower thread tension is too tight. • Page 17 No Inferior needle is used. • Page 5 No • The combina ion of needle size/ thread size/fabric is incorrect. • Page 15 iNo Threading is not correct. • Page 12-15 No... • Wrong needle is used. • Page 5 No Spool of needle size/ thread size/fabric is not correct. Page 13 No The combination of thread is not correctly installed. • Page 10 No...
Users Manual - English
Page 57
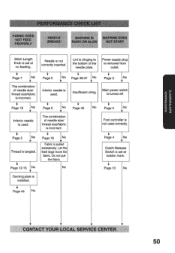
...No Page 18 No • Fabric is turned off. Page 49 • • CONTACT YOUR LOCAL SERVICE CENTER 50 Page 18 No V Inferior needle is removed from outlet. Page 46-47 No Power supply plug is used. Page 5 No • The combination of.../fabric is incorrect. 4 Page 45 Page 4 No • Foot controller is used correctly. Page 3 iNo Inferior needle is not used . No Page 4 No • Clutch Release Switch is not correctly inserted. Needle is set at bobbin mark. Main power switch Insufficient oiling. i Page 5 No Lint is set at no feeding...
...No Page 18 No • Fabric is turned off. Page 49 • • CONTACT YOUR LOCAL SERVICE CENTER 50 Page 18 No V Inferior needle is removed from outlet. Page 46-47 No Power supply plug is used. Page 5 No • The combination of.../fabric is incorrect. 4 Page 45 Page 4 No • Foot controller is used correctly. Page 3 iNo Inferior needle is not used . No Page 4 No • Clutch Release Switch is not correctly inserted. Needle is set at bobbin mark. Main power switch Insufficient oiling. i Page 5 No Lint is set at no feeding...
Users Manual - English
Page 61
Page Performance Checklist 47 Principal Parts 1, 2 R Relative Chart of Sewing Fabrics, Needles and Threads 18 Repacking 52 Reverse Sewing Button 8 S Satin Stitch 25 Sewing Light Switch 4 Bulb Replacement 44 Shuttle Hook Removal 46 Shuttle ...Race Cleaning 46 Simple Zigzag Stitch 24 Stitch Length Knob 7 Stitch Width Knob 8 Straight Stitch 20 T Thin Fabric Sewing Thread Tension Troubleshooting Twin Needle Sewing 22 17 48, 50 16 U Upper Tension Control Dial 17 Upper Threading 13 w Winding the Bobbin 10 14 Modalidad brazo libre Monogramas 0 Ojales...
Page Performance Checklist 47 Principal Parts 1, 2 R Relative Chart of Sewing Fabrics, Needles and Threads 18 Repacking 52 Reverse Sewing Button 8 S Satin Stitch 25 Sewing Light Switch 4 Bulb Replacement 44 Shuttle Hook Removal 46 Shuttle ...Race Cleaning 46 Simple Zigzag Stitch 24 Stitch Length Knob 7 Stitch Width Knob 8 Straight Stitch 20 T Thin Fabric Sewing Thread Tension Troubleshooting Twin Needle Sewing 22 17 48, 50 16 U Upper Tension Control Dial 17 Upper Threading 13 w Winding the Bobbin 10 14 Modalidad brazo libre Monogramas 0 Ojales...


