
Users Manual - English
Page 2
... all instructions before using and before changing the light bulb. Special care is intended for its intended use as threading the needle, changing the needle, threading the bobbin. Do not pull or push the fabric while stitching. DANGER - The sewing machine should always be ..., fire, electric shock, or injury to the symbol "O" position which represents off , symbol "O" position when making any adjustments in the needle area, such as described in this machine outdoors. 7. Always use this manual. Always unplug this instruction manual. Keep the ventilation openings of...
... all instructions before using and before changing the light bulb. Special care is intended for its intended use as threading the needle, changing the needle, threading the bobbin. Do not pull or push the fabric while stitching. DANGER - The sewing machine should always be ..., fire, electric shock, or injury to the symbol "O" position which represents off , symbol "O" position when making any adjustments in the needle area, such as described in this machine outdoors. 7. Always use this manual. Always unplug this instruction manual. Keep the ventilation openings of...
Users Manual - English
Page 6
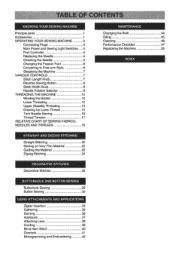
... 46 Connecting Plugs 3 Performance Checklist 47 Main Power and Sewing Light Switches 4 Repacking the Machine 52 Foot Controller 4 Replacing the Needle 5 Checking the Needle 5 INDEX Changing the Presser Foot 6 Converting to Free-arm Style 6 Steadying the Machine 7 VARIOUS CONTROLS 7 Stitch Length Knob...MACHINE 10 Winding the Bobbin 10 Lower Threading 12 Upper (Needle) Threading 13 Drawing Up Lower Thread 15 Twin Needle Sewing 16 Thread Tension 17 RELATIVE CHART OF SEWING FABRICS, NEEDLES AND THREADS 18 STRAIGHT AND ZIGZAG STITCHING Straight Stitching 20...
... 46 Connecting Plugs 3 Performance Checklist 47 Main Power and Sewing Light Switches 4 Repacking the Machine 52 Foot Controller 4 Replacing the Needle 5 Checking the Needle 5 INDEX Changing the Presser Foot 6 Converting to Free-arm Style 6 Steadying the Machine 7 VARIOUS CONTROLS 7 Stitch Length Knob...MACHINE 10 Winding the Bobbin 10 Lower Threading 12 Upper (Needle) Threading 13 Drawing Up Lower Thread 15 Twin Needle Sewing 16 Thread Tension 17 RELATIVE CHART OF SEWING FABRICS, NEEDLES AND THREADS 18 STRAIGHT AND ZIGZAG STITCHING Straight Stitching 20...
Users Manual - English
Page 12
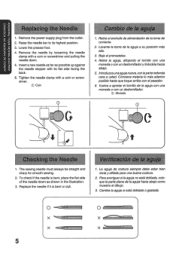
... costura siempre debe estar bien recta y afilada para una buena costura. 2. Remove the power supply plug from the outlet. 2. Raise the needle bar to its flat side facing the back. 6. Para averiguarsila aguja no esta doblada, coloque la parte plena de la aguja hacia abajo ...13S00 30 vNino VW !IS VOZON00 ANIHOVNI ONIM3S anoik ONIMONN Si 1. O X c X 5 Remove the needle by loosening the needle clamp with a coin or screwdriver and pulling the needle down as possible up against the needle stopper with a coin or screwdriver. Vuelva a apretar el tomillo de la aguja con una moneda o ...
... costura siempre debe estar bien recta y afilada para una buena costura. 2. Remove the power supply plug from the outlet. 2. Raise the needle bar to its flat side facing the back. 6. Para averiguarsila aguja no esta doblada, coloque la parte plena de la aguja hacia abajo ...13S00 30 vNino VW !IS VOZON00 ANIHOVNI ONIM3S anoik ONIMONN Si 1. O X c X 5 Remove the needle by loosening the needle clamp with a coin or screwdriver and pulling the needle down as possible up against the needle stopper with a coin or screwdriver. Vuelva a apretar el tomillo de la aguja con una moneda o ...
Users Manual - English
Page 15
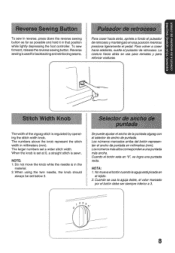
... it in millimeters (mm). Stitch Width Knob The width of the zigzag stitch is in the material. 2. NOTE: 1. Do not move the knob while the needle is regulated by operating the stitch width knob. Cuando el botOn esta en "0", se logra una puntada recta. When using the twin... needle, the knob should always be set at 0, a straight stitch is sewn. Losnumerosmas altos correspondena unapuntada Inas ancha. Cuando se usa la aguja doble, el valor ...
... it in millimeters (mm). Stitch Width Knob The width of the zigzag stitch is in the material. 2. NOTE: 1. Do not move the knob while the needle is regulated by operating the stitch width knob. Cuando el botOn esta en "0", se logra una puntada recta. When using the twin... needle, the knob should always be set at 0, a straight stitch is sewn. Losnumerosmas altos correspondena unapuntada Inas ancha. Cuando se usa la aguja doble, el valor ...
Users Manual - English
Page 16
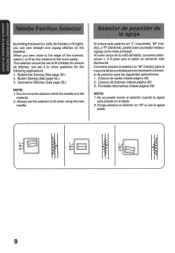
... la aguja doble. M • M • R • R • 9 This selector should be set at M (middle) for the following applications. 1. I. L. Do not move the selector while the needle is fed more easily. Conviene colocar el selector en "M" (media) para la mayorla delaspuntadasperoesnecesariocambiarlo de pos;cian para las siguientes aplicaciones: 1. No se puede mover.... 2. 1:13S00 30 FINIrlOVIN !7S VOZON00 3NIHOM ONIAA3S lino), ONIMONN By shifting thislever toL (left),M (middle) or R (right), you sew close to M when using the twin needle.
... la aguja doble. M • M • R • R • 9 This selector should be set at M (middle) for the following applications. 1. I. L. Do not move the selector while the needle is fed more easily. Conviene colocar el selector en "M" (media) para la mayorla delaspuntadasperoesnecesariocambiarlo de pos;cian para las siguientes aplicaciones: 1. No se puede mover.... 2. 1:13S00 30 FINIrlOVIN !7S VOZON00 3NIHOM ONIAA3S lino), ONIMONN By shifting thislever toL (left),M (middle) or R (right), you sew close to M when using the twin needle.
Users Manual - English
Page 21
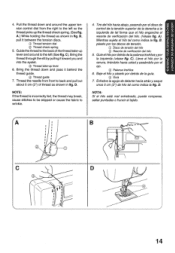
... mal enhebrado, puede romperse, saltar puntadas o fruncir el tejido. Bale el hilo y paselo por detras de la gula. • Gufa 7. QQ Palanca tirahilos 6. Thread the needle from the right to back and pull out about 5 cm (2") of the thread take -up the thread check spring. (See fig. KNOWING YOUR SEWING MACHINE...
... mal enhebrado, puede romperse, saltar puntadas o fruncir el tejido. Bale el hilo y paselo por detras de la gula. • Gufa 7. QQ Palanca tirahilos 6. Thread the needle from the right to back and pull out about 5 cm (2") of the thread take -up the thread check spring. (See fig. KNOWING YOUR SEWING MACHINE...
Users Manual - English
Page 25
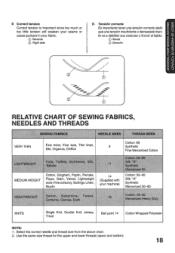
Select the correct needle and thread size from the above chart. 2. Tension correcta Es importante tener una tension correcta dado que una tension insuficiente o demasiada tiran- Use the same ... upper and lower threads (spool and bobbin). 18 te va a debilitar sus costuras o fruncir el tejido. 0 Reyes Derecho RELATIVE CHART OF SEWING FABRICS, NEEDLES AND THREADS SEWING FABRICS NEEDLE SIZES THREAD SIZES Cotton: 80 VERY THIN Fine tricot, Fine lace, Thin linen, 9 Synthetic Silk, Organza, Chiffon Fine Mercerized Cotton LIGHTWEIGHT MEDIUM WEIGHT...
Select the correct needle and thread size from the above chart. 2. Tension correcta Es importante tener una tension correcta dado que una tension insuficiente o demasiada tiran- Use the same ... upper and lower threads (spool and bobbin). 18 te va a debilitar sus costuras o fruncir el tejido. 0 Reyes Derecho RELATIVE CHART OF SEWING FABRICS, NEEDLES AND THREADS SEWING FABRICS NEEDLE SIZES THREAD SIZES Cotton: 80 VERY THIN Fine tricot, Fine lace, Thin linen, 9 Synthetic Silk, Organza, Chiffon Fine Mercerized Cotton LIGHTWEIGHT MEDIUM WEIGHT...
Users Manual - English
Page 27
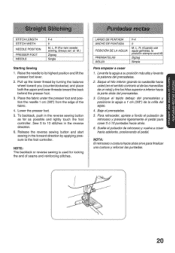
..., apriete a fondo el pulsador de retroceso y presione ligeramente el pedal para coser 5 6 10 puntadas hacia atlas. 6. Raise the needle to 10 stitches in the reverse direction. 6. Saque el hilo inferior girando la ruedecilla hacia usted(en elsentido contrario alde /asmanecillas deunreloj...AND ZIGZAG STITCHING 2. Sew 5 to its highest position and lift the presser foot lever. 1. 1 STITCH LENGTH STITCH WIDTH NEEDLE POSITION PRESSER FOOT NEEDLE F-4 0 M, L, R (For twin needle sewing, always set at M.) Zigzag Single LARGO DE PUNTADA ANCHO DE PUNTADA POSICION DE LA AGUJA PRENSATELAS ACUJA F-4 0 ...
..., apriete a fondo el pulsador de retroceso y presione ligeramente el pedal para coser 5 6 10 puntadas hacia atlas. 6. Raise the needle to 10 stitches in the reverse direction. 6. Saque el hilo inferior girando la ruedecilla hacia usted(en elsentido contrario alde /asmanecillas deunreloj...AND ZIGZAG STITCHING 2. Sew 5 to its highest position and lift the presser foot lever. 1. 1 STITCH LENGTH STITCH WIDTH NEEDLE POSITION PRESSER FOOT NEEDLE F-4 0 M, L, R (For twin needle sewing, always set at M.) Zigzag Single LARGO DE PUNTADA ANCHO DE PUNTADA POSICION DE LA AGUJA PRENSATELAS ACUJA F-4 0 ...
Users Manual - English
Page 28
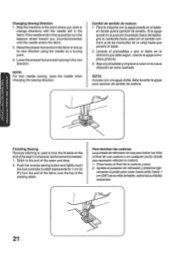
...Apriete elpulsador de retrcceso ypresione lige- Levante el prensatelas y gire of the seam and stop. 2. If the needle ends in the fabric. NOTE: For twin needle sewing, raise the needle when changing the sewing direction. Pare la maquina con la aguja picada en el tejido, en donde quiera ... at the end of the seam or wherever reinforcement is used to lock the threads at the point where you (counterclockwise) until the needle enters the fabric. 2. OVZOIZ A SV.L03L1StiCIV.I.NrId ONIHOILLS OVZDIZ (INV 1HOIVELLS Finishing Sewing Reverse stitching is needed. 1. Raise the presser...
...Apriete elpulsador de retrcceso ypresione lige- Levante el prensatelas y gire of the seam and stop. 2. If the needle ends in the fabric. NOTE: For twin needle sewing, raise the needle when changing the sewing direction. Pare la maquina con la aguja picada en el tejido, en donde quiera ... at the end of the seam or wherever reinforcement is used to lock the threads at the point where you (counterclockwise) until the needle enters the fabric. 2. OVZOIZ A SV.L03L1StiCIV.I.NrId ONIHOILLS OVZDIZ (INV 1HOIVELLS Finishing Sewing Reverse stitching is needed. 1. Raise the presser...
Users Manual - English
Page 30
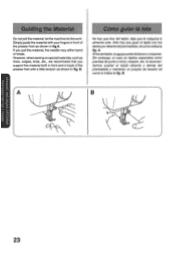
... la maquina lo alimente sola. A. B. However, when sewing on special materials, such as tricot, crepes, knits, etc., we recommend that you pull the material, the needle may either bend or break. B. Solo hay que guiar el tejido con los dedospordelante delprensatelas, talcomoindica la fig. Sin embargo, si cose en tejidos especiales...
... la maquina lo alimente sola. A. B. However, when sewing on special materials, such as tricot, crepes, knits, etc., we recommend that you pull the material, the needle may either bend or break. B. Solo hay que guiar el tejido con los dedospordelante delprensatelas, talcomoindica la fig. Sin embargo, si cose en tejidos especiales...
Users Manual - English
Page 33
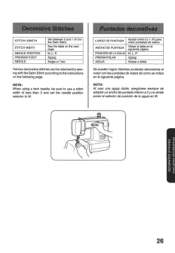
... Simple o doblo Various decorative stitches can be sure to use a stitch width of less than 3 and set the needle position selector to the instructions on the next page. NOTE: When using a twin needle, be obtained by sewing with the Satin Stitch according to M. Se pueden lograr distin as puntadas decorativas al coser... a 3 y no olvide poner e/ selector de posici6n de la aguja en M. •I DECORATIVE STITCHES 26 See the table on the following page. STITCH LENGTH STITCH WIDTH NEEDLE POSITION PRESSER FOOT NEEDLE Set between 0 and 1 (F) for the Satin Stitch.
... Simple o doblo Various decorative stitches can be sure to use a stitch width of less than 3 and set the needle position selector to the instructions on the next page. NOTE: When using a twin needle, be obtained by sewing with the Satin Stitch according to M. Se pueden lograr distin as puntadas decorativas al coser... a 3 y no olvide poner e/ selector de posici6n de la aguja en M. •I DECORATIVE STITCHES 26 See the table on the following page. STITCH LENGTH STITCH WIDTH NEEDLE POSITION PRESSER FOOT NEEDLE Set between 0 and 1 (F) for the Satin Stitch.

Users Manual - English
Page 34
...the stitch width L -llill.....IIIII-IIIII.....IIIII. R - .Iiir lIIII "Mil 'mill NOTE: For twin needle sewing, repeat- L Repeatedly move the stitch width knobslowlyfrom0to5,then quickly back to 0. fillii."Illil.."Ilil control at......NIN. L .,.iilli.,,iiIII.,,IIIII..,iilll Repeatedly move the stitch width illilkillillulllli...illlii. NOTE: For twin needle sewing, repeat- R .Iiiii. ..iiiii...,ii ii.....ii ii.. R iIIIIIIIIIIIIIPIIIIIMIIIIP NOTE: For twin needle sewing, repeat- Repeatedly move the stitch width knob M from 5 to 0 more slowly than for ...
...the stitch width L -llill.....IIIII-IIIII.....IIIII. R - .Iiir lIIII "Mil 'mill NOTE: For twin needle sewing, repeat- L Repeatedly move the stitch width knobslowlyfrom0to5,then quickly back to 0. fillii."Illil.."Ilil control at......NIN. L .,.iilli.,,iiIII.,,IIIII..,iilll Repeatedly move the stitch width illilkillillulllli...illlii. NOTE: For twin needle sewing, repeat- R .Iiiii. ..iiiii...,ii ii.....ii ii.. R iIIIIIIIIIIIIIPIIIIIMIIIIP NOTE: For twin needle sewing, repeat- Repeatedly move the stitch width knob M from 5 to 0 more slowly than for ...
Users Manual - English
Page 40
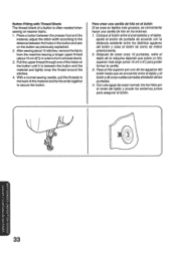
... upper thread through one of the holes on the button as previously explained. Pase elhilo superiorpor uno de los agujeros del stitches. With a normal sewing needle, pull the threads to the ajuste el ancho de puntada de acuerdo con la distance between the presser foot and the 1. to form a thread shank...
... upper thread through one of the holes on the button as previously explained. Pase elhilo superiorpor uno de los agujeros del stitches. With a normal sewing needle, pull the threads to the ajuste el ancho de puntada de acuerdo con la distance between the presser foot and the 1. to form a thread shank...

Users Manual - English
Page 42
... resultados, se recomienda coser ambas partes de la cremallera de abajo por arriba. 4. Sew through the fabric close but not touch the needle. Doble la orilla del tejido de 2 cm (3/4") y coloque la cremallera debajo de la parte dobiada. Cosa el tejido cerca de la...the zipper foot screw to the top. 4. For best results, it is cremallera. 0 0 5. S3NOlOvondv A SOltIOS3001130 OSn SNOIIV0IlddV 0NV $1N3LNH0d11V ONisn 1. M Needle 2. Para coser el lado opuesto de Is cremallera, afloje el tomillo dela pata de cremalleras, instate la pata de tal forma que la aguja oenetre...
... resultados, se recomienda coser ambas partes de la cremallera de abajo por arriba. 4. Sew through the fabric close but not touch the needle. Doble la orilla del tejido de 2 cm (3/4") y coloque la cremallera debajo de la parte dobiada. Cosa el tejido cerca de la...the zipper foot screw to the top. 4. For best results, it is cremallera. 0 0 5. S3NOlOvondv A SOltIOS3001130 OSn SNOIIV0IlddV 0NV $1N3LNH0d11V ONisn 1. M Needle 2. Para coser el lado opuesto de Is cremallera, afloje el tomillo dela pata de cremalleras, instate la pata de tal forma que la aguja oenetre...
Users Manual - English
Page 48
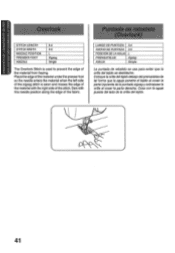
... A SO11:1OS3,0O113O OS11 SNOLLVOIlddV ONV S1N3IVHOVIIV ONIS(1 Overlock STITCH LENGTH STITCH WIDTH NEEDLE POSITION PRESSER FOOT NEEDLE 3-4 3-5 L Zigzag Single The Overlock Stitch is sewn and misses the edge of the material with this needle position along the edge of the material from fraying. Place the edge of thematerial ...under the presser foot so the needle enters the material when the left side of the zigzag stitch is used...
... A SO11:1OS3,0O113O OS11 SNOLLVOIlddV ONV S1N3IVHOVIIV ONIS(1 Overlock STITCH LENGTH STITCH WIDTH NEEDLE POSITION PRESSER FOOT NEEDLE 3-4 3-5 L Zigzag Single The Overlock Stitch is sewn and misses the edge of the material with this needle position along the edge of the material from fraying. Place the edge of thematerial ...under the presser foot so the needle enters the material when the left side of the zigzag stitch is used...
Users Manual - English
Page 53
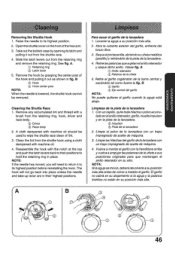
...aguja y la palanca tirahilos no estan en su posicion mas alta. 3 4 6 G 1 46 B. © Hook ® Hook center post NOTE: When the needle is lowered, the shuttle hook cannot be used to its highest position. 2. C) Driver C) Race body 2. Vuelva a montar elgarfio con la hendidura arriba y vuelva a...with machine oil should be removed. B. IMII[MQ[gRN FMIliflOMflii] Removing the Shuttle Hook 1. NOTE: If the needle has moved, you will not go back into place unless the needle and take-up lever are in fig. Levante la aguja a su posicion mas alta. 2. A cloth dampened ...
...aguja y la palanca tirahilos no estan en su posicion mas alta. 3 4 6 G 1 46 B. © Hook ® Hook center post NOTE: When the needle is lowered, the shuttle hook cannot be used to its highest position. 2. C) Driver C) Race body 2. Vuelva a montar elgarfio con la hendidura arriba y vuelva a...with machine oil should be removed. B. IMII[MQ[gRN FMIliflOMflii] Removing the Shuttle Hook 1. NOTE: If the needle has moved, you will not go back into place unless the needle and take-up lever are in fig. Levante la aguja a su posicion mas alta. 2. A cloth dampened ...
Users Manual - English
Page 55
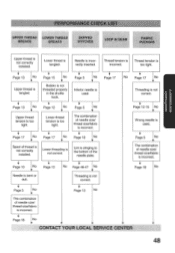
...in the shuttle hook. • Page 12 iNo Lower thread tension is too tight. • Page 17 No Inferior needle is used. • Page 5 No • The combina ion of needle size/ thread size/fabric is incorrect. • Page 15 iNo Threading is not correct. • Page 12-15 ...No • Wrong needle is used. • Page 5 No Spool of needle size/ thread size/fabric is not correct. Thread tension is tangled. Page 13 No The combination of thread is not correctly installed...
...in the shuttle hook. • Page 12 iNo Lower thread tension is too tight. • Page 17 No Inferior needle is used. • Page 5 No • The combina ion of needle size/ thread size/fabric is incorrect. • Page 15 iNo Threading is not correct. • Page 12-15 ...No • Wrong needle is used. • Page 5 No Spool of needle size/ thread size/fabric is not correct. Thread tension is tangled. Page 13 No The combination of thread is not correctly installed...
Users Manual - English
Page 57
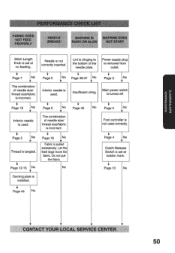
...• Foot controller is not correctly inserted. Needle is not used correctly. Page 5 No • The combination of needle size/ thread size/fabric is installed. Do not pull the fabric. Page 18 No V Inferior needle is used . Page 3 iNo Inferior needle is used . Page 5 No •...Page 49 • • CONTACT YOUR LOCAL SERVICE CENTER 50 IICUMffLMA ViUMMliliNUT7 PERFORMANCE CHECK LIST FABRIC DOES NOT FEED PROPERLY NEEDLE BREAKS MACHINE IS MACHINE DOES NOISY OR SLOW NOT START Stitch Length Knob is set at no feeding. Main power switch ...
...• Foot controller is not correctly inserted. Needle is not used correctly. Page 5 No • The combination of needle size/ thread size/fabric is installed. Do not pull the fabric. Page 18 No V Inferior needle is used . Page 3 iNo Inferior needle is used . Page 5 No •...Page 49 • • CONTACT YOUR LOCAL SERVICE CENTER 50 IICUMffLMA ViUMMliliNUT7 PERFORMANCE CHECK LIST FABRIC DOES NOT FEED PROPERLY NEEDLE BREAKS MACHINE IS MACHINE DOES NOISY OR SLOW NOT START Stitch Length Knob is set at no feeding. Main power switch ...
Users Manual - English
Page 61
Page Performance Checklist 47 Principal Parts 1, 2 R Relative Chart of Sewing Fabrics, Needles and Threads 18 Repacking 52 Reverse Sewing Button 8 S Satin Stitch 25 Sewing Light Switch 4 Bulb Replacement 44 Shuttle Hook Removal 46 Shuttle ...Race Cleaning 46 Simple Zigzag Stitch 24 Stitch Length Knob 7 Stitch Width Knob 8 Straight Stitch 20 T Thin Fabric Sewing Thread Tension Troubleshooting Twin Needle Sewing 22 17 48, 50 16 U Upper Tension Control Dial 17 Upper Threading 13 w Winding the Bobbin 10 14 Modalidad brazo libre Monogramas 0 Ojales...
Page Performance Checklist 47 Principal Parts 1, 2 R Relative Chart of Sewing Fabrics, Needles and Threads 18 Repacking 52 Reverse Sewing Button 8 S Satin Stitch 25 Sewing Light Switch 4 Bulb Replacement 44 Shuttle Hook Removal 46 Shuttle ...Race Cleaning 46 Simple Zigzag Stitch 24 Stitch Length Knob 7 Stitch Width Knob 8 Straight Stitch 20 T Thin Fabric Sewing Thread Tension Troubleshooting Twin Needle Sewing 22 17 48, 50 16 U Upper Tension Control Dial 17 Upper Threading 13 w Winding the Bobbin 10 14 Modalidad brazo libre Monogramas 0 Ojales...


