
Users Manual - English
Page 2
... properly, if it to break. 12. Never operate this machineto be left unattended when plugged in. Keep the ventilation openings of the sewing machine and foot controller free from the accumulation of electric shock: 1. Never drop or insert any object into water. or changing the presser... foot. 15. The sewing machine should always be followed, including the following: "Read all moving parts. Replace bulb with any adjustments in this manual. 3. Use this ...
... properly, if it to break. 12. Never operate this machineto be left unattended when plugged in. Keep the ventilation openings of the sewing machine and foot controller free from the accumulation of electric shock: 1. Never drop or insert any object into water. or changing the presser... foot. 15. The sewing machine should always be followed, including the following: "Read all moving parts. Replace bulb with any adjustments in this manual. 3. Use this ...
Users Manual - English
Page 6
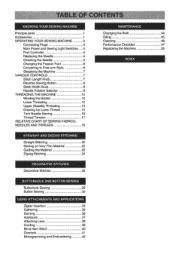
... 46 Connecting Plugs 3 Performance Checklist 47 Main Power and Sewing Light Switches 4 Repacking the Machine 52 Foot Controller 4 Replacing the Needle 5 Checking the Needle 5 INDEX Changing the Presser Foot 6 Converting to Free-arm Style 6 Steadying the Machine 7 VARIOUS CONTROLS 7 Stitch Length Knob 7 Reverse Sewing Button 8 Stitch Width Knob 8 Needle Position Selector 9 THREADING THE MACHINE...
... 46 Connecting Plugs 3 Performance Checklist 47 Main Power and Sewing Light Switches 4 Repacking the Machine 52 Foot Controller 4 Replacing the Needle 5 Checking the Needle 5 INDEX Changing the Presser Foot 6 Converting to Free-arm Style 6 Steadying the Machine 7 VARIOUS CONTROLS 7 Stitch Length Knob 7 Reverse Sewing Button 8 Stitch Width Knob 8 Needle Position Selector 9 THREADING THE MACHINE...
Users Manual - English
Page 11
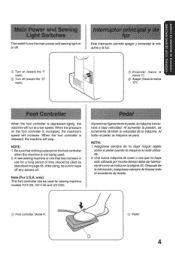
... 0 mark) Encender (hacia Ia marca "I") C) Apagar (hacia Ia marca "0") When the foot controller is not being used for a long period of time should be oiled as described on the foot controller when the machine is depressed lightly, the machine will stop. or off any excess oil. ...aumentar la presidn, se incrementa tambien la velocidad de la maquina. only): Th s foot controller can be used . 2. Despues de la lubricacion, asegurese siempre de limpiar todo el excedente de aceite. 4.\ C) Foot controller: Model N 0 Pedal 4 Asegurese siempre de no dejar ningan objeto sobre elpedal cuando...
... 0 mark) Encender (hacia Ia marca "I") C) Apagar (hacia Ia marca "0") When the foot controller is not being used for a long period of time should be oiled as described on the foot controller when the machine is depressed lightly, the machine will stop. or off any excess oil. ...aumentar la presidn, se incrementa tambien la velocidad de la maquina. only): Th s foot controller can be used . 2. Despues de la lubricacion, asegurese siempre de limpiar todo el excedente de aceite. 4.\ C) Foot controller: Model N 0 Pedal 4 Asegurese siempre de no dejar ningan objeto sobre elpedal cuando...
Users Manual - English
Page 15
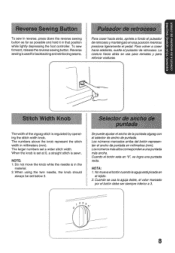
... marcado por el boten debe ser siempre inferior a 3. 2 3 0 5 • 8 The numbers above the knob represent the stitch width in that position while lightly depressing the foot controller. Do not move the knob while the needle is sewn. NOTA: 1. Para volver a coser hacia adelante, suelte elpulsador de retroceso. La costura hacia atras se...
... marcado por el boten debe ser siempre inferior a 3. 2 3 0 5 • 8 The numbers above the knob represent the stitch width in that position while lightly depressing the foot controller. Do not move the knob while the needle is sewn. NOTA: 1. Para volver a coser hacia adelante, suelte elpulsador de retroceso. La costura hacia atras se...
Users Manual - English
Page 27
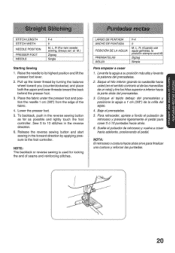
...in the reverse direction. 6. Sew 5 to 10 stitches in the reverse sewing button as far as possible and lightly touch the foot controller. R. (Cuando use aguja gemelas, la posici6n siempre sera M) Zigzag Simple Starting Sewing Para empezar a coser 1. Place the fabric under the presser.... 1. NOTE: The backtack or reverse sewing is used for locking the end of the fabric. Lower the presser foot. 4. Raise the needle to the foot controller. Baje el prensate/as . 3. posicione la aguja a 1 cm (3/8") de la orilla del tejido. Suelte elpulsador de retroceso y vuelva a coser hacia ...
...in the reverse direction. 6. Sew 5 to 10 stitches in the reverse sewing button as far as possible and lightly touch the foot controller. R. (Cuando use aguja gemelas, la posici6n siempre sera M) Zigzag Simple Starting Sewing Para empezar a coser 1. Place the fabric under the presser.... 1. NOTE: The backtack or reverse sewing is used for locking the end of the fabric. Lower the presser foot. 4. Raise the needle to the foot controller. Baje el prensate/as . 3. posicione la aguja a 1 cm (3/8") de la orilla del tejido. Suelte elpulsador de retroceso y vuelva a coser hacia ...
Users Manual - English
Page 28
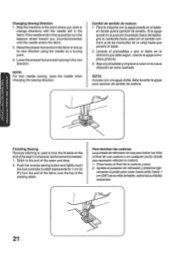
... de retroceso se usa para trabar los hilcs al final de una costura o en cualquier punto donde sea necesario reforzar la costura. 1. Raise the presser foot and turn the balance wheel toward you wish to change directions with the needle still in the up position turn the fabric to lock the... enters the fabric. 2. NOTE: For twin needle sewing, raise the needle when changing the sewing direction. Push the reverse sewing bAton and lightly touch the foot controller to the end of the existing stitch.
... de retroceso se usa para trabar los hilcs al final de una costura o en cualquier punto donde sea necesario reforzar la costura. 1. Raise the presser foot and turn the balance wheel toward you wish to change directions with the needle still in the up position turn the fabric to lock the... enters the fabric. 2. NOTE: For twin needle sewing, raise the needle when changing the sewing direction. Push the reverse sewing bAton and lightly touch the foot controller to the end of the existing stitch.

Users Manual - English
Page 34
edly move the stitch width knob M from 5 to 0 more slowly than for the shape M above to 0 while depressing the foot control at an even speed. knob `rom 0 to 5, then from 0 to 3, then quickly back to 0. R - .Iiir lIIII "Mil 'mill NOTE: For twin ...3A11V80030 27 Repeatedly move the stitch width knob from 0 to 3, then from 5 to make round patterns 111111 '111111 IIIIIHIIIIII• while depressing the foot control at an even speed. L Repeatedly move the stitch width knobslowlyfrom0to5,then quickly back to 0. R .Iiiii. ..iiiii...,ii ii.....ii ii.. edly ...
edly move the stitch width knob M from 5 to 0 more slowly than for the shape M above to 0 while depressing the foot control at an even speed. knob `rom 0 to 5, then from 0 to 3, then quickly back to 0. R - .Iiir lIIII "Mil 'mill NOTE: For twin ...3A11V80030 27 Repeatedly move the stitch width knob from 0 to 3, then from 5 to make round patterns 111111 '111111 IIIIIHIIIIII• while depressing the foot control at an even speed. L Repeatedly move the stitch width knobslowlyfrom0to5,then quickly back to 0. R .Iiiii. ..iiiii...,ii ii.....ii ii.. edly ...
Users Manual - English
Page 57
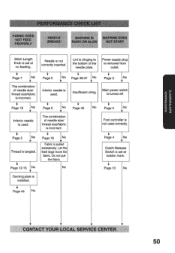
... 18 No V Inferior needle is used correctly. Page 5 No • The combination of needle size/ thread size/fabric is incorrect. 4 Page 45 Page 4 No • Foot controller is not used . Page 49 • • CONTACT YOUR LOCAL SERVICE CENTER 50 Do not pull the fabric. Main power switch Insufficient oiling. is pulled...
... 18 No V Inferior needle is used correctly. Page 5 No • The combination of needle size/ thread size/fabric is incorrect. 4 Page 45 Page 4 No • Foot controller is not used . Page 49 • • CONTACT YOUR LOCAL SERVICE CENTER 50 Do not pull the fabric. Main power switch Insufficient oiling. is pulled...


