
Users Manual - English
Page 2
...needle plate. Do not pull or push the fabric while stitching. "SAVE THESE INSTRUCTIONS" "This sewing machine is intended for examination, repair, electrical or mechanical adjustment. 4. The sewing machine should always be followed, including the following: "Read all moving parts. Always unplug this machineto be...used or where oxygen is used by pulling on the cord. Always unplug before cleaning. 2. Close attention is necessary when the sewing machine is being used as threading the needle, changing the needle, threading the bobbin. Never drop or insert any object into water....
...needle plate. Do not pull or push the fabric while stitching. "SAVE THESE INSTRUCTIONS" "This sewing machine is intended for examination, repair, electrical or mechanical adjustment. 4. The sewing machine should always be followed, including the following: "Read all moving parts. Always unplug this machineto be...used or where oxygen is used by pulling on the cord. Always unplug before cleaning. 2. Close attention is necessary when the sewing machine is being used as threading the needle, changing the needle, threading the bobbin. Never drop or insert any object into water....
Users Manual - English
Page 4
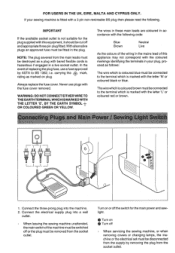
... letter 'N' or coloured black or blue. Connect the electrical supply plug into the machine. 2. Turn on or off When servicing the sewing machine, or when removing covers or changing lamps, the machine or the electrical set must be connected to the terminal which is coloured blue must... WHICHISMARKEDWITH THE LETTER `E', BY THE EARTH SYMBOL J-• OR COLOURED GREEN OR YELLOW. When leaving the sewing machine unattended, the main switch of the wiring in your sewing machine is fitted with bared flexible cords is not suitable for the main power and sewlight. • Turn on...
... letter 'N' or coloured black or blue. Connect the electrical supply plug into the machine. 2. Turn on or off When servicing the sewing machine, or when removing covers or changing lamps, the machine or the electrical set must be connected to the terminal which is coloured blue must... WHICHISMARKEDWITH THE LETTER `E', BY THE EARTH SYMBOL J-• OR COLOURED GREEN OR YELLOW. When leaving the sewing machine unattended, the main switch of the wiring in your sewing machine is fitted with bared flexible cords is not suitable for the main power and sewlight. • Turn on...
Users Manual - English
Page 6
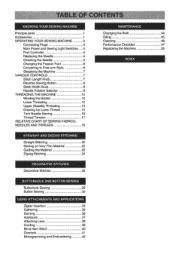
1-;;•),e ti .41 Lachki, . KNOWING YOUR SEWING MACHINE MAINTENANCE Principal parts 1 Changing the Bulb 44 Accessories 1 Oiling 45 OPERATING YOUR SEWING MACHINE 3 Cleaning 46 Connecting Plugs 3 Performance Checklist 47 Main Power and Sewing Light Switches 4 Repacking the Machine 52 Foot Controller 4 Replacing the Needle 5 Checking the Needle 5 INDEX Changing the Presser Foot 6 Converting to Free-arm Style...
1-;;•),e ti .41 Lachki, . KNOWING YOUR SEWING MACHINE MAINTENANCE Principal parts 1 Changing the Bulb 44 Accessories 1 Oiling 45 OPERATING YOUR SEWING MACHINE 3 Cleaning 46 Connecting Plugs 3 Performance Checklist 47 Main Power and Sewing Light Switches 4 Repacking the Machine 52 Foot Controller 4 Replacing the Needle 5 Checking the Needle 5 INDEX Changing the Presser Foot 6 Converting to Free-arm Style...
Users Manual - English
Page 11
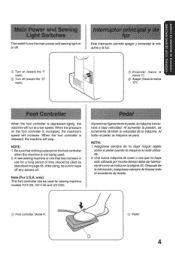
...aumentar la presidn, se incrementa tambien la velocidad de la maquina. A new sewing machine or one that nothing is placed on the foot controller when the machine is not being used for sewing machine models VX1120, VX1140 and VX1250. NOTA: 1. Asegurese siempre de no dejar ningan...controller: Model N 0 Pedal 4 KNOWING YOUR SEWING MACHINE CONOZCA SU MAQUINA DE COSER Main Power and Sewing Light Switches Interruptor principal y cli luz This switch turns the main power and sewing light on the foot controller is increased, the machine's speed will increase. When the pressure on ...
...aumentar la presidn, se incrementa tambien la velocidad de la maquina. A new sewing machine or one that nothing is placed on the foot controller when the machine is not being used for sewing machine models VX1120, VX1140 and VX1250. NOTA: 1. Asegurese siempre de no dejar ningan...controller: Model N 0 Pedal 4 KNOWING YOUR SEWING MACHINE CONOZCA SU MAQUINA DE COSER Main Power and Sewing Light Switches Interruptor principal y cli luz This switch turns the main power and sewing light on the foot controller is increased, the machine's speed will increase. When the pressure on ...
Users Manual - English
Page 15
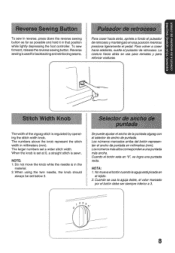
... debe ser siempre inferior a 3. 2 3 0 5 • 8 The numbers above the knob represent the stitch width in that position while lightly depressing the foot controller. KNOWING YOUR SEWING MACHINE CONOZCA SU MAOUINA DE COSER To sew in reverse, press down the reverse sewing button as far as possible and hold it in millimeters (mm). Reverse...
... debe ser siempre inferior a 3. 2 3 0 5 • 8 The numbers above the knob represent the stitch width in that position while lightly depressing the foot controller. KNOWING YOUR SEWING MACHINE CONOZCA SU MAOUINA DE COSER To sew in reverse, press down the reverse sewing button as far as possible and hold it in millimeters (mm). Reverse...
Users Manual - English
Page 17
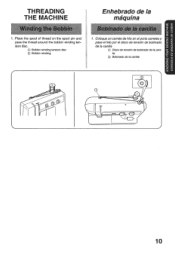
KNOWING YOUR SEWING MACHINE CONOZCA SU MAQUINA DE COSER THREADING THE MACHINE Winding the Bobbin 1. Place the spool of thread on the spool pin and pass the thread around the bobbin winding tersion disc. ® Bobbin winding tension disc ® Bobbin winding Enhebrado de la maquina Bobinado de la canilla 1. disco de tension de bobinado de la canilla ® Disco de tension de bobinado de la canilla 0 Bobinado de la canilla 2 0 1 0 10 Coloque un carrete de hilo en elporta carretes y pase el hilo pore!
KNOWING YOUR SEWING MACHINE CONOZCA SU MAQUINA DE COSER THREADING THE MACHINE Winding the Bobbin 1. Place the spool of thread on the spool pin and pass the thread around the bobbin winding tersion disc. ® Bobbin winding tension disc ® Bobbin winding Enhebrado de la maquina Bobinado de la canilla 1. disco de tension de bobinado de la canilla ® Disco de tension de bobinado de la canilla 0 Bobinado de la canilla 2 0 1 0 10 Coloque un carrete de hilo en elporta carretes y pase el hilo pore!
Users Manual - English
Page 21
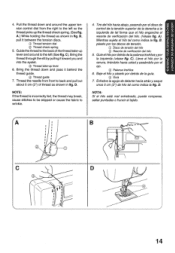
... de tensiOn del bib Resorte de verificacien del bib. 5. D. Guide the thread tothe back of thread as shown in fig. A B ••• C D 4 j.; KNOWING YOUR SEWING MACHINE CONOZCA SU MAQUINA DE COSER OO 4. Lleve el bib por la ranura, tIrandolo hacla usted y pasandolo por el ojo.
... de tensiOn del bib Resorte de verificacien del bib. 5. D. Guide the thread tothe back of thread as shown in fig. A B ••• C D 4 j.; KNOWING YOUR SEWING MACHINE CONOZCA SU MAQUINA DE COSER OO 4. Lleve el bib por la ranura, tIrandolo hacla usted y pasandolo por el ojo.
Users Manual - English
Page 25
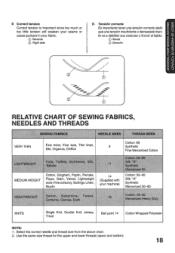
KNOWING YOUR SEWING MACHINE CONOZCA SU MAQUINA DE COSER D Correct tension Correct tension is important since too much or too little tension will weaken your seams or cause puckers in your machine) Cotton: 60-80 Silk: "A" Synthetic Mercerized 50 Cotton: 50-60 Silk: "A" Synthetic Merceri7eri 50-60 ... size from the above chart. 2. te va a debilitar sus costuras o fruncir el tejido. 0 Reyes Derecho RELATIVE CHART OF SEWING FABRICS, NEEDLES AND THREADS SEWING FABRICS NEEDLE SIZES THREAD SIZES Cotton: 80 VERY THIN Fine tricot, Fine lace, Thin linen, 9 Synthetic Silk, Organza, Chiffon...
KNOWING YOUR SEWING MACHINE CONOZCA SU MAQUINA DE COSER D Correct tension Correct tension is important since too much or too little tension will weaken your seams or cause puckers in your machine) Cotton: 60-80 Silk: "A" Synthetic Mercerized 50 Cotton: 50-60 Silk: "A" Synthetic Merceri7eri 50-60 ... size from the above chart. 2. te va a debilitar sus costuras o fruncir el tejido. 0 Reyes Derecho RELATIVE CHART OF SEWING FABRICS, NEEDLES AND THREADS SEWING FABRICS NEEDLE SIZES THREAD SIZES Cotton: 80 VERY THIN Fine tricot, Fine lace, Thin linen, 9 Synthetic Silk, Organza, Chiffon...
Users Manual - English
Page 28
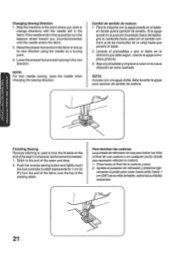
... backwards for 1 cm (3/ 8") from the end of the fabric over the top of the seam and stop. 2. Push the reverse sewing bAton and lightly touch the foot controller to the end of the existing stitch. Cosa hasta el final de la costura y pare. 2. Changing...costura o en cualquier punto donde sea necesario reforzar la costura. 1. OVZOIZ A SV.L03L1StiCIV.I.NrId ONIHOILLS OVZDIZ (INV 1HOIVELLS Finishing Sewing Reverse stitching is needed. 1. Stop the machine at the end of tejido en la direcci0n que debe seguir, usandola aguja como p/aca giratoria. 3. NOTA: Alcosercon una aguja...
... backwards for 1 cm (3/ 8") from the end of the fabric over the top of the seam and stop. 2. Push the reverse sewing bAton and lightly touch the foot controller to the end of the existing stitch. Cosa hasta el final de la costura y pare. 2. Changing...costura o en cualquier punto donde sea necesario reforzar la costura. 1. OVZOIZ A SV.L03L1StiCIV.I.NrId ONIHOILLS OVZDIZ (INV 1HOIVELLS Finishing Sewing Reverse stitching is needed. 1. Stop the machine at the end of tejido en la direcci0n que debe seguir, usandola aguja como p/aca giratoria. 3. NOTA: Alcosercon una aguja...
Users Manual - English
Page 30
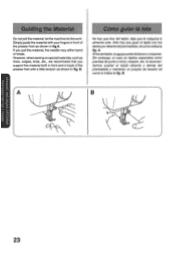
... prendas de punto o tricot, crespen, etc. B OVZOIZ A SV_LO3H StIOV_LNI7c1 DNIH3IIIS OVZOIZ CINIV 1H9IVHIS 23 let the machine do the work. Sitire deltejido, la agujapuede doblarseoromperse. deje que la maquina lo alimente sola. However, when sewing on special materials, such as shown in fig. to cowmandamos sujetar e/ tejido delante y detras del prensatelas y mantener...
... prendas de punto o tricot, crespen, etc. B OVZOIZ A SV_LO3H StIOV_LNI7c1 DNIH3IIIS OVZOIZ CINIV 1H9IVHIS 23 let the machine do the work. Sitire deltejido, la agujapuede doblarseoromperse. deje que la maquina lo alimente sola. However, when sewing on special materials, such as shown in fig. to cowmandamos sujetar e/ tejido delante y detras del prensatelas y mantener...
Users Manual - English
Page 40
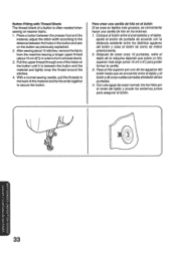
...una canilla de Me en el bot6n The thread shank of the material and tie the ends together puntadas. After sewing about 15 cm (6")) in the button and sew distancia existente entre los distintos agujeros on heavier fabric. material and tightly wrap the thread around the 3. Con una...remove the fabric anteriormente. del botan y cosa el botOn tal como se indica 2. from the machine leaving a longer upper thread 2. ii botOn hasta que se encuentre entre el tejido y el 4. With a normal sewing needle, pull the threads to form a thread shank. to the ajuste el ancho de puntada de...
...una canilla de Me en el bot6n The thread shank of the material and tie the ends together puntadas. After sewing about 15 cm (6")) in the button and sew distancia existente entre los distintos agujeros on heavier fabric. material and tightly wrap the thread around the 3. Con una...remove the fabric anteriormente. del botan y cosa el botOn tal como se indica 2. from the machine leaving a longer upper thread 2. ii botOn hasta que se encuentre entre el tejido y el 4. With a normal sewing needle, pull the threads to form a thread shank. to the ajuste el ancho de puntada de...
Users Manual - English
Page 51
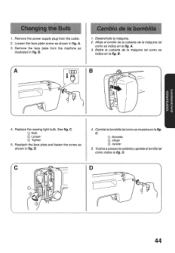
...B. C. Qi Dombilla 0 Afiojar @ Apretar 5. D. Remove the face plate from the outlet. 2. See fig. C. A. 3. Replace the sewing light bulb. Reattach the face plate and fasten the screw as illustrated in fig. D 0 0 44 Cambie bombilla talcomosemuestra enla fig. Loosen the...as shown in fig. B. A U 4. C) Bulb C) Loosen C) Tighten 5. D. 4. Carnbio de la bombilla 1. Remove the power supply plug from the machine as shown in fig. A. 3. Retire la cubierta de la maquina tal como se indica en la fig. Vuelva a colocarla cubierta yapriete eltornillo tal como indica...
...B. C. Qi Dombilla 0 Afiojar @ Apretar 5. D. Remove the face plate from the outlet. 2. See fig. C. A. 3. Replace the sewing light bulb. Reattach the face plate and fasten the screw as illustrated in fig. D 0 0 44 Cambie bombilla talcomosemuestra enla fig. Loosen the...as shown in fig. B. A U 4. C) Bulb C) Loosen C) Tighten 5. D. 4. Carnbio de la bombilla 1. Remove the power supply plug from the machine as shown in fig. A. 3. Retire la cubierta de la maquina tal como se indica en la fig. Vuelva a colocarla cubierta yapriete eltornillo tal como indica...
Users Manual - English
Page 52
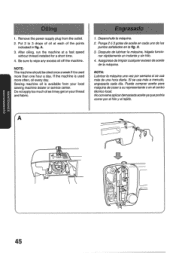
Remove the power supply plug from your local sewing machine dealer or service center. Be sure to 3 drops of the points indicated in fig. NOTA: Lubricar la maquina una vez por semana si se usa ... de aceite en cada uno de los puntos setialados en la fig. rifOffilMBMM1 IEIZIEUE 1. After oiling, run the machine at each of oil at a fast speed without thread installed for a short time. 4. Sewing machine oil is used more often, oil every day. Puede comprar aceite para maquina de coser a su representante o en el...
Remove the power supply plug from your local sewing machine dealer or service center. Be sure to 3 drops of the points indicated in fig. NOTA: Lubricar la maquina una vez por semana si se usa ... de aceite en cada uno de los puntos setialados en la fig. rifOffilMBMM1 IEIZIEUE 1. After oiling, run the machine at each of oil at a fast speed without thread installed for a short time. 4. Sewing machine oil is used more often, oil every day. Puede comprar aceite para maquina de coser a su representante o en el...


