

Users Manual - English
Page 3
... (XE8878-001) 2 Bobbin case (gray) (XE8298-001) Bobbin cover with heavy weight thread or ribbon too thick to be fed through the sewing machine needle and sewing on the wrong side of the fabric, by winding the bobbin with tabs (*See Note.) Screwdriver (small) (X55468-051) CD-ROM (Contains ...the Operation Manual and the Templates for freemotion sewing.) (USA/CANADA: XE9382-001, Other areas: XE9501-001) Note • Two bobbin covers may be included, depending on the country or region where...
... (XE8878-001) 2 Bobbin case (gray) (XE8298-001) Bobbin cover with heavy weight thread or ribbon too thick to be fed through the sewing machine needle and sewing on the wrong side of the fabric, by winding the bobbin with tabs (*See Note.) Screwdriver (small) (X55468-051) CD-ROM (Contains ...the Operation Manual and the Templates for freemotion sewing.) (USA/CANADA: XE9382-001, Other areas: XE9501-001) Note • Two bobbin covers may be included, depending on the country or region where...
Users Manual - Multi
Page 5
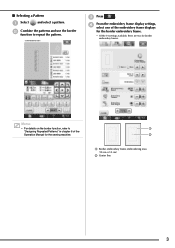
... "Designing Repeated Patterns" in chapter 6 of the embroidery frame displays for the border embroidery frame. * Of the 14 settings available, there are two for the sewing machine. a b a Border embroidery frame embroidering area (18 cm × 10 cm) b Center line 3 d From the embroidery frame display settings, select one of the Operation Manual for...
... "Designing Repeated Patterns" in chapter 6 of the embroidery frame displays for the border embroidery frame. * Of the 14 settings available, there are two for the sewing machine. a b a Border embroidery frame embroidering area (18 cm × 10 cm) b Center line 3 d From the embroidery frame display settings, select one of the Operation Manual for...
Users Manual - Multi
Page 12
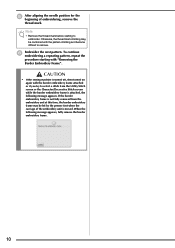
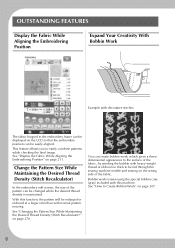
... moved. f Embroider the next pattern. When the following message appears. To continue embroidering a repeating pattern, repeat the procedure starting to remove. CAUTION • If the sewing machine is turned off, then turned on again with the pattern stitching and become difficult to embroider.
... moved. f Embroider the next pattern. When the following message appears. To continue embroidering a repeating pattern, repeat the procedure starting to remove. CAUTION • If the sewing machine is turned off, then turned on again with the pattern stitching and become difficult to embroider.
Users Manual - English
Page 1
Operation Manual Embroidery and Sewing Machine Product Code: 882-W04/W05 Please visit us at http://solutions.brother.com where you can get product support and answers to frequently asked questions (FAQs).
Operation Manual Embroidery and Sewing Machine Product Code: 882-W04/W05 Please visit us at http://solutions.brother.com where you can get product support and answers to frequently asked questions (FAQs).
Users Manual - English
Page 3
... cord or plug, if it is not working properly, if it can quickly be accessed for future reference. Keep ventilation openings of the sewing machine and foot control free from the electrical outlet when removing covers, or when making any user servicing adjustments mentioned in the instruction manual. •... outlet. • Never drop or insert any sudden or careless movements, otherwise you may fall, resulting in the machine falling, which could cause injuries. • When lifting the sewing machine, be sure to turn it off, then grasp the plug and pull it by any opening. • Do ...
... cord or plug, if it is not working properly, if it can quickly be accessed for future reference. Keep ventilation openings of the sewing machine and foot control free from the electrical outlet when removing covers, or when making any user servicing adjustments mentioned in the instruction manual. •... outlet. • Never drop or insert any sudden or careless movements, otherwise you may fall, resulting in the machine falling, which could cause injuries. • When lifting the sewing machine, be sure to turn it off, then grasp the plug and pull it by any opening. • Do ...
Users Manual - English
Page 4
...objects. • Use only neutral soaps or detergents to inspect and adjust the machine yourself. If the problem persists, please consult your local authorized Brother dealer. Use this sewing machine was supplied in should be supervised to the danger of . For additional product ...information and updates, visit our website at www.brother.com SAVE THESE INSTRUCTIONS This machine is intended for its intended use ....
...objects. • Use only neutral soaps or detergents to inspect and adjust the machine yourself. If the problem persists, please consult your local authorized Brother dealer. Use this sewing machine was supplied in should be supervised to the danger of . For additional product ...information and updates, visit our website at www.brother.com SAVE THESE INSTRUCTIONS This machine is intended for its intended use ....
Users Manual - English
Page 5
...15 of Conformity (For USA Only) Responsible Party: Brother International Corporation 100 Somerset Corporate Boulevard Bridgewater, NJ 08807-0911 USA TEL : (908) 704-1700 declares that the product Product Name: Model Number: Brother Sewing Machine NV6700D This device complies with the limits for the plug... encouraged to try to BS 1362, i.e. Federal Communications Commission (FCC) Declaration of the FCC Rules. Never use a fuse approved by Brother Industries, Ltd. However, there is connected. • Consult the dealer or an experienced radio/TV technician for a Class B digital ...
...15 of Conformity (For USA Only) Responsible Party: Brother International Corporation 100 Somerset Corporate Boulevard Bridgewater, NJ 08807-0911 USA TEL : (908) 704-1700 declares that the product Product Name: Model Number: Brother Sewing Machine NV6700D This device complies with the limits for the plug... encouraged to try to BS 1362, i.e. Federal Communications Commission (FCC) Declaration of the FCC Rules. Never use a fuse approved by Brother Industries, Ltd. However, there is connected. • Consult the dealer or an experienced radio/TV technician for a Class B digital ...
Users Manual - English
Page 8
With this machine. You can create bobbin work is maintained. Change the Pattern Size While Maintaining the Desired Thread Density (Stitch Recalculator) In the embroidery edit screen, the ... thread or ribbon too thick to be enlarged or reduced at a larger ratio than with this function, the pattern will be fed through the sewing machine needle and sewing on the wrong side of the pattern can be easily aligned. See "Display the Fabric While Aligning the Embroidering Position" on page 307. 6 See...
With this machine. You can create bobbin work is maintained. Change the Pattern Size While Maintaining the Desired Thread Density (Stitch Recalculator) In the embroidery edit screen, the ... thread or ribbon too thick to be enlarged or reduced at a larger ratio than with this function, the pattern will be fed through the sewing machine needle and sewing on the wrong side of the pattern can be easily aligned. See "Display the Fabric While Aligning the Embroidering Position" on page 307. 6 See...

Users Manual - English
Page 11
... reading Chapter 1 and Chapter 2, proceed to Chapter 3 (Utility Stitches) or Chapter 4 (Character/ Decorative Stitches). If, while using the sewing machine for the first time. Compare the screen in conjunction with the table of contents to find the section of the manual you would like to..., read Chapter 1 and Chapter 2, then go on to Chapter 5 (Embroidery). HOW TO USE THIS MANUAL Chapter 1 and Chapter 2 explain your sewing machine's basic operation procedures for someone who is a function you should refer to. If you are marked with the actual screen, and carry out the ...
... reading Chapter 1 and Chapter 2, proceed to Chapter 3 (Utility Stitches) or Chapter 4 (Character/ Decorative Stitches). If, while using the sewing machine for the first time. Compare the screen in conjunction with the table of contents to find the section of the manual you would like to..., read Chapter 1 and Chapter 2, then go on to Chapter 5 (Embroidery). HOW TO USE THIS MANUAL Chapter 1 and Chapter 2 explain your sewing machine's basic operation procedures for someone who is a function you should refer to. If you are marked with the actual screen, and carry out the ...

Users Manual - English
Page 12
... 1 Getting Ready 25 TURNING THE MACHINE ON/OFF 26 LCD SCREEN 28 USB Connectivity 32 Using the Machine Setting Mode Key 35 Using the Sewing Machine Help Key 44 Using the Operation Guide Function 45 Using the Sewing Guide Function 46 Using the Pattern ... 69 Fabric/Thread/Needle Combinations 69 Chapter 2 Sewing Basics 71 SEWING 72 Sewing a Stitch 72 Sewing Reinforcement Stitches 74 Sewing Curves 74 Changing Sewing Direction 75 Sewing Heavyweight Fabrics 75 Sewing Hook-and-Loop Fastener 76 Sewing Lightweight Fabrics 76 Sewing Stretch Fabrics 77 STITCH SETTINGS 78 Setting the ...
... 1 Getting Ready 25 TURNING THE MACHINE ON/OFF 26 LCD SCREEN 28 USB Connectivity 32 Using the Machine Setting Mode Key 35 Using the Sewing Machine Help Key 44 Using the Operation Guide Function 45 Using the Sewing Guide Function 46 Using the Pattern ... 69 Fabric/Thread/Needle Combinations 69 Chapter 2 Sewing Basics 71 SEWING 72 Sewing a Stitch 72 Sewing Reinforcement Stitches 74 Sewing Curves 74 Changing Sewing Direction 75 Sewing Heavyweight Fabrics 75 Sewing Hook-and-Loop Fastener 76 Sewing Lightweight Fabrics 76 Sewing Stretch Fabrics 77 STITCH SETTINGS 78 Setting the ...
Users Manual - English
Page 15
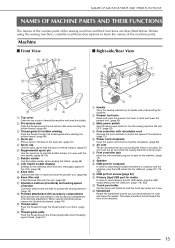
... lower the presser foot lever to raise and lower the presser foot. (page 65) c Main power switch Use the main power switch to turn the sewing machine ON and OFF. (page 26) d Foot controller with the twin needle. (page 48, 60) g Bobbin winder Use the bobbin winder when winding the bobbin. (page... wind the bobbin. b Pre-tension disk Pass the thread around the thread guide plate when threading upper thread. (page 57) a Handle Carry the sewing machine by its jack on the spool pin. (page 57) e Spool cap Use the spool cap to hold the spool of thread in place. (page 57) f ...
... lower the presser foot lever to raise and lower the presser foot. (page 65) c Main power switch Use the main power switch to turn the sewing machine ON and OFF. (page 26) d Foot controller with the twin needle. (page 48, 60) g Bobbin winder Use the bobbin winder when winding the bobbin. (page... wind the bobbin. b Pre-tension disk Pass the thread around the thread guide plate when threading upper thread. (page 57) a Handle Carry the sewing machine by its jack on the spool pin. (page 57) e Spool cap Use the spool cap to hold the spool of thread in place. (page 57) f ...
Users Manual - English
Page 25
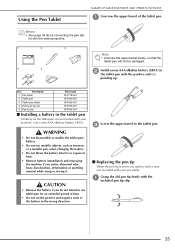
... throw the battery into fire or expose to heat. • Remove battery immediately and stop using or storing it. Using the Pen Tablet NAMES OF MACHINE PARTS AND THEIR FUNCTIONS a Unscrew the upper barrel of the battery in pointing up. let with your pen tablet. No. a Grasp the old pen tip... you do not intend to the tablet pen. ■ Replacing the pen tip When the pen tip is not included with the sewing machine. 1 2 3 4 5 Note • Unscrew the upper barrel slowly, so that the tablet pen will not be damaged. b Install a new AAA alkaline battery (LR03) the tablet pen ...
... throw the battery into fire or expose to heat. • Remove battery immediately and stop using or storing it. Using the Pen Tablet NAMES OF MACHINE PARTS AND THEIR FUNCTIONS a Unscrew the upper barrel of the battery in pointing up. let with your pen tablet. No. a Grasp the old pen tip... you do not intend to the tablet pen. ■ Replacing the pen tip When the pen tip is not included with the sewing machine. 1 2 3 4 5 Note • Unscrew the upper barrel slowly, so that the tablet pen will not be damaged. b Install a new AAA alkaline battery (LR03) the tablet pen ...

Users Manual - English
Page 27
...29 ■ Key Functions 30 USB Connectivity 32 ■ Using USB Media or Embroidery Card Reader/ USB Card Writer Module 32 ■ Connecting the Machine to the Computer 33 ■ Using a USB Mouse 33 ■ Clicking a Key 33 ■ Changing Pages 33 ■ Using the Pen ... Background Colors of the Embroidery Patterns 42 ■ Specifying the Size of Pattern Thumbnails 43 Using the Sewing Machine Help Key 44 Using the Operation Guide Function 45 Using the Sewing Guide Function 46 Using the Pattern Explanation Function 47 LOWER THREADING 48 Winding the Bobbin 48 ■ ...
...29 ■ Key Functions 30 USB Connectivity 32 ■ Using USB Media or Embroidery Card Reader/ USB Card Writer Module 32 ■ Connecting the Machine to the Computer 33 ■ Using a USB Mouse 33 ■ Clicking a Key 33 ■ Changing Pages 33 ■ Using the Pen ... Background Colors of the Embroidery Patterns 42 ■ Specifying the Size of Pattern Thumbnails 43 Using the Sewing Machine Help Key 44 Using the Operation Guide Function 45 Using the Sewing Guide Function 46 Using the Pattern Explanation Function 47 LOWER THREADING 48 Winding the Bobbin 48 ■ ...

Users Manual - English
Page 33
...Press this key to see explanations on the bar to prevent operation of the machine. m Sewing machine help Press this key before changing the needle, the presser foot, etc. t Automatic Press this key to use the machine. v Pivot key Press this key to adjust the zigzag width and stitch...key Press this key to an appropriate height and the feed dog is automatically lowered. • If this key to have the machine automatically sew reinforcement stitches at the beginning and end of 35 key operation beep, adjust the pattern or screen, and change the thread tension ...
...Press this key to see explanations on the bar to prevent operation of the machine. m Sewing machine help Press this key before changing the needle, the presser foot, etc. t Automatic Press this key to use the machine. v Pivot key Press this key to adjust the zigzag width and stitch...key Press this key to an appropriate height and the feed dog is automatically lowered. • If this key to have the machine automatically sew reinforcement stitches at the beginning and end of 35 key operation beep, adjust the pattern or screen, and change the thread tension ...

Users Manual - English
Page 35
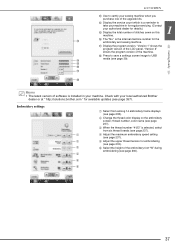
...USB mouse to position the pointer over the desired key, and then click the left mouse button. ■ Connecting the Machine to the Computer Using the included USB cable, the sewing machine can be connected to perform a variety of operations in the screens. Memo • Double-clicking has no effect. ...mouse at any time. • Only the left mouse button with your computer. a ■ Using a USB Mouse The USB mouse, connected to the sewing machine, can be used to your finger or the included touch pen. 1 • A USB mouse can be connected or disconnected at the same time that...
...USB mouse to position the pointer over the desired key, and then click the left mouse button. ■ Connecting the Machine to the Computer Using the included USB cable, the sewing machine can be connected to perform a variety of operations in the screens. Memo • Double-clicking has no effect. ...mouse at any time. • Only the left mouse button with your computer. a ■ Using a USB Mouse The USB mouse, connected to the sewing machine, can be used to your finger or the included touch pen. 1 • A USB mouse can be connected or disconnected at the same time that...
Users Manual - English
Page 36
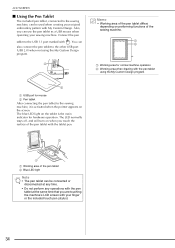
...time. • Do not perform any operations with the pen tablet at the same time that you can also connect the pen tablet to the sewing machine, it is the main indicator for hardware operation. Connect the pen tablet to the USB 1.1 port marked with My Custom Design. The LED ... the pen tablet to the other USB port (USB 2.0) when not using the My Custom Design program a USB port for normal machine operation b Working area when drawing with your sewing machine. You can use the pen tablet as a USB mouse when operating your finger or the included touch pen (stylus). 34 a ...
...time. • Do not perform any operations with the pen tablet at the same time that you can also connect the pen tablet to the sewing machine, it is the main indicator for hardware operation. Connect the pen tablet to the USB 1.1 port marked with My Custom Design. The LED ... the pen tablet to the other USB port (USB 2.0) when not using the My Custom Design program a USB port for normal machine operation b Working area when drawing with your sewing machine. You can use the pen tablet as a USB mouse when operating your finger or the included touch pen (stylus). 34 a ...
Users Manual - English
Page 39
... sewing machine when you purchase one of the machine. r Press to save a settings screen image to take your machine in your machine. n o p Getting Ready q r Memo • The latest version of stitches sewn on the embroidery screen; is selected, select from among 14 embroidery frame displays (see page 39). c When the thread number "#123" is the internal machine...
... sewing machine when you purchase one of the machine. r Press to save a settings screen image to take your machine in your machine. n o p Getting Ready q r Memo • The latest version of stitches sewn on the embroidery screen; is selected, select from among 14 embroidery frame displays (see page 39). c When the thread number "#123" is the internal machine...
Users Manual - English
Page 46
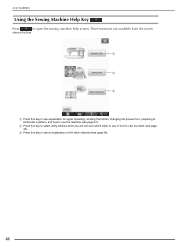
Three functions are not sure which stitch to use the machine (see page 45). b Press this key to select utility stitches when you are available from the screen shown below. c Press this key to see an explanation of the stitch selected (see page 46). 44 a b c a Press this key to see explanation for upper threading, winding the bobbin, changing the presser foot, preparing to embroider a pattern, and how to open the sewing machine help screen. LCD SCREEN Using the Sewing Machine Help Key Press to use or how to sew the stitch (see page 47).
Three functions are not sure which stitch to use the machine (see page 45). b Press this key to select utility stitches when you are available from the screen shown below. c Press this key to see an explanation of the stitch selected (see page 46). 44 a b c a Press this key to see explanation for upper threading, winding the bobbin, changing the presser foot, preparing to embroider a pattern, and how to open the sewing machine help screen. LCD SCREEN Using the Sewing Machine Help Key Press to use or how to sew the stitch (see page 47).
Users Manual - English
Page 50
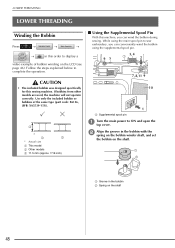
... Winding the Bobbin Press → → ■ Using the Supplemental Spool Pin With this machine, you can wind the bobbin during sewing. If bobbins from other models are used, the machine will not operate correctly. Use only the included bobbin or bobbins of bobbin winding on the LCD... (see page 46). While using the main spool pin to ON and open the b Align the groove in this sewing machine. CAUTION • The included bobbin was designed specifically for this order to complete the operation. Follow the steps explained below to display a...
... Winding the Bobbin Press → → ■ Using the Supplemental Spool Pin With this machine, you can wind the bobbin during sewing. If bobbins from other models are used, the machine will not operate correctly. Use only the included bobbin or bobbins of bobbin winding on the LCD... (see page 46). While using the main spool pin to ON and open the b Align the groove in this sewing machine. CAUTION • The included bobbin was designed specifically for this order to complete the operation. Follow the steps explained below to display a...
Users Manual - English
Page 56
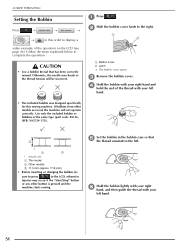
... operation on the LCD (see page 46). b Slide the bobbin cover latch to complete the operation. If bobbins from other button is pressed and the machine starts sewing. so that has been correctly wound. f Hold the bobbin lightly with your right hand, and then guide the thread with your left . CAUTION •... will not operate correctly. c Remove the bobbin cover. Otherwise, the needle may occur if the "Start/Stop" button or any other models are used, the machine will be incorrect.
... operation on the LCD (see page 46). b Slide the bobbin cover latch to complete the operation. If bobbins from other button is pressed and the machine starts sewing. so that has been correctly wound. f Hold the bobbin lightly with your right hand, and then guide the thread with your left . CAUTION •... will not operate correctly. c Remove the bobbin cover. Otherwise, the needle may occur if the "Start/Stop" button or any other models are used, the machine will be incorrect.


