

Users Manual - English
Page 10
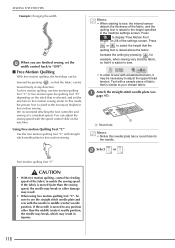
... upper thread and bobbin thread, and then pass them under the presser foot toward the rear of simple stitches: , , n Select a low speed, gently hold the threads behind the presser foot and start sewing. Select a stitch. Depending on the fabric, bunched stitches may break. We recommend selecting a simple stitch and sewing trial stitches to the machine's Operation Manual. For details on the machine. o If your machine is started with the automatic thread cutting function and automatic reinforcement/reverse stitching function, make sure the automatic thread...
... upper thread and bobbin thread, and then pass them under the presser foot toward the rear of simple stitches: , , n Select a low speed, gently hold the threads behind the presser foot and start sewing. Select a stitch. Depending on the fabric, bunched stitches may break. We recommend selecting a simple stitch and sewing trial stitches to the machine's Operation Manual. For details on the machine. o If your machine is started with the automatic thread cutting function and automatic reinforcement/reverse stitching function, make sure the automatic thread...
Users Manual - English
Page 4
... other parts to assure correct installation. 8 For repair or adjustment: • If the light unit is damaged, it to change without notice. IMPORTANT SAFETY INSTRUCTIONS 5 Special care is required when sewing: • Always pay close attention is necessary when the machine is used . • Always consult the operation manual when replacing or installing any adjustments in the needle area. • Do not use a damaged or incorrect needle plate, as...
... other parts to assure correct installation. 8 For repair or adjustment: • If the light unit is damaged, it to change without notice. IMPORTANT SAFETY INSTRUCTIONS 5 Special care is required when sewing: • Always pay close attention is necessary when the machine is used . • Always consult the operation manual when replacing or installing any adjustments in the needle area. • Do not use a damaged or incorrect needle plate, as...

Users Manual - English
Page 12
... Machine Setting Mode Key 35 Using the Sewing Machine Help Key 44 Using the Operation Guide Function 45 Using the Sewing Guide Function 46 Using the Pattern Explanation Function 47 LOWER THREADING 48 Winding the Bobbin 48 Setting the Bobbin 54 Pulling Up the Bobbin Thread 55 UPPER THREADING 57 Upper Threading 57 Using the Twin Needle Mode 60 Using the Spool Stand 63 Using Threads that Unwind Quickly 64 CHANGING THE PRESSER FOOT 65 Removing the Presser Foot 65 Attaching the Presser Foot 65 Attaching the Walking Foot 66 CHANGING THE NEEDLE 67 About the Needle 69 Fabric/Thread...
... Machine Setting Mode Key 35 Using the Sewing Machine Help Key 44 Using the Operation Guide Function 45 Using the Sewing Guide Function 46 Using the Pattern Explanation Function 47 LOWER THREADING 48 Winding the Bobbin 48 Setting the Bobbin 54 Pulling Up the Bobbin Thread 55 UPPER THREADING 57 Upper Threading 57 Using the Twin Needle Mode 60 Using the Spool Stand 63 Using Threads that Unwind Quickly 64 CHANGING THE PRESSER FOOT 65 Removing the Presser Foot 65 Attaching the Presser Foot 65 Attaching the Walking Foot 66 CHANGING THE NEEDLE 67 About the Needle 69 Fabric/Thread...
Users Manual - English
Page 15
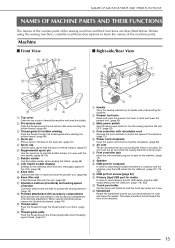
... attachment. b Presser foot lever Raise and lower the presser foot lever to raise and lower the presser foot. (page 65) c Main power switch Use the main power switch to turn the sewing machine ON and OFF. (page 26) d Foot controller with the twin needle. (page 48, 60) g Bobbin winder Use the bobbin winder when winding the bobbin. (page 48) h LCD (liquid crystal display) Settings for the selected stitch and error messages appear in use. NAMES OF MACHINE PARTS AND THEIR FUNCTIONS NAMES OF MACHINE PARTS...
... attachment. b Presser foot lever Raise and lower the presser foot lever to raise and lower the presser foot. (page 65) c Main power switch Use the main power switch to turn the sewing machine ON and OFF. (page 26) d Foot controller with the twin needle. (page 48, 60) g Bobbin winder Use the bobbin winder when winding the bobbin. (page 48) h LCD (liquid crystal display) Settings for the selected stitch and error messages appear in use. NAMES OF MACHINE PARTS AND THEIR FUNCTIONS NAMES OF MACHINE PARTS...
Users Manual - English
Page 17
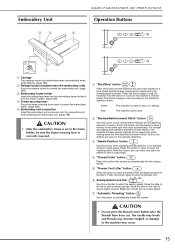
... lowered. Green: The machine is set by the sewing speed controller. The needle may break and threads may become tangled, or damage to raise or lower the needle position. Press this button to lower the presser foot and apply pressure to stop the machine. e "Presser Foot Lifter" button Press this button to the machine may occur. 15 Embroidery Unit NAMES OF MACHINE PARTS AND THEIR FUNCTIONS Operation Buttons a Carriage The carriage moves the embroidery frame automatically when embroidering. (page 188) b Release button...
... lowered. Green: The machine is set by the sewing speed controller. The needle may break and threads may become tangled, or damage to raise or lower the needle position. Press this button to lower the presser foot and apply pressure to stop the machine. e "Presser Foot Lifter" button Press this button to the machine may occur. 15 Embroidery Unit NAMES OF MACHINE PARTS AND THEIR FUNCTIONS Operation Buttons a Carriage The carriage moves the embroidery frame automatically when embroidering. (page 188) b Release button...

Users Manual - English
Page 22
...; Foot controller: Model S This foot controller can be stored in the enclosed acces- Memo 10 11 12 • Always use accessories recommended for this machine. • The screw for the presser foot holder is not included in the machine's soft cover case. (In some specifications may change without notice. 20 Part Name 1 Border embroidery frame H 30 cm × W 10 cm (H 12 inches × W 4 inches) with Kit 3 upgrade 2 Border embroidery frame set H 18...
...; Foot controller: Model S This foot controller can be stored in the enclosed acces- Memo 10 11 12 • Always use accessories recommended for this machine. • The screw for the presser foot holder is not included in the machine's soft cover case. (In some specifications may change without notice. 20 Part Name 1 Border embroidery frame H 30 cm × W 10 cm (H 12 inches × W 4 inches) with Kit 3 upgrade 2 Border embroidery frame set H 18...

Users Manual - English
Page 33
... sew reverse stitches). x Scroll key Press or , to use the machine. m Sewing machine help Press this key to enter free motion sewing mode. 116 The presser foot is lowered for additional pages of the selected stitch pattern. u Free motion mode key Press this key to see explanations on the bar to an appropriate height and the feed dog is raised to jump ahead for free motion quilting. If you select this key to prevent operation...
... sew reverse stitches). x Scroll key Press or , to use the machine. m Sewing machine help Press this key to enter free motion sewing mode. 116 The presser foot is lowered for additional pages of the selected stitch pattern. u Free motion mode key Press this key to see explanations on the bar to an appropriate height and the feed dog is raised to jump ahead for free motion quilting. If you select this key to prevent operation...
Users Manual - English
Page 38
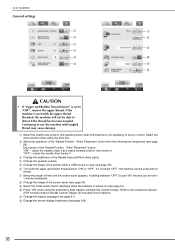
... page 86). e Change the shape of the "Needle Position - raises the needle, stops it at a nearly lowered position, then lowers it is used without thread. A setting between "OFF" (0) and "60" minutes can be set to use the machine with the upper thread threaded, the machine will not be up or down position when using the embroidery data creation software My Custom Design. j Press "ON" when using the pivot key. b Select the operation of the...
... page 86). e Change the shape of the "Needle Position - raises the needle, stops it at a nearly lowered position, then lowers it is used without thread. A setting between "OFF" (0) and "60" minutes can be set to use the machine with the upper thread threaded, the machine will not be up or down position when using the embroidery data creation software My Custom Design. j Press "ON" when using the pivot key. b Select the operation of the...

Users Manual - English
Page 99
...-shaped screw driver included with the machine to sink into the hole of the regular needle plate during sewing. foot c Remove the flat bed attachment or the embroidery unit if either are attached. g Set the straight stitch needle plate in place and use the straight stitch foot in combination with the machine to tighten the plate. plate cover, a Needle plate cover e Grasp the bobbin case, and then pull it toward you. a Press the "Needle Position" button to raise the needle and turn the main power...
...-shaped screw driver included with the machine to sink into the hole of the regular needle plate during sewing. foot c Remove the flat bed attachment or the embroidery unit if either are attached. g Set the straight stitch needle plate in place and use the straight stitch foot in combination with the machine to tighten the plate. plate cover, a Needle plate cover e Grasp the bobbin case, and then pull it toward you. a Press the "Needle Position" button to raise the needle and turn the main power...
Users Manual - English
Page 118
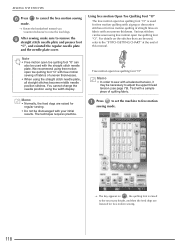
... sew, the internal sensor detects the thickness of the fabric to free motion sewing mode. a Attach the page 97). We recommend attaching the foot controller and sewing at a consistent speed. If the needle is selected, and set the ■ Free Motion Quilting With free motion quilting, the feed dogs can adjust the sewing speed with a balanced tension, it may result. • When using free motion quilting foot "C", be moved freely in the machine settings screen. straight stitch needle plate (see a Round hole Memo • Notice this mode, the presser foot...
... sew, the internal sensor detects the thickness of the fabric to free motion sewing mode. a Attach the page 97). We recommend attaching the foot controller and sewing at a consistent speed. If the needle is selected, and set the ■ Free Motion Quilting With free motion quilting, the feed dogs can adjust the sewing speed with a balanced tension, it may result. • When using free motion quilting foot "C", be moved freely in the machine settings screen. straight stitch needle plate (see a Round hole Memo • Notice this mode, the presser foot...
Users Manual - English
Page 120
...on fabric with zigzag or decorative stitches or for free motion sewing. We recommend using the width display. Free motion open toe quilting foot "O" with the straight stitch needle plate. Test with your initial results. SEWING THE STITCHES h Press mode. Memo • Normally, the feed dogs are lowered for free motion quilting of this manual. to cancel the free motion sewing → Rotate the handwheel toward you (counterclockwise) to remove the straight stitch needle plate and presser foot "C", and reinstall the regular needle plate and the needle plate cover...
...on fabric with zigzag or decorative stitches or for free motion sewing. We recommend using the width display. Free motion open toe quilting foot "O" with the straight stitch needle plate. Test with your initial results. SEWING THE STITCHES h Press mode. Memo • Normally, the feed dogs are lowered for free motion quilting of this manual. to cancel the free motion sewing → Rotate the handwheel toward you (counterclockwise) to remove the straight stitch needle plate and presser foot "C", and reinstall the regular needle plate and the needle plate cover...
Users Manual - English
Page 167
... 7mm satin stitch patterns are selected, press this key to a height appropriate for the selected stitch pattern. t Thread density key After selecting the stitch pattern, use this key to enter free motion sewing mode. 116 The feed dog is lowered and presser foot is set to delete the 158, 159 mistake. When the pivot setting is used . • Be sure the needle position on the type of character patterns. 160 165 Character/Decorative Stitches h Thread tension key...
... 7mm satin stitch patterns are selected, press this key to a height appropriate for the selected stitch pattern. t Thread density key After selecting the stitch pattern, use this key to enter free motion sewing mode. 116 The feed dog is lowered and presser foot is set to delete the 158, 159 mistake. When the pivot setting is used . • Be sure the needle position on the type of character patterns. 160 165 Character/Decorative Stitches h Thread tension key...
Users Manual - English
Page 309
... Bobbin case and bobbin cover 309 ■ Lower thread ...309 ■ Upper thread...309 ■ Needle...309 ■ Presser foot ...309 ■ Fabric ...309 Upper Threading 310 Preparing the Bobbin Thread 310 ■ When tension is applied to the bobbin thread 312 ■ When tension is not applied to the bobbin thread 312 CREATING BOBBIN WORK (SEWING 314 Positioning the Fabric and Sewing 314 ■ Finishing the thread ends 316 Bobbin Work Free Motion Sewing 317 CREATING BOBBIN WORK (EMBROIDERY 318 Selecting the Pattern 318 Start Embroidering 320 ADJUSTING THE THREAD TENSION...
... Bobbin case and bobbin cover 309 ■ Lower thread ...309 ■ Upper thread...309 ■ Needle...309 ■ Presser foot ...309 ■ Fabric ...309 Upper Threading 310 Preparing the Bobbin Thread 310 ■ When tension is applied to the bobbin thread 312 ■ When tension is not applied to the bobbin thread 312 CREATING BOBBIN WORK (SEWING 314 Positioning the Fabric and Sewing 314 ■ Finishing the thread ends 316 Bobbin Work Free Motion Sewing 317 CREATING BOBBIN WORK (EMBROIDERY 318 Selecting the Pattern 318 Start Embroidering 320 ADJUSTING THE THREAD TENSION...
Users Manual - English
Page 311
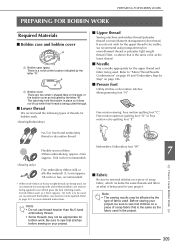
... FOR BOBBIN WORK PREPARING FOR BOBBIN WORK Required Materials ■ Bobbin case and bobbin cover a Bobbin case (gray) There is the same as the fabric used in your project. a Bobbin cover There are two small v-shaped tabs on page 186. ■ Presser foot Utility stitches or decorative stitches: Monogramming foot "N" Free motion sewing: Free motion quilting foot "C", Free motion open toe quilting foot "O" or Free motion echo quilting foot "E" No.5 or finer hand embroidery thread or decorative thread Flexible woven ribbon Embroidery: Embroidery foot "W" 7 (When embroidering: approx...
... FOR BOBBIN WORK PREPARING FOR BOBBIN WORK Required Materials ■ Bobbin case and bobbin cover a Bobbin case (gray) There is the same as the fabric used in your project. a Bobbin cover There are two small v-shaped tabs on page 186. ■ Presser foot Utility stitches or decorative stitches: Monogramming foot "N" Free motion sewing: Free motion quilting foot "C", Free motion open toe quilting foot "O" or Free motion echo quilting foot "E" No.5 or finer hand embroidery thread or decorative thread Flexible woven ribbon Embroidery: Embroidery foot "W" 7 (When embroidering: approx...
Users Manual - English
Page 321
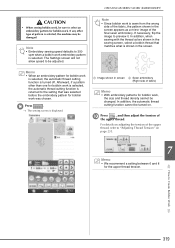
... embroidery. j Press the upper , and then thread. Note • Embroidery sewing speed defaults to be turned on page 233. 7 Memo • We recommend a setting between 6 and 8 for bobbin work embroidery pattern is selected, the machine may be changed. a Image shown in the screen. The Settings screen will not allow speed to 350 spm when a bobbin work is selected, the automatic thread cutting function is displayed. Note • Since bobbin work , the size...
... embroidery. j Press the upper , and then thread. Note • Embroidery sewing speed defaults to be turned on page 233. 7 Memo • We recommend a setting between 6 and 8 for bobbin work embroidery pattern is selected, the machine may be changed. a Image shown in the screen. The Settings screen will not allow speed to 350 spm when a bobbin work is selected, the automatic thread cutting function is displayed. Note • Since bobbin work , the size...

Users Manual - English
Page 345
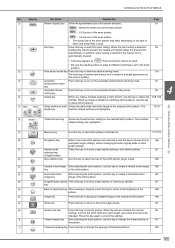
...Rethread upper and lower thread. Press at " http://solutions.brother.com ". Adjust the thread tension. There are scratches near the hole of the fabric. use a bobbin designed specifically for the selected fabric. Reattach the presser foot holder correctly. Check the "Fabric/Thread/Needle Combinations" chart. Replace the needle. authorized dealer. Visit us at any time to return to installing bobbin case.) Using improper needle or thread for this machine Incorrect bobbins will not work properly. TROUBLESHOOTING TROUBLESHOOTING If you need...
...Rethread upper and lower thread. Press at " http://solutions.brother.com ". Adjust the thread tension. There are scratches near the hole of the fabric. use a bobbin designed specifically for the selected fabric. Reattach the presser foot holder correctly. Check the "Fabric/Thread/Needle Combinations" chart. Replace the needle. authorized dealer. Visit us at any time to return to installing bobbin case.) Using improper needle or thread for this machine Incorrect bobbins will not work properly. TROUBLESHOOTING TROUBLESHOOTING If you need...

Users Manual - English
Page 346
..." chart. "STITCH SETTING CHART" Upper thread tension is installed incorrectly. Replace the race, or consult your 97 needle plate. Check the steps for the Check the "Fabric/Thread/Needle 69 selected fabric. Attach the presser foot correctly. 65 Screw of the presser foot. 66 Fabric is set incorrectly. Stitch length is loose. Attach stabilizer. 161, 200 Bobbin thread is not used . A bobbin designed specifically for this machine. Only 54 is incorrectly wound. bobbin. Press [+] in the Replace the presser foot, or consult your 65 presser foot. Machine is...
..." chart. "STITCH SETTING CHART" Upper thread tension is installed incorrectly. Replace the race, or consult your 97 needle plate. Check the steps for the Check the "Fabric/Thread/Needle 69 selected fabric. Attach the presser foot correctly. 65 Screw of the presser foot. 66 Fabric is set incorrectly. Stitch length is loose. Attach stabilizer. 161, 200 Bobbin thread is not used . A bobbin designed specifically for this machine. Only 54 is incorrectly wound. bobbin. Press [+] in the Replace the presser foot, or consult your 65 presser foot. Machine is...
Users Manual - English
Page 361
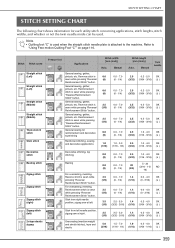
... J ) 2.5 0.2 - 5.0 OK (3/32) (1/64 - 3/16) ( J ) 2.5 1.5 - 4.0 OK (3/32) (1/16 - 3/16) ( J ) 2.5 1.0 - 4.0 OK (3/32) (1/16 - 3/16) ( J ) Decorative stitching, top stitching 0.0 0.0 - 7.0 2.5 1.0 - 4.0 OK (0) (0 - 1/4) (3/32) (1/16 - 3/16) ( J ) Basting For overcasting, mending. General sewing for each utility stitch concerning applications, stitch lengths, stitch widths, and whether or not the twin needle mode can be used when the straight stitch needle plate is attached to "Using Free motion Quilting Foot "C"" on page 116. Note • Quilting foot "C" is used .
... J ) 2.5 0.2 - 5.0 OK (3/32) (1/64 - 3/16) ( J ) 2.5 1.5 - 4.0 OK (3/32) (1/16 - 3/16) ( J ) 2.5 1.0 - 4.0 OK (3/32) (1/16 - 3/16) ( J ) Decorative stitching, top stitching 0.0 0.0 - 7.0 2.5 1.0 - 4.0 OK (0) (0 - 1/4) (3/32) (1/16 - 3/16) ( J ) Basting For overcasting, mending. General sewing for each utility stitch concerning applications, stitch lengths, stitch widths, and whether or not the twin needle mode can be used when the straight stitch needle plate is attached to "Using Free motion Quilting Foot "C"" on page 116. Note • Quilting foot "C" is used .
Users Manual - English
Page 370
... needle 75/107 69 236 Bar tacks 140 Basting 98 Blind hem stitches 122 Block move key 331 Bobbin pulling up the bobbin thread 55 runs out of thread 229 setting 54 winding 48 Bobbin case alternate bobbin case (no color on the screw 218 cleaning 338 Bobbin clip 17 , Bobbin cover 14 54 Bobbin holder (switch 50 Bobbin winder 13 Bobbin work 307 , Border key 285 290 Built-in camera 6 87, 148, 213 Button sewing 142 4 hole buttons 143 shank 143 Buttonhole lever...
... needle 75/107 69 236 Bar tacks 140 Basting 98 Blind hem stitches 122 Block move key 331 Bobbin pulling up the bobbin thread 55 runs out of thread 229 setting 54 winding 48 Bobbin case alternate bobbin case (no color on the screw 218 cleaning 338 Bobbin clip 17 , Bobbin cover 14 54 Bobbin holder (switch 50 Bobbin winder 13 Bobbin work 307 , Border key 285 290 Built-in camera 6 87, 148, 213 Button sewing 142 4 hole buttons 143 shank 143 Buttonhole lever...
Users Manual - English
Page 371
... fabric/thread/needle combinations 69 mode 28 twin needle 60 , Needle bar thread guides 14 61 Needle clamp screw 14 Needle mode selection key 60 Needle plate 14 , Needle position 86 96 Needle Position button 15 O , Operation buttons 13 15 Overcasting 102, 104, 105 P Patchwork 103 , Pen tablet 23 34 Piecing 113 Pintuck 101 Pivoting 84 Point delete key 330 Power cord 27 Power cord receptacle 13 Presser foot attaching 65 pressure 85 removing 65 types 359 , Presser foot code 29 198 , Presser foot holder 14 65 Presser foot holder screw 14 , Presser foot lever...
... fabric/thread/needle combinations 69 mode 28 twin needle 60 , Needle bar thread guides 14 61 Needle clamp screw 14 Needle mode selection key 60 Needle plate 14 , Needle position 86 96 Needle Position button 15 O , Operation buttons 13 15 Overcasting 102, 104, 105 P Patchwork 103 , Pen tablet 23 34 Piecing 113 Pintuck 101 Pivoting 84 Point delete key 330 Power cord 27 Power cord receptacle 13 Presser foot attaching 65 pressure 85 removing 65 types 359 , Presser foot code 29 198 , Presser foot holder 14 65 Presser foot holder screw 14 , Presser foot lever...


