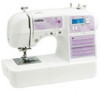
Brother International SQ9050 Support Question
Brother International SQ9050 Support Question
Find answers below for this question about Brother International SQ9050.Need a Brother International SQ9050 manual? We have 4 online manuals for this item!
Question posted by dtmulhern on September 29th, 2012
Free Motion Quilting Foot
For a Brother SQ9050 I will be using the free motio quilting foot. On the stitch selector which letter do I use for the free motion foot. Is it the same as J?
And how do you adjust the stitch length when using the free motion foot?
Current Answers
Related Brother International SQ9050 Manual Pages
Users Manual - English - Page 3
... you do not deflect the needle and cause it to break.
6 This machine is not a toy:
• Your close attention is necessary when the machine is used or where oxygen is required when sewing:
• Always pay close attention to clean the case. Keep ventilation openings of the sewing machine and foot control free from all moving parts.
Users Manual - English - Page 5
...SEWING ...27
General sewing procedure ...27 Selecting a stitch ...28 Starting to sew ...29 Adjusting thread tension ...31
USEFUL SEWING TIPS ...32
Trial sewing ...32 Changing the sewing direction ...32 Sewing curves ...32 Sewing thick fabrics ...32 Sewing hook-and-loop fastener ...33 Sewing thin fabrics ...34 Sewing stretch fabrics ...34 Using a free-arm style ...34
3 KNOWING YOUR SEWING MACHINE...
Users Manual - English - Page 7
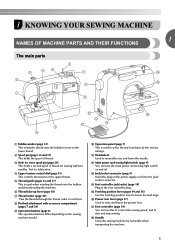
...the sewing machine model.
l Main power and sewing light switch (page 9) You can use as the lower thread. p Presser foot lever (page 17) Used to cut them.
o Feed dog position lever (pages 49 and 56) Use .... Not for use this to control the sewing speed, and to select the stitch and specify the various settings.
e Thread guide (pages 12 and 17) This is used when winding the...
Users Manual - English - Page 8

... to easily perform various basic sewing machine operations. When sewing is stopped, the needle is installed onto the presser foot holder. b Needle threader (for models equipped with the sewing speed controller) Slide the sewing speed controller to set bobbin (for the selected stitching. h Bobbin cover Open the bobbin cover to adjust the sewing speed.
6
The operation buttons...
Users Manual - English - Page 9
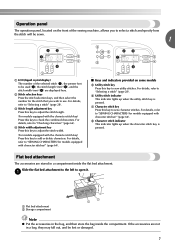
... "Checking characters" (page 66). h Character stitch indicator This indicator lights up when the utility stitch key is pressed. Operation panel
The operation panel, located on some models
e Utility stitch key Press this key to sew utility stitches. c Stitch length adjustment key Press this key to be used (2), the stitch length (mm) (3), and the stitch width (mm) (4) are stored in a bag...
Users Manual - English - Page 10
...15.
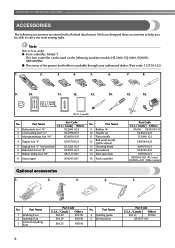
16. Part Name
1 Walking Foot
2 Quilting Foot
3
1/4-Inch Quilting Foot
Part Code
U.S.A. / Canada Others
SA140
F033N
SA129
F005N
SA125
F001N
No. Part Name
4 Quilting guide 5 Eyelet punch
Part Code
U.S.A. / Canada Others
SA132
F016N
XZ5051-001
8
KNOWING YOUR SEWING MACHINE
ACCESSORIES
The following machine models: HS-3000, SQ-9000, SQ9050, XR9500PRW.
● The screw...
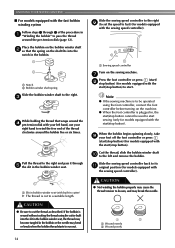
Users Manual - English - Page 12

... controller to build up on the foot controller.
Instead, the machine can be set using the sewing speed controller is stopped. Turn off the foot controller, the machine will stop.
a
Hold down lightly, the machine will increase. After turning on the foot controller when the machine is placed on the sewing machine, release the "-" side of (stitch selection b key) on the left...
Users Manual - English - Page 15

... sewing machine is to be used to start sewing (only for models equipped with the start/stop button) to wind the thread around the bobbin, the machine will make a clicking sound;
Trim the excess thread above the bobbin. If you follow the instructions carefully. When the bobbin seems full and begins j spinning slowly, take your foot...
Users Manual - English - Page 16
...). KNOWING YOUR SEWING MACHINE
■ For models equipped with the fast bobbin winding system
Follow steps 1 through e the slit in the bobbin winder seat.
Slide the sewing speed controller to the right f (to set the speed to wind the free end of the procedure in a "Winding the bobbin" to be operated using the cutter built...
Users Manual - English - Page 17
...around the bobbin, the machine will not operate correctly. Install the bobbin wound with the needle position button), and raise the presser foot lever.
1
a Tension-adjusting spring
15
CAUTION
&#...Use only the enclosed bobbin or bobbins of the bobbin case, it may cause incorrect thread tension (page 31). Hold the end of the thread, push the bobbin d down with this sewing machine...
Users Manual - English - Page 18
... the thread to cut it.
1
a Tension-adjusting spring
Memo
● The order that were designed to be passed through the tension-adjusting spring of the bobbin case, it may cause ...this machine. If the thread unrolls in the wrong direction, it may cause the thread tension to be used with the needle position button), and raise the presser foot lever.
KNOWING YOUR SEWING MACHINE
...
Users Manual - English - Page 19

...on the wheel points up before threading the sewing machine.
17 a Presser foot lever
or
a Mark
b Needle position button
• If the needle is not correctly raised, the sewing machine can not be threaded.
Raise the needle... Make sure you thread the machine properly.
Be sure to raise the needle.
Raise the presser foot using the presser foot a lever. Otherwise, the thread could tangle ...
Users Manual - English - Page 23
... stretch fabrics or fabrics where skipped stitches easily occur. ● Use a 90/14 to 100/16 needle with transparent nylon threads, regardless of the fabric being sewn.
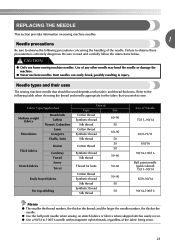
21 Bent needles can easily break, possibly resulting in injury. Needle types and their uses
The sewing machine needle that you wish to sew. REPLACING THE NEEDLE
This section...
Users Manual - English - Page 28

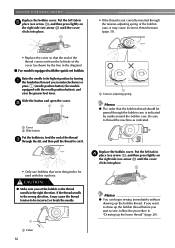
... screwdriver to check that the g presser foot is securely attached.
Removing the presser foot holder
Remove the presser foot holder when cleaning the sewing machine or when installing a presser foot that does not use the presser foot holder, such as the quilting foot.
KNOWING YOUR SEWING MACHINE
Slowly lower the presser foot lever so that the f presser foot pin snaps into the shank in...
Users Manual - English - Page 40

... Presser Foot 100 stitches model 90 stitches model 80 stitches model 70 stitches model 60 stitches model 50 stitches model 40 stitches model Twin Needle Walking Foot Reverse (Rev.)/ Reinforcement (Rfc.)
Stitching
Stitch Name Hand-look
quilting Zigzag stitch (for quilting)
Appliqué stitch
(for quilting) Quilting stippling
Decorative stitch
Pattern No. Application
Stitch Width Stitch Length...
Users Manual - English - Page 48

... 41 41 41 35 35 -
-
Appliqué quilting, free-
a Reinforcement stitching
46 Stitch Name
Pattern No.
motion quilting, satin
stitching, button sewing
3.5 (1/8)
0.0-7.0 (0-1/4)
1.4 (1/16)
0.0-4.0 (0-3/16)
No Yes
*Auto Rfc.: Automatic Reinforcement
The maximum buttonhole length is about 28 mm (1-1/8 inch) (diameter + thickness of the presser foot to the back, as shown below.
* Auto...
Users Manual - English - Page 55

...16-3/16)
Y*e*s ( J )
No
Rfc. b
You can be used for sewing appliqués, patchwork and quilts are described below.
J
16
16
16
15
15
15
orative stitching and sew- 5.0 (3/16) 15 ing overcasting on both 2.5-7.0
pieces of 5.0 mm (3/16 inch) or less. Appliqués
Attach zigzag foot "J". Select stitch . motion quilting, satin
0.0-7.0
0.0-4.0 No Yes Rfc.
J 44 44 44 38...
Users Manual - English - Page 57

... the fabric to be sewn using the optional walking foot and the optional quilting guide. Hook the connecting fork of the machine to check that the needle does not strike the presser foot.
Select stitch ,
d
or .
† Presser foot holder
Adjust the stem of the quilter so that the quilt b guide aligns with the walking foot, sew at a the rear of...
Users Manual - English - Page 58
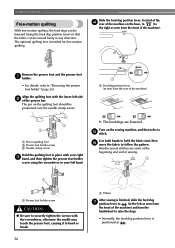
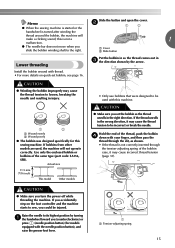
... is needed for free-motion quilting.
Remove the presser foot and the presser foot a holder.
• For details, refer to follow the pattern.
Slide the feed dog position lever, located at the beginning and end of the presser bar. Reinforcement stitches are lowered. VARIOUS STITCHES
Free-motion quilting
With free-motion quilting, the feed dogs can be lowered (using the screwdriver...
Users Manual - English - Page 78

...bobbin 6, 16
quilting 55 quilting foot 56 quilting guide 55
R
reinforcement stitching 57 reverse/reinforcement stitch button 6
S
scallop stitching 61 seam ripper 48 sewing machine needles 21 sewing speed controller 6 sewing the character stitches 67 sleeve holes 57 smocking 61
spool pin 12, 17 start/stop button 6, 30
stitch length 28
stitch selection key 7, 28, 65
stitch width 28...
Similar Questions

How To Fix The Bobbin Holder Case Inside The Sewing Machine In A Brother Lx2500
(Posted by crAll 10 years ago)

How To Make Fonts Bigger For A Brother Sewing Machine Sq9050
(Posted by Yenkum 10 years ago)

Brother Sewing Machine Sq9050 What Type Bobbin
(Posted by Marbl 10 years ago)

Brother Sewing Machine Sq9050 How Bobbin Case Goes In
(Posted by kurpaula 10 years ago)
I Am Trying To Print Sewing Machine Manual For Brother Xl3200. I Do Not Want To
download the PDF REader. Please help. Thank you.
download the PDF REader. Please help. Thank you.
(Posted by spool 10 years ago)