
Users Manual - English
Page 2
...-Motion Sewing ...12 ADJUSTING THE THREAD TENSION...13 Adjusting the Upper Thread Tension ...13 Adjusting the Tension of the Bobbin Thread ...13 TROUBLESHOOTING...14 1 CONTENTS ABOUT BOBBIN WORK ...2 INCLUDED ACCESSORIES ...2 PREPARING FOR BOBBIN WORK ...3 Required Materials ...3 Upper Threading ...4 Preparing the Bobbin Thread...4 CREATING BOBBIN WORK ...8 Positioning the Fabric and Sewing...8 Finishing the thread ends...10...
...-Motion Sewing ...12 ADJUSTING THE THREAD TENSION...13 Adjusting the Upper Thread Tension ...13 Adjusting the Tension of the Bobbin Thread ...13 TROUBLESHOOTING...14 1 CONTENTS ABOUT BOBBIN WORK ...2 INCLUDED ACCESSORIES ...2 PREPARING FOR BOBBIN WORK ...3 Required Materials ...3 Upper Threading ...4 Preparing the Bobbin Thread...4 CREATING BOBBIN WORK ...8 Positioning the Fabric and Sewing...8 Finishing the thread ends...10...

Users Manual - English
Page 3
...for freemotion sewing.) (USA/CANADA: XE9382-001, Other areas: XE9501-001) Note • Two bobbin covers may be included, depending on the wrong side of the fabric, by winding the bobbin with heavy weight thread or ribbon too thick to be fed through the sewing machine needle and sewing... on the country or region where this kit. ABOUT BOBBIN WORK You can create designs, which gives a three-dimensional appearance to the surface of the fabric. Bobbin work is sewn using the special bobbin case (gray) and bobbin cover with tabs included with your machine cannot be installed on...
...for freemotion sewing.) (USA/CANADA: XE9382-001, Other areas: XE9501-001) Note • Two bobbin covers may be included, depending on the wrong side of the fabric, by winding the bobbin with heavy weight thread or ribbon too thick to be fed through the sewing machine needle and sewing... on the country or region where this kit. ABOUT BOBBIN WORK You can create designs, which gives a three-dimensional appearance to the surface of the fabric. Bobbin work is sewn using the special bobbin case (gray) and bobbin cover with tabs included with your machine cannot be installed on...
Users Manual - English
Page 4
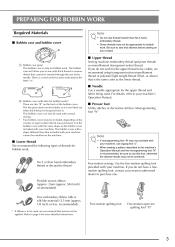
PREPARING FOR BOBBIN WORK Required Materials
PREPARING FOR BOBBIN WORK Required Materials
Users Manual - English
Page 6
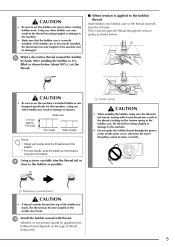
If the bobbin case is correctly installed. Using any other bobbin case may result in the thread becoming tangled or damage to use the bobbin case (gray) when creating bobbin work. h CAUTION • Be sure to the machine. • Make sure that the bobbin case is incorrectly installed, the thread may become tangled or the machine may be damaged.
If the bobbin case is correctly installed. Using any other bobbin case may result in the thread becoming tangled or damage to use the bobbin case (gray) when creating bobbin work. h CAUTION • Be sure to the machine. • Make sure that the bobbin case is incorrectly installed, the thread may become tangled or the machine may be damaged.
Users Manual - English
Page 8
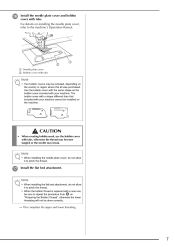
... with a shape different than that included with a new one, be sure to pinch the thread. • When the bobbin thread is replaced with your machine. q Install the flat bed attachment. Note • When installing the needle plate cover, do not allow it to... flat bed attachment, do not allow it to the machine's Operation Manual. Use the bobbin cover with the same shape as the bobbin cover included with tabs Note • Two bobbin covers may break. a Needle plate cover b Bobbin cover with your machine cannot be included, depending on installing the needle plate cover, refer...
... with a shape different than that included with a new one, be sure to pinch the thread. • When the bobbin thread is replaced with your machine. q Install the flat bed attachment. Note • When installing the needle plate cover, do not allow it to... flat bed attachment, do not allow it to the machine's Operation Manual. Use the bobbin cover with the same shape as the bobbin cover included with tabs Note • Two bobbin covers may break. a Needle plate cover b Bobbin cover with your machine cannot be included, depending on installing the needle plate cover, refer...
Users Manual - English
Page 9
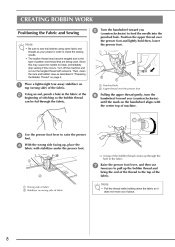
...• Pull the thread while holding down the fabric so it does not move out of stitching so the bobbin thread can be fed through the hole in the fabric. c d Use the presser foot lever to feed ... (counterclockwise) until the mark on the handwheel aligns with the center top of the bobbin thread comes up the bobbin thread and bring the end of the thread to break, immediately stop sewing if this... may become tangled due to the type of the fabric. Since this occurs. CREATING BOBBIN WORK Positioning the Fabric and Sewing Note • Be sure to sew trial stitches using same fabric...
...• Pull the thread while holding down the fabric so it does not move out of stitching so the bobbin thread can be fed through the hole in the fabric. c d Use the presser foot lever to feed ... (counterclockwise) until the mark on the handwheel aligns with the center top of the bobbin thread comes up the bobbin thread and bring the end of the thread to break, immediately stop sewing if this... may become tangled due to the type of the fabric. Since this occurs. CREATING BOBBIN WORK Positioning the Fabric and Sewing Note • Be sure to sew trial stitches using same fabric...

Users Manual - English
Page 10
...the threads may become tangled or the machine may break. For details on the machine. o If your machine is enough thread in the bobbin. When you have been made. For details on adjusting the stitch length and stitch width, refer to the machine's Operation Manual. k ...CAUTION • Before sewing, make sure the automatic thread cutting and automatic reinforcement/reverse stitching have been turned off . h Align the upper thread and bobbin thread, and then pass them under the presser foot toward the rear of simple stitches: , , n Select a low speed, gently hold the threads...
...the threads may become tangled or the machine may break. For details on the machine. o If your machine is enough thread in the bobbin. When you have been made. For details on adjusting the stitch length and stitch width, refer to the machine's Operation Manual. k ...CAUTION • Before sewing, make sure the automatic thread cutting and automatic reinforcement/reverse stitching have been turned off . h Align the upper thread and bobbin thread, and then pass them under the presser foot toward the rear of simple stitches: , , n Select a low speed, gently hold the threads...
Users Manual - English
Page 11
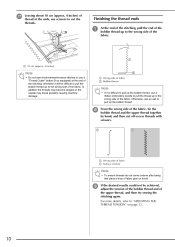
...thread at the ends, use a "Thread Cutter" button (if so equipped) at the end of the stitching; otherwise it is difficult to pull up the bobbin thread, use an awl to pull up to cut off excess threads with scissors. a 10 cm (approx. 4 inches) Note • Do not sew ...13. 10 Otherwise, use a ribbon embroidery needle to "ADJUSTING THE THREAD TENSION" on knots. For more details, refer to pull the thread up the bobbin thread. In addition the threads may become tangled or the needle may break possibly causing machine damage. a Wrong side of fabric b Surface of fabric Note...
...thread at the ends, use a "Thread Cutter" button (if so equipped) at the end of the stitching; otherwise it is difficult to pull up the bobbin thread, use an awl to pull up to cut off excess threads with scissors. a 10 cm (approx. 4 inches) Note • Do not sew ...13. 10 Otherwise, use a ribbon embroidery needle to "ADJUSTING THE THREAD TENSION" on knots. For more details, refer to pull the thread up the bobbin thread. In addition the threads may become tangled or the needle may break possibly causing machine damage. a Wrong side of fabric b Surface of fabric Note...
Users Manual - English
Page 12
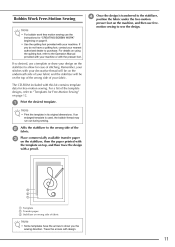
... its original dimensions. Trace the arrows with this kit contains template data for free-motion sewing. Bobbin Work Free-Motion Sewing Note • For bobbin work free motion sewing use the instructions for "CREATING BOBBIN WORK" beginning on page 8. • Use the quilting foot provided with a pencil. Place ... then the paper printed with the template on top, and then trace the design with your fabric. d Once the design is used, the bobbin thread may run out during sewing. a Print the desired template. If you do not have the arrows to allow for Free-Motion Sewing" ...
... its original dimensions. Trace the arrows with this kit contains template data for free-motion sewing. Bobbin Work Free-Motion Sewing Note • For bobbin work free motion sewing use the instructions for "CREATING BOBBIN WORK" beginning on page 8. • Use the quilting foot provided with a pencil. Place ... then the paper printed with the template on top, and then trace the design with your fabric. d Once the design is used, the bobbin thread may run out during sewing. a Print the desired template. If you do not have the arrows to allow for Free-Motion Sewing" ...
Users Manual - English
Page 13
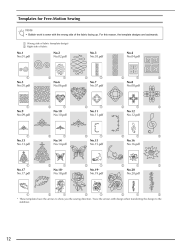
... fabric (template design) b Right side of the fabric facing up. For this reason, the template designs are backwards. Templates for Free-Motion Sewing Note • Bobbin work is sewn with design when transferring the design to show you the sewing direction. Trace the arrows with the wrong side of fabric No...
... fabric (template design) b Right side of the fabric facing up. For this reason, the template designs are backwards. Templates for Free-Motion Sewing Note • Bobbin work is sewn with design when transferring the design to show you the sewing direction. Trace the arrows with the wrong side of fabric No...
Users Manual - English
Page 14
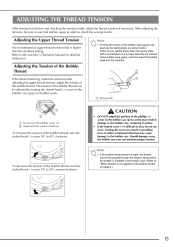
...; clockwise. b Adjust with a screwdriver so it useless. • If the slotted screw (-) is lower than the standard setting. To increase the tension of the bobbin thread, turn the phillips screw (+). Note • Turning the screw on page 6.) To decrease the tension of the... gently press down the spring plate with the small screwdriver. • DO NOT adjust the position of the Bobbin Thread If the desired stitching cannot be adjusted by turning the slotted-head (-) screw on the bobbin case (gray) as shown below. If this may cause damage to the machine's Operation Manual for...
...; clockwise. b Adjust with a screwdriver so it useless. • If the slotted screw (-) is lower than the standard setting. To increase the tension of the bobbin thread, turn the phillips screw (+). Note • Turning the screw on page 6.) To decrease the tension of the... gently press down the spring plate with the small screwdriver. • DO NOT adjust the position of the Bobbin Thread If the desired stitching cannot be adjusted by turning the slotted-head (-) screw on the bobbin case (gray) as shown below. If this may cause damage to the machine's Operation Manual for...
Users Manual - Multi
Page 8
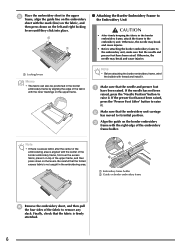
... firmly stretched. 6 Finally, check that the embroidery unit carriage has moved to the embroidery unit. Note • Before attaching the border embroidery frame, wind the bobbin with thread and install it . Be careful that the needle and presser foot have been raised. e Place the embroidery sheet in the upper frame, align...
... firmly stretched. 6 Finally, check that the embroidery unit carriage has moved to the embroidery unit. Note • Before attaching the border embroidery frame, wind the bobbin with thread and install it . Be careful that the needle and presser foot have been raised. e Place the embroidery sheet in the upper frame, align...
Users Manual - English
Page 8
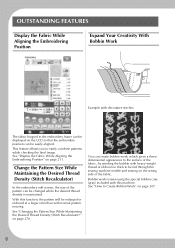
...While Aligning the Embroidering Position" on page 307. 6 OUTSTANDING FEATURES Display the Fabric While Aligning the Embroidering Position Expand Your Creativity With Bobbin Work Example with decorative stitches The fabric hooped in the embroidery frame can be displayed on the LCD so that the embroidery position can...) In the embroidery edit screen, the size of the pattern can be changed while the desired thread density is sewn using the special bobbin case (gray) included with this function, the pattern will be enlarged or reduced at a larger ratio than with heavy weight thread or...
...While Aligning the Embroidering Position" on page 307. 6 OUTSTANDING FEATURES Display the Fabric While Aligning the Embroidering Position Expand Your Creativity With Bobbin Work Example with decorative stitches The fabric hooped in the embroidery frame can be displayed on the LCD so that the embroidery position can...) In the embroidery edit screen, the size of the pattern can be changed while the desired thread density is sewn using the special bobbin case (gray) included with this function, the pattern will be enlarged or reduced at a larger ratio than with heavy weight thread or...
Users Manual - English
Page 10
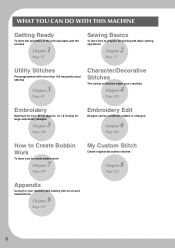
...) for large embroidery designs 5 Chapter Page 185 Embroidery Edit Designs can be combined, rotated or enlarged 6 Chapter Page 263 How to Create Bobbin Work To learn how to create bobbin work 7 Chapter Page 307 My Custom Stitch Create original decorative stitches 8 Chapter Page 325 Appendix Caring for your machine and dealing with...
...) for large embroidery designs 5 Chapter Page 185 Embroidery Edit Designs can be combined, rotated or enlarged 6 Chapter Page 263 How to Create Bobbin Work To learn how to create bobbin work 7 Chapter Page 307 My Custom Stitch Create original decorative stitches 8 Chapter Page 325 Appendix Caring for your machine and dealing with...

Users Manual - English
Page 12
...Needle and Presser Foot Section 14 Embroidery Unit 15 Operation Buttons 15 Using the Flat Bed Attachment 16 Using the Accessory Case 16 Storing Bobbin Clips 17 Using the Embroidery Unit Carrying Case 17 Included Accessories 17 Options 20 Using the Spool Stand 21 Using the Pen Tablet 23... Guide Function 45 Using the Sewing Guide Function 46 Using the Pattern Explanation Function 47 LOWER THREADING 48 Winding the Bobbin 48 Setting the Bobbin 54 Pulling Up the Bobbin Thread 55 UPPER THREADING 57 Upper Threading 57 Using the Twin Needle Mode 60 Using the Spool Stand 63 Using ...
...Needle and Presser Foot Section 14 Embroidery Unit 15 Operation Buttons 15 Using the Flat Bed Attachment 16 Using the Accessory Case 16 Storing Bobbin Clips 17 Using the Embroidery Unit Carrying Case 17 Included Accessories 17 Options 20 Using the Spool Stand 21 Using the Pen Tablet 23... Guide Function 45 Using the Sewing Guide Function 46 Using the Pattern Explanation Function 47 LOWER THREADING 48 Winding the Bobbin 48 Setting the Bobbin 54 Pulling Up the Bobbin Thread 55 UPPER THREADING 57 Upper Threading 57 Using the Twin Needle Mode 60 Using the Spool Stand 63 Using ...

Users Manual - English
Page 13
...Embroidery Step by Step 186 Attaching Embroidery Foot "W 187 Attaching the Embroidery Unit 188 SELECTING PATTERNS 190 Selecting Embroidery Patterns/Brother "Exclusives"/Greek Alphabet Patterns/Floral Alphabet Patterns/Utility Embroidery Patterns 193 Selecting Alphabet Character Patterns 194 Selecting Frame Patterns 196 ...231 Resuming Embroidery After Turning Off the Power 231 MAKING EMBROIDERY ADJUSTMENTS ..........233 Adjusting Thread Tension 233 Adjusting the Alternate Bobbin Case (with No Color on the Screw 234 Using the Automatic Thread Cutting Function (END COLOR TRIM 235 Using ...
...Embroidery Step by Step 186 Attaching Embroidery Foot "W 187 Attaching the Embroidery Unit 188 SELECTING PATTERNS 190 Selecting Embroidery Patterns/Brother "Exclusives"/Greek Alphabet Patterns/Floral Alphabet Patterns/Utility Embroidery Patterns 193 Selecting Alphabet Character Patterns 194 Selecting Frame Patterns 196 ...231 Resuming Embroidery After Turning Off the Power 231 MAKING EMBROIDERY ADJUSTMENTS ..........233 Adjusting Thread Tension 233 Adjusting the Alternate Bobbin Case (with No Color on the Screw 234 Using the Automatic Thread Cutting Function (END COLOR TRIM 235 Using ...

Users Manual - English
Page 14
... Precautions on storing the machine 338 Cleaning the LCD Screen 338 Cleaning the Machine Casing 338 Cleaning the Race 338 Cleaning the Cutter in the Bobbin Case Area 340 About the Maintenance Message 341 ADJUSTING THE SCREEN 342 Adjusting the Brightness of the Screen Display 342 Touch Panel is Malfunctioning 342...
... Precautions on storing the machine 338 Cleaning the LCD Screen 338 Cleaning the Machine Casing 338 Cleaning the Race 338 Cleaning the Cutter in the Bobbin Case Area 340 About the Maintenance Message 341 ADJUSTING THE SCREEN 342 Adjusting the Brightness of the Screen Display 342 Touch Panel is Malfunctioning 342...
Users Manual - English
Page 15
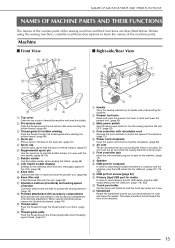
..., carefully read these buttons and the slide to operate the sewing machine. (page 15) l Flat bed attachment with accessory compartment Store presser feet and bobbins in use. Machine ■ Front View ■ Right-side/Rear View a Top cover Open the top cover to raise and lower the needle. ...Thread guide for the selected stitch and error messages appear in place. (page 57) f Supplemental spool pin Use this spool pin to wind the bobbin thread, or to USB media, plug the USB media directly into its handle when transporting the machine. b Presser foot lever Raise and lower the ...
..., carefully read these buttons and the slide to operate the sewing machine. (page 15) l Flat bed attachment with accessory compartment Store presser feet and bobbins in use. Machine ■ Front View ■ Right-side/Rear View a Top cover Open the top cover to raise and lower the needle. ...Thread guide for the selected stitch and error messages appear in place. (page 57) f Supplemental spool pin Use this spool pin to wind the bobbin thread, or to USB media, plug the USB media directly into its handle when transporting the machine. b Presser foot lever Raise and lower the ...
Users Manual - English
Page 16
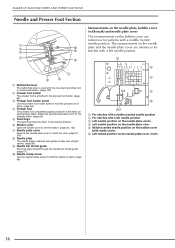
The measurements on the needle plate and the needle plate cover are references for patterns with mark) f Left needle position on the bobbin cover (with a middle (center) needle position. a Buttonhole lever The buttonhole lever is marked with guides to help sew straight seams. (page 96) i ... the fabric in place. (page 66) d Presser foot The presser foot consistently applies pressure to the fabric as sewing takes place. f Bobbin cover Open the bobbin cover to set the bobbin. (page 54, 103) g Needle plate cover Remove the needle plate cover to clean the race. (page 97, 219) h Needle ...
The measurements on the needle plate and the needle plate cover are references for patterns with mark) f Left needle position on the bobbin cover (with a middle (center) needle position. a Buttonhole lever The buttonhole lever is marked with guides to help sew straight seams. (page 96) i ... the fabric in place. (page 66) d Presser foot The presser foot consistently applies pressure to the fabric as sewing takes place. f Bobbin cover Open the bobbin cover to set the bobbin. (page 54, 103) g Needle plate cover Remove the needle plate cover to clean the race. (page 97, 219) h Needle ...
Users Manual - English
Page 19
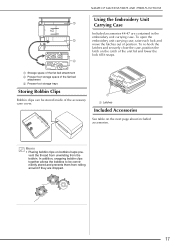
... foot storage space of the accessory case cover. In addition, snapping bobbin clips together allows the bobbins to be stored inside of the flat bed attachment c Presser foot storage trays Storing Bobbin Clips Bobbin clips can be conveniently stored and prevents them from the bobbin. To open the embroidery unit carrying case, raise each lock...
... foot storage space of the accessory case cover. In addition, snapping bobbin clips together allows the bobbins to be stored inside of the flat bed attachment c Presser foot storage trays Storing Bobbin Clips Bobbin clips can be conveniently stored and prevents them from the bobbin. To open the embroidery unit carrying case, raise each lock...


