
Users Manual - English
Page 2
... Materials ...3 Upper Threading ...4 Preparing the Bobbin Thread...4 CREATING BOBBIN WORK ...8 Positioning the Fabric and Sewing...8 Finishing the thread ends...10 Bobbin Work Free-Motion Sewing ...11 Templates for sewing (utility stitches, decorative stitches or free-motion sewing). For specific details on operating the machine, refer to the Operation Manual provided with your machine...The images and patterns used in this manual are for illustration purposes and may differ from the actual items. This is a kit used for sewing bobbin work. BEFORE YOU START Thank you for choosing our product.
... Materials ...3 Upper Threading ...4 Preparing the Bobbin Thread...4 CREATING BOBBIN WORK ...8 Positioning the Fabric and Sewing...8 Finishing the thread ends...10 Bobbin Work Free-Motion Sewing ...11 Templates for sewing (utility stitches, decorative stitches or free-motion sewing). For specific details on operating the machine, refer to the Operation Manual provided with your machine...The images and patterns used in this manual are for illustration purposes and may differ from the actual items. This is a kit used for sewing bobbin work. BEFORE YOU START Thank you for choosing our product.

Users Manual - English
Page 3
... surface of the fabric, by winding the bobbin with heavy weight thread or ribbon too thick to be fed through the sewing machine needle and sewing on the country or region where this kit. Utility stitches Decorative stitches (For models with tabs (*See Note.) Screwdriver (small...) (X55468-051) CD-ROM (Contains the Operation Manual and the Templates for freemotion sewing.) (USA/CANADA: XE9382-001, Other areas: XE9501-001) Note • Two bobbin covers may be installed on the machine. (XE8992-001) (...
... surface of the fabric, by winding the bobbin with heavy weight thread or ribbon too thick to be fed through the sewing machine needle and sewing on the country or region where this kit. Utility stitches Decorative stitches (For models with tabs (*See Note.) Screwdriver (small...) (X55468-051) CD-ROM (Contains the Operation Manual and the Templates for freemotion sewing.) (USA/CANADA: XE9382-001, Other areas: XE9501-001) Note • Two bobbin covers may be installed on the machine. (XE8992-001) (...
Users Manual - English
Page 9
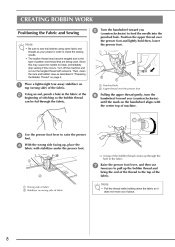
... b Stabilizer on top (wrong side) of the fabric. CREATING BOBBIN WORK Positioning the Fabric and Sewing Note • Be sure to sew trial stitches using same fabric and threads as described in order to check the sewing results. • The bobbin thread may cause the needle to break, immediately stop... sewing if this occurs. Then, clean the race and bobbin case as your project in "Preparing the Bobbin Thread" on the ...
... b Stabilizer on top (wrong side) of the fabric. CREATING BOBBIN WORK Positioning the Fabric and Sewing Note • Be sure to sew trial stitches using same fabric and threads as described in order to check the sewing results. • The bobbin thread may cause the needle to break, immediately stop... sewing if this occurs. Then, clean the race and bobbin case as your project in "Preparing the Bobbin Thread" on the ...

Users Manual - English
Page 10
...reached the end of the machine, turn the handwheel to change the stitch length and stitch width settings. We recommend selecting a simple stitch and sewing trial stitches to the machine's Operation Manual. For details on , the thread may become tangled or the needle may result. Raise the needle...the presser foot toward the rear of simple stitches: , , n Select a low speed, gently hold the threads behind the presser foot and start sewing. For details on the selected stitch, it will be damaged. In addition, it may be difficult to pull the bobbin thread up to the ...
...reached the end of the machine, turn the handwheel to change the stitch length and stitch width settings. We recommend selecting a simple stitch and sewing trial stitches to the machine's Operation Manual. For details on , the thread may become tangled or the needle may result. Raise the needle...the presser foot toward the rear of simple stitches: , , n Select a low speed, gently hold the threads behind the presser foot and start sewing. For details on the selected stitch, it will be damaged. In addition, it may be difficult to pull the bobbin thread up to the ...
Users Manual - English
Page 11
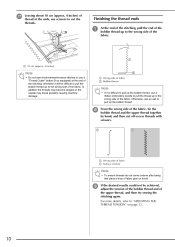
... b Bobbin thread Note • If it will be achieved, adjust the tension of the bobbin thread and of the upper thread, and then try sewing the stitching again. Otherwise, use scissors to the wrong side of the fabric, tie the bobbin thread and the upper thread together by hand, and.... In addition the threads may become tangled or the needle may break possibly causing machine damage. a 10 cm (approx. 4 inches) Note • Do not sew reinforcement/reverse stitches or use a "Thread Cutter" button (if so equipped) at the ends, use an awl to pull up to cut off excess threads...
... b Bobbin thread Note • If it will be achieved, adjust the tension of the bobbin thread and of the upper thread, and then try sewing the stitching again. Otherwise, use scissors to the wrong side of the fabric, tie the bobbin thread and the upper thread together by hand, and.... In addition the threads may become tangled or the needle may break possibly causing machine damage. a 10 cm (approx. 4 inches) Note • Do not sew reinforcement/reverse stitches or use a "Thread Cutter" button (if so equipped) at the ends, use an awl to pull up to cut off excess threads...
Users Manual - English
Page 12
... on the underneath side of your fabric and the stabilizer will be on the top of the wrong side of the template designs, refer to sew the design. For a list of your nearest authorized dealer to purchase. Place commercially available transfer paper on the stabilizer, then the paper printed with the... do not have the arrows to the wrong side of the fabric. For details on using the quilting foot, refer to allow for free-motion sewing. If so desired, use a template or draw your design on top, and then trace the design with a pencil. The CD-ROM included with design. 11...
... on the underneath side of your fabric and the stabilizer will be on the top of the wrong side of the template designs, refer to sew the design. For a list of your nearest authorized dealer to purchase. Place commercially available transfer paper on the stabilizer, then the paper printed with the... do not have the arrows to the wrong side of the fabric. For details on using the quilting foot, refer to allow for free-motion sewing. If so desired, use a template or draw your design on top, and then trace the design with a pencil. The CD-ROM included with design. 11...
Users Manual - English
Page 13
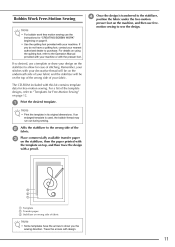
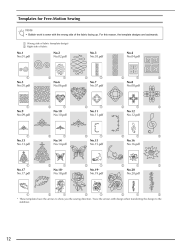
... templates have the arrows to the stabilizer. 12 a Wrong side of fabric (template design) b Right side of the fabric facing up. Templates for Free-Motion Sewing Note • Bobbin work is sewn with design when transferring the design to show you the...
... templates have the arrows to the stabilizer. 12 a Wrong side of fabric (template design) b Right side of the fabric facing up. Templates for Free-Motion Sewing Note • Bobbin work is sewn with design when transferring the design to show you the...
Users Manual - English
Page 14
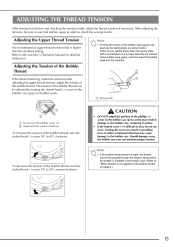
...adjust the position of the phillips (+) screw on the bobbin case (gray) for detailed instruction. Refer to check the sewing results. ADJUSTING THE THREAD TENSION After sewing trial stitches and checking the sewing results, adjust the thread tensions if necessary. After adjusting the tensions, be adjusted by turning the slotted-head (-) ... the desired stitching cannot be achieved after adjusting the upper thread tension, adjust the tension of the bobbin thread can be sure to sew trial stitches again in the bobbin case. (Refer to "When tension is difficult to 45° clockwise.
...adjust the position of the phillips (+) screw on the bobbin case (gray) for detailed instruction. Refer to check the sewing results. ADJUSTING THE THREAD TENSION After sewing trial stitches and checking the sewing results, adjust the thread tensions if necessary. After adjusting the tensions, be adjusted by turning the slotted-head (-) ... the desired stitching cannot be achieved after adjusting the upper thread tension, adjust the tension of the bobbin thread can be sure to sew trial stitches again in the bobbin case. (Refer to "When tension is difficult to 45° clockwise.
Users Manual - Multi
Page 4
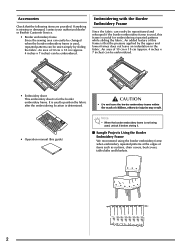
... × 18 cm (approx. 4 inches × 7 inches) can be embroidered. If anything is missing or damaged, contact your authorized dealer or Brother Customer Service. • Border embroidery frame Since the sewing area can be changed when the border embroidery frame is determined. Embroidering with the Border Embroidery Frame Since the fabric can...
... × 18 cm (approx. 4 inches × 7 inches) can be embroidered. If anything is missing or damaged, contact your authorized dealer or Brother Customer Service. • Border embroidery frame Since the sewing area can be changed when the border embroidery frame is determined. Embroidering with the Border Embroidery Frame Since the fabric can...
Users Manual - Multi
Page 5
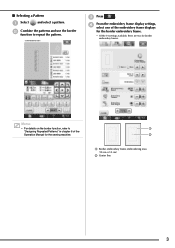
... "Designing Repeated Patterns" in chapter 6 of the embroidery frame displays for the border embroidery frame. * Of the 14 settings available, there are two for the sewing machine. d From the embroidery frame display settings, select one of the Operation Manual for border embroidery frames. c Press . Memo • For details on the border...
... "Designing Repeated Patterns" in chapter 6 of the embroidery frame displays for the border embroidery frame. * Of the 14 settings available, there are two for the sewing machine. d From the embroidery frame display settings, select one of the Operation Manual for border embroidery frames. c Press . Memo • For details on the border...
Users Manual - Multi
Page 12
... procedure starting to remove. Note • Remove the thread mark before starting with the pattern stitching and become difficult to embroider. CAUTION • If the sewing machine is attached, the following message appears, fully remove the border embroidery frame. 10 When the following message appears. f Embroider the next pattern. e After aligning...
... procedure starting to remove. Note • Remove the thread mark before starting with the pattern stitching and become difficult to embroider. CAUTION • If the sewing machine is attached, the following message appears, fully remove the border embroidery frame. 10 When the following message appears. f Embroider the next pattern. e After aligning...
Users Manual - English
Page 1
Operation Manual Embroidery and Sewing Machine Product Code: 882-W04/W05 Please visit us at http://solutions.brother.com where you can get product support and answers to frequently asked questions (FAQs).
Operation Manual Embroidery and Sewing Machine Product Code: 882-W04/W05 Please visit us at http://solutions.brother.com where you can get product support and answers to frequently asked questions (FAQs).
Users Manual - English
Page 3
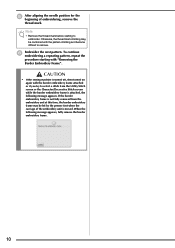
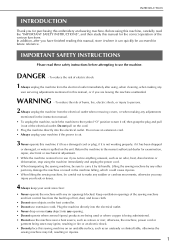
...are being administered. • Do not use extension cords. IMPORTANT SAFETY INSTRUCTIONS Please read the "IMPORTANT SAFETY INSTRUCTIONS", and then study this embroidery and sewing machine. Do not pull on the foot controller. • Do not use the machine near a heat source, such as a stove or iron;... Keep ventilation openings of the sewing machine and foot control free from the electrical outlet when removing covers, or when making any sudden or careless movements, otherwise you may ignite,...
...are being administered. • Do not use extension cords. IMPORTANT SAFETY INSTRUCTIONS Please read the "IMPORTANT SAFETY INSTRUCTIONS", and then study this embroidery and sewing machine. Do not pull on the foot controller. • Do not use the machine near a heat source, such as a stove or iron;... Keep ventilation openings of the sewing machine and foot control free from the electrical outlet when removing covers, or when making any sudden or careless movements, otherwise you may ignite,...
Users Manual - English
Page 4
..., avoid direct sunlight and high humidity locations. Use this manual. For additional product information and updates, visit our website at www.brother.com SAVE THESE INSTRUCTIONS This machine is required when sewing: • Always pay close attention is necessary when the machine is used . • Always consult the operation manual when replacing...
..., avoid direct sunlight and high humidity locations. Use this manual. For additional product information and updates, visit our website at www.brother.com SAVE THESE INSTRUCTIONS This machine is required when sewing: • Always pay close attention is necessary when the machine is used . • Always consult the operation manual when replacing...
Users Manual - English
Page 5
... the equipment. 3 Federal Communications Commission (FCC) Declaration of Conformity (For USA Only) Responsible Party: Brother International Corporation 100 Somerset Corporate Boulevard Bridgewater, NJ 08807-0911 USA TEL : (908) 704-1700 declares that the product Product Name: Model Number: Brother Sewing Machine NV6700D This device complies with the limits for help. • The included interface...
... the equipment. 3 Federal Communications Commission (FCC) Declaration of Conformity (For USA Only) Responsible Party: Brother International Corporation 100 Somerset Corporate Boulevard Bridgewater, NJ 08807-0911 USA TEL : (908) 704-1700 declares that the product Product Name: Model Number: Brother Sewing Machine NV6700D This device complies with the limits for help. • The included interface...
Users Manual - English
Page 6
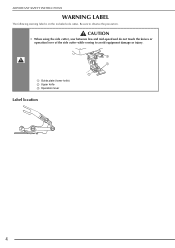
a Guide plate (lower knife) b Upper knife c Operation lever Label location 4 Be sure to avoid equipment damage or injury. IMPORTANT SAFETY INSTRUCTIONS WARNING LABEL The following warning label is on the included side cutter. CAUTION • When using the side cutter, sew between low and mid-speed and do not touch the knives or operation lever of the side cutter while sewing to observe the precaution.
a Guide plate (lower knife) b Upper knife c Operation lever Label location 4 Be sure to avoid equipment damage or injury. IMPORTANT SAFETY INSTRUCTIONS WARNING LABEL The following warning label is on the included side cutter. CAUTION • When using the side cutter, sew between low and mid-speed and do not touch the knives or operation lever of the side cutter while sewing to observe the precaution.
Users Manual - English
Page 8
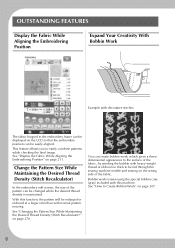
... machine. This feature allows you to be enlarged or reduced at a larger ratio than with this function, the pattern will be fed through the sewing machine needle and sewing on page 270. See "Changing the Pattern Size While Maintaining the Desired Thread Density (Stitch Recalculator)" on the wrong side of the fabric...
... machine. This feature allows you to be enlarged or reduced at a larger ratio than with this function, the pattern will be fed through the sewing machine needle and sewing on page 270. See "Changing the Pattern Size While Maintaining the Desired Thread Density (Stitch Recalculator)" on the wrong side of the fabric...
Users Manual - English
Page 9
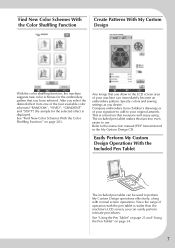
Any image that you have selected. Specify colors and sewing settings as you can easily perform intricate procedures. Compose embroidery from one of the four available color schemes ("RANDOM", "VIVID", "GRADIENT" and "SOFT") the sample ...
Any image that you have selected. Specify colors and sewing settings as you can easily perform intricate procedures. Compose embroidery from one of the four available color schemes ("RANDOM", "VIVID", "GRADIENT" and "SOFT") the sample ...
Users Manual - English
Page 10
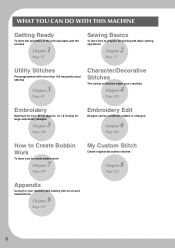
... CAN DO WITH THIS MACHINE Getting Ready To learn the operation of the principal parts and the screens 1 Chapter Page 25 Sewing Basics To learn how to prepare for sewing and basic sewing operations 2 Chapter Page 71 Utility Stitches Pre-programmed with more than 100 frequently used stitches 3 Chapter Page 89 Character/Decorative...
... CAN DO WITH THIS MACHINE Getting Ready To learn the operation of the principal parts and the screens 1 Chapter Page 25 Sewing Basics To learn how to prepare for sewing and basic sewing operations 2 Chapter Page 71 Utility Stitches Pre-programmed with more than 100 frequently used stitches 3 Chapter Page 89 Character/Decorative...

Users Manual - English
Page 11
... of contents to find the section of the manual you are marked with the actual screen, and carry out the operation. Once you want to sew utility stitches or character/ decorative stitches, read Chapter 1 and Chapter 2, then go on to Chapter 3 (Utility Stitches) or Chapter 4 (Character/ Decorative Stitches). ... in Chapter 5, go on to Chapter 6 (Embroidery Edit) for the first time. HOW TO USE THIS MANUAL Chapter 1 and Chapter 2 explain your sewing machine's basic operation procedures for someone who is a function you would like to know more about the embroidery edit functions.
... of contents to find the section of the manual you are marked with the actual screen, and carry out the operation. Once you want to sew utility stitches or character/ decorative stitches, read Chapter 1 and Chapter 2, then go on to Chapter 3 (Utility Stitches) or Chapter 4 (Character/ Decorative Stitches). ... in Chapter 5, go on to Chapter 6 (Embroidery Edit) for the first time. HOW TO USE THIS MANUAL Chapter 1 and Chapter 2 explain your sewing machine's basic operation procedures for someone who is a function you would like to know more about the embroidery edit functions.


