
Users Manual - English
Page 2
... this manual are for illustration purposes and may differ from the actual items. This is a kit used for machine embroidering. CONTENTS ABOUT BOBBIN WORK ...2 INCLUDED ACCESSORIES ...2 PREPARING FOR BOBBIN WORK ...3 Required Materials ...3 Upper Threading ...4 Preparing the Bobbin Thread...4 CREATING BOBBIN WORK ...8 Positioning the Fabric and Sewing...8 Finishing the thread ends...10...
... this manual are for illustration purposes and may differ from the actual items. This is a kit used for machine embroidering. CONTENTS ABOUT BOBBIN WORK ...2 INCLUDED ACCESSORIES ...2 PREPARING FOR BOBBIN WORK ...3 Required Materials ...3 Upper Threading ...4 Preparing the Bobbin Thread...4 CREATING BOBBIN WORK ...8 Positioning the Fabric and Sewing...8 Finishing the thread ends...10...

Users Manual - English
Page 3
.... Bobbin work is sewn using the special bobbin case (gray) and bobbin cover with tabs included with built-in decorative stitches) Free-motion sewing INCLUDED ACCESSORIES 1. 2. 3. 4. Utility stitches Decorative stitches (For models with this kit was purchased.
.... Bobbin work is sewn using the special bobbin case (gray) and bobbin cover with tabs included with built-in decorative stitches) Free-motion sewing INCLUDED ACCESSORIES 1. 2. 3. 4. Utility stitches Decorative stitches (For models with this kit was purchased.

Users Manual - Multi
Page 3
ENGLISH CONTENTS Accessories...2 Embroidering with the Border Embroidery Frame 2 Sample Projects Using the Border Embroidery Frame 2 Selecting a Pattern ...3 Hooping the Fabric in the Border Embroidery Frame 5 Attaching the Border Embroidery Frame to the Embroidery Unit 6 Embroidering the First Pattern 7 Removing the Border Embroidery Frame 8 Embroidering the Next Pattern 8 1
ENGLISH CONTENTS Accessories...2 Embroidering with the Border Embroidery Frame 2 Sample Projects Using the Border Embroidery Frame 2 Selecting a Pattern ...3 Hooping the Fabric in the Border Embroidery Frame 5 Attaching the Border Embroidery Frame to the Embroidery Unit 6 Embroidering the First Pattern 7 Removing the Border Embroidery Frame 8 Embroidering the Next Pattern 8 1
Users Manual - Multi
Page 4
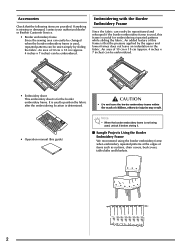
Accessories Check that the pressure applied by sliding the fabric. If anything is missing or damaged, contact your authorized dealer or Brother Customer Service. • Border embroidery frame Since the sewing area can easily be changed when the border embroidery frame is determined. It is used to ...
Accessories Check that the pressure applied by sliding the fabric. If anything is missing or damaged, contact your authorized dealer or Brother Customer Service. • Border embroidery frame Since the sewing area can easily be changed when the border embroidery frame is determined. It is used to ...
Users Manual - English
Page 4
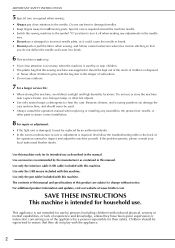
If the problem persists, please consult your local authorized Brother dealer. Use this manual. Use only the pen tablet included with the bag...as described in the manual. Do not use bent or damaged needles. • Keep fingers away from all moving parts. Use accessories recommended by or near a space heater, iron, halogen lamp, or other parts to assure correct installation. 8 For repair or ...the machine yourself. For additional product information and updates, visit our website at www.brother.com SAVE THESE INSTRUCTIONS This machine is not intended for their safety.
If the problem persists, please consult your local authorized Brother dealer. Use this manual. Use only the pen tablet included with the bag...as described in the manual. Do not use bent or damaged needles. • Keep fingers away from all moving parts. Use accessories recommended by or near a space heater, iron, halogen lamp, or other parts to assure correct installation. 8 For repair or ...the machine yourself. For additional product information and updates, visit our website at www.brother.com SAVE THESE INSTRUCTIONS This machine is not intended for their safety.

Users Manual - English
Page 12
... Presser Foot Section 14 Embroidery Unit 15 Operation Buttons 15 Using the Flat Bed Attachment 16 Using the Accessory Case 16 Storing Bobbin Clips 17 Using the Embroidery Unit Carrying Case 17 Included Accessories 17 Options 20 Using the Spool Stand 21 Using the Pen Tablet 23 Chapter 1 Getting Ready 25 TURNING...
... Presser Foot Section 14 Embroidery Unit 15 Operation Buttons 15 Using the Flat Bed Attachment 16 Using the Accessory Case 16 Storing Bobbin Clips 17 Using the Embroidery Unit Carrying Case 17 Included Accessories 17 Options 20 Using the Spool Stand 21 Using the Pen Tablet 23 Chapter 1 Getting Ready 25 TURNING...
Users Manual - English
Page 15
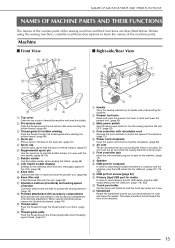
...Front View ■ Right-side/Rear View a Top cover Open the top cover to operate the sewing machine. (page 15) l Flat bed attachment with accessory compartment Store presser feet and bobbins in place. (page 57) f Supplemental spool pin Use this thread guide when winding the bobbin thread. (page 48) ...the slot. (page 83) k Operation buttons (6 buttons) and sewing speed controller Use these descriptions to hold the spool of thread in the accessory compartment of the flat bed attachment. b Presser foot lever Raise and lower the presser foot lever to raise and lower the presser foot. (page...
...Front View ■ Right-side/Rear View a Top cover Open the top cover to operate the sewing machine. (page 15) l Flat bed attachment with accessory compartment Store presser feet and bobbins in place. (page 57) f Supplemental spool pin Use this thread guide when winding the bobbin thread. (page 48) ...the slot. (page 83) k Operation buttons (6 buttons) and sewing speed controller Use these descriptions to hold the spool of thread in the accessory compartment of the flat bed attachment. b Presser foot lever Raise and lower the presser foot lever to raise and lower the presser foot. (page...
Users Manual - English
Page 18
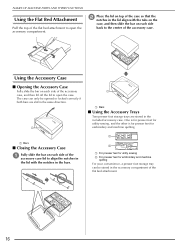
... the lid with the tabs on the case, and then slide the bar on top of the case so that the notches in the included accessory case. The case can be opened or locked correctly if both bars are stored in the lid align with the notches in the same direction... machine quilting. NAMES OF MACHINE PARTS AND THEIR FUNCTIONS Using the Flat Bed Attachment Pull the top of the flat bed attachment to open the accessory compartment. One is for presser feet for utility sewing, and the other is for presser feet for embroidery and machine quilting For your convenience, a presser...
... the lid with the tabs on the case, and then slide the bar on top of the case so that the notches in the included accessory case. The case can be opened or locked correctly if both bars are stored in the lid align with the notches in the same direction... machine quilting. NAMES OF MACHINE PARTS AND THEIR FUNCTIONS Using the Flat Bed Attachment Pull the top of the flat bed attachment to open the accessory compartment. One is for presser feet for utility sewing, and the other is for presser feet for embroidery and machine quilting For your convenience, a presser...
Users Manual - English
Page 19
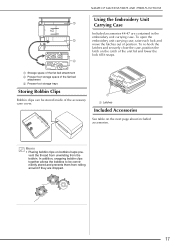
To re-hook the latches and securely close the case, position the latch on the next page about included accessories. a a Latches Included Accessories See table on the catch of the flat bed attachment c Presser foot storage trays Storing Bobbin Clips Bobbin clips can be conveniently stored and ...lid and lower the lock till it snaps. To open the embroidery unit carrying case, raise each lock and move the latches out of the accessory case cover. Memo • Placing bobbin clips on bobbins helps prevent the thread from unwinding from rolling around if they are contained in the ...
To re-hook the latches and securely close the case, position the latch on the next page about included accessories. a a Latches Included Accessories See table on the catch of the flat bed attachment c Presser foot storage trays Storing Bobbin Clips Bobbin clips can be conveniently stored and ...lid and lower the lock till it snaps. To open the embroidery unit carrying case, raise each lock and move the latches out of the accessory case cover. Memo • Placing bobbin clips on bobbins helps prevent the thread from unwinding from rolling around if they are contained in the ...
Users Manual - English
Page 20
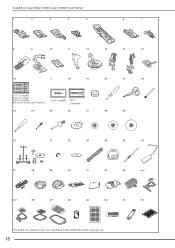
NAMES OF MACHINE PARTS AND THEIR FUNCTIONS 1 2 3 4 5 6 7 8 9 10 11 12 13 14 15 16 17 18 19 20 21 22 75/11 2 needles 90/14 2 needles 90/14 2 needles: Ball point needle (gold colored) 2.0/11 needle 75/11 2 needles 23 24 25 26 27 28 29 30 31 32 33 34 35 36 37 38 39 40 41 42 43 44* 45* 46* 47* 48 49 50 51 52 *Included Accessories 44-47 are contained in the embroidery unit carrying case. 18
NAMES OF MACHINE PARTS AND THEIR FUNCTIONS 1 2 3 4 5 6 7 8 9 10 11 12 13 14 15 16 17 18 19 20 21 22 75/11 2 needles 90/14 2 needles 90/14 2 needles: Ball point needle (gold colored) 2.0/11 needle 75/11 2 needles 23 24 25 26 27 28 29 30 31 32 33 34 35 36 37 38 39 40 41 42 43 44* 45* 46* 47* 48 49 50 51 52 *Included Accessories 44-47 are contained in the embroidery unit carrying case. 18
Users Manual - English
Page 21
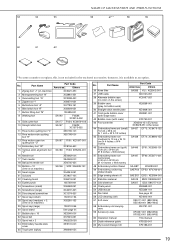
however, it is not included in the enclosed accessories; Part Name Americas Others 1 Zigzag foot "J" (on machine) XC3021-051 2 Monogramming foot "N" X53840-351 3 Overcasting foot "G" XC3098-051 4 Zipper foot "I" X59370-051 5 Buttonhole foot "A" X57789-... 56 LCD cleaning cloth XE4913-001 57 Soft cover XE5111-001 (882-W04) XE5163-001 (882-W05) 58 Embroidery unit carrying case XE3791-001 59 Accessory case XF0337-001 (882-W04) XF0333-001 (882-W05) 60 Operation manual This manual 61 Quick reference guide XF0230-001 62 My Custom Design CD...
however, it is not included in the enclosed accessories; Part Name Americas Others 1 Zigzag foot "J" (on machine) XC3021-051 2 Monogramming foot "N" X53840-351 3 Overcasting foot "G" XC3098-051 4 Zipper foot "I" X59370-051 5 Buttonhole foot "A" X57789-... 56 LCD cleaning cloth XE4913-001 57 Soft cover XE5111-001 (882-W04) XE5163-001 (882-W05) 58 Embroidery unit carrying case XE3791-001 59 Accessory case XF0337-001 (882-W04) XF0333-001 (882-W05) 60 Operation manual This manual 61 Quick reference guide XF0230-001 62 My Custom Design CD...

Users Manual - English
Page 22
The product code is available as optional accessories to be stored in the machine's soft cover case. (In some ...controller: Model S This foot controller can be purchased separately from your authorized dealer (Part code XA4813-051). • Included accessories 37, 43, 60 and 61 can be aware that some countries or regions, the soft cover 13 case is not included... 1/4 quilting foot with product code 882-W04/W05. Memo 10 11 12 • Always use accessories recommended for this machine. • The screw for the presser foot holder is available through your authorized...
The product code is available as optional accessories to be stored in the machine's soft cover case. (In some ...controller: Model S This foot controller can be purchased separately from your authorized dealer (Part code XA4813-051). • Included accessories 37, 43, 60 and 61 can be aware that some countries or regions, the soft cover 13 case is not included... 1/4 quilting foot with product code 882-W04/W05. Memo 10 11 12 • Always use accessories recommended for this machine. • The screw for the presser foot holder is available through your authorized...
Users Manual - English
Page 23
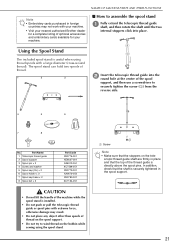
... Do not push or pull the telescopic thread guide or spool pins with your machine. • Visit your nearest authorized Brother dealer for a complete listing of optional accessories and embroidery cards available for your machine. ■ How to assemble the spool stand a Fully extend the telescopic thread ...guide shaft, and then rotate the shaft until the two internal stoppers click into round hole at the center of...
... Do not push or pull the telescopic thread guide or spool pins with your machine. • Visit your nearest authorized Brother dealer for a complete listing of optional accessories and embroidery cards available for your machine. ■ How to assemble the spool stand a Fully extend the telescopic thread ...guide shaft, and then rotate the shaft until the two internal stoppers click into round hole at the center of...
Users Manual - English
Page 59
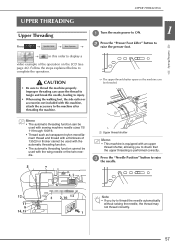
... can cause the thread to tangle and break the needle, leading to injury. • When using the walking foot, the side cutter or accessories not included with this order to display a video example of 130/20 or thicker cannot be used with the automatic threading function. • The... thread with a thickness of the operation on the LCD (see page 46). Lifter" button to Getting Ready → in this machine, attach the accessory to check that the upper threading is performed correctly. Position" button to raise Note • If you to the machine after threading the machine. ...
... can cause the thread to tangle and break the needle, leading to injury. • When using the walking foot, the side cutter or accessories not included with this order to display a video example of 130/20 or thicker cannot be used with the automatic threading function. • The... thread with a thickness of the operation on the LCD (see page 46). Lifter" button to Getting Ready → in this machine, attach the accessory to check that the upper threading is performed correctly. Position" button to raise Note • If you to the machine after threading the machine. ...
Users Manual - English
Page 358
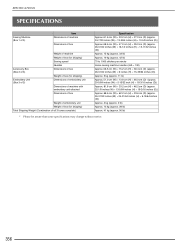
SPECIFICATIONS SPECIFICATIONS Sewing Machine (Box 1 of 3) Item Dimensions of machine Dimensions of box Accessory Box (Box 2 of 3) Embroidery Unit (Box 3 of 3) Weight of machine Weight of box (for shipping) Sewing speed Needles Dimensions of box Weight of box (for ...
SPECIFICATIONS SPECIFICATIONS Sewing Machine (Box 1 of 3) Item Dimensions of machine Dimensions of box Accessory Box (Box 2 of 3) Embroidery Unit (Box 3 of 3) Weight of machine Weight of box (for shipping) Sewing speed Needles Dimensions of box Weight of box (for ...
Users Manual - English
Page 370
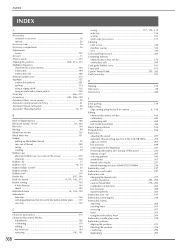
INDEX INDEX A Accessories included accessories 16 options 20 Accessory case 16 Accessory compartment 16 Adjustments screen 342 Air vent 13 Alarm sounds 355 Aligning the position 208 211, 213 Alphabet characters character/decorative stitches 158 embroidery 194 ...
INDEX INDEX A Accessories included accessories 16 options 20 Accessory case 16 Accessory compartment 16 Adjustments screen 342 Air vent 13 Alarm sounds 355 Aligning the position 208 211, 213 Alphabet characters character/decorative stitches 158 embroidery 194 ...
Circular Attachment Instruction Manual - Multi
Page 4
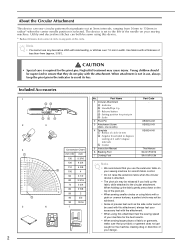
... pivot pin. 50 2 • When sewing smaller circles or using fabric with a 40 3/2 grain or uneven textures, a perfect circle may cause injury. Included Accessories 1 2 4 5 2 No. CAUTION • Special care is required for pivot pin e Scale 2 Pivot Pin XE6016-001 3 3 Attachment Screw XE6022-001 ... Manual SA141/F021N SA110/F013N 120 4 3/4 Note 110 4 3/8 100 4 • We recommend that you use the extension table on your accessory feet with side feeding, or stitches over 7.0 mm in width. Part Name Part Code 1 Circular Attachment - Note • You cannot use ...
... pivot pin. 50 2 • When sewing smaller circles or using fabric with a 40 3/2 grain or uneven textures, a perfect circle may cause injury. Included Accessories 1 2 4 5 2 No. CAUTION • Special care is required for pivot pin e Scale 2 Pivot Pin XE6016-001 3 3 Attachment Screw XE6022-001 ... Manual SA141/F021N SA110/F013N 120 4 3/4 Note 110 4 3/8 100 4 • We recommend that you use the extension table on your accessory feet with side feeding, or stitches over 7.0 mm in width. Part Name Part Code 1 Circular Attachment - Note • You cannot use ...


