
Users Manual - English
Page 11
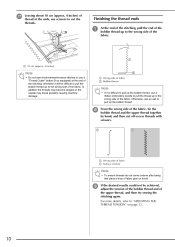
...In addition the threads may become tangled or the needle may break possibly causing machine damage. a Wrong side of fabric b Surface of fabric Note • ...otherwise it is difficult to pull up to "ADJUSTING THE THREAD TENSION" on knots. Otherwise, use a ribbon embroidery needle to pull the thread up to pull up to cut off excess threads with scissors. c If the ... to pull the bobbin thread up the bobbin thread. a 10 cm (approx. 4 inches) Note • Do not sew reinforcement/reverse stitches or use a "Thread Cutter" button (if so equipped) at the ends, use scissors to the wrong...
...In addition the threads may become tangled or the needle may break possibly causing machine damage. a Wrong side of fabric b Surface of fabric Note • ...otherwise it is difficult to pull up to "ADJUSTING THE THREAD TENSION" on knots. Otherwise, use a ribbon embroidery needle to pull the thread up to pull up to cut off excess threads with scissors. c If the ... to pull the bobbin thread up the bobbin thread. a 10 cm (approx. 4 inches) Note • Do not sew reinforcement/reverse stitches or use a "Thread Cutter" button (if so equipped) at the ends, use scissors to the wrong...
Users Manual - Multi
Page 5
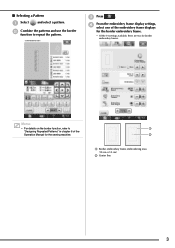
... line 3 b Combine the patterns and use the border function to "Designing Repeated Patterns" in chapter 6 of the embroidery frame displays for the border embroidery frame. * Of the 14 settings available, there are two for the sewing machine. Memo • For details on the border function, refer to repeat the pattern. c Press . ■ Selecting a Pattern...
... line 3 b Combine the patterns and use the border function to "Designing Repeated Patterns" in chapter 6 of the embroidery frame displays for the border embroidery frame. * Of the 14 settings available, there are two for the sewing machine. Memo • For details on the border function, refer to repeat the pattern. c Press . ■ Selecting a Pattern...
Users Manual - Multi
Page 12
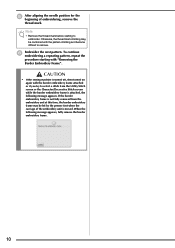
CAUTION • If the sewing machine is turned off, then turned on again with the border embroidery frame attached or if you try to select a stitch from the embroidery unit at this time, the border embroidery frame may be hit by the presser foot when the carriage of embroidering, remove...removed from the Utility Stitch screen or the Character/Decorative Stitch screen while the border embroidery frame is moved. Otherwise, the thread mark stitching may be combined with "Removing the Border Embroidery Frame". When the following message appears. Note • Remove the thread mark ...
CAUTION • If the sewing machine is turned off, then turned on again with the border embroidery frame attached or if you try to select a stitch from the embroidery unit at this time, the border embroidery frame may be hit by the presser foot when the carriage of embroidering, remove...removed from the Utility Stitch screen or the Character/Decorative Stitch screen while the border embroidery frame is moved. Otherwise, the thread mark stitching may be combined with "Removing the Border Embroidery Frame". When the following message appears. Note • Remove the thread mark ...
Users Manual - English
Page 1
Operation Manual Embroidery and Sewing Machine Product Code: 882-W04/W05 Please visit us at http://solutions.brother.com where you can get product support and answers to frequently asked questions (FAQs).
Operation Manual Embroidery and Sewing Machine Product Code: 882-W04/W05 Please visit us at http://solutions.brother.com where you can get product support and answers to frequently asked questions (FAQs).
Users Manual - English
Page 3
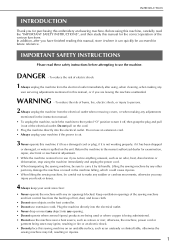
...operation of the electrical outlet. IMPORTANT SAFETY INSTRUCTIONS Please read the "IMPORTANT SAFETY INSTRUCTIONS", and then study this manual for purchasing this sewing machine on the cord. • Plug the machine directly into any air openings blocked. To reduce the risk of lint, dust, and loose cloth. • Do not store...are being used or where oxygen is being sewn may ignite, resulting in fire or an electric shock. • Do not place this embroidery and sewing machine. Do not pull on an unstable surface, such as an odor, heat, discoloration or deformation, stop using the...
...operation of the electrical outlet. IMPORTANT SAFETY INSTRUCTIONS Please read the "IMPORTANT SAFETY INSTRUCTIONS", and then study this manual for purchasing this sewing machine on the cord. • Plug the machine directly into any air openings blocked. To reduce the risk of lint, dust, and loose cloth. • Do not store...are being used or where oxygen is being sewn may ignite, resulting in fire or an electric shock. • Do not place this embroidery and sewing machine. Do not pull on an unstable surface, such as an odor, heat, discoloration or deformation, stop using the...
Users Manual - English
Page 8
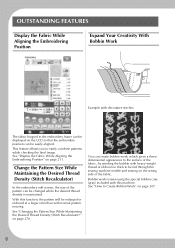
... While Aligning the Embroidering Position Expand Your Creativity With Bobbin Work Example with decorative stitches The fabric hooped in the embroidery frame can be displayed on the LCD so that the embroidery position can be changed while the desired thread density is sewn using the special bobbin case (gray) included with normal... weight thread or ribbon too thick to be enlarged or reduced at a larger ratio than with this function, the pattern will be fed through the sewing machine needle and sewing on the wrong side of the pattern can be easily aligned.
... While Aligning the Embroidering Position Expand Your Creativity With Bobbin Work Example with decorative stitches The fabric hooped in the embroidery frame can be displayed on the LCD so that the embroidery position can be changed while the desired thread density is sewn using the special bobbin case (gray) included with normal... weight thread or ribbon too thick to be enlarged or reduced at a larger ratio than with this function, the pattern will be fed through the sewing machine needle and sewing on the wrong side of the pattern can be easily aligned.
Users Manual - English
Page 9
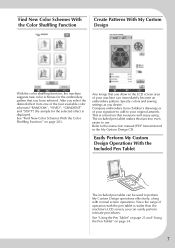
.... 7 Compose embroidery from one of your machine can be used to the instruction manual (PDF format) stored in the LCD screen area of the four available color schemes ("RANDOM", "VIVID", "GRADIENT" and "SOFT") the sample for the embroidery pattern that you draw in the My Custom Design CD. Specify colors and sewing settings as...
.... 7 Compose embroidery from one of your machine can be used to the instruction manual (PDF format) stored in the LCD screen area of the four available color schemes ("RANDOM", "VIVID", "GRADIENT" and "SOFT") the sample for the embroidery pattern that you draw in the My Custom Design CD. Specify colors and sewing settings as...
Users Manual - English
Page 10
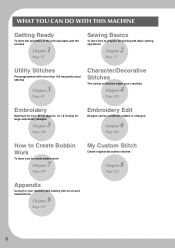
WHAT YOU CAN DO WITH THIS MACHINE Getting Ready To learn the operation of the principal parts and the screens 1 Chapter Page 25 Sewing Basics To learn how to prepare for sewing and basic sewing operations 2 Chapter Page 71 Utility Stitches Pre-programmed with more than 100 ...frequently used stitches 3 Chapter Page 89 Character/Decorative Stitches The variety of stitches widen your creativity 4 Chapter Page 155 Embroidery Maximum 30...
WHAT YOU CAN DO WITH THIS MACHINE Getting Ready To learn the operation of the principal parts and the screens 1 Chapter Page 25 Sewing Basics To learn how to prepare for sewing and basic sewing operations 2 Chapter Page 71 Utility Stitches Pre-programmed with more than 100 ...frequently used stitches 3 Chapter Page 89 Character/Decorative Stitches The variety of stitches widen your creativity 4 Chapter Page 155 Embroidery Maximum 30...

Users Manual - English
Page 11
... index at the back of the operation manual in the directions with . If, while using the embroidery function after reading Chapter 1 and Chapter 2, proceed to Chapter 5 (Embroidery). HOW TO USE THIS MANUAL Chapter 1 and Chapter 2 explain your sewing machine's basic operation procedures for someone who is a function you would like to know more about...
... index at the back of the operation manual in the directions with . If, while using the embroidery function after reading Chapter 1 and Chapter 2, proceed to Chapter 5 (Embroidery). HOW TO USE THIS MANUAL Chapter 1 and Chapter 2 explain your sewing machine's basic operation procedures for someone who is a function you would like to know more about...

Users Manual - English
Page 12
... IMPORTANT SAFETY INSTRUCTIONS 1 OUTSTANDING FEATURES 6 WHAT YOU CAN DO WITH THIS MACHINE ......8 HOW TO USE THIS MANUAL 9 NAMES OF MACHINE PARTS AND THEIR FUNCTIONS 13 Machine 13 Needle and Presser Foot Section 14 Embroidery Unit 15 Operation Buttons 15 Using the Flat Bed Attachment 16 Using the ...the Embroidery Unit Carrying Case 17 Included Accessories 17 Options 20 Using the Spool Stand 21 Using the Pen Tablet 23 Chapter 1 Getting Ready 25 TURNING THE MACHINE ON/OFF 26 LCD SCREEN 28 USB Connectivity 32 Using the Machine Setting Mode Key 35 Using the Sewing Machine ...
... IMPORTANT SAFETY INSTRUCTIONS 1 OUTSTANDING FEATURES 6 WHAT YOU CAN DO WITH THIS MACHINE ......8 HOW TO USE THIS MANUAL 9 NAMES OF MACHINE PARTS AND THEIR FUNCTIONS 13 Machine 13 Needle and Presser Foot Section 14 Embroidery Unit 15 Operation Buttons 15 Using the Flat Bed Attachment 16 Using the ...the Embroidery Unit Carrying Case 17 Included Accessories 17 Options 20 Using the Spool Stand 21 Using the Pen Tablet 23 Chapter 1 Getting Ready 25 TURNING THE MACHINE ON/OFF 26 LCD SCREEN 28 USB Connectivity 32 Using the Machine Setting Mode Key 35 Using the Sewing Machine ...

Users Manual - English
Page 13
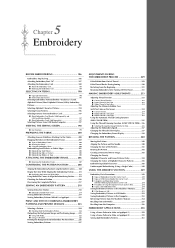
... the Machine's Memory 254 Recalling from USB Media 255 Recalling from the Computer 256 EMBROIDERY APPLICATIONS 258 Using a Frame Pattern to Make an Appliqué (1 258 Using a Frame Pattern to Make an Appliqué (2 259 Sewing Split Embroidery Patterns 261 Chapter 6 Embroidery Edit 263 EXPLANATION OF FUNCTIONS 264 SELECTING PATTERNS TO EDIT 265 Selecting Embroidery Patterns/Brother...
... the Machine's Memory 254 Recalling from USB Media 255 Recalling from the Computer 256 EMBROIDERY APPLICATIONS 258 Using a Frame Pattern to Make an Appliqué (1 258 Using a Frame Pattern to Make an Appliqué (2 259 Sewing Split Embroidery Patterns 261 Chapter 6 Embroidery Edit 263 EXPLANATION OF FUNCTIONS 264 SELECTING PATTERNS TO EDIT 265 Selecting Embroidery Patterns/Brother...
Users Manual - English
Page 43
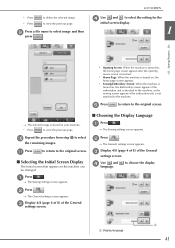
...Display The Initial screen that appears on , the Embroidery screen appears if the embroidery unit is attached to the machine, or the sewing screen appears if the embroidery unit is turned on the machine can be changed. a Press . → The Sewing settings screen appears. k Press to return to...Getting Ready * Opening Screen: When the machine is turned on, the home page screen appears after the opening movie screen is touched. * Home Page: When the machine is turned on, the home page screen appears. * Sewing/Embroidery Screen: When the machine is not attached to delete the selected ...
...Display The Initial screen that appears on , the Embroidery screen appears if the embroidery unit is attached to the machine, or the sewing screen appears if the embroidery unit is turned on the machine can be changed. a Press . → The Sewing settings screen appears. k Press to return to...Getting Ready * Opening Screen: When the machine is turned on, the home page screen appears after the opening movie screen is touched. * Home Page: When the machine is turned on, the home page screen appears. * Sewing/Embroidery Screen: When the machine is not attached to delete the selected ...
Users Manual - English
Page 50
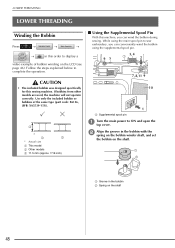
... groove in the bobbin b Spring on the shaft 48 If bobbins from other models are used, the machine will not operate correctly. Use only the included bobbin or bobbins of bobbin winding on the shaft. Follow... 46). While using the main spool pin to sew → embroidery, you can conveniently wind the bobbin using the supplemental spool pin. → in this machine, you can wind the bobbin during sewing. LOWER THREADING LOWER THREADING Winding the Bobbin Press ...a Turn the main top cover. CAUTION • The included bobbin was designed specifically for this sewing machine.
... groove in the bobbin b Spring on the shaft 48 If bobbins from other models are used, the machine will not operate correctly. Use only the included bobbin or bobbins of bobbin winding on the shaft. Follow... 46). While using the main spool pin to sew → embroidery, you can conveniently wind the bobbin using the supplemental spool pin. → in this machine, you can wind the bobbin during sewing. LOWER THREADING LOWER THREADING Winding the Bobbin Press ...a Turn the main top cover. CAUTION • The included bobbin was designed specifically for this sewing machine.
Users Manual - English
Page 187
... Saving Embroidery Patterns to USB Media 252 Saving Embroidery Patterns in the Computer 253 Retrieving Patterns from the Machine's Memory 254 Recalling from USB Media 255 Recalling from the Computer 256 EMBROIDERY APPLICATIONS 258 Using a Frame Pattern to Make an Appliqué (1 258 Using a Frame Pattern to Make an Appliqué (2 259 Sewing Split Embroidery Patterns...
... Saving Embroidery Patterns to USB Media 252 Saving Embroidery Patterns in the Computer 253 Retrieving Patterns from the Machine's Memory 254 Recalling from USB Media 255 Recalling from the Computer 256 EMBROIDERY APPLICATIONS 258 Using a Frame Pattern to Make an Appliqué (1 258 Using a Frame Pattern to Make an Appliqué (2 259 Sewing Split Embroidery Patterns...
Users Manual - English
Page 217
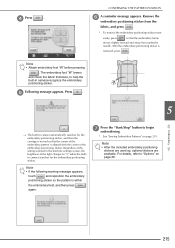
...built-in camera recognize the embroidery positioning sticker. After the embroidery positioning sticker is within the embroidery field, and then press again. Press . 5 Embroidery → The built-in the machine settings screen, the brightness of the embroidery positioning sticker. Regardless of... message appears. button to "5" while the builtin camera searches for the embroidery positioning sticker, and then the carriage is aligned with the center of the light changes to begin * See "Sewing Embroidery Patterns" on page 20. 215 d Press . CONFIRMING THE PATTERN POSITION...
...built-in camera recognize the embroidery positioning sticker. After the embroidery positioning sticker is within the embroidery field, and then press again. Press . 5 Embroidery → The built-in the machine settings screen, the brightness of the embroidery positioning sticker. Regardless of... message appears. button to "5" while the builtin camera searches for the embroidery positioning sticker, and then the carriage is aligned with the center of the light changes to begin * See "Sewing Embroidery Patterns" on page 20. 215 d Press . CONFIRMING THE PATTERN POSITION...
Users Manual - English
Page 221
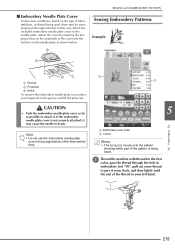
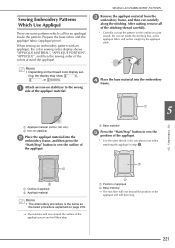
a Thread the color, pass machine with thread for any applications other than embroidery. 5 Embroidery a Embroidery color order b Cursor Memo • The [+] cursor moves over the pattern, showing which part of the cover into the notches on the ... in your fingernail in the groove and lift the plate out. SEWING AN EMBROIDERY PATTERN Sewing Embroidery Patterns Example: b a a Groove b Projection c Notch To remove the embroidery needle plate cover, place your left hand. 219 Note • Do not use the embroidery needle plate cover for the first the thread through the hole in...
a Thread the color, pass machine with thread for any applications other than embroidery. 5 Embroidery a Embroidery color order b Cursor Memo • The [+] cursor moves over the pattern, showing which part of the cover into the notches on the ... in your fingernail in the groove and lift the plate out. SEWING AN EMBROIDERY PATTERN Sewing Embroidery Patterns Example: b a a Groove b Projection c Notch To remove the embroidery needle plate cover, place your left hand. 219 Note • Do not use the embroidery needle plate cover for the first the thread through the hole in...
Users Manual - English
Page 223
... then cut out the pattern on the outline you plan to sew the outline of the appliqué. base material into the embroidery 5 Embroidery a Appliqué material (cotton, felt, etc.) b Iron-on page 219. → The machine will then stop . After cutting, remove all of the appliqu...233; b Appliqué material Memo • The embroidery procedure is the same as the appliqué fabric will sew around the appliqué. the wrong d Place the frame. a Attach side of appliqué b Base material → The machine will not be caught by the appliqué stitch...
... then cut out the pattern on the outline you plan to sew the outline of the appliqué. base material into the embroidery 5 Embroidery a Appliqué material (cotton, felt, etc.) b Iron-on page 219. → The machine will then stop . After cutting, remove all of the appliqu...233; b Appliqué material Memo • The embroidery procedure is the same as the appliqué fabric will sew around the appliqué. the wrong d Place the frame. a Attach side of appliqué b Base material → The machine will not be caught by the appliqué stitch...
Users Manual - English
Page 225
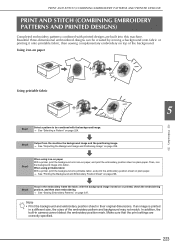
... pattern to be created by ironing a background onto fabric or printing it onto printable fabric, then sewing complementary embroidery on page 227. Step2 Output from the machine the background image and the positioning image. → See "Outputting the Background Image and Positioning Image... this machine. Note • Print the background and embroidery position sheet in the embroidery frame the fabric with the background image ironed on or printed, check the embroidering position, and then start embroidering. → See "Sewing Embroidery Patterns" on top of the embroidery pattern and...
... pattern to be created by ironing a background onto fabric or printing it onto printable fabric, then sewing complementary embroidery on page 227. Step2 Output from the machine the background image and the positioning image. → See "Outputting the Background Image and Positioning Image... this machine. Note • Print the background and embroidery position sheet in the embroidery frame the fabric with the background image ironed on or printed, check the embroidering position, and then start embroidering. → See "Sewing Embroidery Patterns" on top of the embroidery pattern and...
Users Manual - English
Page 251
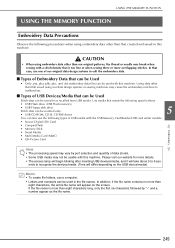
... other than that created and saved in the file names. Using data other than that saved using our data design systems or sewing machines may cause the embroidery machine to malfunction. ■ Types of USB Devices/Media that can be Used Stitch data can be saved to 6 sec- onds to recognize the devices/...media. (Time will take about 5 to or recalled from USB media. If the file name is too fine or when sewing three or more ...
... other than that created and saved in the file names. Using data other than that saved using our data design systems or sewing machines may cause the embroidery machine to malfunction. ■ Types of USB Devices/Media that can be Used Stitch data can be saved to 6 sec- onds to recognize the devices/...media. (Time will take about 5 to or recalled from USB media. If the file name is too fine or when sewing three or more ...
Users Manual - English
Page 311
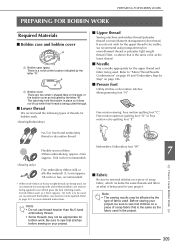
...gives the best stitching results. Note • The sewing results may not be sure to sew trial stitches on a piece of fabric used . Before sewing your project. Note • Do not use thread heavier than No.5 hand embroidery thread. • Some threads may be affected by ... project. 309 If wide ribbon such as the fabric used in your project, be appropriate for bobbin work . ■ Upper thread Sewing machine embroidery thread (polyester thread) or monofilament (transparent nylon) thread. Refer to see which includes the same threads and fabric as the lower thread...
...gives the best stitching results. Note • The sewing results may not be sure to sew trial stitches on a piece of fabric used . Before sewing your project. Note • Do not use thread heavier than No.5 hand embroidery thread. • Some threads may be affected by ... project. 309 If wide ribbon such as the fabric used in your project, be appropriate for bobbin work . ■ Upper thread Sewing machine embroidery thread (polyester thread) or monofilament (transparent nylon) thread. Refer to see which includes the same threads and fabric as the lower thread...


