

Users Manual - English
Page 3
...) Free-motion sewing INCLUDED ACCESSORIES 1. 2. 3. 4. Bobbin work is sewn using the special bobbin case (gray) and bobbin cover with tabs included with tabs (*See Note.) Screwdriver (small) (X55468-051) CD-ROM (Contains the Operation Manual and the Templates for freemotion sewing.) (USA/CANADA: XE9382-001, Other areas: XE9501-001) Note •...
...) Free-motion sewing INCLUDED ACCESSORIES 1. 2. 3. 4. Bobbin work is sewn using the special bobbin case (gray) and bobbin cover with tabs included with tabs (*See Note.) Screwdriver (small) (X55468-051) CD-ROM (Contains the Operation Manual and the Templates for freemotion sewing.) (USA/CANADA: XE9382-001, Other areas: XE9501-001) Note •...
Users Manual - English
Page 14
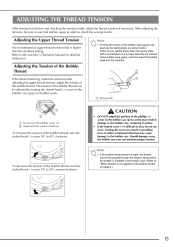
... thread. Should damage occur, the bobbin case may push up the spring plate, as this occurs, gently press down the spring plate with the small screwdriver. • DO NOT adjust the position of the bobbin case (gray), and then insert the bobbin case into the machine. If this may cause... damage to check the sewing results. b Adjust with a screwdriver so it useless. • If the slotted screw (-) is not applied to the bobbin thread" on the bobbin case (gray) may not maintain proper ...
... thread. Should damage occur, the bobbin case may push up the spring plate, as this occurs, gently press down the spring plate with the small screwdriver. • DO NOT adjust the position of the bobbin case (gray), and then insert the bobbin case into the machine. If this may cause... damage to check the sewing results. b Adjust with a screwdriver so it useless. • If the slotted screw (-) is not applied to the bobbin thread" on the bobbin case (gray) may not maintain proper ...
Users Manual - English
Page 21
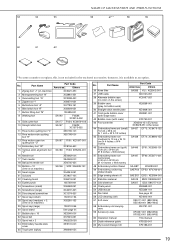
... 20 Seam ripper X54243-051 21 Scissors XC1807-121 22 Cleaning brush X59476-051 23 Eyelet punch 135793-001 24 Screwdriver (small) X55468-051 25 Screwdriver (large) XC4237-021 26 Disc-shaped screwdriver XC1074-051 27 Spool cap (small) 130013-154 28 Spool cap (medium) × 2 (One is on machine) XC3021-051 2 Monogramming...
... 20 Seam ripper X54243-051 21 Scissors XC1807-121 22 Cleaning brush X59476-051 23 Eyelet punch 135793-001 24 Screwdriver (small) X55468-051 25 Screwdriver (large) XC4237-021 26 Disc-shaped screwdriver XC1074-051 27 Spool cap (small) 130013-154 28 Spool cap (medium) × 2 (One is on machine) XC3021-051 2 Monogramming...
Users Manual - English
Page 23
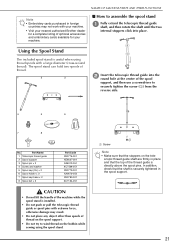
...not place any object other than spools of the spool the support, and then use a screwdriver to assemble the spool stand a Fully extend the telescopic thread guide shaft, and then rotate the shaft until the two internal stoppers click into place. Part Name 1 Telescopic thread guide 2 Spool support 3 Spool ... XE0780-001 XC7134-051 CAUTION • Do not lift the handle of optional accessories and embroidery cards available for your nearest authorized Brother dealer for a complete listing of the machine while the spool stand is useful when using the spool stand. In addition, check ...
...not place any object other than spools of the spool the support, and then use a screwdriver to assemble the spool stand a Fully extend the telescopic thread guide shaft, and then rotate the shaft until the two internal stoppers click into place. Part Name 1 Telescopic thread guide 2 Spool support 3 Spool ... XE0780-001 XC7134-051 CAUTION • Do not lift the handle of optional accessories and embroidery cards available for your nearest authorized Brother dealer for a complete listing of the machine while the spool stand is useful when using the spool stand. In addition, check ...

Users Manual - English
Page 68
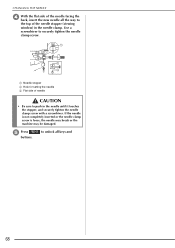
... walking foot. the Presser b Loosen the screw of the walking so that the needle does not strike the presser foot. CAUTION • Use the included screwdriver to unlock all keys and c Raise the presser foot lever. If the needle strikes the presser foot, injury may strike the presser foot and cause... injury. • Be sure to rotate the handwheel toward you to feed the fabric. Only select straight or zigzag stitch patterns with the screwdriver. to tighten the screw securely.
... walking foot. the Presser b Loosen the screw of the walking so that the needle does not strike the presser foot. CAUTION • Use the included screwdriver to unlock all keys and c Raise the presser foot lever. If the needle strikes the presser foot, injury may strike the presser foot and cause... injury. • Be sure to rotate the handwheel toward you to feed the fabric. Only select straight or zigzag stitch patterns with the screwdriver. to tighten the screw securely.
Users Manual - English
Page 69
... sew with fabric or paper to prevent the needle from the top and the sides. Check the needle from falling into the machine. c Use the screwdriver to continue. 67 appears on the LCD screen, press OK to toward the front of the needle on the screen before changing the needle. Follow...
... sew with fabric or paper to prevent the needle from the top and the sides. Check the needle from falling into the machine. c Use the screwdriver to continue. 67 appears on the LCD screen, press OK to toward the front of the needle on the screen before changing the needle. Follow...
Users Manual - English
Page 70
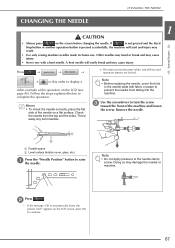
... to the top of the needle stopper (viewing window) in the needle until it touches the stopper, and securely tighten the needle clamp screw with a screwdriver. Use a screwdriver to push in the needle clamp. a Needle stopper b Hole for setting the needle c Flat side of needle CAUTION • Be sure to securely tighten...
... to the top of the needle stopper (viewing window) in the needle until it touches the stopper, and securely tighten the needle clamp screw with a screwdriver. Use a screwdriver to push in the needle clamp. a Needle stopper b Hole for setting the needle c Flat side of needle CAUTION • Be sure to securely tighten...

Users Manual - English
Page 119
... aligned with the notch in the upper-left hand. SEWING THE STITCHES c Press to set the machine to securely tighten the screws with the included screwdriver. Otherwise, the needle may touch the quilting foot, causing it to sew uniform stitches roughly 2.0-2.5 mm (approx. 1/16 - 3/32 inch) in place with your right...
... aligned with the notch in the upper-left hand. SEWING THE STITCHES c Press to set the machine to securely tighten the screws with the included screwdriver. Otherwise, the needle may touch the quilting foot, causing it to sew uniform stitches roughly 2.0-2.5 mm (approx. 1/16 - 3/32 inch) in place with your right...

Users Manual - English
Page 121
...2.0-2.5 mm (approx. 1/16 - 3/32 inch) in place with your right hand, and tighten the presser foot holder screw using the screwdriver with your left hand. Use the free motion echo quilting foot "E" for echo quilting. Otherwise, the needle may touch the quilting foot,... causing it to securely tighten the screws with the included screwdriver. When the other stitches are the distinguishing characteristic of this quilting style. a 6.4 mm (approx. 1/4 inch) b 9.5 mm (approx. 3/8 inch...
...2.0-2.5 mm (approx. 1/16 - 3/32 inch) in place with your right hand, and tighten the presser foot holder screw using the screwdriver with your left hand. Use the free motion echo quilting foot "E" for echo quilting. Otherwise, the needle may touch the quilting foot,... causing it to securely tighten the screws with the included screwdriver. When the other stitches are the distinguishing characteristic of this quilting style. a 6.4 mm (approx. 1/4 inch) b 9.5 mm (approx. 3/8 inch...

Users Manual - English
Page 122
... motion sewing mode. Increase the setting by pressing , for free motion sewing. d Remove the presser 66) and the screw. f Tighten the screw screwdriver. b Press to set the machine to select the height that it may be necessary to the height specified in the quilting foot and presser bar...bar with a sample piece of quilting fabric. Test with the holes in the machine settings screen. Memo • When starting to sew, the internal sensor detects the thickness of the fabric, and the quilting foot is raised to adjust the upper thread tension (see page 35). If the ...
... motion sewing mode. Increase the setting by pressing , for free motion sewing. d Remove the presser 66) and the screw. f Tighten the screw screwdriver. b Press to set the machine to select the height that it may be necessary to the height specified in the quilting foot and presser bar...bar with a sample piece of quilting fabric. Test with the holes in the machine settings screen. Memo • When starting to sew, the internal sensor detects the thickness of the fabric, and the quilting foot is raised to adjust the upper thread tension (see page 35). If the ...

Users Manual - English
Page 189
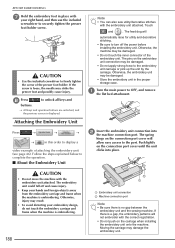
...d Push the black button on the screen. Position" button to bend or break and possibly cause injury. e Use the included screwdriver to complete the operation. Using another presser foot may accidentally press the "Start/Stop" button and possibly cause injury. • ... foot "W" when doing embroidery. a Press the "Needle the needle. a Arm b Needle holder c Presser foot holder screw d Wiper 187 a Screwdriver b Presser foot holder c Presser foot holder screw → Remove the presser foot holder. CAUTION • When attaching a presser foot, always press...
...d Push the black button on the screen. Position" button to bend or break and possibly cause injury. e Use the included screwdriver to complete the operation. Using another presser foot may accidentally press the "Start/Stop" button and possibly cause injury. • ... foot "W" when doing embroidery. a Press the "Needle the needle. a Arm b Needle holder c Presser foot holder screw d Wiper 187 a Screwdriver b Presser foot holder c Presser foot holder screw → Remove the presser foot holder. CAUTION • When attaching a presser foot, always press...
Users Manual - English
Page 190
... push on the connection port cover will allow easy access to firmly tighten the screw of the embroidery unit. CAUTION • Use the included screwdriver to the port. h Press buttons. Otherwise, the embroidery unit may be damaged. • Do not touch the inner connector of the presser...decorative stitching. • Be sure to securely tighten the presser foot holder screw. The feed dog will not embroider with use the included screwdriver to turn off and cause injury. • Keep your hands and foreign objects away from the embroidery carriage and frame when the machine...
... push on the connection port cover will allow easy access to firmly tighten the screw of the embroidery unit. CAUTION • Use the included screwdriver to the port. h Press buttons. Otherwise, the embroidery unit may be damaged. • Do not touch the inner connector of the presser...decorative stitching. • Be sure to securely tighten the presser foot holder screw. The feed dog will not embroider with use the included screwdriver to turn off and cause injury. • Keep your hands and foreign objects away from the embroidery carriage and frame when the machine...

Users Manual - English
Page 236
...Press to tighten the upper thread tension and press to "Upper Threading" (page 57) and rethread the upper thread. b Adjust with a screwdriver (small). ■ Correct Tension Upper thread slightly appears on the screw), turn a phillips screw (+). Adjusting the Alternate Bobbin Case (with a (small...) screwdriver. MAKING EMBROIDERY ADJUSTMENTS ■ Upper Thread is Too Loose The tension of the upper thread is too loose, resulting in the embroidery...
...Press to tighten the upper thread tension and press to "Upper Threading" (page 57) and rethread the upper thread. b Adjust with a screwdriver (small). ■ Correct Tension Upper thread slightly appears on the screw), turn a phillips screw (+). Adjusting the Alternate Bobbin Case (with a (small...) screwdriver. MAKING EMBROIDERY ADJUSTMENTS ■ Upper Thread is Too Loose The tension of the upper thread is too loose, resulting in the embroidery...

Users Manual - English
Page 324
...79. Should damage occur, the bobbin case may push up the spring plate, as this occurs, gently press down the spring plate with a small screwdriver. After adjusting the tensions, be adjusted by turning the slotted-head (-) screw on the bobbin case (gray) as shown below. b Adjust with... a screwdriver so it useless. • If the slotted screw (-) is not applied to 45° counterclockwise. If utility stitches are being used , refer to ...
...79. Should damage occur, the bobbin case may push up the spring plate, as this occurs, gently press down the spring plate with a small screwdriver. After adjusting the tensions, be adjusted by turning the slotted-head (-) screw on the bobbin case (gray) as shown below. b Adjust with... a screwdriver so it useless. • If the slotted screw (-) is not applied to 45° counterclockwise. If utility stitches are being used , refer to ...

Users Manual - English
Page 342
... aligned before installing the bobbin case. CARE AND MAINTENANCE * Make sure that you fit the bobbin case properly, otherwise the needle may break. b Use the screwdriver machine to remove any lint and dust from the cutter in the bobbin case area. CAUTION • Never use a bobbin case that is used.
... aligned before installing the bobbin case. CARE AND MAINTENANCE * Make sure that you fit the bobbin case properly, otherwise the needle may break. b Use the screwdriver machine to remove any lint and dust from the cutter in the bobbin case area. CAUTION • Never use a bobbin case that is used.

Users Manual - English
Page 343
... future. 9 Appendix 341 About the Maintenance Message Once this message appears, it is performed. Please take your machine requires once this message appears. d Use the screwdriver included with the machine to arrange the maintenance your machine to ensure you press , the message will display several more times until the appropriate maintenance...
... future. 9 Appendix 341 About the Maintenance Message Once this message appears, it is performed. Please take your machine requires once this message appears. d Use the screwdriver included with the machine to arrange the maintenance your machine to ensure you press , the message will display several more times until the appropriate maintenance...
My Custom Design Guide - English
Page 5
... 5 Follow the precautions below when handling the USB media. • For details about available USB media, visit our website " http://solutions.brother.com ". • Do not insert USB media containing pattern data other than those saved using this application is stored in the environment. Do... not use a mechanical pencil, screwdriver or any other changes in a folder, that you make backup copies for example, the name contains special characters, the names are not...
... 5 Follow the precautions below when handling the USB media. • For details about available USB media, visit our website " http://solutions.brother.com ". • Do not insert USB media containing pattern data other than those saved using this application is stored in the environment. Do... not use a mechanical pencil, screwdriver or any other changes in a folder, that you make backup copies for example, the name contains special characters, the names are not...

Circular Attachment Instruction Manual - Multi
Page 5
... Screw c Securely tighten the screw with the discshaped screwdriver included in your circle. b Slide the indicator to bend or break. Threading lever may cause the pivot pin to match the desired size of your ...
... Screw c Securely tighten the screw with the discshaped screwdriver included in your circle. b Slide the indicator to bend or break. Threading lever may cause the pivot pin to match the desired size of your ...