
Users Manual - English
Page 11
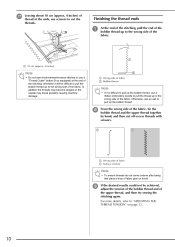
... it is difficult to pull up the bobbin thread, use a ribbon embroidery needle to pull the thread up to pull up the bobbin thread. ... q Leaving about 10 cm (approx. 4 inches) of thread at the end of the upper thread, and then try sewing the stitching again. b From the wrong side of the fabric. Finishing the thread ends a At the end of the ... In addition the threads may become tangled or the needle may break possibly causing machine damage. a 10 cm (approx. 4 inches) Note • Do not sew reinforcement/reverse stitches or use an awl to the wrong side of the fabric...
... it is difficult to pull up the bobbin thread, use a ribbon embroidery needle to pull the thread up to pull up the bobbin thread. ... q Leaving about 10 cm (approx. 4 inches) of thread at the end of the upper thread, and then try sewing the stitching again. b From the wrong side of the fabric. Finishing the thread ends a At the end of the ... In addition the threads may become tangled or the needle may break possibly causing machine damage. a 10 cm (approx. 4 inches) Note • Do not sew reinforcement/reverse stitches or use an awl to the wrong side of the fabric...
Users Manual - Multi
Page 5
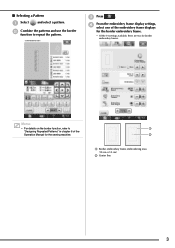
... border function to "Designing Repeated Patterns" in chapter 6 of the embroidery frame displays for the border embroidery frame. * Of the 14 settings available, there are two for the sewing machine. d From the embroidery frame display settings, select one of the Operation Manual for border embroidery frames. a b a Border embroidery frame embroidering area (18 cm × 10 cm) b Center...
... border function to "Designing Repeated Patterns" in chapter 6 of the embroidery frame displays for the border embroidery frame. * Of the 14 settings available, there are two for the sewing machine. d From the embroidery frame display settings, select one of the Operation Manual for border embroidery frames. a b a Border embroidery frame embroidering area (18 cm × 10 cm) b Center...
Users Manual - Multi
Page 12
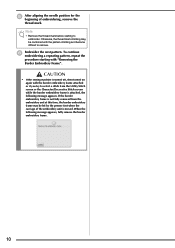
... the pattern stitching and become difficult to embroider. CAUTION • If the sewing machine is attached, the following message appears, fully remove the border embroidery frame. 10 To continue embroidering a repeating pattern, repeat the procedure starting to remove. If the border embroidery frame is moved. e After aligning the needle position for the beginning of...
... the pattern stitching and become difficult to embroider. CAUTION • If the sewing machine is attached, the following message appears, fully remove the border embroidery frame. 10 To continue embroidering a repeating pattern, repeat the procedure starting to remove. If the border embroidery frame is moved. e After aligning the needle position for the beginning of...
Users Manual - English
Page 1
Operation Manual Embroidery and Sewing Machine Product Code: 882-W04/W05 Please visit us at http://solutions.brother.com where you can get product support and answers to frequently asked questions (FAQs).
Operation Manual Embroidery and Sewing Machine Product Code: 882-W04/W05 Please visit us at http://solutions.brother.com where you can get product support and answers to frequently asked questions (FAQs).
Users Manual - English
Page 3
... outlet. • Never drop or insert any other part may fall, resulting in fire or an electric shock. • Do not place this embroidery and sewing machine. WARNING - Lifting the sewing machine by any object into the electrical outlet. IMPORTANT SAFETY INSTRUCTIONS Please read the "IMPORTANT SAFETY INSTRUCTIONS", and then study this manual for purchasing...
... outlet. • Never drop or insert any other part may fall, resulting in fire or an electric shock. • Do not place this embroidery and sewing machine. WARNING - Lifting the sewing machine by any object into the electrical outlet. IMPORTANT SAFETY INSTRUCTIONS Please read the "IMPORTANT SAFETY INSTRUCTIONS", and then study this manual for purchasing...
Users Manual - English
Page 8
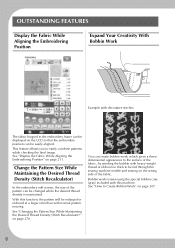
...fabric. Change the Pattern Size While Maintaining the Desired Thread Density (Stitch Recalculator) In the embroidery edit screen, the size of the pattern can be fed through the sewing machine needle and sewing on the wrong side of the fabric, by winding the bobbin with heavy weight thread ... thread density is sewn using the special bobbin case (gray) included with this function, the pattern will be easily aligned. With this machine. See "How to Create Bobbin Work" on page 270. OUTSTANDING FEATURES Display the Fabric While Aligning the Embroidering Position Expand Your Creativity...
...fabric. Change the Pattern Size While Maintaining the Desired Thread Density (Stitch Recalculator) In the embroidery edit screen, the size of the pattern can be fed through the sewing machine needle and sewing on the wrong side of the fabric, by winding the bobbin with heavy weight thread ... thread density is sewn using the special bobbin case (gray) included with this function, the pattern will be easily aligned. With this machine. See "How to Create Bobbin Work" on page 270. OUTSTANDING FEATURES Display the Fabric While Aligning the Embroidering Position Expand Your Creativity...
Users Manual - English
Page 9
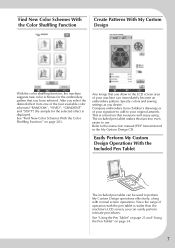
After you desire. Specify colors and sewing settings as you select the desired effect from children's drawings or ... the range of the four available color schemes ("RANDOM", "VIVID", "GRADIENT" and "SOFT") the sample for the embroidery pattern that you can easily perform intricate procedures. See "Using the Pen Tablet" on page 23 and "Using the ... manual (PDF format) stored in the LCD screen area of your signature to add to your machine can immediately become an embroidery pattern. Find New Color Schemes With the Color Shuffling Function Create Patterns With My Custom Design With...
After you desire. Specify colors and sewing settings as you select the desired effect from children's drawings or ... the range of the four available color schemes ("RANDOM", "VIVID", "GRADIENT" and "SOFT") the sample for the embroidery pattern that you can easily perform intricate procedures. See "Using the Pen Tablet" on page 23 and "Using the ... manual (PDF format) stored in the LCD screen area of your signature to add to your machine can immediately become an embroidery pattern. Find New Color Schemes With the Color Shuffling Function Create Patterns With My Custom Design With...
Users Manual - English
Page 10
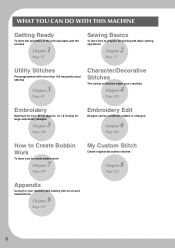
WHAT YOU CAN DO WITH THIS MACHINE Getting Ready To learn the operation of the principal parts and the screens 1 Chapter Page 25 Sewing Basics To learn how to prepare for sewing and basic sewing operations 2 Chapter Page 71 Utility Stitches Pre-programmed with more than 100 ...frequently used stitches 3 Chapter Page 89 Character/Decorative Stitches The variety of stitches widen your creativity 4 Chapter Page 155 Embroidery Maximum 30...
WHAT YOU CAN DO WITH THIS MACHINE Getting Ready To learn the operation of the principal parts and the screens 1 Chapter Page 25 Sewing Basics To learn how to prepare for sewing and basic sewing operations 2 Chapter Page 71 Utility Stitches Pre-programmed with more than 100 ...frequently used stitches 3 Chapter Page 89 Character/Decorative Stitches The variety of stitches widen your creativity 4 Chapter Page 155 Embroidery Maximum 30...

Users Manual - English
Page 11
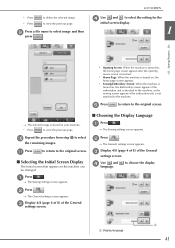
HOW TO USE THIS MANUAL Chapter 1 and Chapter 2 explain your sewing machine's basic operation procedures for someone who is a function you would like to know more about the embroidery edit functions. In the screens appearing in the step-by-step instructions, the parts referred to in the ... Compare the screen in Chapter 5, go on to . Once you want to sew utility stitches or character/ decorative stitches, read Chapter 1 and Chapter 2, then go on to Chapter 5 (Embroidery). If, while using the sewing machine for an explanation about , refer to the index at the back of the ...
HOW TO USE THIS MANUAL Chapter 1 and Chapter 2 explain your sewing machine's basic operation procedures for someone who is a function you would like to know more about the embroidery edit functions. In the screens appearing in the step-by-step instructions, the parts referred to in the ... Compare the screen in Chapter 5, go on to . Once you want to sew utility stitches or character/ decorative stitches, read Chapter 1 and Chapter 2, then go on to Chapter 5 (Embroidery). If, while using the sewing machine for an explanation about , refer to the index at the back of the ...

Users Manual - English
Page 12
... IMPORTANT SAFETY INSTRUCTIONS 1 OUTSTANDING FEATURES 6 WHAT YOU CAN DO WITH THIS MACHINE ......8 HOW TO USE THIS MANUAL 9 NAMES OF MACHINE PARTS AND THEIR FUNCTIONS 13 Machine 13 Needle and Presser Foot Section 14 Embroidery Unit 15 Operation Buttons 15 Using the Flat Bed Attachment 16 Using the Accessory... Embroidery Unit Carrying Case 17 Included Accessories 17 Options 20 Using the Spool Stand 21 Using the Pen Tablet 23 Chapter 1 Getting Ready 25 TURNING THE MACHINE ON/OFF 26 LCD SCREEN 28 USB Connectivity 32 Using the Machine Setting Mode Key 35 Using the Sewing Machine ...
... IMPORTANT SAFETY INSTRUCTIONS 1 OUTSTANDING FEATURES 6 WHAT YOU CAN DO WITH THIS MACHINE ......8 HOW TO USE THIS MANUAL 9 NAMES OF MACHINE PARTS AND THEIR FUNCTIONS 13 Machine 13 Needle and Presser Foot Section 14 Embroidery Unit 15 Operation Buttons 15 Using the Flat Bed Attachment 16 Using the Accessory... Embroidery Unit Carrying Case 17 Included Accessories 17 Options 20 Using the Spool Stand 21 Using the Pen Tablet 23 Chapter 1 Getting Ready 25 TURNING THE MACHINE ON/OFF 26 LCD SCREEN 28 USB Connectivity 32 Using the Machine Setting Mode Key 35 Using the Sewing Machine ...

Users Manual - English
Page 13
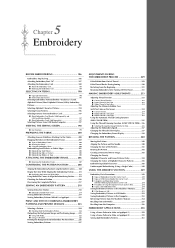
... the Machine's Memory 254 Recalling from USB Media 255 Recalling from the Computer 256 EMBROIDERY APPLICATIONS 258 Using a Frame Pattern to Make an Appliqué (1 258 Using a Frame Pattern to Make an Appliqué (2 259 Sewing Split Embroidery Patterns 261 Chapter 6 Embroidery Edit 263 EXPLANATION OF FUNCTIONS 264 SELECTING PATTERNS TO EDIT 265 Selecting Embroidery Patterns/Brother...
... the Machine's Memory 254 Recalling from USB Media 255 Recalling from the Computer 256 EMBROIDERY APPLICATIONS 258 Using a Frame Pattern to Make an Appliqué (1 258 Using a Frame Pattern to Make an Appliqué (2 259 Sewing Split Embroidery Patterns 261 Chapter 6 Embroidery Edit 263 EXPLANATION OF FUNCTIONS 264 SELECTING PATTERNS TO EDIT 265 Selecting Embroidery Patterns/Brother...
Users Manual - English
Page 43
...the opening movie screen is touched. * Home Page: When the machine is turned on, the home page screen appears. * Sewing/Embroidery Screen: When the machine is turned on, the Embroidery screen appears if the embroidery unit is attached to delete the selected image. to select the... remaining images. a Press . → The Sewing settings screen appears. c Display 4/8 (page 4 of ...
...the opening movie screen is touched. * Home Page: When the machine is turned on, the home page screen appears. * Sewing/Embroidery Screen: When the machine is turned on, the Embroidery screen appears if the embroidery unit is attached to delete the selected image. to select the... remaining images. a Press . → The Sewing settings screen appears. c Display 4/8 (page 4 of ...
Users Manual - English
Page 50
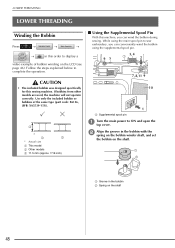
... LCD (see page 46). While using the main spool pin to sew → embroidery, you can conveniently wind the bobbin using the supplemental spool pin. → in this machine, you can wind the bobbin during sewing. Follow the steps explained below to complete the operation. LOWER THREADING... 11.5 mm (approx. 7/16 inch) a Supplemental spool pin a Turn the main top cover. If bobbins from other models are used, the machine will not operate correctly. Use only the included bobbin or bobbins of bobbin winding on the shaft. CAUTION • The included bobbin was designed specifically...
... LCD (see page 46). While using the main spool pin to sew → embroidery, you can conveniently wind the bobbin using the supplemental spool pin. → in this machine, you can wind the bobbin during sewing. Follow the steps explained below to complete the operation. LOWER THREADING... 11.5 mm (approx. 7/16 inch) a Supplemental spool pin a Turn the main top cover. If bobbins from other models are used, the machine will not operate correctly. Use only the included bobbin or bobbins of bobbin winding on the shaft. CAUTION • The included bobbin was designed specifically...
Users Manual - English
Page 187
... Saving Embroidery Patterns to USB Media 252 Saving Embroidery Patterns in the Computer 253 Retrieving Patterns from the Machine's Memory 254 Recalling from USB Media 255 Recalling from the Computer 256 EMBROIDERY APPLICATIONS 258 Using a Frame Pattern to Make an Appliqué (1 258 Using a Frame Pattern to Make an Appliqué (2 259 Sewing Split Embroidery Patterns...
... Saving Embroidery Patterns to USB Media 252 Saving Embroidery Patterns in the Computer 253 Retrieving Patterns from the Machine's Memory 254 Recalling from USB Media 255 Recalling from the Computer 256 EMBROIDERY APPLICATIONS 258 Using a Frame Pattern to Make an Appliqué (1 258 Using a Frame Pattern to Make an Appliqué (2 259 Sewing Split Embroidery Patterns...
Users Manual - English
Page 217
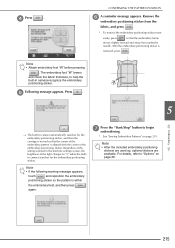
... 219. Note • Attach embroidery foot "W" before pressing . For details, refer to begin * See "Sewing Embroidery Patterns" on page 20. 215 The embroidery foot "W" lowers and check the fabric thickness, to "5" while the builtin camera searches for the embroidery positioning sticker, and then the ...the fabric, and press . * To remove the embroidery positioning sticker more easily, press so that the center of the light changes to help the built-in the machine settings screen, the brightness of the embroidery pattern is removed, press . CONFIRMING THE PATTERN POSITION...
... 219. Note • Attach embroidery foot "W" before pressing . For details, refer to begin * See "Sewing Embroidery Patterns" on page 20. 215 The embroidery foot "W" lowers and check the fabric thickness, to "5" while the builtin camera searches for the embroidery positioning sticker, and then the ...the fabric, and press . * To remove the embroidery positioning sticker more easily, press so that the center of the light changes to help the built-in the machine settings screen, the brightness of the embroidery pattern is removed, press . CONFIRMING THE PATTERN POSITION...
Users Manual - English
Page 221
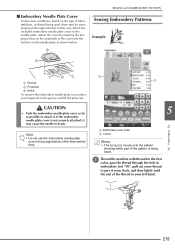
.... SEWING AN EMBROIDERY PATTERN Sewing Embroidery Patterns Example: b a a Groove b Projection c Notch To remove the embroidery needle plate cover, place your left hand. 219 Note • Do not use the embroidery needle plate cover for the first the thread through the hole in embroidery foot "W", pull out some thread to the needle plate. a Thread the color, pass machine with...
.... SEWING AN EMBROIDERY PATTERN Sewing Embroidery Patterns Example: b a a Groove b Projection c Notch To remove the embroidery needle plate cover, place your left hand. 219 Note • Do not use the embroidery needle plate cover for the first the thread through the hole in embroidery foot "W", pull out some thread to the needle plate. a Thread the color, pass machine with...
Users Manual - English
Page 223
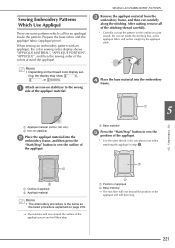
... Iron-on stabilizer b Place the appliqué embroidery frame, material into the and then press the "Start/Stop" button to sew the * Use the same thread color you just sewed. to sew the outline of an iron-on page 219. → The machine will sew around the outline of appliqué b Appliqu&#...233; material Memo • The embroidery procedure is the same as the appliqu...
... Iron-on stabilizer b Place the appliqué embroidery frame, material into the and then press the "Start/Stop" button to sew the * Use the same thread color you just sewed. to sew the outline of an iron-on page 219. → The machine will sew around the outline of appliqué b Appliqu&#...233; material Memo • The embroidery procedure is the same as the appliqu...
Users Manual - English
Page 225
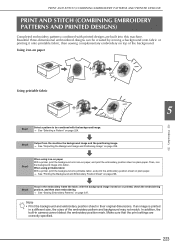
... ironing a background onto fabric or printing it onto printable fabric, then sewing complementary embroidery on plain paper. Then, iron the background image onto fabric. In addition, the built-in their original dimensions. Make sure that the print settings are built into this machine. Step4 Hoop in a different size, the sizes of the background...
... ironing a background onto fabric or printing it onto printable fabric, then sewing complementary embroidery on plain paper. Then, iron the background image onto fabric. In addition, the built-in their original dimensions. Make sure that the print settings are built into this machine. Step4 Hoop in a different size, the sizes of the background...
Users Manual - English
Page 251
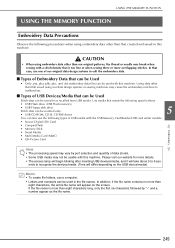
... other than our original patterns, the thread or needle may cause the embroidery machine to 6 sec- CAUTION • When using our data design systems or sewing machines may break when sewing with this machine. Using data other than that saved using embroidery data other than that is more details. • The access lamp will begin blinking after...
... other than our original patterns, the thread or needle may cause the embroidery machine to 6 sec- CAUTION • When using our data design systems or sewing machines may break when sewing with this machine. Using data other than that saved using embroidery data other than that is more details. • The access lamp will begin blinking after...
Users Manual - English
Page 311
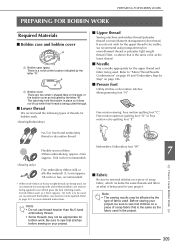
... ribbon or heavy weight threads are two small v-shaped tabs on a piece of threads for more detailed instructions. Note • The sewing results may not be appropriate for bobbin work . ■ Upper thread Sewing machine embroidery thread (polyester thread) or monofilament (transparent nylon) thread. Note • Do not use thread heavier than No.5 hand...
... ribbon or heavy weight threads are two small v-shaped tabs on a piece of threads for more detailed instructions. Note • The sewing results may not be appropriate for bobbin work . ■ Upper thread Sewing machine embroidery thread (polyester thread) or monofilament (transparent nylon) thread. Note • Do not use thread heavier than No.5 hand...


