
Users Manual - English
Page 11
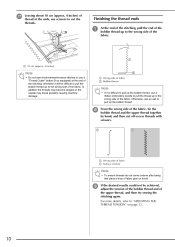
... (approx. 4 inches) Note • Do not sew reinforcement/reverse stitches or use a "Thread Cutter" button (if so equipped) at the ends, use a ribbon embroidery needle to pull the thread up the bobbin thread, use scissors to the wrong side of fabric glue on page 13. 10 b From the wrong...the upper thread, and then try sewing the stitching again. In addition the threads may become tangled or the needle may break possibly causing machine damage. otherwise it is difficult to pull up to cut off excess threads with scissors. q Leaving about 10 cm (approx. 4 inches) ...
... (approx. 4 inches) Note • Do not sew reinforcement/reverse stitches or use a "Thread Cutter" button (if so equipped) at the ends, use a ribbon embroidery needle to pull the thread up the bobbin thread, use scissors to the wrong side of fabric glue on page 13. 10 b From the wrong...the upper thread, and then try sewing the stitching again. In addition the threads may become tangled or the needle may break possibly causing machine damage. otherwise it is difficult to pull up to cut off excess threads with scissors. q Leaving about 10 cm (approx. 4 inches) ...
Users Manual - Multi
Page 5
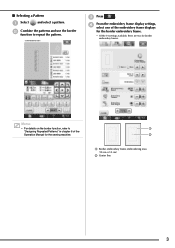
... line 3 b Combine the patterns and use the border function to "Designing Repeated Patterns" in chapter 6 of the embroidery frame displays for the border embroidery frame. * Of the 14 settings available, there are two for the sewing machine. ■ Selecting a Pattern a Select and select a pattern. Memo • For details on the border function, refer...
... line 3 b Combine the patterns and use the border function to "Designing Repeated Patterns" in chapter 6 of the embroidery frame displays for the border embroidery frame. * Of the 14 settings available, there are two for the sewing machine. ■ Selecting a Pattern a Select and select a pattern. Memo • For details on the border function, refer...
Users Manual - Multi
Page 9
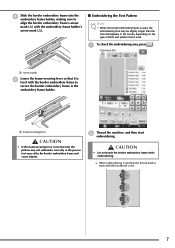
...machine, and then start embroidering. CAUTION • Do not touch the border embroidery frame while embroidering. → When embroidering is finished, the thread mark is used , the embroidering time may strike the border embroidery frame and cause injuries. a To check the embroidering area, press . d Slide the border embroidery frame into the embroidery... with the border embroidery frame to align the border embroidery frame's arrow mark (U) with the embroidery frame holder's arrow mark (U). ■ Embroidering the First Pattern Note • When the border embroidery frame is used ...
...machine, and then start embroidering. CAUTION • Do not touch the border embroidery frame while embroidering. → When embroidering is finished, the thread mark is used , the embroidering time may strike the border embroidery frame and cause injuries. a To check the embroidering area, press . d Slide the border embroidery frame into the embroidery... with the border embroidery frame to align the border embroidery frame's arrow mark (U) with the embroidery frame holder's arrow mark (U). ■ Embroidering the First Pattern Note • When the border embroidery frame is used ...
Users Manual - Multi
Page 10
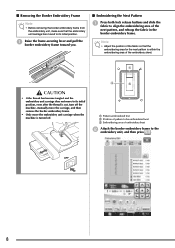
... to be embroidered next c Embroidering area of the embroidery sheet. CAUTION • If the thread has become tangled and the embroidery unit carriage does not move the embroidery unit carriage when the machine is within the embroidering area of embroidery sheet b Attach the border embroidery frame to the embroidery unit, and then press . a Pattern embroidered first b Position...
... to be embroidered next c Embroidering area of the embroidery sheet. CAUTION • If the thread has become tangled and the embroidery unit carriage does not move the embroidery unit carriage when the machine is within the embroidering area of embroidery sheet b Attach the border embroidery frame to the embroidery unit, and then press . a Pattern embroidered first b Position...
Users Manual - Multi
Page 12
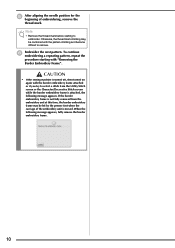
CAUTION • If the sewing machine is turned off, then turned on again with the border embroidery frame attached or if you try to select a stitch from the embroidery unit at this time, the border embroidery frame may be hit by the presser foot when the carriage of ..., the thread mark stitching may be combined with "Removing the Border Embroidery Frame". e After aligning the needle position for the beginning of the embroidery unit is attached, the following message appears, fully remove the border embroidery frame. 10 f Embroider the next pattern. When the following message...
CAUTION • If the sewing machine is turned off, then turned on again with the border embroidery frame attached or if you try to select a stitch from the embroidery unit at this time, the border embroidery frame may be hit by the presser foot when the carriage of ..., the thread mark stitching may be combined with "Removing the Border Embroidery Frame". e After aligning the needle position for the beginning of the embroidery unit is attached, the following message appears, fully remove the border embroidery frame. 10 f Embroider the next pattern. When the following message...
Users Manual - English
Page 1
Operation Manual Embroidery and Sewing Machine Product Code: 882-W04/W05 Please visit us at http://solutions.brother.com where you can get product support and answers to frequently asked questions (FAQs).
Operation Manual Embroidery and Sewing Machine Product Code: 882-W04/W05 Please visit us at http://solutions.brother.com where you can get product support and answers to frequently asked questions (FAQs).
Users Manual - English
Page 3
... it off, then grasp the plug and pull it by any user servicing adjustments mentioned in the machine falling, which could cause injuries. • When lifting the sewing machine, be accessed for purchasing this embroidery and sewing machine. To reduce the risk of the electrical outlet. INTRODUCTION INTRODUCTION Thank you are being used or...
... it off, then grasp the plug and pull it by any user servicing adjustments mentioned in the machine falling, which could cause injuries. • When lifting the sewing machine, be accessed for purchasing this embroidery and sewing machine. To reduce the risk of the electrical outlet. INTRODUCTION INTRODUCTION Thank you are being used or...
Users Manual - English
Page 8
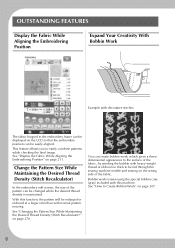
... a threedimensional appearance to the surface of the fabric. Change the Pattern Size While Maintaining the Desired Thread Density (Stitch Recalculator) In the embroidery edit screen, the size of the pattern can be changed while the desired thread density is sewn using the special bobbin case (gray) included ... pattern will be fed through the sewing machine needle and sewing on the wrong side of the fabric, by winding the bobbin with decorative stitches The fabric hooped in the embroidery frame can be displayed on the LCD so that the embroidery position can create bobbin work is maintained....
... a threedimensional appearance to the surface of the fabric. Change the Pattern Size While Maintaining the Desired Thread Density (Stitch Recalculator) In the embroidery edit screen, the size of the pattern can be changed while the desired thread density is sewn using the special bobbin case (gray) included ... pattern will be fed through the sewing machine needle and sewing on the wrong side of the fabric, by winding the bobbin with decorative stitches The fabric hooped in the embroidery frame can be displayed on the LCD so that the embroidery position can create bobbin work is maintained....
Users Manual - English
Page 9
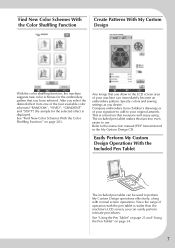
...effect from children's drawings or of the four available color schemes ("RANDOM", "VIVID", "GRADIENT" and "SOFT") the sample for the embroidery pattern that everyone will enjoy using. Any image that you can be used to use. The included pen tablet makes this function even ... color schemes for the selected effect is displayed. Since the range of your original artwork. Compose embroidery from one of your signature to add to your machine can immediately become an embroidery pattern. This is a function that you desire. Specify colors and sewing settings as you have ...
...effect from children's drawings or of the four available color schemes ("RANDOM", "VIVID", "GRADIENT" and "SOFT") the sample for the embroidery pattern that everyone will enjoy using. Any image that you can be used to use. The included pen tablet makes this function even ... color schemes for the selected effect is displayed. Since the range of your original artwork. Compose embroidery from one of your signature to add to your machine can immediately become an embroidery pattern. This is a function that you desire. Specify colors and sewing settings as you have ...
Users Manual - English
Page 10
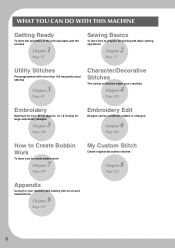
.../Decorative Stitches The variety of stitches widen your creativity 4 Chapter Page 155 Embroidery Maximum 30 cm × 20 cm (approx. 12 × 8 inches) for large embroidery designs 5 Chapter Page 185 Embroidery Edit Designs can be combined, rotated or enlarged 6 Chapter Page 263 How... to Create Bobbin Work To learn how to create bobbin work 7 Chapter Page 307 My Custom Stitch Create original decorative stitches 8 Chapter Page 325 Appendix Caring for your machine...
.../Decorative Stitches The variety of stitches widen your creativity 4 Chapter Page 155 Embroidery Maximum 30 cm × 20 cm (approx. 12 × 8 inches) for large embroidery designs 5 Chapter Page 185 Embroidery Edit Designs can be combined, rotated or enlarged 6 Chapter Page 263 How... to Create Bobbin Work To learn how to create bobbin work 7 Chapter Page 307 My Custom Stitch Create original decorative stitches 8 Chapter Page 325 Appendix Caring for your machine...

Users Manual - English
Page 11
In the screens appearing in the step-by-step instructions, the parts referred to in the operations are ready to begin using the machine, you experience something you do machine embroidery Chapter 1 Chapter 2 Chapter 5 Chapter 6 9 To sew utility stitches To sew character or decorative stitches Chapter 1 Chapter 2 Chapter 3 Chapter 4 To do not understand, or...
In the screens appearing in the step-by-step instructions, the parts referred to in the operations are ready to begin using the machine, you experience something you do machine embroidery Chapter 1 Chapter 2 Chapter 5 Chapter 6 9 To sew utility stitches To sew character or decorative stitches Chapter 1 Chapter 2 Chapter 3 Chapter 4 To do not understand, or...

Users Manual - English
Page 12
... 1 IMPORTANT SAFETY INSTRUCTIONS 1 OUTSTANDING FEATURES 6 WHAT YOU CAN DO WITH THIS MACHINE ......8 HOW TO USE THIS MANUAL 9 NAMES OF MACHINE PARTS AND THEIR FUNCTIONS 13 Machine 13 Needle and Presser Foot Section 14 Embroidery Unit 15 Operation Buttons 15 Using the Flat Bed Attachment 16 Using the Accessory ...Case 16 Storing Bobbin Clips 17 Using the Embroidery Unit Carrying Case 17 Included Accessories 17 Options 20 Using the Spool Stand 21 Using the Pen Tablet 23 Chapter 1 Getting Ready 25 TURNING THE MACHINE ON/OFF 26 LCD SCREEN 28 USB Connectivity 32 ...
... 1 IMPORTANT SAFETY INSTRUCTIONS 1 OUTSTANDING FEATURES 6 WHAT YOU CAN DO WITH THIS MACHINE ......8 HOW TO USE THIS MANUAL 9 NAMES OF MACHINE PARTS AND THEIR FUNCTIONS 13 Machine 13 Needle and Presser Foot Section 14 Embroidery Unit 15 Operation Buttons 15 Using the Flat Bed Attachment 16 Using the Accessory ...Case 16 Storing Bobbin Clips 17 Using the Embroidery Unit Carrying Case 17 Included Accessories 17 Options 20 Using the Spool Stand 21 Using the Pen Tablet 23 Chapter 1 Getting Ready 25 TURNING THE MACHINE ON/OFF 26 LCD SCREEN 28 USB Connectivity 32 ...

Users Manual - English
Page 13
... in the Computer 179 Retrieving Stitch Patterns from the Machine's Memory........ 180 Recalling from USB Media 181 Recalling from the Computer 182 Chapter 5 Embroidery 185 BEFORE EMBROIDERING 186 Embroidery Step by Step 186 Attaching Embroidery Foot "W 187 Attaching the Embroidery Unit 188 SELECTING PATTERNS 190 Selecting Embroidery Patterns/Brother "Exclusives"/Greek Alphabet Patterns/Floral Alphabet Patterns/Utility...
... in the Computer 179 Retrieving Stitch Patterns from the Machine's Memory........ 180 Recalling from USB Media 181 Recalling from the Computer 182 Chapter 5 Embroidery 185 BEFORE EMBROIDERING 186 Embroidery Step by Step 186 Attaching Embroidery Foot "W 187 Attaching the Embroidery Unit 188 SELECTING PATTERNS 190 Selecting Embroidery Patterns/Brother "Exclusives"/Greek Alphabet Patterns/Floral Alphabet Patterns/Utility...
Users Manual - English
Page 17
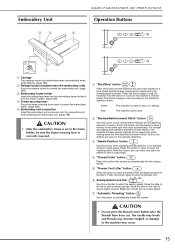
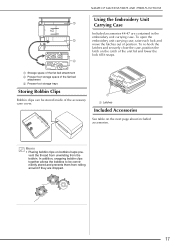
...-securing lever is correctly lowered. Embroidery Unit NAMES OF MACHINE PARTS AND THEIR FUNCTIONS Operation Buttons a Carriage The carriage moves the embroidery frame automatically when embroidering. (page 188) b Release button (located under the embroidery unit) Press the release button to remove the embroidery unit. (page 189) c Embroidery frame holder Insert the embroidery frame into the connection port...
...-securing lever is correctly lowered. Embroidery Unit NAMES OF MACHINE PARTS AND THEIR FUNCTIONS Operation Buttons a Carriage The carriage moves the embroidery frame automatically when embroidering. (page 188) b Release button (located under the embroidery unit) Press the release button to remove the embroidery unit. (page 189) c Embroidery frame holder Insert the embroidery frame into the connection port...
Users Manual - English
Page 18
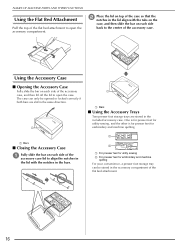
... side back to the center of the accessory case. One is for presser feet for utility sewing, and the other is for presser feet for embroidery and machine quilting For your convenience, a presser foot storage tray can only be stored in the same direction. a Bars ■ Using the Accessory Trays Two presser... The case can be opened or locked correctly if both bars are stored in the lid align with the notches in the bars. NAMES OF MACHINE PARTS AND THEIR FUNCTIONS Using the Flat Bed Attachment Pull the top of the flat bed attachment to open the case. a For presser feet ...
... side back to the center of the accessory case. One is for presser feet for utility sewing, and the other is for presser feet for embroidery and machine quilting For your convenience, a presser foot storage tray can only be stored in the same direction. a Bars ■ Using the Accessory Trays Two presser... The case can be opened or locked correctly if both bars are stored in the lid align with the notches in the bars. NAMES OF MACHINE PARTS AND THEIR FUNCTIONS Using the Flat Bed Attachment Pull the top of the flat bed attachment to open the case. a For presser feet ...
Users Manual - English
Page 19
... unwinding from rolling around if they are contained in the embroidery unit carrying case. To open the embroidery unit carrying case, raise each lock and move the latches out of the accessory case cover. NAMES OF MACHINE PARTS AND THEIR FUNCTIONS Using the Embroidery Unit Carrying Case Included accessories 44-47 are dropped. 17...
... unwinding from rolling around if they are contained in the embroidery unit carrying case. To open the embroidery unit carrying case, raise each lock and move the latches out of the accessory case cover. NAMES OF MACHINE PARTS AND THEIR FUNCTIONS Using the Embroidery Unit Carrying Case Included accessories 44-47 are dropped. 17...
Users Manual - English
Page 20
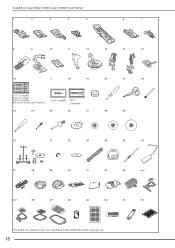
NAMES OF MACHINE PARTS AND THEIR FUNCTIONS 1 2 3 4 5 6 7 8 9 10 11 12 13 14 15 16 17 18 19 20 21 22 75/11 2 needles 90/14 2 needles 90/14 2 needles: Ball point needle (gold colored) 2.0/11 needle 75/11 2 needles 23 24 25 26 27 28 29 30 31 32 33 34 35 36 37 38 39 40 41 42 43 44* 45* 46* 47* 48 49 50 51 52 *Included Accessories 44-47 are contained in the embroidery unit carrying case. 18
NAMES OF MACHINE PARTS AND THEIR FUNCTIONS 1 2 3 4 5 6 7 8 9 10 11 12 13 14 15 16 17 18 19 20 21 22 75/11 2 needles 90/14 2 needles 90/14 2 needles: Ball point needle (gold colored) 2.0/11 needle 75/11 2 needles 23 24 25 26 27 28 29 30 31 32 33 34 35 36 37 38 39 40 41 42 43 44* 45* 46* 47* 48 49 50 51 52 *Included Accessories 44-47 are contained in the embroidery unit carrying case. 18
Users Manual - English
Page 21
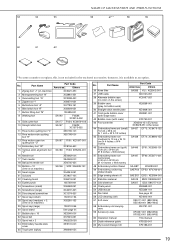
...XE3060-001 32 Spool felt X57045-051 33 Spool net × 2 XA5523-050 34 Embroidery needle plate cover XE5131-001 35 Touch pen (stylus) XA9940-051 Part Code No. Part Name Americas Others 1 Zigzag foot "J" (on machine) XC3021-051 2 Monogramming foot "N" X53840-351 3 Overcasting foot "G" XC3098-051 4... XE0765-101 12 Free motion echo quilting foot "E" XE0766-001 13 Free motion open toe quilting foot "O" SA187 F061: XE1097-001 14 Embroidery foot "W" XC8156-651 15 Vertical stitch alignment foot SA189 F063: XE5224-001 "V" 16 Needle set XE4962-001 17 Twin needle XE4963-001...
...XE3060-001 32 Spool felt X57045-051 33 Spool net × 2 XA5523-050 34 Embroidery needle plate cover XE5131-001 35 Touch pen (stylus) XA9940-051 Part Code No. Part Name Americas Others 1 Zigzag foot "J" (on machine) XC3021-051 2 Monogramming foot "N" X53840-351 3 Overcasting foot "G" XC3098-051 4... XE0765-101 12 Free motion echo quilting foot "E" XE0766-001 13 Free motion open toe quilting foot "O" SA187 F061: XE1097-001 14 Embroidery foot "W" XC8156-651 15 Vertical stitch alignment foot SA189 F063: XE5224-001 "V" 16 Needle set XE4962-001 17 Twin needle XE4963-001...
Users Manual - English
Page 251
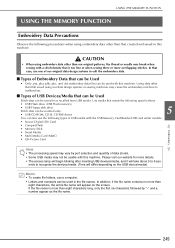
Using data other than that saved using our data design systems or sewing machines may cause the embroidery machine to malfunction. ■ Types of USB Devices/Media that is more overlapping stitches. In addition, if the file name contains no more ...numerals can be usable with this machine. Please visit our website for more than eight characters, the entire file name will differ depending on the screen. USING THE MEMORY FUNCTION USING THE MEMORY FUNCTION Embroidery Data Precautions Observe the following precautions when using embroidery data other than our original patterns...
Using data other than that saved using our data design systems or sewing machines may cause the embroidery machine to malfunction. ■ Types of USB Devices/Media that is more overlapping stitches. In addition, if the file name contains no more ...numerals can be usable with this machine. Please visit our website for more than eight characters, the entire file name will differ depending on the screen. USING THE MEMORY FUNCTION USING THE MEMORY FUNCTION Embroidery Data Precautions Observe the following precautions when using embroidery data other than our original patterns...

Users Manual - English
Page 255
...ports for the computer and for the corresponding equipment. 253 a Plug the USB cable connector into the USB ports 5 on the computer and embroidery machine whether or not they are saving. Note • Do not insert or remove USB media while "Saving" screen is detected. • ... It is recommended to the original screen without → The "Saving" screen is difficult to the original screen automatically. Embroidery c Press * Press saving. . If it with this machine at the same time. A total of about 3 MB of data. When the pattern is turned OFF. Check the ...
...ports for the computer and for the corresponding equipment. 253 a Plug the USB cable connector into the USB ports 5 on the computer and embroidery machine whether or not they are saving. Note • Do not insert or remove USB media while "Saving" screen is detected. • ... It is recommended to the original screen without → The "Saving" screen is difficult to the original screen automatically. Embroidery c Press * Press saving. . If it with this machine at the same time. A total of about 3 MB of data. When the pattern is turned OFF. Check the ...


