

Users Manual - Multi
Page 3
ENGLISH CONTENTS Accessories...2 Embroidering with the Border Embroidery Frame 2 Sample Projects Using the Border Embroidery Frame 2 Selecting a Pattern ...3 Hooping the Fabric in the Border Embroidery Frame 5 Attaching the Border Embroidery Frame to the Embroidery Unit 6 Embroidering the First Pattern 7 Removing the Border Embroidery Frame 8 Embroidering the Next Pattern 8 1
ENGLISH CONTENTS Accessories...2 Embroidering with the Border Embroidery Frame 2 Sample Projects Using the Border Embroidery Frame 2 Selecting a Pattern ...3 Hooping the Fabric in the Border Embroidery Frame 5 Attaching the Border Embroidery Frame to the Embroidery Unit 6 Embroidering the First Pattern 7 Removing the Border Embroidery Frame 8 Embroidering the Next Pattern 8 1
Users Manual - Multi
Page 7
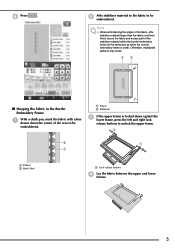
... b Stabilizer c If the upper frame is used). b Affix stabilizer material to the fabric to unlock the upper frame. f Press . Otherwise, misaligned patterns may result. ■ Hooping the Fabric in the same way as when the normal embroidery frame is locked down the center of the stabilizer material within the border embroidery...
... b Stabilizer c If the upper frame is used). b Affix stabilizer material to the fabric to unlock the upper frame. f Press . Otherwise, misaligned patterns may result. ■ Hooping the Fabric in the same way as when the normal embroidery frame is locked down the center of the stabilizer material within the border embroidery...
Users Manual - Multi
Page 8
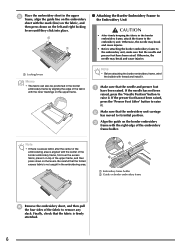
... the left and right locking levers until they click into place. ■ Attaching the Border Embroidery Frame to the Embroidery Unit CAUTION • After firmly hooping the fabric in the border embroidery frame by aligning the edge of the fabric with the inner markings on border embroidery frame f Remove the embroidery...
... the left and right locking levers until they click into place. ■ Attaching the Border Embroidery Frame to the Embroidery Unit CAUTION • After firmly hooping the fabric in the border embroidery frame by aligning the edge of the fabric with the inner markings on border embroidery frame f Remove the embroidery...
Users Manual - English
Page 8
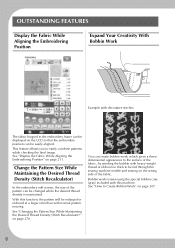
OUTSTANDING FEATURES Display the Fabric While Aligning the Embroidering Position Expand Your Creativity With Bobbin Work Example with decorative stitches The fabric hooped in the embroidery frame can be displayed on the LCD so that the embroidery position can be changed while the desired thread density is sewn ...
OUTSTANDING FEATURES Display the Fabric While Aligning the Embroidering Position Expand Your Creativity With Bobbin Work Example with decorative stitches The fabric hooped in the embroidery frame can be displayed on the LCD so that the embroidery position can be changed while the desired thread density is sewn ...

Users Manual - English
Page 13
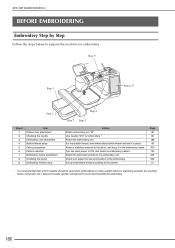
...Embroidery Step by Step 186 Attaching Embroidery Foot "W 187 Attaching the Embroidery Unit 188 SELECTING PATTERNS 190 Selecting Embroidery Patterns/Brother "Exclusives"/Greek Alphabet Patterns/Floral Alphabet Patterns/Utility Embroidery Patterns 193 Selecting Alphabet Character Patterns 194 Selecting Frame Patterns 196 ...197 VIEWING THE SEWING SCREEN 198 PREPARING THE FABRIC 200 Attaching Iron-on Stabilizers (Backing) to the Fabric 200 Hooping the Fabric in the Embroidery Frame 202 Embroidering Small Fabrics or Fabric Edges 205 ATTACHING THE EMBROIDERY FRAME..........206 CONFIRMING ...
...Embroidery Step by Step 186 Attaching Embroidery Foot "W 187 Attaching the Embroidery Unit 188 SELECTING PATTERNS 190 Selecting Embroidery Patterns/Brother "Exclusives"/Greek Alphabet Patterns/Floral Alphabet Patterns/Utility Embroidery Patterns 193 Selecting Alphabet Character Patterns 194 Selecting Frame Patterns 196 ...197 VIEWING THE SEWING SCREEN 198 PREPARING THE FABRIC 200 Attaching Iron-on Stabilizers (Backing) to the Fabric 200 Hooping the Fabric in the Embroidery Frame 202 Embroidering Small Fabrics or Fabric Edges 205 ATTACHING THE EMBROIDERY FRAME..........206 CONFIRMING ...
Users Manual - English
Page 187
... the Embroidery Unit 189 SELECTING PATTERNS 190 ■ Copyright Information 190 ■ Pattern Selection Screens 191 Selecting Embroidery Patterns/Brother "Exclusives"/Greek Alphabet Patterns/Floral Alphabet Patterns/Utility Embroidery Patterns 193 Selecting Alphabet Character Patterns 194 Selecting Frame Patterns 196 Selecting... SEWING SCREEN 198 ■ Key Functions 199 PREPARING THE FABRIC 200 Attaching Iron-on Stabilizers (Backing) to the Fabric 200 Hooping the Fabric in the Embroidery Frame 202 ■ Types of Embroidery Frames 202 ■ Inserting the Fabric 203 ■...
... the Embroidery Unit 189 SELECTING PATTERNS 190 ■ Copyright Information 190 ■ Pattern Selection Screens 191 Selecting Embroidery Patterns/Brother "Exclusives"/Greek Alphabet Patterns/Floral Alphabet Patterns/Utility Embroidery Patterns 193 Selecting Alphabet Character Patterns 194 Selecting Frame Patterns 196 Selecting... SEWING SCREEN 198 ■ Key Functions 199 PREPARING THE FABRIC 200 Attaching Iron-on Stabilizers (Backing) to the Fabric 200 Hooping the Fabric in the Embroidery Frame 202 ■ Types of Embroidery Frames 202 ■ Inserting the Fabric 203 ■...
Users Manual - English
Page 188
... thread and set it in place. Set up embroidery thread according to ON, and select an embroidery pattern. Attach a stabilizer material to the fabric, and hoop it in the embroidery frame. Ball point needle (golden colored) 90/14 is recommended that a 90/14 needle should be used when embroidering on heavy...
... thread and set it in place. Set up embroidery thread according to ON, and select an embroidery pattern. Attach a stabilizer material to the fabric, and hoop it in the embroidery frame. Ball point needle (golden colored) 90/14 is recommended that a 90/14 needle should be used when embroidering on heavy...
Users Manual - English
Page 204
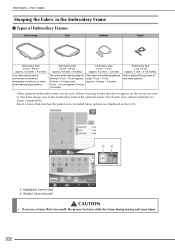
... × 6 cm (approx. 1 inch × 2-1/2 inches) Use for frame compatibility. Check with your authorized dealer for embroidering names or very small patterns. PREPARING THE FABRIC Hooping the Fabric in the Embroidery Frame ■ Types of the optional frame. Embroidery field 20 cm × 20 cm (approx. 8 inches × 8 inches) Embroidery field...
... × 6 cm (approx. 1 inch × 2-1/2 inches) Use for frame compatibility. Check with your authorized dealer for embroidering names or very small patterns. PREPARING THE FABRIC Hooping the Fabric in the Embroidery Frame ■ Types of the optional frame. Embroidery field 20 cm × 20 cm (approx. 8 inches × 8 inches) Embroidery field...
Users Manual - English
Page 210
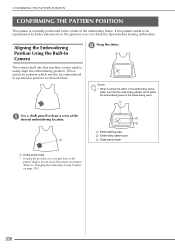
... be embroidered in the embroidery frame, make sure that the embroidery pattern will fit within the embroidering area of the embroidery frame. Note • When hooping the fabric in a particular position as shown below. Aligning the Embroidering Position Using the Built-In Camera...
... be embroidered in the embroidery frame, make sure that the embroidery pattern will fit within the embroidering area of the embroidery frame. Note • When hooping the fabric in a particular position as shown below. Aligning the Embroidering Position Using the Built-In Camera...

Users Manual - English
Page 213
...; For details on using light to medium weight fabrics. Display the Fabric While Aligning the Embroidering Position The fabric hooped in the embroidery frame, then attach the frame to the embroidery and machine. a Hoop the fabric in the embroidery frame can be displayed on Thick Fabric" (page 213). Memo • If you...
...; For details on using light to medium weight fabrics. Display the Fabric While Aligning the Embroidering Position The fabric hooped in the embroidery frame, then attach the frame to the embroidery and machine. a Hoop the fabric in the embroidery frame can be displayed on Thick Fabric" (page 213). Memo • If you...
Users Manual - English
Page 215
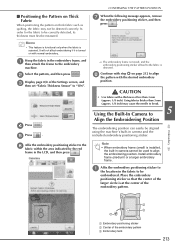
... in the embroidery frame, then attach the frame to the embroidery and machine. Memo • This feature is functional only when the fabric is detected. a Hoop the fabric in the fabric to be sticker to embroidered. Using fabrics thicker than 3 mm (approx. 1/8 inch). Place the embroidery positioning sticker so that the...
... in the embroidery frame, then attach the frame to the embroidery and machine. Memo • This feature is functional only when the fabric is detected. a Hoop the fabric in the fabric to be sticker to embroidered. Using fabrics thicker than 3 mm (approx. 1/8 inch). Place the embroidery positioning sticker so that the...
Users Manual - English
Page 220
... not hang off the table or hold the fabric to bend or break and possibly cause injury. Using the appropriate stabilizer (see page 200) and hooping the fabric in the machine has a green marking on the inside of the needle and thread being used.
... not hang off the table or hold the fabric to bend or break and possibly cause injury. Using the appropriate stabilizer (see page 200) and hooping the fabric in the machine has a green marking on the inside of the needle and thread being used.
Users Manual - English
Page 225
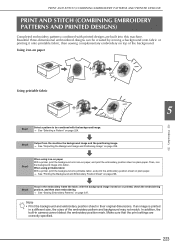
.... Step2 Output from the machine the background image and the positioning image. → See "Outputting the Background Image and Positioning Image" on page 227. Step4 Hoop in their original dimensions. PRINT AND STITCH (COMBINING EMBROIDERY PATTERNS AND PRINTED DESIGNS) PRINT AND STITCH (COMBINING EMBROIDERY PATTERNS AND PRINTED DESIGNS) Completed embroidery patterns...
.... Step2 Output from the machine the background image and the positioning image. → See "Outputting the Background Image and Positioning Image" on page 227. Step4 Hoop in their original dimensions. PRINT AND STITCH (COMBINING EMBROIDERY PATTERNS AND PRINTED DESIGNS) PRINT AND STITCH (COMBINING EMBROIDERY PATTERNS AND PRINTED DESIGNS) Completed embroidery patterns...
Users Manual - English
Page 229
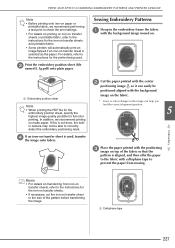
... to the fabric with the background image ironed fabric on. c Print the embroidery position sheet named E_1p.pdf) onto plain paper. (file Sewing Embroidery Patterns a Hoop in the image can easily be able to the instructions for the iron-on transfer sheets and printable fabric. • Some printers will automatically print...
... to the fabric with the background image ironed fabric on. c Print the embroidery position sheet named E_1p.pdf) onto plain paper. (file Sewing Embroidery Patterns a Hoop in the image can easily be able to the instructions for the iron-on transfer sheets and printable fabric. • Some printers will automatically print...
Users Manual - English
Page 263
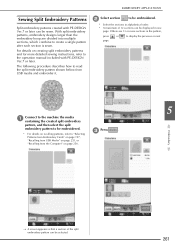
... APPLICATIONS Sewing Split Embroidery Patterns Split embroidery patterns created with PE-DESIGN Ver.7 or later. With split embroidery patterns, embroidery designs larger than the embroidery hoop are 13 or more detailed sewing instructions, refer to read the split embroidery pattern shown below from the Computer" on page 255, or "Recalling from...
... APPLICATIONS Sewing Split Embroidery Patterns Split embroidery patterns created with PE-DESIGN Ver.7 or later. With split embroidery patterns, embroidery designs larger than the embroidery hoop are 13 or more detailed sewing instructions, refer to read the split embroidery pattern shown below from the Computer" on page 255, or "Recalling from...

Users Manual - English
Page 305
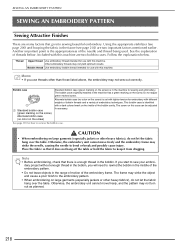
k Use two layers of adhesive water-soluble stabilizer material with their sticky sides together, and then hoop them in the embroidery frame, attach the embroidery frame to indicate the pattern orientation before cutting it out. • Carefully cut out the ...the appliqué piece is used , there may be caught by the appliqué stitch. Do not cut along the stitching. VARIOUS EMBROIDERING FUNCTIONS h Hoop the appliqué fabric in the embroidery frame. To reduce shrinkage of the cutting line. • When using patterns that are vertically and horizontally symmetrical...
k Use two layers of adhesive water-soluble stabilizer material with their sticky sides together, and then hoop them in the embroidery frame, attach the embroidery frame to indicate the pattern orientation before cutting it out. • Carefully cut out the ...the appliqué piece is used , there may be caught by the appliqué stitch. Do not cut along the stitching. VARIOUS EMBROIDERING FUNCTIONS h Hoop the appliqué fabric in the embroidery frame. To reduce shrinkage of the cutting line. • When using patterns that are vertically and horizontally symmetrical...
Users Manual - English
Page 322
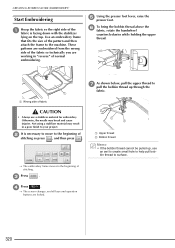
... the bobbin thread cannot be pulled up through the to the beginning of stitching so press , and then press . CREATING BOBBIN WORK (EMBROIDERY) Start Embroidering a Hoop the fabric so the right side of the fabric is necessary to move to fabric. e Using the presser presser foot. Otherwise, the needle may result...
... the bobbin thread cannot be pulled up through the to the beginning of stitching so press , and then press . CREATING BOBBIN WORK (EMBROIDERY) Start Embroidering a Hoop the fabric so the right side of the fabric is necessary to move to fabric. e Using the presser presser foot. Otherwise, the needle may result...


