
Advanced Users Manual - English
Page 5
... 44 Enlarging or reducing the image copied 44 Improving copy quality 45 Using the Options key 46 Sorting copies using the ADF 47 Adjusting Contrast, Color and Brightness 47 Making N in 1 copies (page layout 49 2 in 1 ID Copy 50 Tray selection 51 Duplex (2-sided) copying 51 Duplex...wires 61 Cleaning the drum unit 65 Cleaning the paper pick-up rollers 71 Calibration ...72 Auto Registration 73 Manual Registration 73 Frequency (Color Correction 74 Checking the Page Counters 74 Checking the remaining life of parts 74 Replacing periodic maintenance parts 75 Packing and shipping the ...
... 44 Enlarging or reducing the image copied 44 Improving copy quality 45 Using the Options key 46 Sorting copies using the ADF 47 Adjusting Contrast, Color and Brightness 47 Making N in 1 copies (page layout 49 2 in 1 ID Copy 50 Tray selection 51 Duplex (2-sided) copying 51 Duplex...wires 61 Cleaning the drum unit 65 Cleaning the paper pick-up rollers 71 Calibration ...72 Auto Registration 73 Manual Registration 73 Frequency (Color Correction 74 Checking the Page Counters 74 Checking the remaining life of parts 74 Replacing periodic maintenance parts 75 Packing and shipping the ...
Advanced Users Manual - English
Page 13
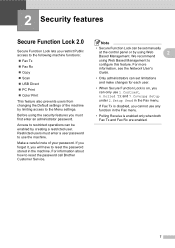
... to the following machine functions: Fax Tx Fax Rx Copy Scan USB Direct PC Print Color Print This feature also prevents users from changing the Default settings of your password. For information about how to use any function in the Fax... menu. • Polling Receive is disabled, you must enter a user password to reset the password call Brother Customer Service. Make a careful note of the machine by limiting access to the Menu settings. If you forget it, you can be enabled by...
... to the following machine functions: Fax Tx Fax Rx Copy Scan USB Direct PC Print Color Print This feature also prevents users from changing the Default settings of your password. For information about how to use any function in the Fax... menu. • Polling Receive is disabled, you must enter a user password to reset the password call Brother Customer Service. Make a careful note of the machine by limiting access to the Menu settings. If you forget it, you can be enabled by...

Advanced Users Manual - English
Page 15
... step for Fax Tx. c Enter the administrator password. d Press a or b to choose Enable or Disable for Fax Rx, Copy, Scan, USB Direct, PC Print and Color Print. Press OK. f Press Stop/Exit. Press OK. a Press Menu, 1, 7, 1. 17.Security 1.Function Lock a Set Password b Setup ID Select ab or OK b Press a or b to... Setting up the public user mode 2 Public user mode restricts the functions that are available for Fax Rx, Copy, Scan, USB Direct, PC Print and Color Print. Press OK. When the LCD shows Exit, press OK.
... step for Fax Tx. c Enter the administrator password. d Press a or b to choose Enable or Disable for Fax Rx, Copy, Scan, USB Direct, PC Print and Color Print. Press OK. f Press Stop/Exit. Press OK. a Press Menu, 1, 7, 1. 17.Security 1.Function Lock a Set Password b Setup ID Select ab or OK b Press a or b to... Setting up the public user mode 2 Public user mode restricts the functions that are available for Fax Rx, Copy, Scan, USB Direct, PC Print and Color Print. Press OK. When the LCD shows Exit, press OK.
Advanced Users Manual - English
Page 17
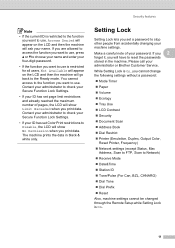
...Lock Settings. • If your ID has set page limit restrictions and already reached the maximum number of your administrator or Brother Customer Service. If you are allowed to access the function you want to use is restricted for all users, Not Available ...61550; Tray Use LCD Contrast Security Document Scan Address Book Dial Restrict Printer (Emulation, Duplex, Output Color, Reset Printer, Frequency) Network settings (except Status, Mac Address, Scan to FTP, Scan to Network) Receive Mode Date&Time ...
...Lock Settings. • If your ID has set page limit restrictions and already reached the maximum number of your administrator or Brother Customer Service. If you are allowed to access the function you want to use is restricted for all users, Not Available ...61550; Tray Use LCD Contrast Security Document Scan Address Book Dial Restrict Printer (Emulation, Duplex, Output Color, Reset Printer, Frequency) Network settings (except Status, Mac Address, Scan to FTP, Scan to Network) Receive Mode Date&Time ...
Advanced Users Manual - English
Page 23
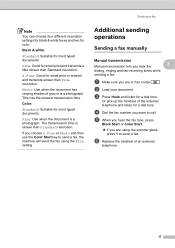
... or artwork and transmits slower than Fine resolution. S.Fine: Good for a dial tone. e When you hear the fax tone, press Black Start or Color Start. If you are in Fax mode . This has the slowest transmission time. If you are using the scanner glass, press 1 to...time is a photograph. d Dial the fax number you hear the 3 3 dialing, ringing and fax-receiving tones while sending a fax. Fine: Good for color. f Replace the handset of gray or is a photograph. Note You can choose four different resolution settings for black & white faxes and two for small print...
... or artwork and transmits slower than Fine resolution. S.Fine: Good for a dial tone. e When you hear the fax tone, press Black Start or Color Start. If you are in Fax mode . This has the slowest transmission time. If you are using the scanner glass, press 1 to...time is a photograph. d Dial the fax number you hear the 3 3 dialing, ringing and fax-receiving tones while sending a fax. Fine: Good for color. f Replace the handset of gray or is a photograph. Note You can choose four different resolution settings for black & white faxes and two for small print...
Advanced Users Manual - English
Page 24
... the scanner glass, press 1 to cancel scanning. The LCD will vary depending on them. a Ask the other party before hanging up . d Press Black Start or Color Start. If you are in Fax mode . Note If you get an Out of Memory message while scanning a subsequent page, you can send a fax...
... the scanner glass, press 1 to cancel scanning. The LCD will vary depending on them. a Ask the other party before hanging up . d Press Black Start or Color Start. If you are in Fax mode . Note If you get an Out of Memory message while scanning a subsequent page, you can send a fax...
Advanced Users Manual - English
Page 30
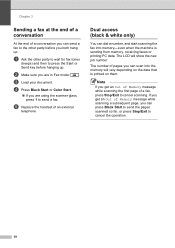
... a cover page for the next fax, your fax. a Make sure you are in Fax mode . d Press a or b to choose Print Sample. d Press Black Start or Color Start. e After the machine prints a copy of your document. Press OK. Press OK. c Press Menu, 2, 2, 7. 22.Setup Send 7.Coverpg Setup a Next Fax:On b Next Fax...
... a cover page for the next fax, your fax. a Make sure you are in Fax mode . d Press a or b to choose Print Sample. d Press Black Start or Color Start. e After the machine prints a copy of your document. Press OK. Press OK. c Press Menu, 2, 2, 7. 22.Setup Send 7.Coverpg Setup a Next Fax:On b Next Fax...
Advanced Users Manual - English
Page 32
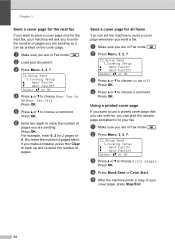
... case there is a power failure before the fax is available. 4 Receiving a fax 4 Remote Fax Options (black & white only) 4 Remote Fax Options ARE NOT available for color fax. IMPORTANT If you choose Backup Print On, the machine will also print the fax at your machine so you want your received faxes to...
... case there is a power failure before the fax is available. 4 Receiving a fax 4 Remote Fax Options (black & white only) 4 Remote Fax Options ARE NOT available for color fax. IMPORTANT If you choose Backup Print On, the machine will also print the fax at your machine so you want your received faxes to...
Advanced Users Manual - English
Page 33
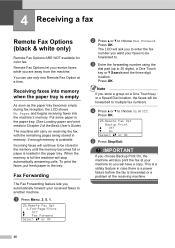
... Forward Select ab or OK b Press a or b to choose Paging. Note If Fax Storage is the same as that you store your machine cannot receive a color fax unless the sending machine converts it is turned on page 31.) Your machine will automatically be printed at another location using the remote retrieval...
... Forward Select ab or OK b Press a or b to choose Paging. Note If Fax Storage is the same as that you store your machine cannot receive a color fax unless the sending machine converts it is turned on page 31.) Your machine will automatically be printed at another location using the remote retrieval...
Advanced Users Manual - English
Page 35
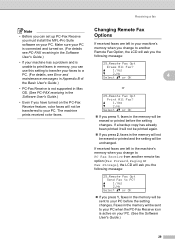
... on your PC before the setting changes. Faxes in the Software User's Guide.) • Even if you have turned on the PC-Fax Receive feature, color faxes will ask you the following message: 25.Remote Fax Opt Send Fax to your PC when the PC-Fax Receive icon is active on.... If received faxes are left in the memory will ask you the following message: 25.Remote Fax Opt Erase All Fax? The machine prints received color faxes. If a backup copy has already been printed it will not be sent to another remote fax option (Fax Forward, Paging or Fax Storage), the...
... on your PC before the setting changes. Faxes in the Software User's Guide.) • Even if you have turned on the PC-Fax Receive feature, color faxes will ask you the following message: 25.Remote Fax Opt Send Fax to your PC when the PC-Fax Receive icon is active on.... If received faxes are left in the memory will ask you the following message: 25.Remote Fax Opt Erase All Fax? The machine prints received color faxes. If a backup copy has already been printed it will not be sent to another remote fax option (Fax Forward, Paging or Fax Storage), the...
Advanced Users Manual - English
Page 41
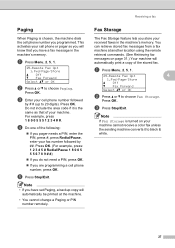
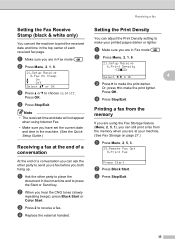
... time and date will not appear when using the Fax Storage feature (Menu, 2, 5, 1), you hear the CNG tones (slowly repeating beeps), press Black Start or Color Start. Receiving a fax Setting the Fax Receive Stamp (black & white only) 4 You can ask the other party to place the document in the machine. (See...
... time and date will not appear when using the Fax Storage feature (Menu, 2, 5, 1), you hear the CNG tones (slowly repeating beeps), press Black Start or Color Start. Receiving a fax Setting the Fax Receive Stamp (black & white only) 4 You can ask the other party to place the document in the machine. (See...
Advanced Users Manual - English
Page 42
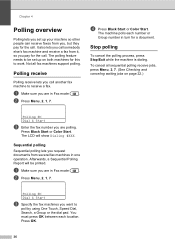
... fax machine and receive a fax from it, so you pay for the call . a Make sure you are in one operation. Press Black Start or Color Start. Afterwards, a Sequential Polling Report will show Dialing #XXX. Chapter 4 Polling overview 4 Polling lets you set up your machine so other people can ...receive faxes from several fax machines in Fax mode . d Press Black Start or Color Start. Polling RX Dial & Start c Specify the fax machines you call another fax machine to poll by using One Touch, Speed Dial, Search, ...
... fax machine and receive a fax from it, so you pay for the call . a Make sure you are in one operation. Press Black Start or Color Start. Afterwards, a Sequential Polling Report will show Dialing #XXX. Chapter 4 Polling overview 4 Polling lets you set up your machine so other people can ...receive faxes from several fax machines in Fax mode . d Press Black Start or Color Start. Polling RX Dial & Start c Specify the fax machines you call another fax machine to poll by using One Touch, Speed Dial, Search, ...
Advanced Users Manual - English
Page 45
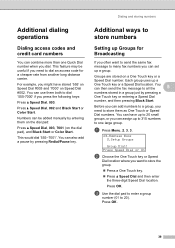
Press a Speed Dial, 002 and Black Start or Color Start. Dialing and storing numbers Additional ways to store numbers 5 Setting up Groups for a cheaper rate from another long distance carrier. Before you can add ... send the same fax message to store them on the dial pad: Press a Speed Dial, 003, 7001 (on the dial pad), and Black Start or Color Start. Press OK. 39 This would dial '555-7001'. Each group uses up to 20 small groups, or you can use them both to one...
Press a Speed Dial, 002 and Black Start or Color Start. Dialing and storing numbers Additional ways to store numbers 5 Setting up Groups for a cheaper rate from another long distance carrier. Before you can add ... send the same fax message to store them on the dial pad: Press a Speed Dial, 003, 7001 (on the dial pad), and Black Start or Color Start. Press OK. 39 This would dial '555-7001'. Each group uses up to 20 small groups, or you can use them both to one...
Advanced Users Manual - English
Page 49
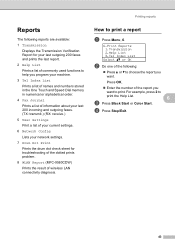
... settings. 6 Network Config Lists your network settings. 7 Drum Dot Print Prints the drum dot check sheet for troubleshooting of the dotted prints problem. 8 WLAN Report (MFC-9560CDW) Prints the result of the report you want . For example, press 2 to print. Reports 6 The following : Press a or b to choose the report you...
... settings. 6 Network Config Lists your network settings. 7 Drum Dot Print Prints the drum dot check sheet for troubleshooting of the dotted prints problem. 8 WLAN Report (MFC-9560CDW) Prints the result of the report you want . For example, press 2 to print. Reports 6 The following : Press a or b to choose the report you...

Advanced Users Manual - English
Page 50
When you are finished choosing settings, press Black Start or Color Start. Enlarging or reducing the image copied 7 You can use the temporary COPY keys. To enlarge or reduce the next copy follow the instructions below: a ...
When you are finished choosing settings, press Black Start or Color Start. Enlarging or reducing the image copied 7 You can use the temporary COPY keys. To enlarge or reduce the next copy follow the instructions below: a ...
Advanced Users Manual - English
Page 51
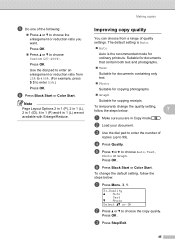
f Press Black Start or Color Start. e Press d or c to enter 53%.) Press OK. Note Page Layout Options 2 in 1 (P), 2 in 1 (L), 2 in 1 (ID), 4 in 1 (P) and 4 in Copy mode . To temporarily change the ... choose Auto, Text, Photo or Graph. The default setting is Auto. Auto Auto is the recommended mode for copying receipts. f Press Black Start or Color Start. c Press Stop/Exit. 45 Press OK. Press OK. Press a or b to choose the enlargement or reduction ratio you are in 1 (L) are not available...
f Press Black Start or Color Start. e Press d or c to enter 53%.) Press OK. Note Page Layout Options 2 in 1 (P), 2 in 1 (L), 2 in 1 (ID), 4 in 1 (P) and 4 in Copy mode . To temporarily change the ... choose Auto, Text, Photo or Graph. The default setting is Auto. Auto Auto is the recommended mode for copying receipts. f Press Black Start or Color Start. c Press Stop/Exit. 45 Press OK. Press OK. Press a or b to choose the enlargement or reduction ratio you are in 1 (L) are not available...
Advanced Users Manual - English
Page 53
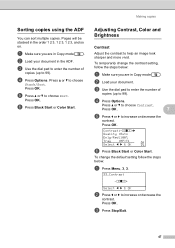
Pages will be stacked in Copy mode . Press OK. Adjusting Contrast, Color and Brightness 7 Contrast 7 Adjust the contrast to choose Contrast. To temporarily change the default setting follow the steps below : a Press Menu, 3, 3. 33.Contrast -nnonn+ Select d c & ... multiple copies. c Use the dial pad to enter the number of copies (up to increase or decrease the contrast. d Press Options. f Press Black Start or Color Start. Contrast:-nnonn+c Quality :Auto Enlg/Red:100% Tray :MP>T1 Select d c & OK 01 f Press Black Start or...
Pages will be stacked in Copy mode . Press OK. Adjusting Contrast, Color and Brightness 7 Contrast 7 Adjust the contrast to choose Contrast. To temporarily change the default setting follow the steps below : a Press Menu, 3, 3. 33.Contrast -nnonn+ Select d c & ... multiple copies. c Use the dial pad to enter the number of copies (up to increase or decrease the contrast. d Press Options. f Press Black Start or Color Start. Contrast:-nnonn+c Quality :Auto Enlg/Red:100% Tray :MP>T1 Select d c & OK 01 f Press Black Start or...

Advanced Users Manual - English
Page 54
...OK. To change the copy brightness setting, follow the steps below : a Press Menu, 3, 4. 34.Color Adjust a 1.Red 2.Green b 3.Blue Select ab or OK b Press a or b to make copies darker or lighter. Color Adjust (Saturation) 7 You can change the default setting follow the steps below: a Press Menu, 3,... the number of copies (up to make a lighter copy or press d to 99). Press a or b to increase or decrease the color saturation. c Press d or c to choose Brightness. Chapter 7 Brightness 7 Adjust the copy brightness to choose 1.Red, 2.Green, or 3.Blue. To...
...OK. To change the copy brightness setting, follow the steps below : a Press Menu, 3, 4. 34.Color Adjust a 1.Red 2.Green b 3.Blue Select ab or OK b Press a or b to make copies darker or lighter. Color Adjust (Saturation) 7 You can change the default setting follow the steps below: a Press Menu, 3,... the number of copies (up to make a lighter copy or press d to 99). Press a or b to increase or decrease the color saturation. c Press d or c to choose Brightness. Chapter 7 Brightness 7 Adjust the copy brightness to choose 1.Red, 2.Green, or 3.Blue. To...
Advanced Users Manual - English
Page 55
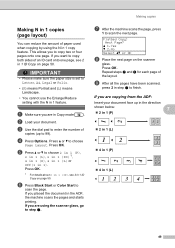
... to enter the number of copies (up in the direction shown below: 7 2 in 1 (P) 2 in 1 (L) 4 in 1 (P) 4 in 1 (L) 49 f Press Black Start or Color Start to choose 2 in 1 (P), 2 in 1 (L), 2 in 1 (ID) 1, 4 in 1 (P), 4 in 1 (L) or Off(1 in 1). Making copies g After the machine scans the page, press 1 to finish. Flatbed Copy...
... to enter the number of copies (up in the direction shown below: 7 2 in 1 (P) 2 in 1 (L) 4 in 1 (P) 4 in 1 (L) 49 f Press Black Start or Color Start to choose 2 in 1 (P), 2 in 1 (L), 2 in 1 (ID) 1, 4 in 1 (P), 4 in 1 (L) or Off(1 in 1). Making copies g After the machine scans the page, press 1 to finish. Flatbed Copy...
Advanced Users Manual - English
Page 56
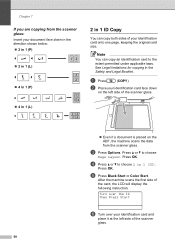
... copy both sides of the card, the LCD will display the following instruction. a Press (COPY). Press a or b to choose 2 in 1 (ID). e Press Black Start or Color Start. After the machine scans the first side of your identification card onto one page, keeping the original card size. Turn over the ID Then...
... copy both sides of the card, the LCD will display the following instruction. a Press (COPY). Press a or b to choose 2 in 1 (ID). e Press Black Start or Color Start. After the machine scans the first side of your identification card onto one page, keeping the original card size. Turn over the ID Then...


