
Advanced Users Manual - English
Page 3
Table of Contents 1 General Setup 1 Memory storage...1 Volume settings ...1 Ring volume...1 Beeper volume 2 Speaker volume 2 Automatic daylight savings time 3 Ecology features...3 Toner Save ...3 Sleep Mode ...4 Deep Sleep mode 4 LCD Contrast ...4 Dial Prefix ...5 Setting up the prefix number 5 Changing the prefix number 5 Mode Timer...6 2 Security features 7 Secure Function ...
Table of Contents 1 General Setup 1 Memory storage...1 Volume settings ...1 Ring volume...1 Beeper volume 2 Speaker volume 2 Automatic daylight savings time 3 Ecology features...3 Toner Save ...3 Sleep Mode ...4 Deep Sleep mode 4 LCD Contrast ...4 Dial Prefix ...5 Setting up the prefix number 5 Changing the prefix number 5 Mode Timer...6 2 Security features 7 Secure Function ...

Advanced Users Manual - English
Page 9
... and back one hour in the Fall. c Press Stop/Exit. Press OK. Note We do not recommend Toner Save for Daylight Savings Time. c Press Stop/Exit. Automatic daylight savings time 1 You can save toner using this feature. a Press Menu, 0, 2, 2. 02.Date&Time 2.Auto Daylight a On b Off ...Select ab or OK b Press a or b to choose On or Off. General Setup Ecology features 1 Toner Save 1 1 You can set the machine to On, ...
... and back one hour in the Fall. c Press Stop/Exit. Press OK. Note We do not recommend Toner Save for Daylight Savings Time. c Press Stop/Exit. Automatic daylight savings time 1 You can save toner using this feature. a Press Menu, 0, 2, 2. 02.Date&Time 2.Auto Daylight a On b Off ...Select ab or OK b Press a or b to choose On or Off. General Setup Ecology features 1 Toner Save 1 1 You can set the machine to On, ...
Advanced Users Manual - English
Page 61
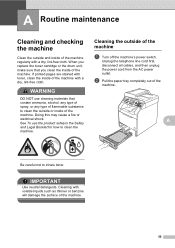
...and checking the machine A Clean the outside and inside of the machine. When you replace the toner cartridge or the drum unit, make sure that contain ammonia, alcohol, any type of spray, or any ...type of flammable substance to inhale toner. Doing this may cause a fire or electrical shock. If printed pages are stained with a dry...free cloth. See To use cleaning materials that you clean the inside of the machine with toner, clean the inside of the machine. A Be careful not to clean the outside of the machine. Cleaning with ...
...and checking the machine A Clean the outside and inside of the machine. When you replace the toner cartridge or the drum unit, make sure that contain ammonia, alcohol, any type of spray, or any ...type of flammable substance to inhale toner. Doing this may cause a fire or electrical shock. If printed pages are stained with a dry...free cloth. See To use cleaning materials that you clean the inside of the machine with toner, clean the inside of the machine. A Be careful not to clean the outside of the machine. Cleaning with ...
Advanced Users Manual - English
Page 65
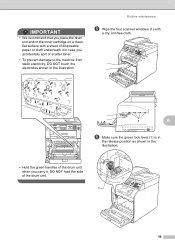
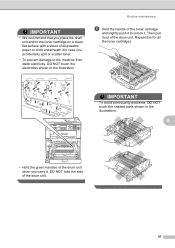
DO NOT hold the side of disposable paper or cloth underneath it . IMPORTANT • We recommend that you place the drum unit and/or the toner cartridge on a clean, flat surface with a dry, lint-free cloth. 1 A f Make sure the green lock lever (1) is in the release position as shown in the... illustration. • Hold the green handles of the drum unit when you carry it in case you accidentally spill or scatter toner. • To prevent damage to the machine from static electricity, DO NOT touch the electrodes shown in the illustration. Routine maintenance e Wipe the four ...
DO NOT hold the side of disposable paper or cloth underneath it . IMPORTANT • We recommend that you place the drum unit and/or the toner cartridge on a clean, flat surface with a dry, lint-free cloth. 1 A f Make sure the green lock lever (1) is in the release position as shown in the... illustration. • Hold the green handles of the drum unit when you carry it in case you accidentally spill or scatter toner. • To prevent damage to the machine from static electricity, DO NOT touch the electrodes shown in the illustration. Routine maintenance e Wipe the four ...
Advanced Users Manual - English
Page 68
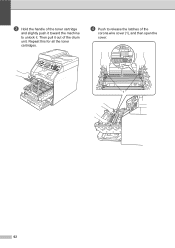
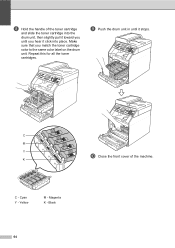
d Push to unlock it. c Hold the handle of the toner cartridge and slightly push it toward the machine to release the latches of the drum unit. Repeat this for all the toner cartridges. Then pull it out of the corona wire cover (1), and then open the cover. 1 62
d Push to unlock it. c Hold the handle of the toner cartridge and slightly push it toward the machine to release the latches of the drum unit. Repeat this for all the toner cartridges. Then pull it out of the corona wire cover (1), and then open the cover. 1 62
Advanced Users Manual - English
Page 70
Cyan Y - Black 64 Make sure that you hear it stops. K C - Magenta K - h Hold the handle of the machine. C M Y j Close the front cover of the toner cartridge and slide the toner cartridge into the drum unit, then slightly pull it toward you until it click into place. i Push the drum unit in until you match the toner cartridge color to the same color label on the drum unit. Yellow M - Repeat this for all the toner cartridges.
Cyan Y - Black 64 Make sure that you hear it stops. K C - Magenta K - h Hold the handle of the machine. C M Y j Close the front cover of the toner cartridge and slide the toner cartridge into the drum unit, then slightly pull it toward you until it click into place. i Push the drum unit in until you match the toner cartridge color to the same color label on the drum unit. Yellow M - Repeat this for all the toner cartridges.
Advanced Users Manual - English
Page 73
...IMPORTANT To avoid print quality problems, DO NOT touch the shaded parts shown in the illustration. Repeat this for all the toner cartridges. Routine maintenance f Hold the handle of the toner cartridge and slightly push it to the machine from static electricity, DO NOT touch the electrodes shown in the illustrations. ...DO NOT hold the side of the drum unit. 67 IMPORTANT • We recommend that you place the drum unit and/or the toner cartridge on a clean, flat surface with a sheet of disposable paper or cloth underneath it out of the drum unit. Then pull it in ...
...IMPORTANT To avoid print quality problems, DO NOT touch the shaded parts shown in the illustration. Repeat this for all the toner cartridges. Routine maintenance f Hold the handle of the toner cartridge and slightly push it to the machine from static electricity, DO NOT touch the electrodes shown in the illustrations. ...DO NOT hold the side of the drum unit. 67 IMPORTANT • We recommend that you place the drum unit and/or the toner cartridge on a clean, flat surface with a sheet of disposable paper or cloth underneath it out of the drum unit. Then pull it in ...

Advanced Users Manual - English
Page 75
... gear toward you by holding the green handles. Magenta K - C - Routine maintenance m Hold the handle of the photosensitive drum with a cotton swab until you match the toner cartridge color to the same color label on the surface comes off. Repeat this for all the... toner cartridges. K IMPORTANT DO NOT clean the surface of the toner cartridge and slide the toner cartridge into place. l Turn the drum unit over by hand while looking at the surface of the suspected area. Black 69...
... gear toward you by holding the green handles. Magenta K - C - Routine maintenance m Hold the handle of the photosensitive drum with a cotton swab until you match the toner cartridge color to the same color label on the surface comes off. Repeat this for all the... toner cartridges. K IMPORTANT DO NOT clean the surface of the toner cartridge and slide the toner cartridge into place. l Turn the drum unit over by hand while looking at the surface of the suspected area. Black 69...
Advanced Users Manual - English
Page 80
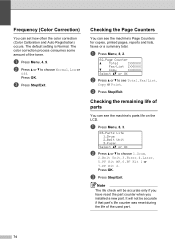
..., faxes or a summary total. Press OK. Checking the Page Counters A You can see Total, Fax/List, Copy or Print. Checking the remaining life of the toner. The color correction process consumes some amount of parts A You can set how often the color correction (Color Calibration and Auto Registration) occurs.
..., faxes or a summary total. Press OK. Checking the Page Counters A You can see Total, Fax/List, Copy or Print. Checking the remaining life of the toner. The color correction process consumes some amount of parts A You can set how often the color correction (Color Calibration and Auto Registration) occurs.
Advanced Users Manual - English
Page 82
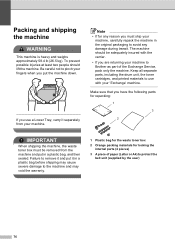
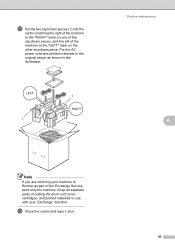
... that you have the following parts for repacking: 1 3 2 IMPORTANT When shipping the machine, the waste toner box must be adequately insured with your fingers when you must ship your machine to Brother as part of paper (Letter or A4) to remove it separately from the machine and put in a ...the belt unit (supplied by the user) 76 Note • If for locking the internal parts (4 pieces) 3 A piece of the Exchange Service, pack only the machine. Keep all separate parts, including the drum unit, the toner cartridges, and printed materials to use a Lower Tray, carry it and put the ...
... that you have the following parts for repacking: 1 3 2 IMPORTANT When shipping the machine, the waste toner box must be adequately insured with your fingers when you must ship your machine to Brother as part of paper (Letter or A4) to remove it separately from the machine and put in a ...the belt unit (supplied by the user) 76 Note • If for locking the internal parts (4 pieces) 3 A piece of the Exchange Service, pack only the machine. Keep all separate parts, including the drum unit, the toner cartridges, and printed materials to use a Lower Tray, carry it and put the ...
Advanced Users Manual - English
Page 84
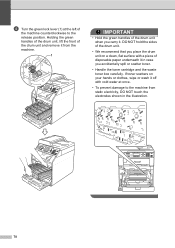
... the drum unit and remove it from static electricity, DO NOT touch the electrodes shown in case you accidentally spill or scatter toner. • Handle the toner cartridge and the waste toner box carefully. d Turn the green lock lever (1) at once. • To prevent damage to the release position. DO ...NOT hold the sides of the drum unit. • We recommend that you carry it in the illustration. 78 If toner scatters on a clean, flat surface with cold water at the left of the machine counterclockwise to the machine from the machine. 1 IMPORTANT •...
... the drum unit and remove it from static electricity, DO NOT touch the electrodes shown in case you accidentally spill or scatter toner. • Handle the toner cartridge and the waste toner box carefully. d Turn the green lock lever (1) at once. • To prevent damage to the release position. DO ...NOT hold the sides of the drum unit. • We recommend that you carry it in the illustration. 78 If toner scatters on a clean, flat surface with cold water at the left of the machine counterclockwise to the machine from the machine. 1 IMPORTANT •...
Advanced Users Manual - English
Page 85
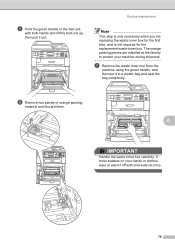
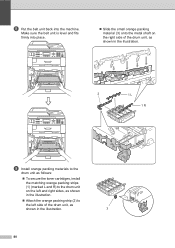
...lift the belt unit up, then pull it in a plastic bag and seal the bag completely. If toner scatters on your machine during shipment. The orange packing pieces are replacing the waste toner box for the first time, and is only necessary when you are installed at once. 79 Routine ...maintenance Note This step is not required for the replacement waste toner box. e Hold the green handle of orange packing material ...
...lift the belt unit up, then pull it in a plastic bag and seal the bag completely. If toner scatters on your machine during shipment. The orange packing pieces are replacing the waste toner box for the first time, and is only necessary when you are installed at once. 79 Routine ...maintenance Note This step is not required for the replacement waste toner box. e Hold the green handle of orange packing material ...
Advanced Users Manual - English
Page 86
... right side of the drum unit, as shown in the illustration. 2 1 L 1 R i Install orange packing materials to the drum unit as follows: To secure the toner cartridges, install the matching orange packing strips (1) (marked L and R) to the drum unit on the left and right sides, as shown in the illustration. ...
... right side of the drum unit, as shown in the illustration. 2 1 L 1 R i Install orange packing materials to the drum unit as follows: To secure the toner cartridges, install the matching orange packing strips (1) (marked L and R) to the drum unit on the left and right sides, as shown in the illustration. ...
Advanced Users Manual - English
Page 88
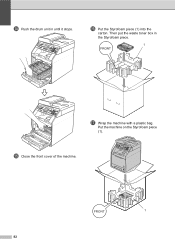
p Put the Styrofoam piece (1) into the carton. Put the machine on the Styrofoam piece (1). Then put the waste toner box in until it stops. o Close the front cover of the machine. n Push the drum unit in the Styrofoam piece. 1 FRONT q Wrap the machine with a plastic bag. FRONT 1 82
p Put the Styrofoam piece (1) into the carton. Put the machine on the Styrofoam piece (1). Then put the waste toner box in until it stops. o Close the front cover of the machine. n Push the drum unit in the Styrofoam piece. 1 FRONT q Wrap the machine with a plastic bag. FRONT 1 82
Advanced Users Manual - English
Page 89
... the carton and tape it shut. 83 Put the AC power cord and printed materials in the original carton as part of the machine to Brother as shown in the illustration. LEFT 1 1 RIGHT Routine maintenance A Note If you are returning your 'Exchange' machine. Keep all separate parts, ...including the drum unit, toner cartridges, and printed materials to use with your machine to the "LEFT" mark on one of the styrofoam pieces, and the left of the Exchange ...
... the carton and tape it shut. 83 Put the AC power cord and printed materials in the original carton as part of the machine to Brother as shown in the illustration. LEFT 1 1 RIGHT Routine maintenance A Note If you are returning your 'Exchange' machine. Keep all separate parts, ...including the drum unit, toner cartridges, and printed materials to use with your machine to the "LEFT" mark on one of the styrofoam pieces, and the left of the Exchange ...
Advanced Users Manual - English
Page 100
... 38 with two-line jack 38 Telephone line converting wall outlets 37 roll over lines 37 two-line telephone system 37 Temporary copy settings 44 Toner Save 3 Two-line telephone system 37 V Volume, setting beeper 2 ring 1 speaker 2 W Windows® See Software User's Guide. Wireless Network See Quick Setup Guide and Network...
... 38 with two-line jack 38 Telephone line converting wall outlets 37 roll over lines 37 two-line telephone system 37 Temporary copy settings 44 Toner Save 3 Two-line telephone system 37 V Volume, setting beeper 2 ring 1 speaker 2 W Windows® See Software User's Guide. Wireless Network See Quick Setup Guide and Network...
Quick Setup Guide - English
Page 1
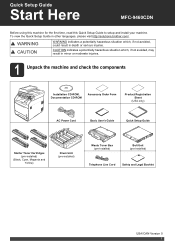
...Drum Unit (pre-installed) Waste Toner Box (pre-installed) Belt Unit (pre-installed) Telephone Line Cord Safety and Legal Booklet USA/CAN Version 0 1 To view the Quick Setup Guide in death or serious injuries. Quick Setup Guide Start Here MFC-9460CDN Before using this machine for the... first time, read this Quick Setup Guide to setup and install your machine. CAUTION indicates a potentially hazardous situation which , if not avoided, could result in other languages, please visit http://solutions.brother.com/.
...Drum Unit (pre-installed) Waste Toner Box (pre-installed) Belt Unit (pre-installed) Telephone Line Cord Safety and Legal Booklet USA/CAN Version 0 1 To view the Quick Setup Guide in death or serious injuries. Quick Setup Guide Start Here MFC-9460CDN Before using this machine for the... first time, read this Quick Setup Guide to setup and install your machine. CAUTION indicates a potentially hazardous situation which , if not avoided, could result in other languages, please visit http://solutions.brother.com/.
Quick Setup Guide - English
Page 25
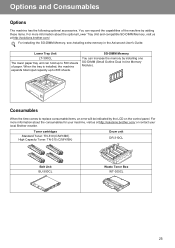
... installing the SO-DIMM Memory, see Installing extra memory in the Advanced User's Guide. For more information about the consumables for your local Brother reseller. When the tray is installed, the machine expands total input capacity up to 800 sheets. SO-DIMM Memory You can expand the ...capabilities of paper. Toner cartridges Standard Toner: TN-310 (C/M/Y/BK) High Capacity Toner: TN-315 (C/M/Y/BK) Drum unit DR-310CL Belt Unit BU-300CL Waste Toner Box WT-300CL 25 You can increase the memory by the LCD on the...
... installing the SO-DIMM Memory, see Installing extra memory in the Advanced User's Guide. For more information about the consumables for your local Brother reseller. When the tray is installed, the machine expands total input capacity up to 800 sheets. SO-DIMM Memory You can expand the ...capabilities of paper. Toner cartridges Standard Toner: TN-310 (C/M/Y/BK) High Capacity Toner: TN-315 (C/M/Y/BK) Drum unit DR-310CL Belt Unit BU-300CL Waste Toner Box WT-300CL 25 You can increase the memory by the LCD on the...
Software Users Manual - English
Page 2
...2 Using printer keys ...2 Job Cancel...2 Secure Key ...2 Printer Emulation Support ...3 Printing the Internal Font List...4 Printing the Print Configuration List ...4 Test Print ...4 Duplex ...5 Output Color ...5 Restoring default printer settings...5 Section II Windows® 2 Printing 7 Using the Brother printer driver...7 Printing a document...8 Duplex printing...9 Guidelines for printing on both sides of the... / Booklet ...17 Paper Source ...18 Advanced tab...19 Scaling ...20 Reverse Print...20 Use Watermark...20 Watermark Settings ...21 Header-Footer Print...23 Toner Save Mode ...23 i
...2 Using printer keys ...2 Job Cancel...2 Secure Key ...2 Printer Emulation Support ...3 Printing the Internal Font List...4 Printing the Print Configuration List ...4 Test Print ...4 Duplex ...5 Output Color ...5 Restoring default printer settings...5 Section II Windows® 2 Printing 7 Using the Brother printer driver...7 Printing a document...8 Duplex printing...9 Guidelines for printing on both sides of the... / Booklet ...17 Paper Source ...18 Advanced tab...19 Scaling ...20 Reverse Print...20 Use Watermark...20 Watermark Settings ...21 Header-Footer Print...23 Toner Save Mode ...23 i
Software Users Manual - English
Page 14
2 Printing 2 Note • The screens in Windows® applications, and allows you to set various printer settings, including Toner Save Mode and custom paper size. 1 Windows Server® 2003, Windows Server® 2008 and Windows Server® 2008 R2 are from Windows® XP... A printer driver is protected by following the Quick Setup Guide. You can also be downloaded from the CD-ROM, see the User's Guide for your Brother device. If you are unable to enhance printing speed in this section are available for Microsoft® Windows® 2000 Professional/XP/XP Professional x64...
2 Printing 2 Note • The screens in Windows® applications, and allows you to set various printer settings, including Toner Save Mode and custom paper size. 1 Windows Server® 2003, Windows Server® 2008 and Windows Server® 2008 R2 are from Windows® XP... A printer driver is protected by following the Quick Setup Guide. You can also be downloaded from the CD-ROM, see the User's Guide for your Brother device. If you are unable to enhance printing speed in this section are available for Microsoft® Windows® 2000 Professional/XP/XP Professional x64...


