
Motherboard DIY Troubleshooting Guide
Page 16
... is supported under Windows® XP and Linux 2.4.x (kernel) and later versoins only. R P4V8X-MX P4V8X-MX CPU Socket 478 Gold Arrow Notes on Hyper-Threading Technology,visit www.intel.com/info/hyperthreading. For more infformaion on Intel Hyper-Threading Technology 1. ASUS P4V8X-MX Motherboard 1-7 This motherboard supports Intel® Pentium® 4 CPUs with core speeds of the...
... is supported under Windows® XP and Linux 2.4.x (kernel) and later versoins only. R P4V8X-MX P4V8X-MX CPU Socket 478 Gold Arrow Notes on Hyper-Threading Technology,visit www.intel.com/info/hyperthreading. For more infformaion on Intel Hyper-Threading Technology 1. ASUS P4V8X-MX Motherboard 1-7 This motherboard supports Intel® Pentium® 4 CPUs with core speeds of the...
Motherboard DIY Troubleshooting Guide
Page 18
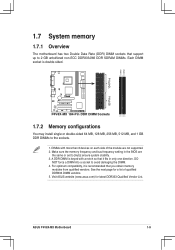
For optimum compatibility, it fits in the BIOS are not supported. 2. ASUS P4V8X-MX Motherboard 1-9 DIMMs with a notch so that it is double-sided. Visit ASUS website (www.asus.com) for a list of the module are the same or set to avoid damaging the DIMM. 4. Make sure the memory frequency... force a DIMM into a socket to [Auto] ensure system stability. 3. See the next page for latest DDR333 Qualified Vendor List. R P4V8X-MX P4V8X-MX 184-Pin DDR DIMM Sockets 1.7.2 Memory configurations You may install single or double-sided 64 MB, 128 MB, 256 MB, 512 MB, ...
For optimum compatibility, it fits in the BIOS are not supported. 2. ASUS P4V8X-MX Motherboard 1-9 DIMMs with a notch so that it is double-sided. Visit ASUS website (www.asus.com) for a list of the module are the same or set to avoid damaging the DIMM. 4. Make sure the memory frequency... force a DIMM into a socket to [Auto] ensure system stability. 3. See the next page for latest DDR333 Qualified Vendor List. R P4V8X-MX P4V8X-MX 184-Pin DDR DIMM Sockets 1.7.2 Memory configurations You may install single or double-sided 64 MB, 128 MB, 256 MB, 512 MB, ...

Motherboard DIY Troubleshooting Guide
Page 39
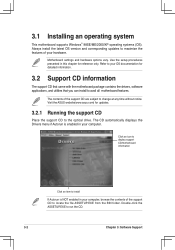
... optical drive for floppy... Checking for CD-ROM... Completed. Bad BIOS checksum. CD-ROM found ! Reading file "P4V8X-MX.ROM". Start flashing... Recovering the BIOS from the support CD To recover the BIOS from the floppy disk drive, ...after the utility completes the updating process. ASUS P4V8X-MX Motherboard 2-7 The utility then updates the corrupted BIOS file. Remove any floppy disk from the support CD: 1. Starting BIOS recovery... Starting BIOS recovery... Visit the ASUS website (www.asus.com) to the optical drive. 3. Doing ...
... optical drive for floppy... Checking for CD-ROM... Completed. Bad BIOS checksum. CD-ROM found ! Reading file "P4V8X-MX.ROM". Start flashing... Recovering the BIOS from the support CD To recover the BIOS from the floppy disk drive, ...after the utility completes the updating process. ASUS P4V8X-MX Motherboard 2-7 The utility then updates the corrupted BIOS file. Remove any floppy disk from the support CD: 1. Starting BIOS recovery... Starting BIOS recovery... Visit the ASUS website (www.asus.com) to the optical drive. 3. Doing ...
Motherboard DIY Troubleshooting Guide
Page 63
... support CD Place the support CD to run the CD. 3-2 Chapter 3: Software Support Double-click the ASSETUP.EXE to the optical drive. Visit the ASUS website(www.asus.com) for reference only. The contents of the support CD to avail all motherboard features. Refer to change at any time without notice. Motherboard settings...
... support CD Place the support CD to run the CD. 3-2 Chapter 3: Software Support Double-click the ASSETUP.EXE to the optical drive. Visit the ASUS website(www.asus.com) for reference only. The contents of the support CD to avail all motherboard features. Refer to change at any time without notice. Motherboard settings...


